900% 4000% Zamorak Solo (Magic)
900-4000% Solo Zamorak

Intro
This guide contains information for players doing Zamorak from 900% - 4000% enrage solo with  . The key takeaways from the guide will differ depending on enrage.
⬥ Players pushing beyond 900% enrage: Take note of the general advice in this guide (counting autos, high enrage solo spec clears, high enrage solo P7) which are universally applicable beyond 900.
⬥ Players doing 2000% enrage kills: The rotations in this guide will help you achieve 4-5kph stylecamping with magic. This guide assumes strong knowledge from #Zamorak Basic Guide and #Zamorak Main Guide. BIS gear is highly recommended.
⬥ Players pushing to 4000% enrage: Take note of the tips and insights for each phase.
⬥ This guide assumes edict order 2-4-1-6-5-3.
Preset and Relics
 Penance Powder active
⬥
Penance Powder active
⬥  Spirit Cape unlocked
⬥
Spirit Cape unlocked
⬥  A Demon slayer combo perk is used
⬥ Bonfire + thermal spa HP boosts are active
A Demon slayer combo perk is used
⬥ Bonfire + thermal spa HP boosts are active
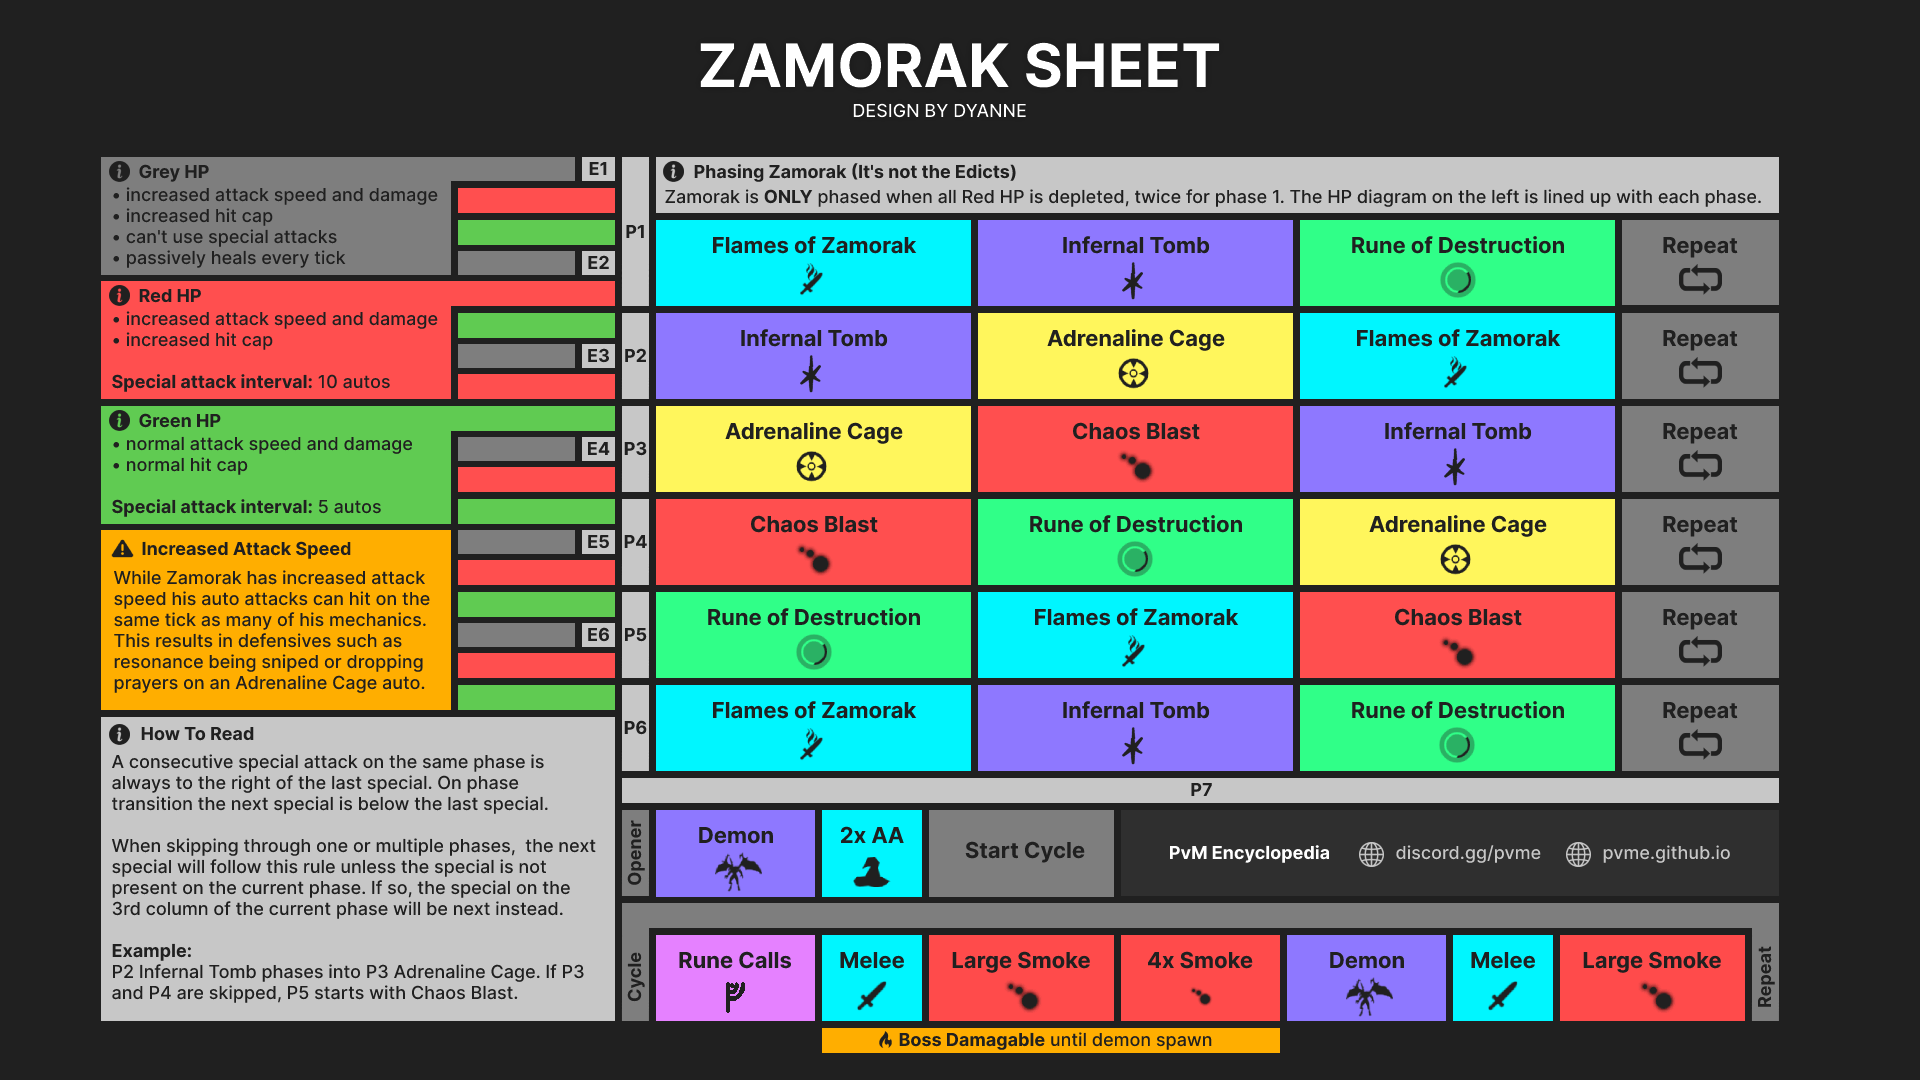
Special attack order
⬥ This special attack order (referred to as spec order) is followed throughout the guide. Deviations from this order will require improvisation to correct.
⬥ Specs mentioned without "(red HP)" imply the specs occurs during green HP.
⬥ Following this spec order minimises experiencing mechanics which slow down your DPS during the fight or are likely to execute you (e.g. getting chaos blast when  is on cooldown, or if your
  +
+ 
 isn't up), and prevents you from getting adrenaline cage during red HP.
⬥ Order:
• P1: Flames of Zamorak → Infernal Tomb → phase
• P2: Rune of Destruction (red HP) → Flames of Zamorak → Infernal Tomb → Adrenaline cage → Phase
⬩ P2 Alternative: Adrenaline cage → Phase
• P3: Flames of Zamorak (red HP) → Infernal Tomb → Adrenaline cage → Phase
• P4: Chaos blast (red HP) → Rune of Destruction → Adrenaline cage → Phase
• P5: Chaos blast (red HP) → Rune of Destruction → Flames of Zamorak → Phase
• P6: Chaos blast (red HP) → Rune of Destruction → Flames of Zamorak → Infernal Tomb → repeat until phased.
Handling Grey HP
⬥ Above 900%, grey HP regeneration increases significantly. If handled incorrectly, this will result in phasing with 300K red HP. This extends kills significantly and you will experience more special attacks, increasing your risk of dying.
• Effective grey HP management will result in significantly faster kills and an easier experience while pushing enrage.
⬥ Strategies following this guide aim to mitigate grey HP regeneration as much as possible to reduce killtime and damage taken. Losing ticks between phases or using suboptimal ability rotations while killing the witch will result in Zamorak having more regeneration. As such, this is the most important part of the guide to focus on.
⬥ Tips to reduce grey HP regeneration:
• Grey HP heals every tick. Dealing damage on the same tick as it heals completely nullifies the healing on that tick.
⬩ DoT abilities ( /
/  /
/  ) will prevent healing entirely (while active).
⬩ Efficient movement between pads and proper positioning will reduce the time spent for Zamorak to heal.
Witch Killing Rotation
⬥ → → on Zamorak
⬥ Enter Infernus +  +
+  +
+  to witch (Same GCD)
⬥ (tc)  +
+  +
+  → (dw)
  →
→ 
 →
→  (3-hit) →
  → leave Infernus
• Using with lower stacks of anima flow may result in leaving Infernus without enough adrenaline to use . This isn't an issue when pushing beyond 2000%, as the witch's HP scales high enough to be able to use basics following
• At 2000% enrage and below, can be removed from the rotation and replaced with strong basics (e.g.  → ).
→ ).
⬥ Reapply → → on the way to your next pad.
Counting Auto Attacks:
⬥ Counting auto attacks between phases and special attacks is required for achieving the desired spec pattern.
• Auto attacks up until the next special attack persists between phases.
⬩ For example, Zamorak has 2 autos until he uses chaos blast in phase 5 when the player phases him into grey HP. When the player starts phase 6, Zamorak will use two autos, and then use the chaos blast spec.
• In red HP, Zamorak will use 10 autos between special attacks.
• In green HP, Zamorak will use 5 autos between special attacks.
• After phasing into green HP, Zamorak will use one auto attack (regardless of auto count), then use a special attack.
• The image below is a visual aid to understanding spec orders, and how auto attacks persist between phases. All strategies mentioned in this guide are written with being able to count auto attacks in mind.
⬥ Knowing precisely how many autos are left before the next special attack allows you to mitigate specs more efficiently.
• For example, knowing the exact timing of Chaos Blast allows you to channel right before the spec, which helps to clear the DPS threshold without having to
Mechanics
Flames of Zamorak
⬥ This specs occur under four different scenarios, with different solutions for each. Stack  with
with  past P4. Grey HP autos attack on the same rate as red HP autos. If tanking a smoke bomb under grey HP, solve according to red HP.
- Green HP:
a. The smoke bomb hits one tick before autos.
b. Recommendation: Use and
c. This is unaffected by twinshot being active.
- Red HP, twinshot not active:
a. The smoke bomb will hit one tick after autos attack hits you.
b. Recommendation: Use and
⬩ This has to be tick perfect.
- Red HP, twinshot active:
a. The smoke bomb will hit on the same tick as twinshot damage.
b. and DO NOT WORK, and will be sniped by twinshot.
c. Recommendations: Use  +
+  p1-3, and tank ~4500, and p4-6.
⬩ If you use to tank slam smoke and the next spec is Chaos blast, you may need to wait out its cooldown in Infernus.
- Any of the above, with Rune of Destruction active:
a. → collect smoke + filler (,  , ) → to the opposite side of the rune's smoke → continue as recommended above.
Infernal Tomb
⬥ → wait for stun timing →  to instantly proc the bomb.
• can be used on the incoming bomb in Infernus. Damage from it will not phase Zamorak into grey HP (i.e. If he's 500 HP from phasing, it deals only the remaining 500).
⬩ This tech is used in P1, allowing you to lower Zamorak to 1,344,000 HP without phasing into grey HP.
⬥ Demon: + → 
 → → improv (, , ), ensure you're at max adren before leaving.
• is costly and optional but will speed up kills slightly.
⬥ If you miss the stun, use the demon to build adrenaline to the bomb hit.
⬥ Note for enrage pushing: This special attack may serve as a break in-between specs. If you need an ability recharged before the next special attack/phase (e.g. , ), wait in Infernus.
Rune of Destruction
⬥ Damage from this mechanic cap at 2000%, at around ~2000-3500 per hit.
⬥ The smoke is entirely evadable with effective use of , moving to the trailing half of the smoke's rotation. Alternatively solve with + / if you are unable to move (e.g. taking adrenaline cage spec)
Chaos Blast
⬥ Two possible solves:
• Stun solve:
⬩ Requires counting autos before Chaos Blast begins.
⬩ Under use on the last auto before chaos blast. Let stun, do one extra hit, cancel with → (42000 or less) / if DPS check requires more than 42000.
⬩ + →
⬩  on P6 chaos blast for safety. It's possible to survive without , but the slightest inconsistency (late to , missing any HP) can result in death. Chaos blast damage scales with enrage and thus becomes riskier to tank above 2000%.
• Immort solve:
⬩ → →  → repeat ( →
 ) → (late to not proc bomb early) → build to with (use
  if necessary)
Adrenaline Cage
⬥ Following the spec order in this guide, you should never get this mechanic under red HP.
• Adrenaline Cage during red HP deactivates your prayer on the same tick an auto hits, resulting in death unless you pre-emptively (surviving red HP Adrenaline Cage requires counting auto attacks).
⬥ OR / + overhead off ( only)
• Note for enrage pushing: DO NOT disable overheads beyond 2000%.
The Fight
Prefight:
⬥ Autocast  to five stacks,
  to 6+ stacks, cast
  . Be at 100% adren before killing the last witch.
⬥ After killing last witch:
• Stand on pad 2
• →  + disable overhead →
⬥ Note: Use the following indicators to time
• Kill timer reads 00:01.
• The projectile from Zamorak's auto attack leaves his hand.
• This lets give you adrenaline before your next GCD is available.
Rotations
⬥ Note: All cases of ABS EOF mentioned in the rotations below are 3-hit (one GCD).
⬥ In phase 4-6, you will likely not have enough adrenaline to precisely follow rotations written. In such situations, replace thresholds/ with , which can be used once every two abilities at those phases.
Phase 1
Phase overview:
⬥ In order to do this phase correctly, aim for the following:
• Zamorak uses Flames of Zamorak in green HP.
• You're teleported by Infernal Tomb with ~1350K green HP remaining.
⬩ Allows for instant phasing when leaving Infernus, giving you more autos in P2.
⬥ The P1 ability rotation below does not vary for enrage pushing and works consistently to 4000%.
Phase 1 Rotation:
⬥ + → (tc)  → → → → → + (3-hit) → → →
  + → → → → → + → (slam bomb procs on disrupt) + cancel with /
  → →
→ →
Note: should cast before buff runs out.
⬥ Lure zam to pad 4 +  → → / / (with wand) to lower
  to ~1350k green HP → Get Infernal Tomb
⬥ Phase to grey HP with after exiting Infernus → (1t later so it deals damage to grey HP bar)
⬥ Kill witch:
• → → on Zamorak
• Enter Infernus + + + to witch (Same GCD)
• (tc) + + → → → (3-hit) → → leave Infernus
Phase 2
Phase overview:
⬥ The phase should proceed as follows:
• Zamorak uses Rune of Destruction in Red HP → phase into green HP
• Zamorak uses Flames of Zamorak → Infernal Tomb → Adrenaline Cage, and phases immediately after Adrenaline Cage.
⬥ Notes for pushing beyond 2000%:
• and may be used during red HP if the autos hurt too much. Melee slam can be tanked with  + +being above 8K HP.
• At ~3000%, you should be able to comfortably get by with using in red HP, and eating some food if necessary.
• At ~4000%, you may want to use in red HP, depending on how hard he hits.
Phase 2 Rotation:
⬥ (tc) +
⬥ Build to 100% with bleeds ( / ), , and other basics ( / )
⬥ Walk on pad + → → → → → → → → → → → (phased out of red HP) → → → + → (2-hit) → → → + collect smoke → + out of rune center → → (smoke bomb)
⬥ When Rune of Destruction disappears, lure Zamorak to pad 1.
• At pad 1, Zamorak should stand on the outer edge of the pad as shown below. This sets up positioning for the P3 smoke bomb.
• Stand in MD to activate pad + be in position for p3.
 ⬥ → → → → +
  (Infernal Tomb)
⬥ While killing demon, can use . Save for phasing on Adrenaline Cage, as it extends duration.
⬥ Exit Infernus→ (tc) + + → → → → + → + stop lowering HP at 1.1M HP.
⬥ Optionally apply  while waiting Adrenaline Cage.
⬥ After Adrenaline Cage occurs, + → + → → + enter Infernus.
⬥ Kill witch:
• + + to witch (Same GCD)
• (tc) + + → → → (3-hit) → → on exit
Phase 3
Phase overview:
⬥ The phase should proceed as follows:
• Zamorak uses Flames of Zamorak in red HP, and immediately phase into green HP.
• If Zamorak uses more than 1 auto in red HP, + an auto to reach full HP. If you die, its due to attaining too many bomb stacks (more than 4 will kill you).
⬩ If you have more than 4 stacks, use alongside .
• Note: Using a channelled ability while standing under Zamorak will force him to give you at most 2-3 smoke bomb stacks.
⬥ Zamorak uses Infernal Tomb and Adrenaline Cage in green HP.
⬥ Note for pushing beyond 2000%:
• Apply if Zamorak switches to ranged autos early. If not using , flicking helps a lot. The higher the enrage, the more likely you'll need to tank the melee slam bomb with due to grey HP healing ramping up.
• At 4000%, with three smoke bomb stacks and active, smoke bomb detonation will deal 7799 damage to you.
Phase 3 Rotation:
⬥ (tc) + + bleed ( / ) → adren received from auto+ + → → → (replace with → if missing adren) → → + → → → (run under ) → + (phase out of red HP) → → → + (tank bomb) → (Infernal Tomb)
⬥ P3 green HP fast rotation (990K green HP and below):
• The scope of this rotation is to have Zamorak lured to pad 6 before entering Infernus. This saves time and keeps grey HP low, as you can instantly activate the pad after killing the witch.
• If Zamorak is above 990K HP, start with (as you leave Infernus) → . Lure Zamorak to pad 6 after Adrenaline Cage.
⬥ Note for pushing beyond 2000%:
• At 3000%+, the non-sun rotation may be used with → if Zamorak is above 990K green HP. Due to witch HP scaling, will have time to come off CD for P4.
⬥ (tc) + + → + towards pad 6, run to pad 6 while using: → → (replace with → if lacking adren) → → → (Adrenaline Cage) → → → + (phase into grey HP)
⬥ Kill witch:
• → → on
• Enter Infernus + + + to witch (Same GCD)
• (tc) + + → → → (3-hit) → → leave Infernus
Phase 4
Phase overview:
⬥ The phase should proceed as follows:
• Zamorak uses Chaos Blast in red HP, DO NOT USE
• Zamorak uses Rune of Destruction → Adrenaline Cage → phased in green HP
⬥ Note for pushing beyond 2000%:
• At 3000%+, you'll want to replace → with → , especially under ranged autos.
Phase 4 Rotation:
⬥ Build to with + + if adren is needed
⬥ (tc) + + + → → → → → → → → (2hit) → → → + → → → → (3-hit) → → → + to southwest quadrant of rune
⬥ → → → → → + → → (smoke) → → → / (Adrenaline Cage) → → → → → → → phase/
⬥ Kill witch:
• → → on
• Enter Infernus + + + to witch (Same GCD)
• (tc) + + → → → (3-hit) → → leave Infernus
Phase 5
Phase overview:
⬥ The phase should proceed as follows:
• Zamorak uses Chaos Blast in red HP, use
• Zamorak uses Rune of Destruction → Flames of Zamorak → phased
⬥ Note for pushing beyond 2000%:
• At 3000%+, replace → with → , especially under ranged autos.
Phase 5 Rotation:
⬥ (tc) + + (while charging pad) → → → → → → → → → (2-hit, stuns Chaos Blast) → → + + → → → → → → → →
⬥ → → → → → → → + (rune smoke) → → → → → → + → + to pad 3
⬥ Kill witch:
• + + to witch (Same GCD)
• (tc) + + → → → (3-hit) →
Phase 6
Phase overview:
⬥ Zamorak will do Chaos Blast () → Rune of Destruction → Flames of Zamorak during red HP.
• By far the most important part of phase 6 is to exit red HP as fast as possible so you can deal with the smoke bomb during green HP. Try to have your HP be below 60% during chaos blast to benefit from the pad 6 damage buff. Disable  , and use to lower your HP if needed.
• Red HP smoke bomb at phase 6 requires either (which will be on cooldown from Chaos Blast) or  + + +
+ + +  (inconsistent past 2000%).
⬥ The green HP spec cycle can comfortably be repeated until phasing into P7. Additionally, Infernal Tomb should be used to wait on any cooldowns ( / / / ) for P7.
⬥ The phase should proceed as follows:
• Zamorak uses Chaos Blast in red HP.
• Zamorak uses Rune of Destruction → Flames of Zamorak → Infernal Tomb → repeat
⬥ Notes for enrage pushing:
• should be used after tanking the chaos trap on pad 3, it will last until you kill the protector witch.
• after runs out
• Chaos Blast can be solved without up to 2000%, but requires 3 autos before the blast at least, and being channelled before he uses the spec, and max HP.
• Avoid using / so they're off cooldown for P7 (guide assumes solve).
P6 rotation:
⬥ when leaving Infernus → (tc) + →  / + to pad 3 → + → + → + northeast of Zamorak
⬥ → target protector → → + → → → → target → → → → → → → → (bomb hit) → (auto) → → → →
⬥ P6 green HP: → → → → → → → + (smoke) → → → / + (smoke) → (melee slam) → → → → → + (smoke bomb) → → → → → (Infernal Tomb)
⬥ + → target demon + → to exit rune
⬥ Target → → → →  → + → → phase
Solo 900-2000% P7:
⬥ may be used after , or during cycle. Doesn't largely change consistency of the rotation. May be preferable to during cycle to ensure adrenaline for .
⬥ Note for enrage pushing: An alternative cycle is written for 3000%+ at the bottom of this section. The alternative cycle is also useable for the "The Last Guardian" feat in #Feats Roles
⬥ Phase transition
 → +
→ +  + activate
⬥ Infernus + Demon
(tc) +  + → → → + → →
⬥ Runes
• Rune 1: + → → →
• Rune 2: → → (rune break) → + / into
⬥ First cycle:
+ → + (use only after melee slam is tanked by ) → → + → →  → → + move under → (overhead off) → → demon → kill demon
⬥ Second cycle (fast), requires to be 95K HP or below:
• Killing demon may be omitted for even faster kills. Ensure to reapply and stay out of MD.
• Debuff demon
• Kill demon using → → → → → (don't use to be able to earlier)
• Execution will vary depending on second cycle rune order. Certain second cycles will give you runes with increased HP due to their regeneration mechanic. Rotation used during rune break is irrelevant if you set up the following:
⬩ in range of runes and , + + +  active, + applied. Start cycle with high (90%+) adren.
⬩ Break second rune → → → (tank bomb with  ) → →
) → →
⬥ Second cycle (slow, 95K+ HP):
• Lower SECOND rune HP first. Ensure you before rune is below 10K HP. Unequip  and reset
  stacks by un-equipping and re-equipping your weapons. This prevents accidentally resetting the rune's HP or executing yourself before using .
• Lower rune to sub 2000 HP using wand autos.
• Break first rune.
• Apply: + +to , + +  to self.
• Build 5x stacks, 12x stacks. Do not swap off after , maintain 12x stacks before starting cycle.
• → + → → → → → → (on )
• Move to range of rune +  + → target rune + + + to → target
• → → → ( procs) → →
⬩ Unequip  after if
  is not on cooldown. Re-equip after procs
⬥ Alternative P7 first cycle:
• Note for "The Last Guardian" feat: use on the second mage auto on phase entry to have enough health to survive the cycle.
→ → → → + + → +  → → → →