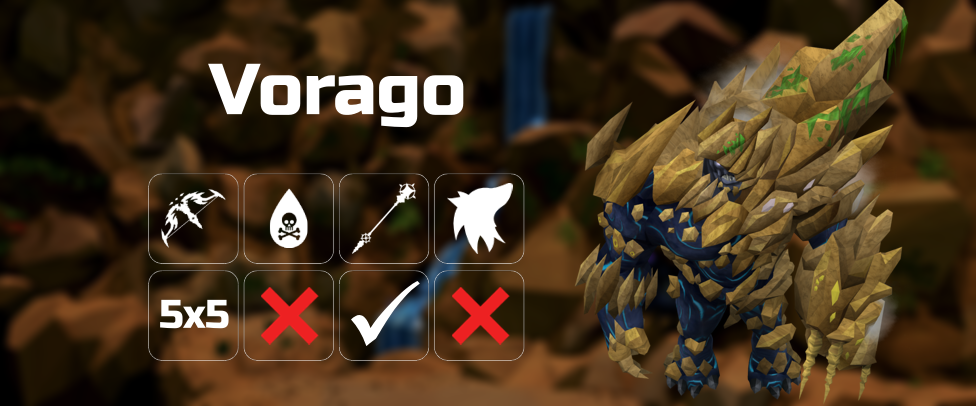
Solo Vorago
Vorago: Solo
Introduction
⬥ This guide will try to give you the basics to learn and be able to get consistent kills, but will leave specific details for optimization out, as once learning the basics it shouldn't be hard to work on them independently.
• It will also include a lot of mechanics info that may not be necessary but can be helpful for those interested on it.
Choosing a combat style
Difficulty
⬥ Both magic and ranged have their advantages and disadvantages.
• Magic makes it easier to survive with cryptbloom  and animate dead
  , with this allowing you to miss a lot of prayer flicks. As any other PvM encounter it will be very useful to remember to spell swap but can brute-force through some mechanics with damage.
• Ranged allows you to not have to bother with 
 on P2 and 5 as you can use Black stone arrows
  . As any other PvM encounter it will be very useful to swap arrows, although ranged won't be able to brute-force through everything like mage can, with a decent understanding of the combat style and following the rotations suggested, ranged should have very similar kill times to mage.
⬩ Both combat styles will require to know decent abilities rotations, specific to the combat style, and require you to improvise, so it likely will be easier to learn with the style you are more comfortable with.
Gameplay of each combat style
⬥ Assuming both combat styles are still equally prefered, this is what you can expect the gameplay to be from each style:
• Ranged:
⬩ Consistent kill times
⬩ 
 will not be used as much as it doesn't synergise very well with wen arrows
⬩ A lot of pray flicking, specially with  (Not necessary when learning)
⬩ A lot of movement freedom
⬩ Adren starved
⬩ No grim pages required
• Magic:
⬩ Very safe start with cryptbloom and animate dead
⬩ Too many channels will limit your movement which can make positioning hard or affect your damage output
⬩ Spell switching will be very useful
⬩ Can brute-force through mechanics with 
⬩ Grim required
Useful skills for learning
⬥ Defining the difficulty of something can be hard, for Vorago the most difficult part is in learning, as the hardest phase is P5, and you get a single attempt every 10 minutes. Here are some skills that may be useful for you to get through those phases or make P5 easier for you:
• Pray flicking between 2-3 different prayers ( /
/  /
/  )
)
• Kiting while attacking
⬩ For Scops or clearing bleeds  on P2 and 4
• Decent understanding of your prefered combat style
⬩ To be able to perform or improvise decent abilities rotations
• Decent understanding of Vorago's mechanics
⬩ Solo P5 will be explained here
• Spirit flicking
⬩ Not needed at all but something useful to do
• Ability hit timings
⬩ To know which abilities could push in between Vorago's autos
• Being able to not panic when something goes wrong
⬩ This can be the difference between a successful or failed P5
Drops
⬥ There are five drops per kill, one for each phase.
⬥ Each drop has a 4/5 chance of 2 Tectonic Energies  .
.
⬥ Each drop has a 1/200 chance at a Seismic weapon 
 , and both weapons have an equal chance. Only one Seismic can drop per kill.
⬥ Each drop has a 1/5000 chance of an Ancient Summoning Stone  , with a threshold of 1000.
Why Solo is Worthwhile
⬥ Vorago is a highly time gated boss, which limits duo KPH to 7 (6 on The End) at the highest skill level
• In comparison, the average solo KPH is 5
⬩ Therefore, solo Vorago will always be more gp/hr as you do not need to split Energies or Seismics and you are getting more than half duo KPH.
Preset and Relics
Unlocks and buffs not shown
⬥  Ring of Vigour passive effect
⬥  Divert
⬥  Double Surge
⬥  Double Escape
⬥  Ingenuity of the Humans
⬥  2x Malletops
⬥  Smoke Nihil 5% increased magic accuracy
⬥  Ogre flask (thermal)
⬥  Powder of Penance
⬥ Animate dead
⬥  Dark form
Mechanics
Pray Flicking
⬥ As mentioned, prayer flicking is a huge part of solo Vorago and what can make it hard to learn if you are not used to it.
⬥ Vorago throws an auto every 4 ticks
• When standing at melee distance it can be either a Melee swipe, a Blue bomb, or both.
⬩ Blue bombs  also have a travel time which is calculated from the auto release tick and is based on your distance away from melee distance.
⬥ The following diagram shows the Melee swipes and Blue bombs hit timings relative to your distance away from Vorago, where the tick the animations starts is considered tick 0:
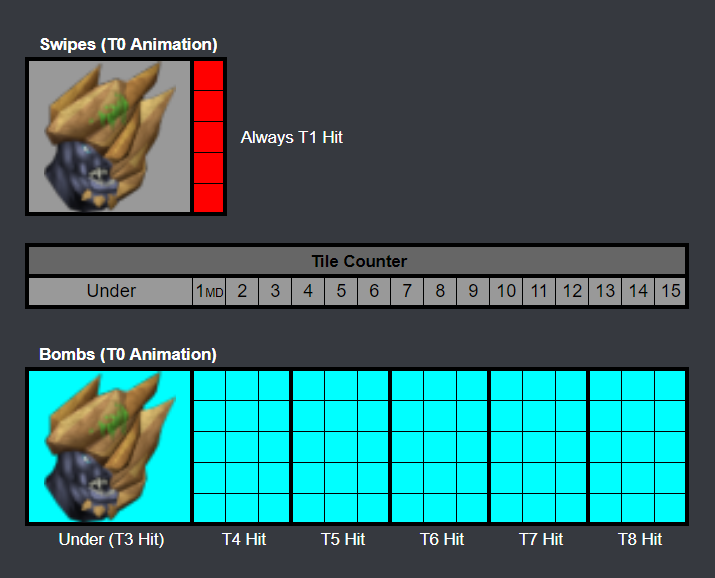
Note: The importance of this will be explained in more detail later but because on Phase 5 autos are thrown every 3 ticks instead of 4, standing within 1-3 tiles allows you to stack a blue bomb with a melee swipe.
Clearing P2 and P4 Bleeds
⬥ In order to clear bleeds, Vorago checks the distance you are away from him (on P2) or the distance you are away from where you received the bleed (on P5) only when the bleed would deal damage to you.
• This means even of you are distanced away enough to clear the bleed it wont clear until Vorago does that check, which is every 2 ticks.
⬥ Vorago throws a Bleed every 6 ticks
• However, Vorago also throws a Blue bomb the same tick as the 3rd bleed , which results in his attack cooldown resetting to his auto cooldown (4 ticks) making him throw the 4th bleed in 4 ticks instead of 6
⬩ Because of this, the fastest way to clear bleeds is saving Freedom  to clear the 3rd so you do not lose time surging or bladed diving and walking back to melee distance to receive the 4th bleed
⬥ A common way to clear bleeds is  →
→  → →
→ →  → .
→ .
How to Safely Clear Bleeds
⬥ An easy way to fail clearing Bleeds is walking through Vorago on the same direction his walking direction is
• This results in not Surging far away enough to clear the bleed.
⬥ The safe way to clear Bleeds is to start spam clicking early enough, Surge , and then keep spam clicking away from vorago after Surging
• This may result on losing a lot of ticks.
⬥ A safer way to clear Bleeds without losing ticks is checking Vorago's walk direction, then position yourself on the opposite side of it (in a way where you have space to surge), face the direction you want to Surge to and spam click back to Vorago right when you start Surging
• Doing this you can even Surge through Vorago with way less risk of failing to clear a Bleed if his walk direction is the opposite side you are Surging to.
Clearing P5 Bleeds
⬥ On Phase 5 you only receive 3 bleeds
• The optimal way to clear them is  → (walk in) →
Increased Chance for Melee Swipes
⬥ Standing in melee distance after a forced Blue Bomb makes next auto have an increased chance to be a Melee Swipe which can be taken advantage of in many ways
• An example of this is when utilizing Barricade  on Phase 2 you can force a Blue Bomb and then stand in melee distance for the last Auto before the Red Bomb
  hits to take less damage
⬩ The same applies with Devotion  at the end of reflects on Phases 2, 3, and 4.
Phase 0
⬥ Although a Powerburst of acceleration  is recommended for Phase 1, a Powerburst of vitality
  can be used instead to start the fight with more Hp.
• The timing to use it is 20 ticks after you challenge Vorago which can be timed in 2 ways:
⬩ Counting each tick from when you challenge, this can be easily done by looking at your prayer points drain and starting from 0 the tick you click "We fight." and doing the input on 20.
⬩ Looking at the bar above Vorago and clicking on it when its about to fill like in the following clip:
⬥ In case of doing this method, for the climb it is recommended to after sliding through the first rock, again after climbing the first rock, → (a tick after surge) on the corner cut.
• This also means you would have to from Vorago to the first rock if you at the start
Phase 1
⬥ Starting P1 you will drop on tile 1, in order to Vorago properly you will need to move to tile 2 before positioning on tile 3.
• This way you will be facing west so leaves you in front of the rock to start climbing.
⬥ The timing to Target cycle + + is exactly when the timer reaches 9.0s.
• Click the rock the next tick and proceed to climb as suggested in the image.
Ranged
⬥ With ranged you can place a Dummy  , tag it with
  , stall .
• (tc) r +  +
+
Note: Snap can be skipped if doing the previous inputs consitently on the same tick can be difficult, that just means the phase will last slightly longer.
⬥ Rotation when reaching the top:
• Tag Vorago with ()  →
→  (run to the jump spot to walk your combust) → →
  →
→  +
+  →
→  → →
→ →  → (
→ ( )
)  → →
→ →  → () → →
  →
→ 
 (8t) → → (Based on Hp) → Jump
⬥ The rotation after jumping will vary depending on the Hp left on Vorago and your adrenaline
• If possible try to utilize abilities with increased accuracy, such as specs or Snipe, as will run out at this point.
⬩ Try to Divert last blue bomb , having high adren will be helpful for the start of P2.
Magic
⬥ With magic you can (pre)  .
.
• ( ) (tc)
  + r + + .
Note: Detonate can be skipped if doing the previous inputs consitently on the same tick can be difficult, that just means the phase will last slightly longer.
⬥ Rotation when reaching the top:
• Tag Vorago with  →
→  (run to the jump spot to walk your combust) → →
  + → +
+ → +  →
→  →
→  → → /
→ → /  /
/  /
/  /
/  /
/  /
/ 
⬩ Jump when Vorago has around 30k Hp left, be aware FSOA autos can easily reset Hp.
⬥ After jumping finish Vorago with some thresholds or basics depending on the remaining Hp
• Try to Divert last blue bomb , having high adren will be helpful for the start of P2.
Phase 2
Phase 2 Concerns
⬥ For Phase 2, dealing the damage required in the time gate given can be slightly difficult and defensives will rarely be used, so being able to pray flick correctly will be extremely helpful.
Ranged
⬥ Stack before first reflect and ideally get 7 stacks with the last before reflect.
⬥ Use on the 2nd blue of reflect, forcing blue bomb after the red and then a melee hit. (add a clip of this)
⬥ To deal enough damage before bring him down, after first reflect use () → → →
• Can use () → → again while finishing clearing bleeds .
⬩ If needed, use after clearing bleeds.
⬥ Safe bleeds strategy:
• → → (flick ) → →
⬩ Using  on all the movement abilities can be really helpful if a mistake is made to clear any bleed.
⬥ Bring him down rotation:
() → → → → s +
+  → (click release) r + →
Magic
⬥ For Phase 2, dealing the damage required in the time gate given can be slightly difficult and defensives will rarely be used so being able to pray flick correctly will be extremely helpful.
• For magic, () (tc) → to clear first bleed → → to clear 2nd bleed → 3rd bleed → clear next 2 bleeds with . Use  or if needed, if high adren you can reflect. + + → (run out of melee distance) () → → / before bleeds if possible to not interrupt autos with your Bladed dive switch when clearing them.
⬥ Safe bleeds strategy:
• → → (flick ) → →
⬩ Using on all the movement abilities can be really helpful if a mistake is made to clear any bleed.
⬥ Can use Animate dead during Bring him down to reduce damage taken when equipping a shield  .
.
⬥ Bring him down rotation:
( ) (-3)
  → + → → → → → → → → +
Note 1: This rotation is not 100% consistent, using Vulnerability bombs in between channels or during abilities will highly increase their success rate.
Note 2: Select Incite fear spell after reaching 12 Exsanguinate stacks.
Phase 3
⬥ The different rotations can be approached in multiple ways
⬥ Some rotations will have Entry methods where it suggests when to utilize defensives (to minimize the amount of food used) and ultimates in a more general way to give an easier understanding of what to do in each phase.
• There will also be Experienced methods where the main focus is to finish the phase as fast as possible.
⬩ These rotations will be more specific but can have a little improvisation based on adrenaline gained by crits, Divert , Relentless  and Impatient
  procs.
Note: For all magic rotations switching to spell after will help to save food.
Phase 3: Ceilings Collapse
Magic Entry Method
(-27)  → (Build) → () (tc) → Basics → (Reflect start) → + → Build with defensives → (Reflect end) → → (After hits) → (Reflect start) → → (Reflect end)
Note: Make sure to stand on the edge of your sun so when the red comes out you can move to the other edge and avoid the blue.
Magic Experienced Method
(-27) → (Build) → () (-3) → (tc) → →  → → → → (Reflect start)
  → → → → + → (Reflect end) (3t) → → → → / → → Improvise
Note: Make sure to in the middle and stand in the center when it's about to jump after reflect.
If Vorago jumps to the middle on the first jump you can walk under to place your and walk out of MD to .
If you get a mid rock just accept it and focus more on surviving.
General Notes
⬥ Use  / around the middle (in between 2 quadrants)
• This way if Vorago drops a rock on one of the quadrants the other will still be available to stay inside of /
⬥ If Vorago jumps too far away you can Surge all the way to the opposite side to drag him and be able to stay inside of / .
Phase 3: Scopulus
In order to stack the Scopuli faster stand in the middle of the south wall, when both Scopuli start getting closer start kiting.
Ranged
⬥ The general idea is utilizing Mechanised chinchompas  with
with  , , and for more AoE damage with increased hit chance and (
 ) for more adrenaline. can be used as a panic ability and when you are low Hp to heal back with Soul Split by pray flicking for its duration.
( both scops) → (tc) → → → → → () → + → ()  → () + → () → → Improvise
Magic Entry Method
⬥ Magic has higher affinity against Scopulus compared to the other combat styles, this allows the use of Reaver's ring 
⬥ The general idea is utilizing → → ( spell) and  + / / for more AoE damage. To reduce the amount of food used it is better to use Resonance at the start when building and stacking, Devotion right before Tsunami and Resonance again when available.
() → ( both scops) → (tc) + + → (move south to stack both scops faster) → → → → (build to 90-100 adren) → ( spell) → →  + → (when possible) into
Note: You can use use short channels like , (2-3hit) and (2-3hit) if you are spaced away enough from the Scopulus.
Magic Experienced Method
⬥ Scopuli attacks have a speed of 4 ticks, as well as Vorago, this means that it is possible to have all attacks hitting on different ticks to pray flick everything consistently.
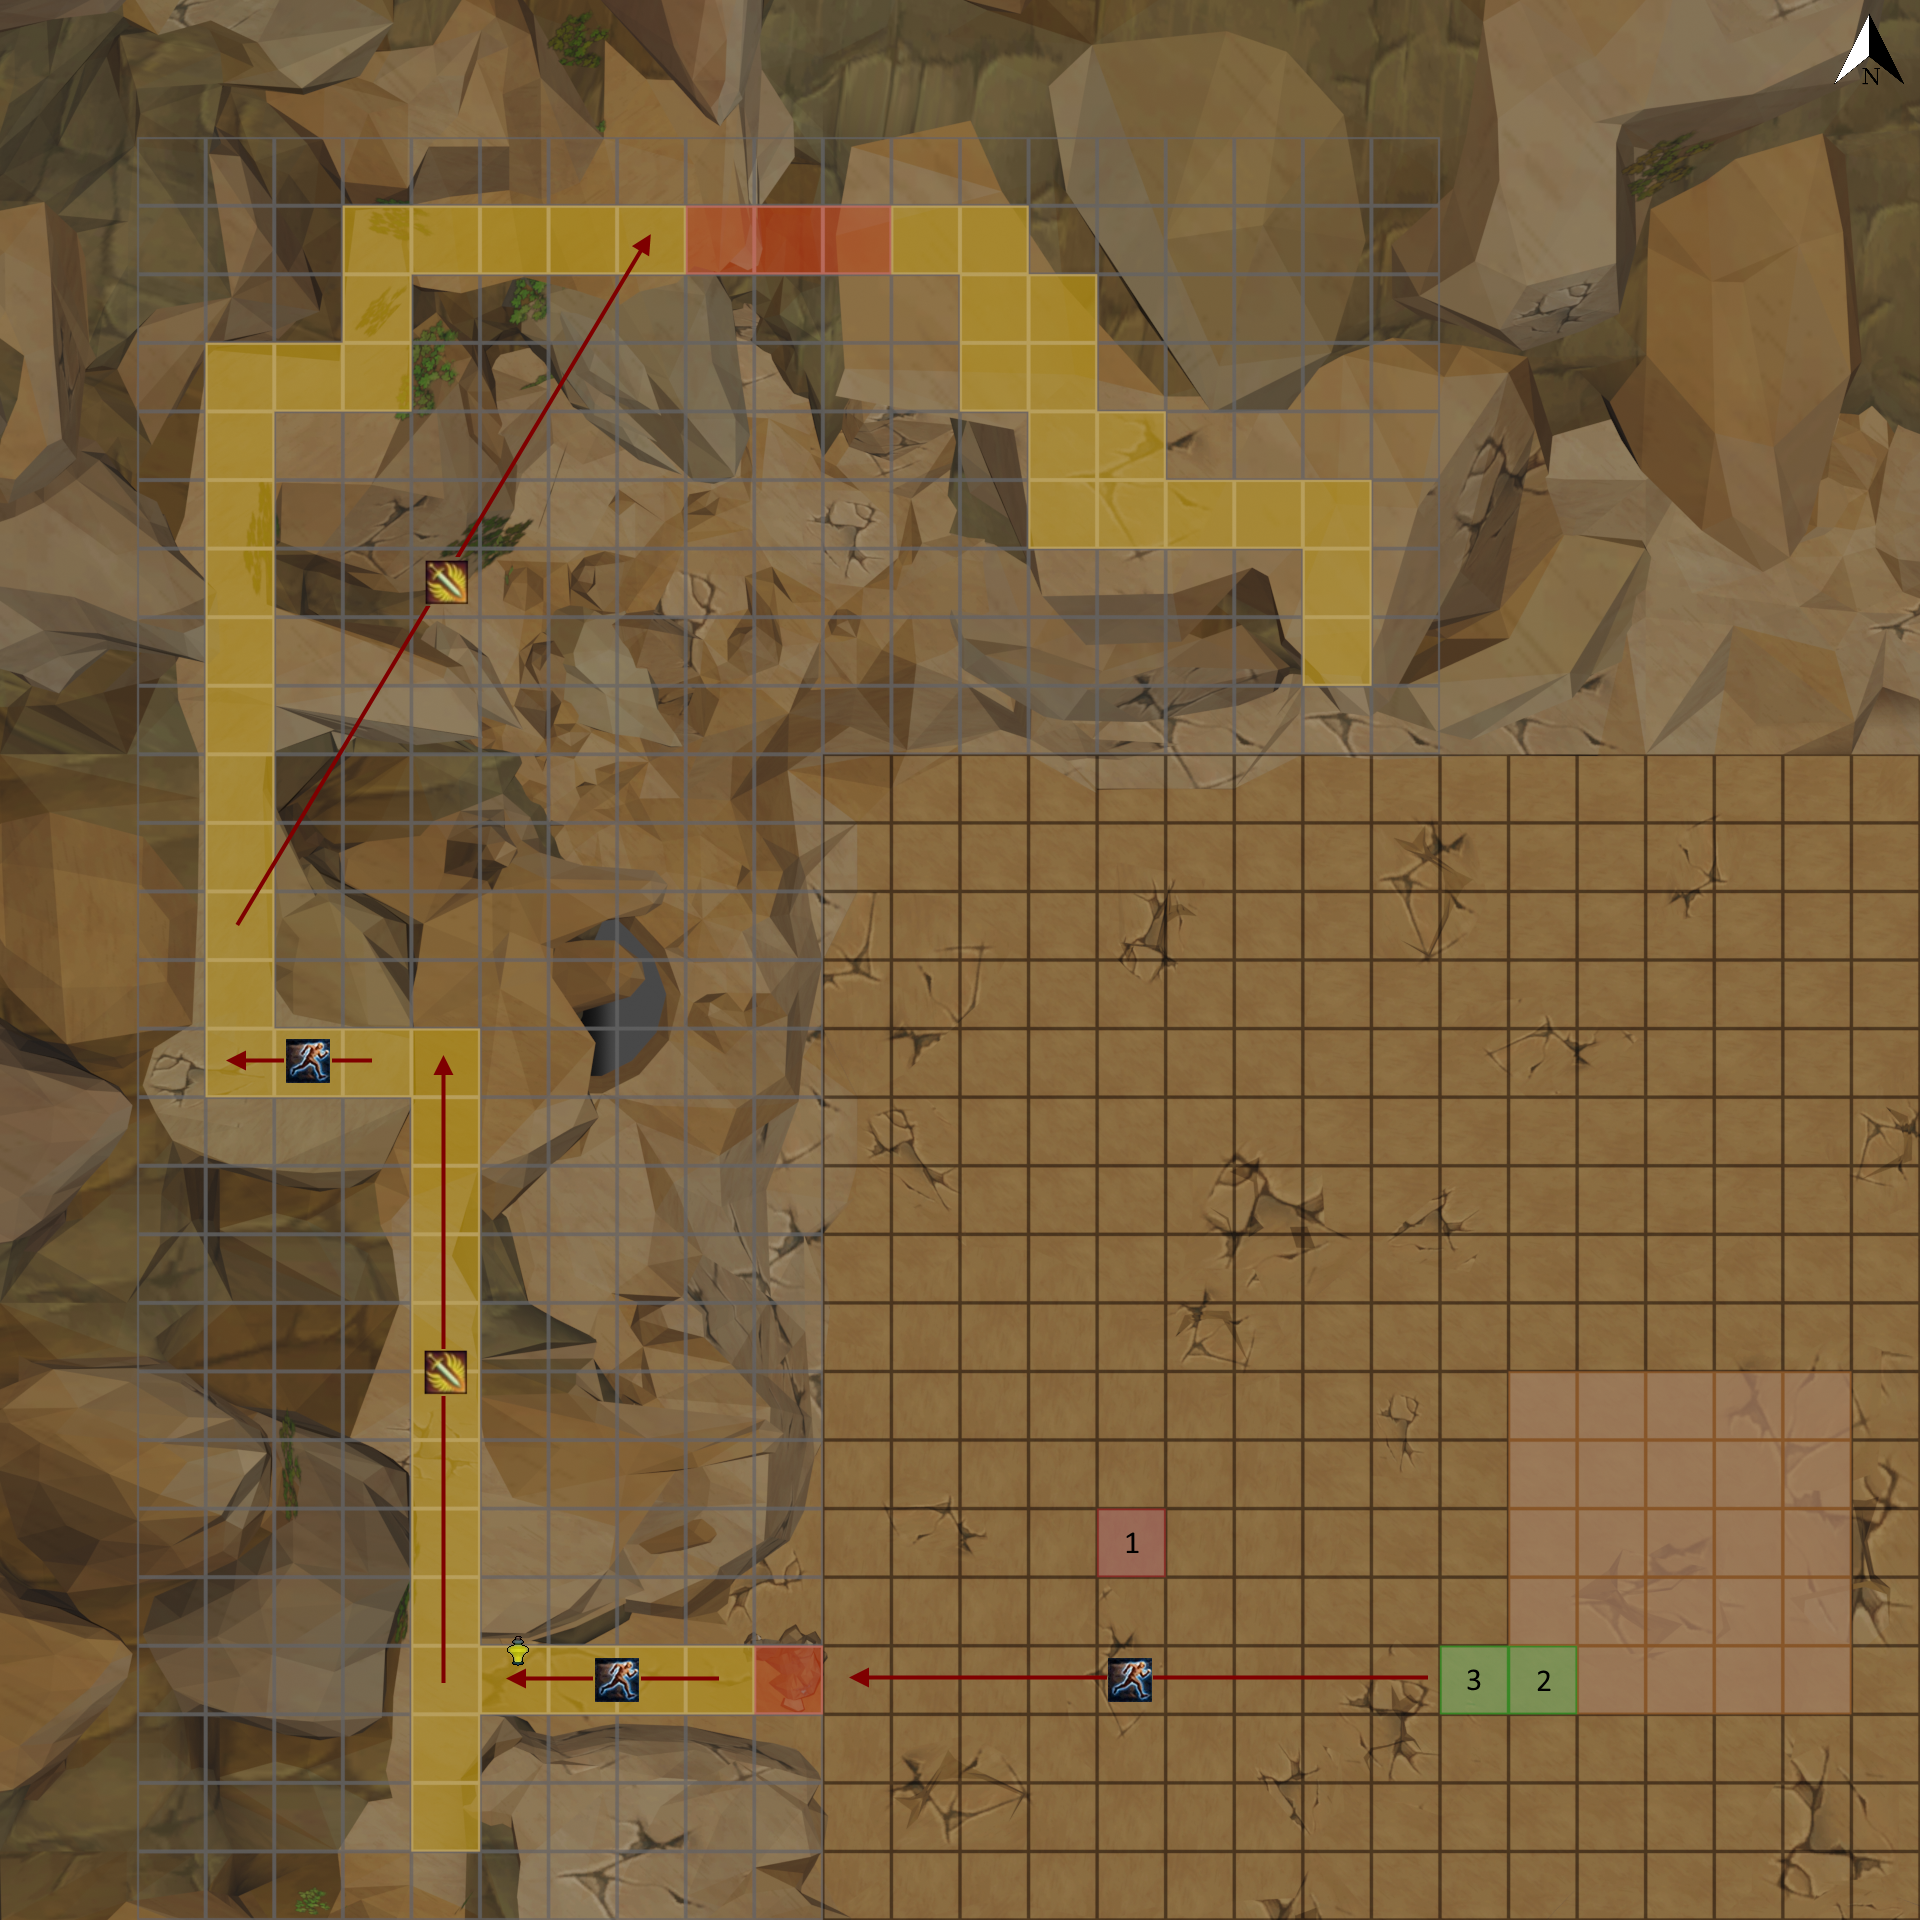
⬥ For this strategy, first you will drop on tile 1, then walk to tile 2 after sunning, and move to tile 3 when you , as shown in the following image.

• This will prevent the scopuli from stacking too fast, allowing you to + , and make them attack you in the following sequence:
⬩ (1) Scopulus auto → (2) Scopulus auto → (3) Blue bomb → (4) Nothing → Repeat
(-30) → ()  →
→  → → → (-15) () → (Move to tile 2) → → → (lose target) + → (tc)
  + (tc back) → (Move to tile 3) → → → +
⬥ From here, what follows depends on the remaining HP of the east scopulus, if it has too high HP you can if enough adren or / / → .
⬥ As soon as the scopulus dies, there are 2 options:
• The safe option is to straight and continue doing damage, when the scopulus gets close to you surge back to your sunshine to finish it off.
• When a scopulus dies, the other will increase its attack speed from 4t to 2t, this means you can continue standing still and pray flicking if its autos are synchronized in the following way:
⬩ (1) Nothing → (2) Scopulus auto → (3) Blue bomb → (4) Scopulus auto → Repeat
General Notes
⬥ Blood barrage with Dark form is essential for this strategy as it will help you sustain Hp while face tanking the scopuli.
⬥ Using a Powerburst of Vitality when is about to run out will decrease the risk of dying due to a missed prayer flick or bad rng.
⬥ Vulning only the west scopulus could be something to consider as you want the east scopulus to stay alive for as long as possible to benefit from autos and crits.
Phase 3: Green Bomb
Magic
(-27) → (Build) → () (-3) → (tc) → → → + → → + → → (Reflect start)  → → → → (Reflect end) (5t) → → → + → Damage based on adren
⬥ Tank first Green bomb  by just eating, Excalibur
  during reflect while healing back to full, Overload
  (to regenerate combat stats if using
  )
)
• second Green bomb .
Phase 3: Teamsplit
Note: For these rotations the second Teamsplit  will always be tanked, a will be highly recommended for this part.
You will always get blue Teamsplit in solo.
Ranged entry method
(-27) → (Build) → ( ) (tc) → ( start) Build → ( end) + → → → → (Reflect start) → (Build) → (Reflect end) → → ( start)
  → ( end) (
 ) → () → → (When needed)
Ranged experienced method
(-27) () → → → → → (tc) → ( start)  → → ( end) () → () → () → () → → → (Refl start) → →
  → (Refl end) (4t) () + → () → ( start) → → → → ( end) → → (8 hit) → → → → → ()
Magic entry method
(-27) → (Build) → (tc) → ( start) Build → ( end) + → → (Reflect start) → → (Reflect end) → ( start) → → ( end) → + → (When needed)
Magic experienced method
(-27) → (Build) → (tc) → ( start) → → ( end) + → + → → + → → (Reflect start) → → → → (Reflect end) (7t) → ( start) → → → → ( end) → → → (2 hit) → →
Phase 3: The End
For The End you do not need to pray flick Blue bombs at all which makes it significantly easier. You are also always going to tag all 3 Red bombs as this will reduce the burst damage you will receive during stand.
Ranged
(-27) () → → → →  → → (tc) → → → () + → → () → → (8t) → → → → → → → (4t) + 2H Auto → (get 3-7 Perfect Equilibrium stacks) → (stand) () → () → () → () → → (Refl start) / → (Refl end) () + → (2nd stand) → → ()
Use  + after Red bombs land and stand.
Magic
(-27) → (Build) → (tc) → → → → (Arms drop) + → → → + → → + → → (Build to + ) → s → (Stand) r + → → (3-hit) → → (Reflect start) → → (Reflect end) + +
Note: Make sure to equip your switch start of reflect to prevent from throwing autos. Starting second cycle is pretty much up to improvisation based on Hp left.
⬥ These rotations should consistently skip second stand, can be used otherwise.
Phase 4
Ranged
⬥ Stack Black stone arrows and shards
• Shatter  damage scales based on the arrow or weapon tier the shards were stacked with, because of this it is recommended to stack shards with t95 arrows (Not BSA ).
⬩ In addition to this, Wen arrows will boost shatter damage so it is highly recommended to use shatter with 15 Wen arrow stacks.
⬥ Never Disrupt going into Phase 5.
Magic
⬥ Get 12 Exsanguinate stacks for Phase 5
⬥ The weekly rotations where you Disrupt going into Phase 5 are:
• Scopulus
• The End
⬩ Do not disrupt going into Phase 5 on any other rotations if following the suggested Phase 5 methods.
Ceilings Collapse
⬥ Try to Resonance 3rd Blue bomb out of Waterfall to avoid losing healing from being already max Hp
• Barricade and clear rocks leaving only one
⬩ When first Bleed starts lure Vorago to get him stuck behind the rock, spam Cease  to prevent the familiar from attacking Vorago and skip the next 4 Bleeds, then repeat.
⬥ Barricade can be skipped for the second cycle if the Hp is too high.
Scopulus
⬥ Try to Resonance 3rd Blue bomb out of Waterfall to avoid losing healing from being already max Hp
• Barricade the Red bomb (same method as Phase 2), clear Bleeds
⬩ Devotion reflect and repeat.
Green Bomb
⬥ For Green bomb it is highly recommended to bring a Primal feast  as this will help surviving the Green bomb and not run out of food before Phase 5.
⬥ Try to Resonance the 3rd Blue bomb out of Waterfall to avoid losing healing from being already max Hp
• Devotion when the Green bomb comes out, over heal with a Primal portion, stay away from melee distance for the first 2 blues, walk into melee distance and pray melee to try forcing a melee auto
⬩ You can eat another Primal portion after Green bomb explodes to be safer during bleeds.
• Clear bleeds
⬩ Reflect  during reflect and repeat.
Teamsplit
⬥ Try to Resonance 3rd Blue bomb out of Waterfall to avoid losing healing from being already max Hp
• Clear bleeds
⬩ Devotion reflect and repeat.
The End
⬥ Try to Resonance 3rd Blue bomb out of Waterfall to avoid losing healing from being already max Hp
• Tag all 3 Red bombs and Barricade stand
⬩ For 2nd cycle skip Barricade as it will be on cooldown for Phase 5
• On stand use → + → 
⬩ Use start of reflect.
Phase 5 Specific Mechanics
⬥ Unlike other boss fights, Phase 5 is heavily rng related, what abilities you use and its order will depend on when Vorago throws Blue bombs, how far you are standing away from it, how much damage you have dealt so far, how much you want to deal in the next few ticks, among other things
• It will not be necessary to understand everything perfectly to start getting kills but it will help improving a lot, as every second of the fight you will have to make quick decisions of which ability would be better to use to generate more stall, when to use Disrupt and many other things and understanding at its best how Phase 5 works will help you taking the better decisions.
⬩ A basic understanding of abilities hit timings will contribute to this.
Mechanic Changes
⬥ Auto attacks are thrown every 3 ticks instead of 4
⬥ You receive 3 Bleeds instead of 5
• To clear them what matters is your distance from the position you were when receiving the bleed instead of your distance away from Vorago.
Push mechanic:
⬥ In order to finish this phase you need to push Vorago 8 tiles from the starting position and maul by clicking the Maul of Omens  .
.
• To push 1 tile you need to deal roughly 20k damage
• When you receive a Blue bomb, Bleed hit, or attack yourself during reflect you will get pushed back the tick after receiving the damage
• Vorago is limited to pushing 1 tile per tick which is where stacking autos comes from.
⬥ There is an exception to this, if a Blue bomb hits same tick a Teamsplit spawn you will not get pushed back
• The following clip demonstrates this:
Stacking:
⬥ As mentioned before, Vorago is limited to pushing 1 tile per tick, this means you can stack multiple auto attacks on the same tick to only get pushed back 1 tile.
⬥ Because Blue bombs have a different travel time depending on your distance away from Vorago, you can move to manipulate their travel time and stack multiple autos on the same tick. The ticks autos are released relevant for this are (remember tile 1 is MD):
• Melee swipes - tick 1
• Blue Bombs (1-3 tiles) - tick 4
• Blue Bombs (10-12 tiles) - tick 7
⬥ In order to stack them you would need to stand initially 10-12 tiles away from Vorago, and as soon as the animation from the first Blue bomb starts Bladed Dive to 2-3 tiles away from Vorago
• When the animation from the second blue starts, walk to Melee distance and use Resonance , Divert or Shield dome to reduce the damage from the combo as it can easily kill you.
Note: It is important to not Bladed dive on melee distance, as it can replace the second Blue bomb for a Melee swipe and push you back, messing up the stack.
⬥ Stacking 3 autos is the most known way of stacking.
• On Purple bomb  rotation you receive more Blue bombs when you are dealing damage, this allows you to stack fast Blue bombs with a Melee swipe
⬩ This will increase the damage taken a lot but will reduce pushback
⬩ It is important to note that there is a chance of getting a Melee swipe and still get a Blue bomb from the same auto so it is something to consider depending on the amount of food left
Vorago attack paterns:
⬥ Teamsplit P5:

⬥ Purple Bomb P5:

⬥ Green Bomb P5:

⬥ After each Special attack (, , ) the next Blue bomb will be delayed by 4, 5 and 10 ticks respectively
Stalling:
⬥ If Vorago gets pushed, Autos, Special attacks (TS, Pb, Gb) or Bleeds cooldown resets to 3 ticks.
⬥ If Vorago pushes you, Autos, Special attacks or Bleeds cooldown resets to 6 ticks
• These 2 cases are known as stalling Vorago.
⬩ In addition to this, Vorago can be stalled on the last tile without having any push animation
⬥ If you deal enough damage to push or get pushed the same tick Vorago was going to release an Auto, Special attack, or Bleed, then the push takes priority and gets stalled before releasing its attack.
⬥ If you push and get pushed back on the same tick, the sequence will always be get pushed and then pushing Vorago
• This means it is always going to be a 3 ticks cooldown for the next attack instead of 6 ticks.
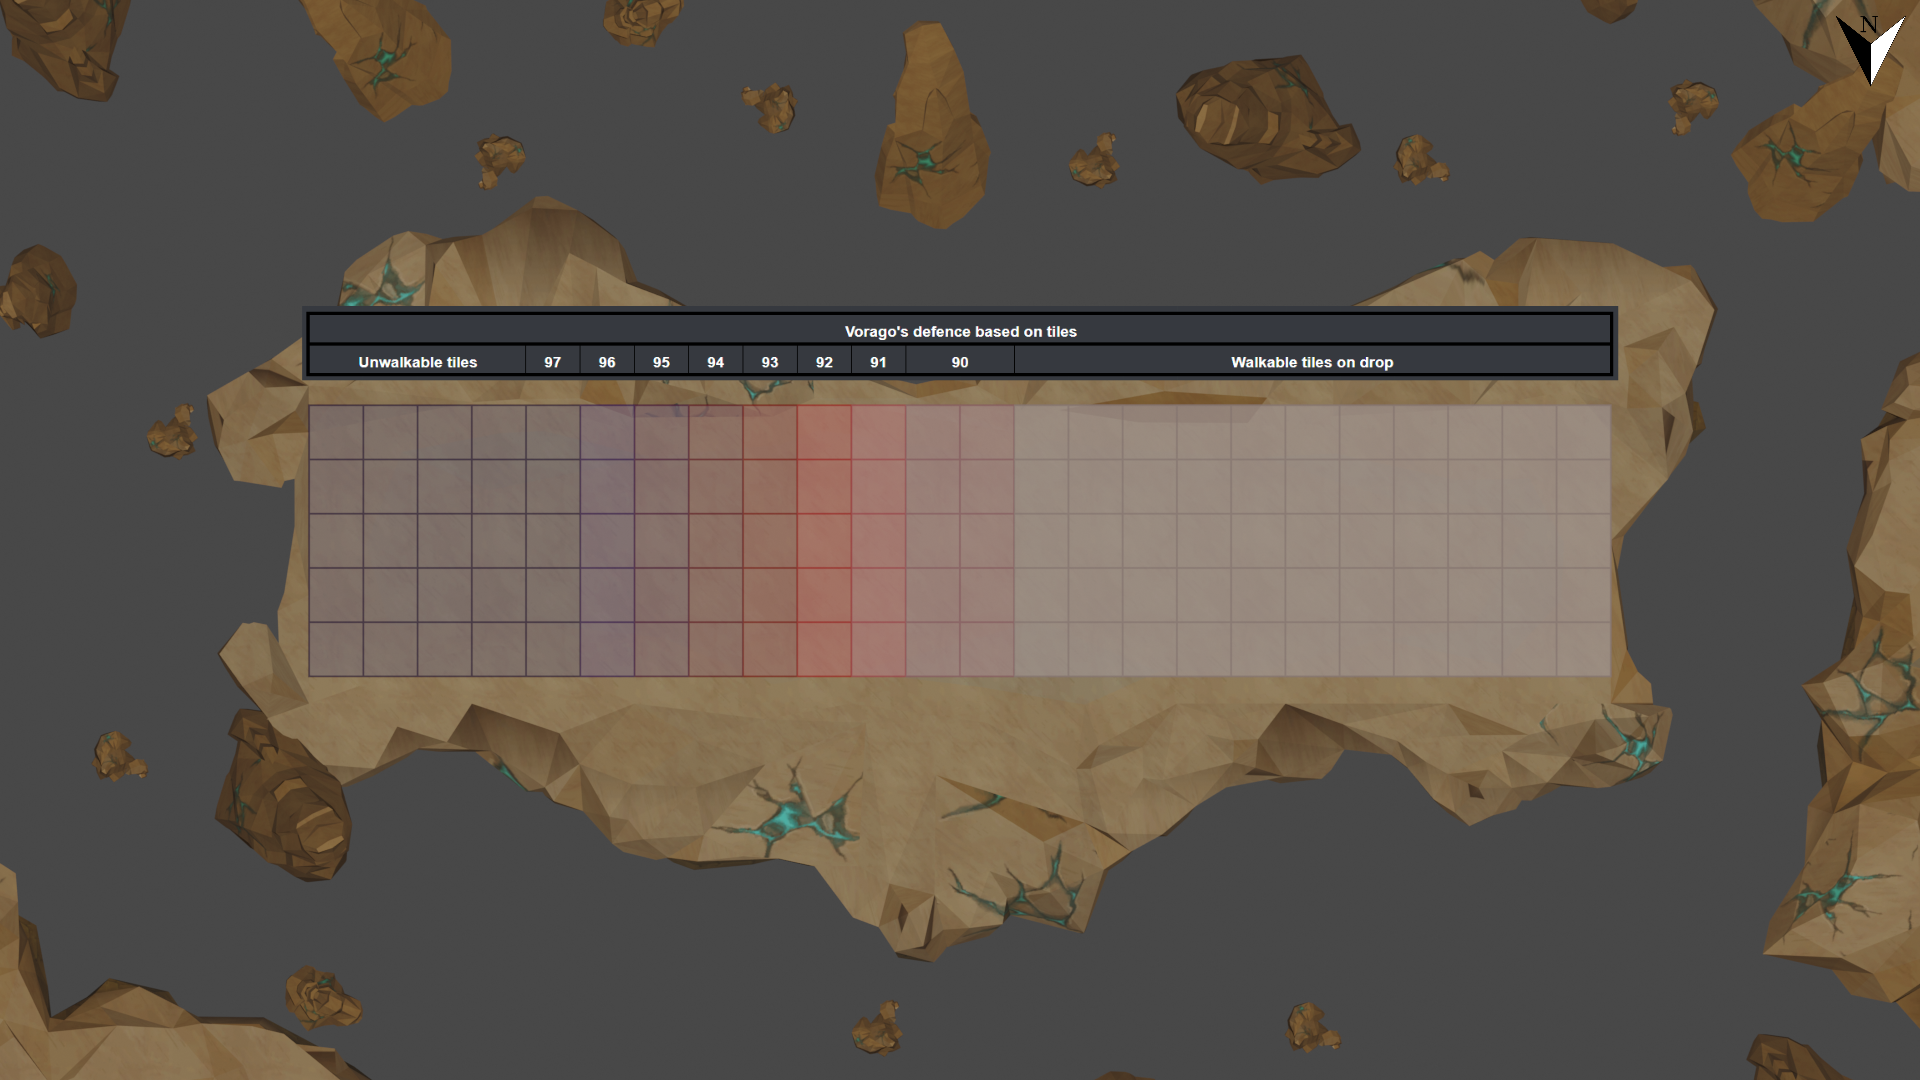
Defence scaling
⬥ Vorago will increase its defence based on how close it is from maul spot, starting at 90 defence and scaling up to 97.
• If you get pushed back from the starting point it won't decrease below 90.
⬩ This means you can go from 94.5% hitchance (from a standard setup with 20 BSA stacks) to 89% or from 99.7% (Gstaff + SWH ) to 94.3%.
General Strategies
⬥ Ranged has the advantage of being much more consistent compared to magic as you have Black stone arrows and Wen arrows that increase your accuracy and don't have that much variable adrenaline.
• Because of this, it is possible to have specific rotations that most of the time will not require much improvisation and will get you a quick phase with little to none mistakes done.
⬩ It is highly recommended to use Pernix's quivers  with the suggested setups as it will make switching easier.
⬥ For Magic, the strategy is generally the same on all weeks, dealing with the mechanics as best as possible to reduce pushback and brute force it with damage
• Although there is a method to continue with in case the phase does not finish around the end of the first cycle.
Phase 5: Teamsplit
Ranged
(-27) () → → → → → → (tc) → ( start) → → ( end) () → () → () → → + → → (Refl start) → → → → (Refl end) () → + → → + OH auto → 2H Auto → → + → → (8t) → → → ( start) build → ( end) () → → → ()
⬥ Disrupt near the end to make mauling easier.
⬥ If the phase extends too much, the general rotation to keep in mind is ( end) () → → → () → (Refl start) Stack autos + → (Refl end) → (3rd bleed) + → (8t) → →
• Might need to improvise based on adren and tiles away from maul.
Magic
(-27) → (Build) → () (tc) → ( start) → (wait 2 ticks) → → ( end) + → (run back and click Vorago to stay at max distance) → → → + →  → + → →
  → → (Reflect end) + → (During Bleeds ) → → / / / / /
⬥ After clearing Bleeds any combination of / / / / / based on adren should push Vorago a few tiles, ( start) → → (if high adren) → ( end) .
• If it is still not on maul spot you can stack on reflect, → again during Bleeds and repeat the same rotation.
⬥ This should be enough to push Vorago to maul spot or very close to it, if the phase extends too much:
• The fast rotation to try mauling it as soon as possible is (Refl end) → () → → Improvise
⬩ Note that your / / might be on cooldown after reflect if you didn't stall Vorago enough, improvise according to that and only use when cooldown is up.
• The slow and safe rotation to keep in mind is ( end) → build to during reflect, (During Bleeds ) → → / / / / / → ( end) → (Reflect start) stack. If is on cooldown skip and only → .
Phase 5: Purple Bomb
Ranged
(-27) () → → → → → → (tc) () → () → → () → → + → () → → → (Refl start) → → → → () → → (Refl end) 2H Auto + + → → + OH auto → 2H Auto → → () + → () → → (8t) → → () → () → ( start) () → () Improvise
⬥ Disrupt near the end to make mauling easier.
⬥ If the phase extends too much, the general rotation to keep in mind is first blue after release, + / during/after reflect and deal damage during Bleeds and the next set, stack during reflect, thresh during Bleeds and repeat.
• Divert can be really helpful when stacking for free adrenaline.
Magic
(-27) → (Build) → () (-3) → (tc) → → → + → → + → → + → → → → + → (Reflect end) → (During Bleeds ) → → / / / / / /
⬥ This should be enough to push Vorago to maul spot or very close to it, if the phase extends too much:
• The fast rotation to try mauling it as soon as possible is (Refl end) → () → → Improvise
⬩ Note that your / / might be on cooldown after reflect if you didn't stall Vorago enough, improvise according to that and only use when cooldown is up.
• The slow and safe rotation to keep in mind is first blue after release, during reflect, (During Bleeds ) → → / / / / / / .
⬩ If is on cooldown skip and only → .
Phase 5: Green Bomb
Magic
() (-18) → → → → → → (tc) → → → → → (4-6 tiles away from Vorago) () → → (4t) + →
⬥ When Reflect starts you need to pay attention the the Blue bomb animation, you need to use the tick the Blue bomb is released or the next tick, then in between GCD to then → + , this way when you get hit by the stack it will be after sunshine, proceed to → and clear bleeds. Save for the third Blue bomb after Bleeds.
• You need to stand exactly 4-6 tiles away from Vorago during when you use , this is because the rotation aims to push when (2-4 hits) hit as well as the proc on Combust with Kerapac wrist wraps, stalling first Blue bomb release until you use , and by standing at that distance away from Vorago it will hit same tick the Green bomb hits, reducing a tile of pushback.
⬩ For this rotation you do not need an energizing switch as you don't Barricade
⬥ Because you into Sunshine on top of the Adrenaline renewal you use, you have a lot of adrenaline to use right when reflect ends, this allows to push faster during bleeds and make 2nd Green bomb skip more consistent.
Note: For this rotation specifically it is recommended to use a melee main hand without Aftershock and of lower tier, this is because the start rotation aims to push on specific ticks, Statius' warhammer special attack and aftershock can contribute too much with damage causing Vorago to get pushed a tick too early with Omnipower, making the following Blue bomb get released before Vorago gets stalled again.
General P5 notes:
⬥ At the end of any Reflect step 1 square back
• This is because getting pushed while being at Melee distance "stuns" your character for a few ticks
⬩ This makes you unable to and clear Bleeds .
⬥ It is recommended to clear Bleeds with → → in that order
• This is because Escaping in between GCDs while other abilities are being used can potentially push Vorago stalling it before first or second Blue bomb after bleeds
⬩ If is used instead to clear third Bleed it is very likely that the first or second Blue bomb will come out before any stall and you will not be able to use that pushback to generate more stall.
⬥ Never Disrupt the first Blue bomb after a Spec
• This is because you want to stall Vorago as much as possible, and disrupting first Blue bomb will make the following Blue bombs come out faster
⬩ The best situations to use Disrupt is when you are confident you can generate enough stall by yourself without getting pushed back or it is going to push you same tick you are going to push it.