Mechanics
Introduction
This channel will cover a number of game mechanics, uncommon ability interactions, and more nuanced game information that can be used for reference.
Mechanics are split into two categories: basic and advanced. Basic mechanics are game interactions that are more important to the casual player and may be relatively easily learned, whereas advanced mechanics may be learnt slowly with time as you play the game.
Ability Queueing
How It Works
⬥ Ability queueing ('queueing') is a toggleable setting that allows you to 'queue' abilities to trigger them when possible.
⬥ The setting can be found by pressing Esc > Settings > Gameplay > Combat & Action Bar > Action Bar.
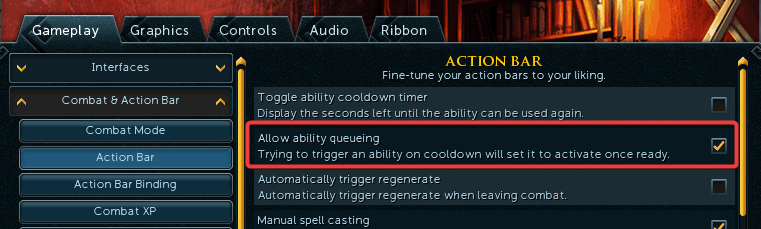
⬥ When you enable ability queueing, pressing an ability that cannot immediately be activated queues it, with the following icon appearing on top of it  .
.
⬥ The ability will then get used as soon as it becomes possible to do so (after constraints like adrenaline, 2H/DW weapon requirements, global/ability cooldowns, etc.)
⬥ There are a number of interactions with ability queueing that are worth mentioning.
Movement Stalling
⬥ Queued abilities will interrupt movement when they are are activated by the game.
⬥ This may cause issues if you are trying to 'kite' monsters (like at Nex or Barrows: Rise of the Six) while also trying to use ability queueing.
⬥ The solution is to disable queueing, or simply press the ability slightly later so that it triggers normally (without queueing).
On-tick Defensives
⬥ Some abilities will have their effects affected depending on whether or not they're queued.
⬥ Defensive abilities that are queued will have different 'on-tick' behaviour under different scenarios.
• 'On-tick' refers to a defensive ability that is cast on the same tick as getting hit by an attack.
⬥ They can be queued on 3 different ticks (since each global cooldown is 3t long), and they work as follows:
• 3 ticks before cast: works with on-tick damage if player is between 1 to 5 tiles from the enemy.
• 2 ticks before cast: works with with on-tick damage if player is 1 or 2 tiles from the enemy.
• 1 tick before cast: does not work with on-tick damage.
Last-Tick Interactions
⬥ Certain 'last tick' interactions (with ultimates and other timed abilities) are affected by queueing.
⬥ Greater Barge 
• The buff from lasts 10t/6s, but trying to convert a channel into a DoT barge bleed on the last tick, will not work if the ability is queued.
⬥ Limitless / Ingenuity of the Humans  /
/ 
• lasts 10t/6s, but trying to use a queued threshold with <50% adrenaline on the last tick will not work.
• lasts 10t/6s, but trying to use an ability on the last tick will not give it the guaranteed 100% hitchance.
⬥ Berserk 
• Queued abilities will not on the last tick of will not get the damage boost, but this does not affect other damage-boosting special attacks and ultimates.
Note: For more information on damage boosts from the last ticks of damage-boosting buffs, see the section on Berserker Auras (linked in the pinned message).
Other Ability Interactions
⬥ Detonate 
• Can be released mid-GCD if queueing is enabled - this is not possible with it disabled.
⬥ Stalled Abilities
• Stalled abilities can be released mid-GCD (using spells on an action bar) if queueing is enabled - this is not possible with it disabled.
Losing Target
⬥ When ability queueing is enabled, you can lose a target with the following options:
• Right-click a shield and use the 'Provoke' option - requires a T80 or higher shield (from Dungeoneering or Barrows: Rise of the Six).
• Use a special attack without having a target selected. This does not work with special attacks of the following weapons, as they do not require any target to activate.
⬩ Dragon Battleaxe 
⬩ Zaros Godsword 
⬩ Staff of Light/Darkness  /
/ 
⬩ Decimation 
⬩ Eldritch Crossbow 
Ability Stalling
Note: See !stalling for a summary instead on how to stall and release abilities.
How It Works
⬥ It is possible to 'stall' an ability by activating it but not actually using it, instead holding it 'in reserve' to release it at a later time.
⬥ This is primarily used to delay the activation of an ability to stack it together with another ability, to deal extra damage without losing any ticks.
How to Stall Abilities
⬥ Casting a non-channeled ability outside your maximum attack range will normally try to run your character back into range to use it on a target.
⬥ If you interrupt this action by clicking away (e.g. on the floor), it will 'hold' the ability in reserve to be released (this is the stalled ability).
⬥ The ability can then be 'released' later to use the ability without consuming a global cooldown.
How to Release Stalled Abilities
⬥ Method 1: Run-in Release
• Casting an ability outside your attack range and not interrupting the action, your character will run in and release it automatically.
⬥ Method 2: Click Release
• After stalling an ability, click your target to release the stalled ability.
⬥ Method 3: Spell Release
• After stalling an ability, use a debuff spell like 

 from your ability bar to release the stalled ability.
• You must have the runes required to cast the spell, but a weapon is not required.
Note: In Method 3, the spell used to release the stalled ability replaces your next auto-attack. See the differences between Click and Spell Release below.
Differences between Click and Spell Release
⬥ Click release is limited to the target you stall on - spell release does not have this restriction.
⬥ Click release can be done mid-GCD at any time - spell release can only do this if using an auto with ability queueing on.
⬥ After a click release, the next ability must be at least 1 tick afterwards. With spell release, the next ability can be on the same tick as the spell release of the stalled ability.
⬥ Spell release replaces your next auto with the spell used to release.
• Use Cease  + click target to clear this.
• Not an issue when using Magic  - you can just hit a different spell keybind for your intended auto.
Adrenaline Management
Adrenaline is generated when players use auto attacks and basic abilities, and by default, naturally drains after the player falls out of combat (10 seconds of no combat). Your adrenaline determines what abilities you can and cannont use at any given point.
There are a couple different mechanics to note with regard to adrenaline.
⬥ Stalling adrenaline to not lose it out of combat.
⬥ Gaining adrenaline even without a target under some circumstances.
⬥ Deliberately losing your target to use some abilities (like Reflect  or Detonate ) without costing adrenaline.
⬥ Adrenaline gained from certain actions may feel 'delayed' (covered below).
Stalling Adrenaline
⬥ There are multiple ways to stall adrenaline.
⬥ Method 1: Simply remain in combat.
• This is done by using abilities that do not require a target within every 10 seconds to make the game think the player is still 'in combat'.
⬩ Non-defensive abilities that do not require a target -  /
/  /
/  /
/  / etc.
⬩ Defensive abilities -  /
/  / / etc.
⬩ Other abilities like Reprisal
⬥ Method 2: Use something that grants permanent adrenaline stalling.
• Adrenaline Urn  (holds up to 1000% adrenaline).
• Persistent Rage  relic.
• Infernal Puzzle Box  (unlocked up to the 3rd tier).
Gaining Adrenaline Without Target
⬥ For 10 seconds after your last damaging ability on a target, you can use any abilities to gain adrenaline.
⬥ After 10 seconds, you can continue to gain adrenaline using defensive basics, at most once per 10 seconds.
⬥ The following abilities do not affect or reset this 'cooldown':
• Non-defensive abilities that do not require a target / / .
• Defensive thresholds (these will consume 15 adren if you have a target, but their use does not affect the cooldown).
• Ultimates that do not require a target  /
/  / / etc.
Late Adrenaline
⬥ Adrenaline Renewals 
• When used, gives 4% adrenaline per tick for 10 ticks (40% total).
• Except the first tick, when drinking a the adrenaline gained cannot be used until the next game tick.
• This is because the input action (drinking) is registered on the same tick as other input actions, but for all other ticks, player input registers before the adren gain.
⬥ Barrages 

• Barrage crits check for crit buffs that give adrenaline later in the tick than normal.
• Essentially, this means that if you crit a barrage auto attack and in the same tick gain a buff that generates adrenaline from crits, the barrage will give adrenaline.
• For example:  → will give adrenaline if crits.
⬥ Mech Chins 
• Similar to barrages, adrenaline gained from crits with attacks using will be calculated late.
• This may impact certain actions (like back-to-back 
 with ) that rely on adrenaline gained from previous abilities.
How To Lose Target
⬥ It is possible to lose your target to enable the using threshold abilities like Devotion  to be used without consuming adrenaline, in a couple ways.
⬥ Method 1: Simply drop out of combat.
• This is accomplished by not attacking/being attacked for 10 seconds.
⬥ Method 2: Have your target no longer be present.
• Kill your current target, or switch to a target that then dies (e.g. Combat Dummy  that gets dismissed), then use an ability.
⬩ If queueing is on: try to use a special attack or press 'Provoke' on a shield.
⬩ If queueing is off: try to use a damaging ability.
Note: For more information, see the section on Ability Queueing (linked in the pinned message).
Berserker Auras 


How It Works
⬥ Berserker-variant auras exist for each style:
• Berserker for 
• Reckless for 
• Maniacal for
⬥ They provide the following boosts:
• Invisible +10% to damage.
• Invisible +10% to accuracy.
• Boosts the corresponding attack stats (Attack + Strength, Ranged, or Magic) by 10%.
• Increases all damage taken (except hard typless) by 15%.
• Reduces defence level by 15%.
Interactions with Damage-Boosting Ultimates
⬥ The invisible +10% damage boost from berserker-variant auras does not stack with damage-boosting ultimates. These are:
• Berserk
• Death's Swiftness
• Sunshine
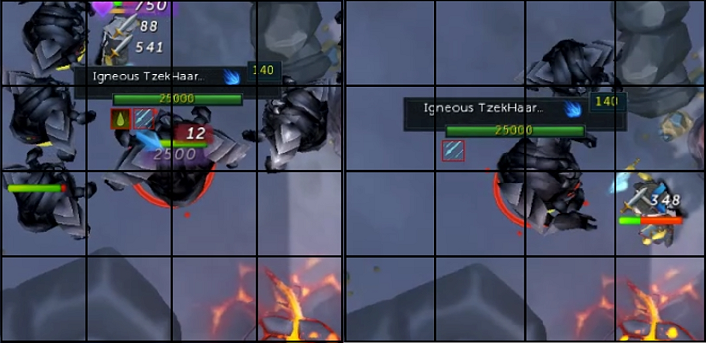
⬥ However, the damage boost from ultimates is on-cast, while the aura damage boost is on-hit.
⬥ This interaction makes it so that if you cast an ability on during an ultimate, but it lands/hits after the ultimate ends, it stacks both the ult and the aura buff.
⬥ In the following image, the same ability is cast twice: on the left it casts and hits during , and on the right it's cast on during but hits after ends - see the damage difference.
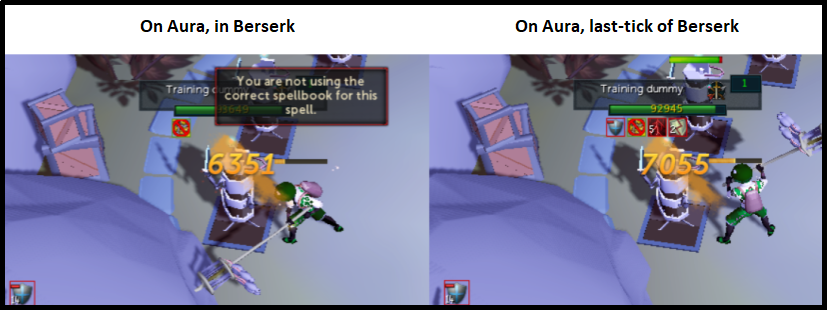 Note*: this interaction does not* work if you queue an ability on the last tick of an ultimate.
Camera Shaking
How It Works
⬥ During some mechanics and cutscenes, the game has the ability to 'shake' the camera view.
• An easy example is when you use the ability Quake  with the setting enabled.
⬥ The setting can be found by pressing Esc > Settings > Gameplay > Camera > System.
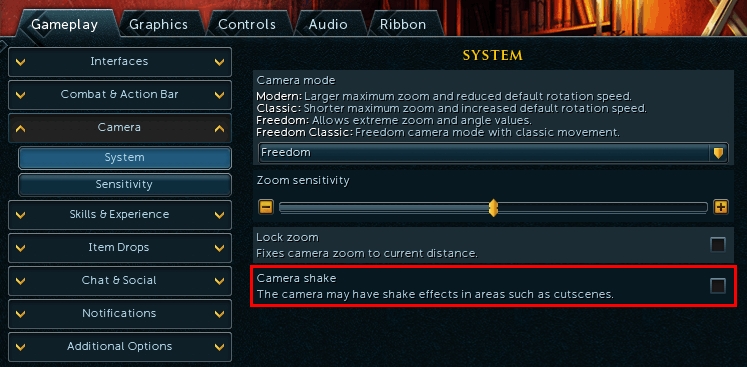
⬥ This is sometimes used as an indicator for certain boss mechanics, but you can disable this if you suffer from motion sickness.
⬥ Some examples of places this is found:
• Barrows: Rise of the Six (during the tunnels - recommended to have camera shaking turned off).
• Solak (during the roots phase in P1).
• Raksha (during the rockfall attack).
• ED2 (during the 'spikes' special attack of Black Stone Dragon and any other Gemstone Dragon).
Critical Hits
Note: For a summary, see the !crit and !critbuff commands.
How It Works
⬥ Critical hits (crits) occur when you hit for >95% of your ability damage range. They are indicated by larger, stylized damage numbers.
⬥ Crits have an increased hitcap: 10k → 12k. This hitcap can be increased by some items (see Items That Affect Critical Hits below).
⬥ There are two types of crits:
• Forced crit: When your critical hit chance forces your attack to hit >95% of your damage range. All attacks first get checked to see if they will be a forced crit.
• Natural crit: When you don't get a forced crit, but you hit >95% of your damage range anyway.
⬥ Your total critical hit chance is the sum of your forced crit chance + natural crit chance.
Ability Interactions
⬥ Fury 
• Each hit of increases the next hit's forced crit chance by 5%.
• This caps at 15% after the 3rd hit.
⬥ Greater Fury 
• Adds a fixed +10% forced crit chance to the next hit.
⬥ (Greater) Concentrated Blast  /
/ 
• Same as Fury .
⬥ Meteor Strike  , Tsunami and Incendiary Shot
• All three abilities provide a 30s buff that grants 10% adrenaline for every critical hit.
• The buff starts from when the abilities hit the target (on-cast for / , and when it detonates for ).
• If the Corbicula Rex perk No Fear is owned, it increases the forced crit chance of by 20% (tier 1) / 40% (tier 2).
⬥ Smoke Tendrils 
• All hits of will always crit.
⬥ The following abilities cannot do critical hits, regardless of what they actually hit.
• Dismember 
• Slaughter 
• Blood Tendrils 
• Massacre  (bleed hits)
• EZK special attack 
 (bleed hits)
• Combust 
• Corruption Blast 
• Magma Tempest 
• Frag Shot 
• Corruption Shot 
• Deadshot  (bleed hits)
Items That Affect Critical Hits
Note: In the following section, all critial hit chance increases apply to forced critical hit chance. These methods can stack together.
⬥ Biting Perk 
• +2% critical hit chance per rank, up to 8% at Biting 4 (up to 8.8% with level 20 equipment)
⬥ Tuska's Might
• +1% critical hit chance per equipped piece of Warpriest Armour of Tuska.
• This effect is not strong enough to justify using this armour.
⬥ Kal'gerion Demon familiar 

• Its special move, Crit-i-kal gives +5% critical hitchance for 60 seconds.
• This applies to everyone near the familiar when it is cast, and you can move away from the familiar without losing the effect after it is cast.
• The scrolls cannot be autofired.
• Ironmen can only benefit from their own familiar.
⬥ Erethedor's Grimoire 
• +12% critical hit chance while active, and increases hit cap for crits from 12k → 15k.
• Outside of Solak, is extremely expensive to use.
⬥ Reaver's Ring 
• +5% critical hit chance at the expense of -5% accuracy.
⬥ Champion's Ring 
• +3% critical hit chance if the target has any active bleed on it.
⬥ Channeller's Ring 
• Channelled magic abilities gain +4% critical hit chance per channeled hit.
• e.g. Asphyx would gain +4%/+8%/+12%/+16% critical hit chance on each of its 4 hits respectively.
• This affects (Greater) Concentrated Blast / , Asphyxiate  , and Onslaught
⬥ Smoke Cloud
• Increase hitcap for crits by 15% for , and by 6% for /
⬥ Dark Shard of Leng (T95 Leng mainhand) special attack 
• Increases damage cap by 30% for Melee , Reflect and Dominion mine  damage.
Grimoire/Scrimshaw Switching ('Grimshaw')
Note: This is very rarely done due to the extreme intensity of inputs required, and due to how some weapons like the FSOA  can actually be hindered by doing it..
How It Works
⬥ It is possible to obtain the boosts of Erethdor's Grimoire and a Scrimshaw 
 at the same time.
• This can result in ~6% damage increase across the course of an entire rotation, but will drastically increase the amount of inputs.
⬥ This is due to how critical hits work:
• Critical hits are rolled on cast.
• Modifiers like scrimshaws are calculated on hit.
Sample Rotation
⬥ The grimoire must be on when the ability is cast, and the scrimshaw must be on when it hits.
⬥ A single input sequence using Dragon Breath  might look like:
• → + → repeat
⬥ It is possible do this while using 4TAA, for example:
• 
 → + → (1t delay) + +
 + → repeat
Note: and take 2 inputs to use → one input to equip, second input to activate, both in the same tick as all other actions.
Hex Weapons 


How It Works
⬥ This refers to the following three weapons:
• Hexhunter bow
• Terrasaur maul
• Inquisitor's staff .
⬥ They are referred to as 'Hex' weapons because the Hexhunter bow was the first weapon with its passive effect, and all of them have very similar passive effects.
⬥ The passive effect provides +12.5% damage and +10% hitchance against susceptible targets.
• This is a passive +10% hitchance compared to a standard T80 weapon.
• Effect works on targets whose main attack style is weak to the weapon's style (based on the combat triangle).
• If the passive works, a debuff icon will appear underneath the target's health bar.
⬥ The damage increase works on the following:
• Abilities
• Auto-attacks
⬥ The damage increase does not work on the following:
• Poison 
• Aftershock 
• Crackling 
⬥ The damage can be further boosted by an additional +5% if the relevant style-specific enchantment is consumed.
• Enchantment of Affliction  boosts damage of by +5%.
• Enchantment of Dispelling  boosts damage of by +5%.
• Enchantment of Savagery  boosts damage of by +5%.
Notes
⬥ It is common to see people refer to them as 'T97' or 'T105' weapons, etc. - this is a common misconception, and is only a theoretical effective tier possible with sufficient level boosts and equipment bonuses.
Instance Hopping
How It Works
⬥ This is a minor mechanic, but can be used to get more kills per hour at some places (most notably, at GWD2 bosses).
⬥ To do it: kill boss → pick up loot → quickly exit instance → quickly re-enter instance → repeat.
⬥ This works because it is faster to spawn a boss for the first time in an instance, compared to the duration between subsequent spawns.
⬥ At the expense of higher effort, this can potentially save time even compared to the 'Fastest' instance spawn speed, if you instance-hop sufficiently quickly.
Manual Spellcasting
Note: For a summary, see the !manualspellcasting and !spellswap commands.
How It Works
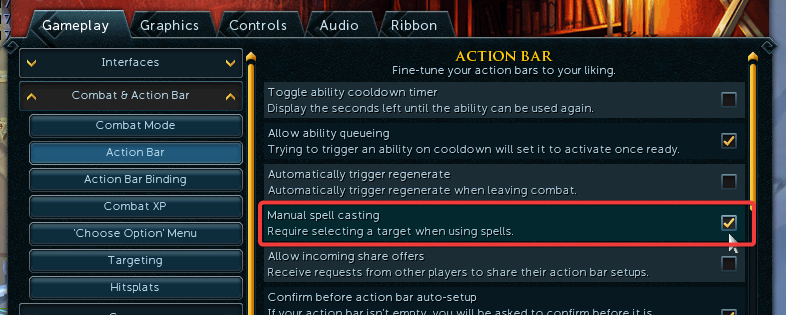
⬥ Manual spellcasting is a setting that affects how spells and abilities can be used in combat.
⬥ The setting can be found by pressing Esc > Settings > Gameplay > Combat > Action Bar.
⬥ Behaviour with manual spellcasting off:
• Magic auto attacks deal damage based on the spell your weapon is set to.
• Clicking on a spell in your Magic spellbook or on your ability bar will switch your autocast spell to it.
⬩ Typically, you'll press spell + next ability on the same tick, not during a global cooldown.
• Clicking on an ability from an ability book or on your ability bar will use that ability against your target.
⬥ Behaviour with manual spellcasting on:
• Magic auto attacks deal damage based on the spell your weapon is set to.
• Clicking on a spell on your ability bar no longer switches your autocast spell - it casts the selected auto, but with the damage and effects of your original autocast spell.
• To change autocast spells, you must right click a spell and select 'Autocast', either from your ability bar or your Magic spellbook.
• Clicking on a spell in your Magic spellbook now requires you to select a target before it is used.
• Clicking on an ability from an ability book will now require you to select a target before it is used.
Why It's Good
⬥ Saving rune costs with manual spellcasting on.
• You can autocast Air Surge but have your keybound spell on your ability bar as Air Strike 
• When you press your auto keybind, it will cast and consume only 1 Air Rune  but do the damage of
• Note that this works with Ancient Magicks as well, but to get AoE damage, your auto keybind must also be an AoE spell.
⬥ Getting the benefit of one spell while autocasting another.
• For example, you can autocast Exsanguinate  to build stacks, but use Blood Barrage to get healing on the autos instead.
• Another example would be using a Blood spell autocast but using an Ice spell instead to freeze a monster without changing your default autocast.
⬥ Some example applications of manual spellcasting:
• Telos: Selectively using Ice spells at correct times with Blood spells autocast, to get better control of freeze timings.
NPC Centre vs. Coordinate
This section covers the difference between an NPC's centre and coordinate and how it impacts certain abilities when it comes to targeting and hitboxes.
NPC Centre vs. Coordinate
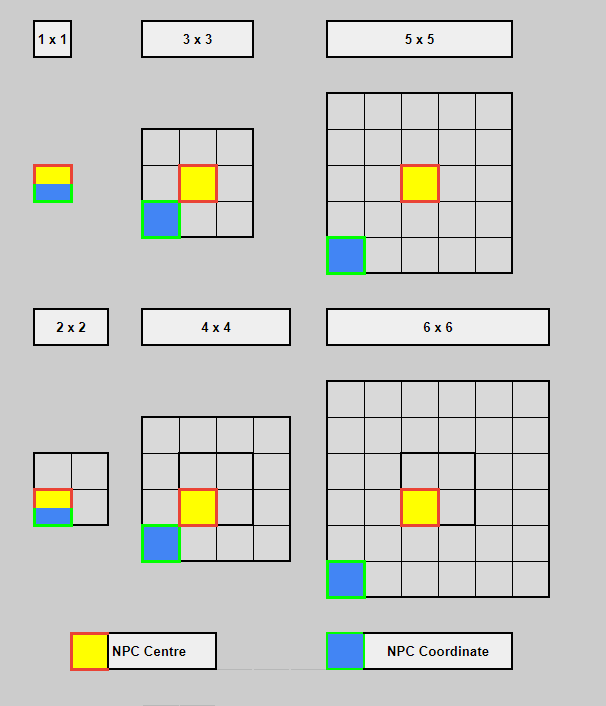
⬥ An NPC's centre and coordinate are both attributes of its position. They are not the same, and are both used in different scenarios to decide where exactly the 'centre' of an NPC is.
⬥ The NPC centre depends on the size of the NPC:
• For odd-sized NPCs (1x1, 3x3, 5x5, etc.): it is always the centre tile.
• For even-size NPCs (2x2, 4x4, 6x6, etc.): it is always the south-west tile in middle 2x2 tile region.
⬥ The NPC coordinate is always the south-west tile.
⬥ The follow image visualizes these changes.
Abilities and NPC Coordinate
⬥ The following abilities all use the NPC coordinate for targeting, to decide their 'point of origin', or 'centre'.
• Note that this is not their hitbox, which is the entirety of the tiles they occupy. It is simply the point from which these abilities begin to propagate.
⬥ Ranged abilities:
• Corruption Shot
• (Greater) Ricochet  /
/ 
• Bombardment 
• Incendiary Shot
• All attacks with Mechanical Chinchompas
⬥ Magic abilities:
• Corruption Blast
• (Greater) Chain  /
/ 
• Detonate
• All burst/barrage auto attacks  /
/
⬥ We can use this information to predict where our AoEs will begin from and what targets they will hit, as show in the following illustration.
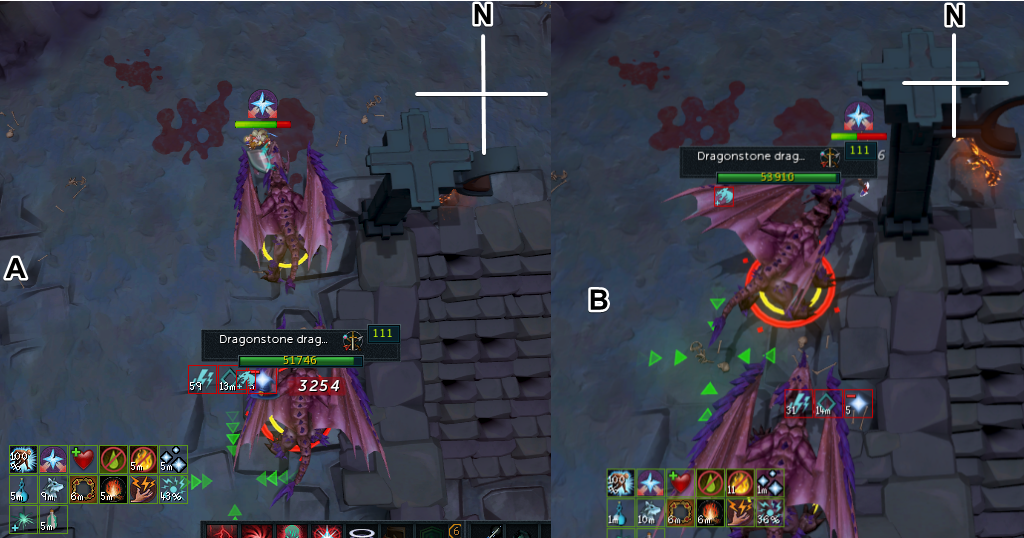
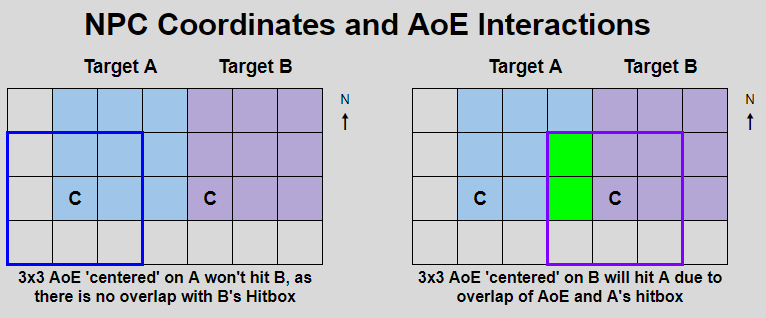 ⬥ See the picture below for an example of this behaviour - Detonate will only hit the south dragon in A, but it will hit both dragons in Scenario B (both dragons are 3x3 in size).
 Note: For / to spread, the target's coordinate must be within 2 tiles of another target's hitbox. In the previous example, using on the north dragon would spread to the southern dragon, but not the other way around.
NPC Facing and Flanking
Note: For more information on boss sizes and how to calculate their NPC centre and coordinate tiles, see NPC Centre vs. Coordinate.
This section covers how NPCs face, how it affects their movement and targeting, and its impact on Flanking Angles.
Facing Direction: Movement
⬥ NPC's in RuneScape can only face in one of 8 drections: the four cardinal directions N/W/S/E and the four diagonal directions in-between, NW/SW/SE/NE.
⬥ NPCs can also only move in one of these 8 directions.
• The same behaviour applies to players as well.
⬥ Each direction therefore corresponds to a 45° angle.
Facing Direction: Targeting
⬥ Bosses in Runescape will always face the direction their target is in. Again, this can only be one of the 8 directions mentioned earlier.
• When without a target, NPCs will face in the direction they are moving.
⬥ Players can face any direction, but they will be re-oriented to face their target when:
• They get a new target (by clicking or using target cycle).
• They attack a target (using any spell/ability/special attack/etc.)
• They try to cast a channel while in attack range of a target.
⬥ The following image attempts to show how bosses will face based on their target's location.
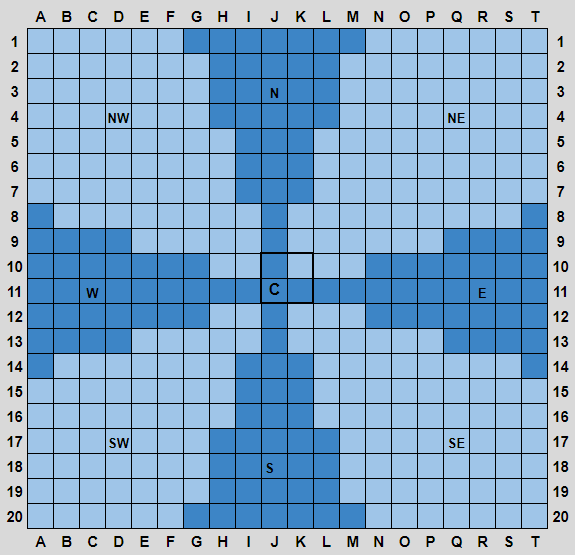
⬥ In the above image:
• The centre 2x2 region represents the monster's hitbox.
• The monster's centre tile is marked by C (in this case, the SW tile of the middle 2x2 region since the monster is even-sized).
• The dark-colored tiles represent cardinal directions, and the lighter tiles are diagonal directions.
⬥ Here is a small table of player positions vs. where the monster would face:
Player at F6 → Monster faces NORTH-WEST
Player at R10 → Monster faces EAST
Player at K14 → Monster faces SOUTH
Player at L14 → Monster faces SOUTH-EAST
etc.
⬥ This is important as it can affect flanking angles.
NPC Directions and Flanking
⬥ Flanking  requires the following conditions to be met:
• Target is facing a particular direction.
• Your distance past the target's centre tile in that direction is zero - i.e. relative to the centre tile you are not further ahead than the target in that direction.
⬥ If both the above conditions are met, then you can Flank the target.
⬥ See the following image for 2 examples of angles that you can Flank from on larger targets.
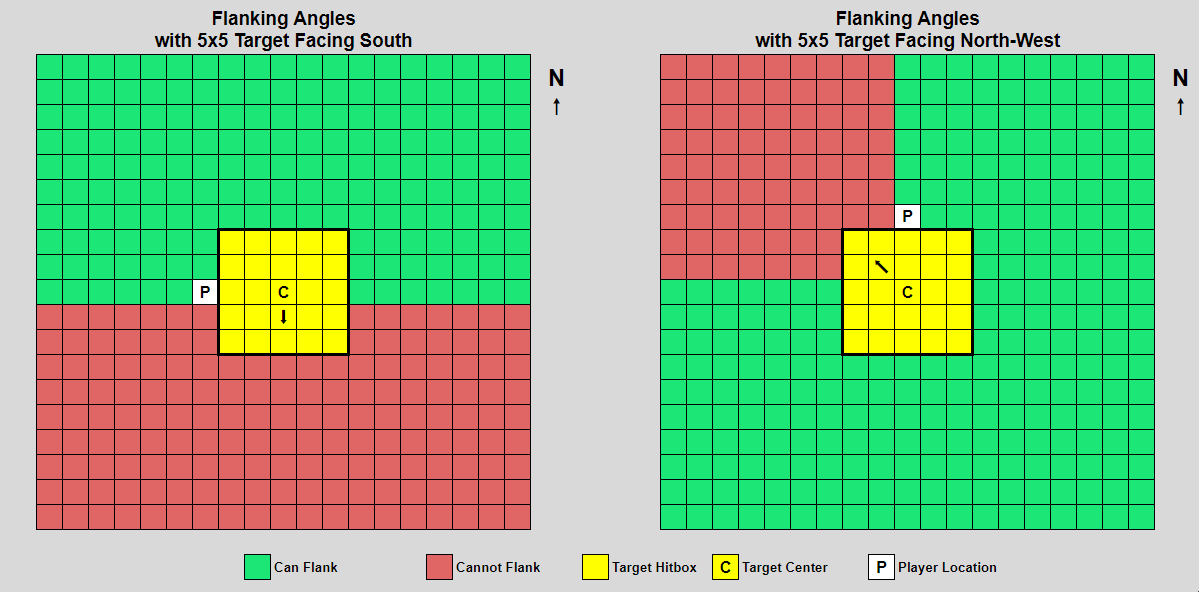
⬥ Case 1: Target Facing South (Cardinal Direction)
• Player can use anywhere in the green region because:
⬩ The target is facing south.
⬩ The player is not further south than the target's centre.
• i.e. Flanking angle is the 180° region behind the target's centre.
⬥ Case 2: Target Facing North-West (Diagonal Direction)
• Player can use anywhere in the green region because:
⬩ The target is facing both north and west.
⬩ Player is only futher north, not also further west, than the target's centre.
• i.e. Flanking angle is the 270° region not including the quadrant the boss is facing.
⬥ See the following image for an example of this behaviour with a 2x2 monster:
Solo Flanking
⬥ It is possible to use on some bosses even in a solo scenario.
⬥ Method 1: Move Behind Target
• By moving behind the target, you can use cast an ability and get the effect.
• Some bosses like Black Stone Dragon (during the spiral flames) or Kerapac (when he spawns the Time Thread Tears) will avoid moving, and this gives time for the player to move behind them.
⬥ Method 2: Move Under Target
• You can move under a target when casting an ability and be able to benefit from effect.
• This can happen when the target is immobile (like Ambassador), or temporarily immobile (like the examples before).
• Mobile but stunnable/bindable targets (like Telos) can be stunned/bound then walked under.
Player Character Movement
Bladed Dive
⬥ Bladed Dive is a melee movement ability that can be unlocked from Shattered Worlds for 63M anima.
⬥ It is unique, in that it allows you to specify a tile to move to after casting the ability.
⬥ The maximum range is 10 tiles.
⬥ After the ability is used, the player's final position and facing direction depend on where the click was made. The following image illustrates this:
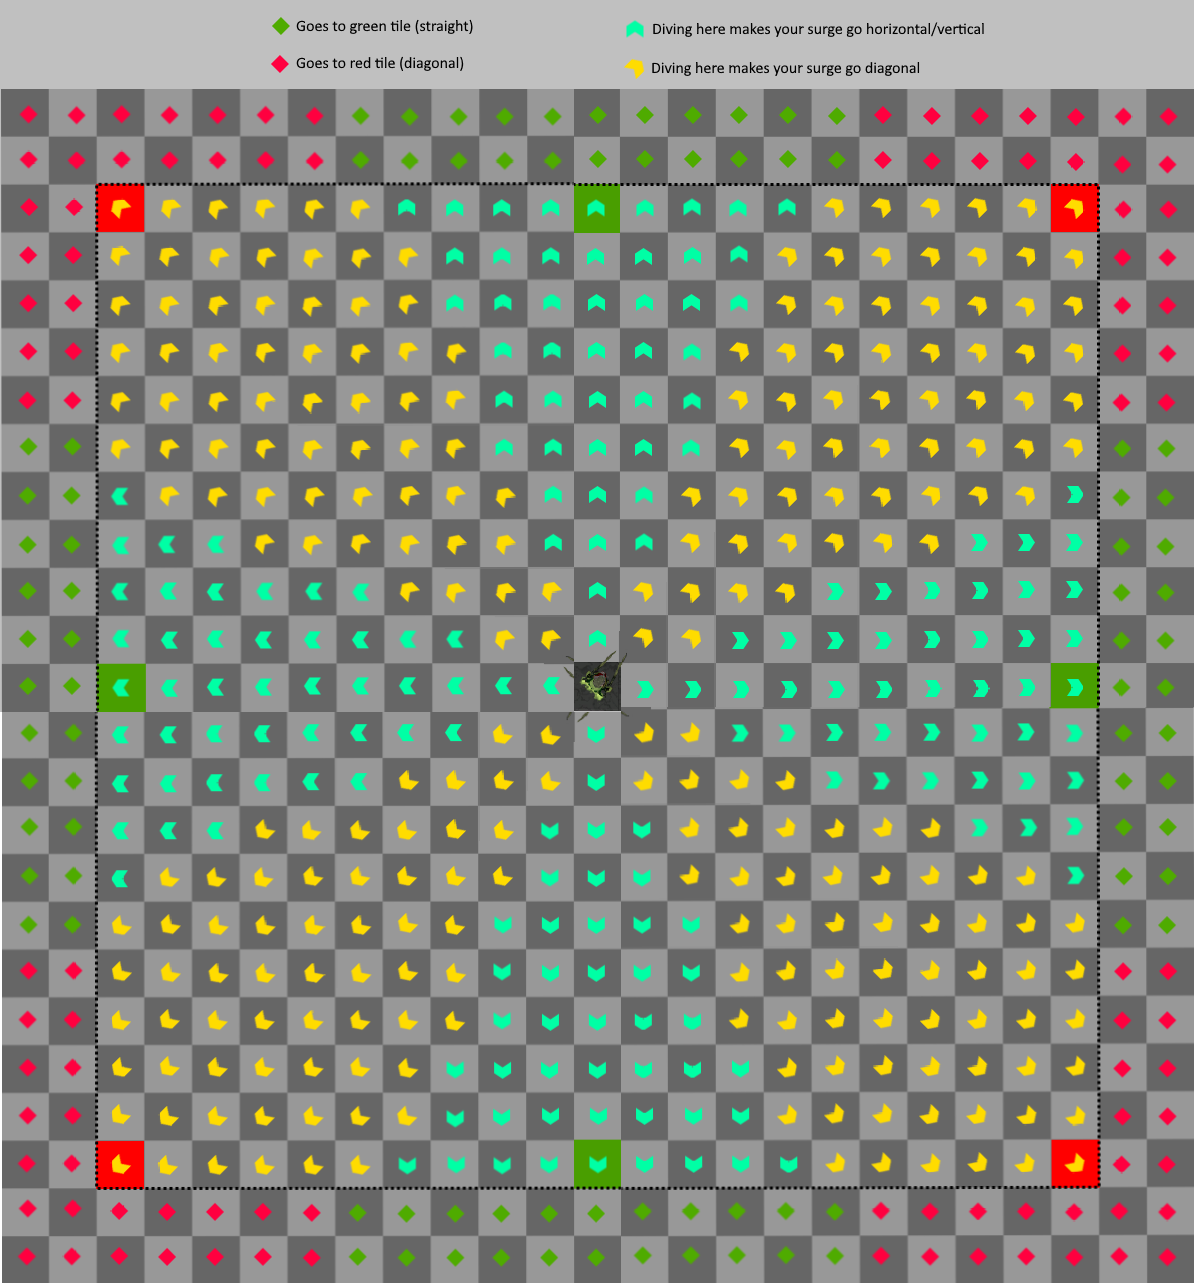
⬥ Note the following in the above image:
• The maximum range of (10 tiles) is indicated by the black border.
• Clicking anywhere within this range will move the player to exactly that tile, and their facing direction will be the same orientation as the arrow within that tile.
• Clicking outside the range will move the player up to 10 tiles along one of the 8 main directions based on where they clicked, indicated by the green and red tiles along the border - this will be where the game tries to move the player to.
⬥ If Surge is used immediately after then it will move the player in the direction they are facing after the landed.
⬥ Additionally, Bladed Dive also does damage.
• Bladed Diving onto a target will attempt to do damage in a 3x3 AoE.
• If a halberd-range weapon is equipped, this is increased to a 5x5 AoE.
• This AoE is centreed on around the player where they land.
Walking Abilities
⬥ Players can move while casting abilities, with some exceptions:
• Generally cannot move while channeling an ability (with some exceptions, see below).
• Queued abilities interrupt movement (see Ability Queueing for a video example).
⬥ Moving during a channeled ability will cancel the ability - this may happen by accident.
• To prevent this, press an auto attack keybind before pressing your channel.
• e.g. pressing → will prevent it from accidentally being cancelled.
• This works because the auto attack attempts to stop your character, even if it's on cooldown.
⬥ The following channeled abilities are exceptions:
• Players can walk during Melee channels ( /
/  /
/  ) on any non-cast tick.
⬩ Cast ticks are ticks 1/3/5/7, so players can move on ticks on ticks 2/4/6/8 and not cancel the channel.
• Players can walk during Rapid Fire  if wearing Fleeting Boots
• Players can walk during Snipe  if wearing
Seren Godbow (SGB) Mechanics 
Note: For a summary of where/when/how to use SGB, and a list of boss sizes use the !sgb command.
How It Works
⬥ The Seren Godbow is a T92 chargebow that has a strong special attack, Crystal Rain.
⬥ The special attack fires 5 arrows that land in a certain area around the target. There are two aspects to this:
• Whether Arrow 1 hits, and how it affects the special attack.
• How the game decides whether Arrows 2-5 hit the target, and how much damage they do.
Arrow 1
⬥ Arrow 1 lands 1 tick before the other arrows, dealing 80-200% ability damage.
⬥ If Arrow 1 hits: damage from the remaining arrows is calculated, and goes on cooldown for 30s.
⬥ If Arrow 1 splashes: all other arrows splash, and can be re-used immediately (no cooldown).
Arrows 2-5+
Note: In most cases, only the first 5 arrows are considered. For exceptions, see Notes below.
⬥ All subsequent arrows scale their maximum damage range based on Arrow 1's minimum hit - see the following table.
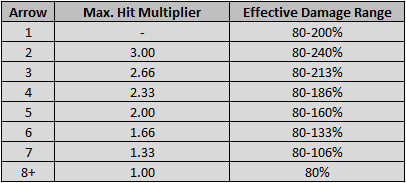 ⬥ Some perks can impact this range:
• Precise  applies its effect to Arrow 1 first, then subsequent damages are calculated using the new minimum.
• Eruptive  applies its effects on the final damage range.
⬥ To decide whether Arrows 2-5 hit the target, the game does the following:
• Step 1: Find NPC centre
⬩ This is the actual NPC centre (middle tile).
⬩ For even-sized NPCs (2x2, 4x4, etc.) this is the SW tile of their middle 2x2 region.
• Step 2: Find starting tile for spec
⬩ Choose a tile that is Floor(NPC Size/2) away from its centre.
⬩ Player must be able to walk to this tile - if no options are acceptable, then use the NPC centre instead.
• Step 3: Choose 4 tiles in a 5x5 square centred at the chosen tile
⬩ Arrows 2-5 will land on these tiles.
⬩ If a tile is already used by a previous arrow, reroll the choice up to 10 times.
• Step 4: Any arrows that overlap with NPC hitbox will do damage.
⬥ This means that the chances that Arrows 2-5 hit the target increase with the size of the target.
• i.e. on bigger targets, the minimum expected damage of increases.
⬥ The following diagram visualizes this process for two example targets, 4x4 and 5x5 in size.
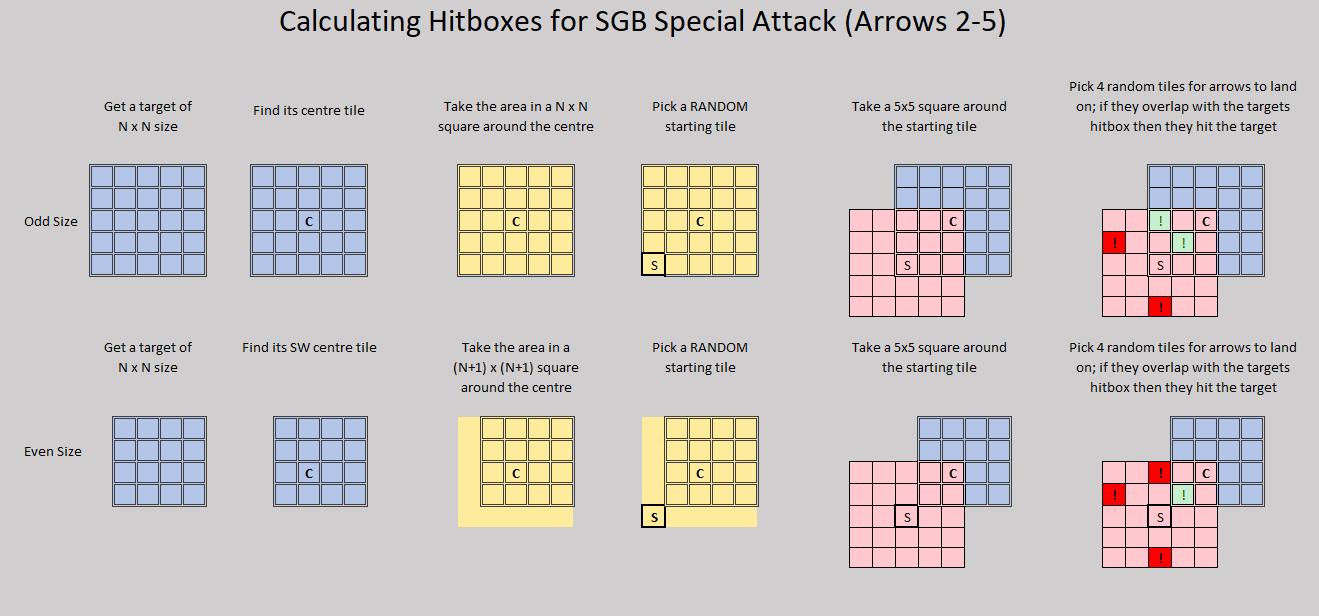 Note: The image is just an example, actual results may vary due to randomness.
⬥ The average number of targets that will hit a given NPC, based on its size is given in the following table:
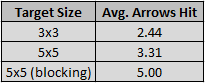
⬥ A general rule of thumb for :
• When Ranging → use on 3⨯3 or bigger targets.
• When off-style → use 5⨯5 or larger targets.
Blocked Targets
⬥ A target is considered 'blocked' when the player is unable to reach it's centre tile.
• e.g. P4 Araxxi
⬥ Any NPC whose size is ≥5x5 and also blocked will always have all arrows from hit, if the first arrow hits.
Notes
⬥ Multi-SGB Hits
• It is possible for multiple to hit a target 'at once'.
• This can happen with chin-sgb ( + ) or if multiple people use at the same time.
• All arrows that land on a target within 2t of Arrow 1 are considered part of the same 'spec', and so will scale down in damage based on the table earlier.
⬥ Arrows 2-5+ roll for critical hits when they are 'cast'.
• i.e. after Arrow 1 lands, or 3t after using .
⬥ If Ingenuity of the Humans is used, it guarantees Arrow 1 to hit.
• This forces Arrows 2-5 to roll for damage, and on a blocked target >5x5 in size, means all 5 arrows will hit.
Target Cycling (TC)
How It Works
⬥ Target cycling is the ability to select a new combat target using a keybind, instead of clicking it.
• This is similar to 'tab-targeting', found in other MOBAs and MMOs.
⬥ Target cycle settings can be found by pressing Esc > Settings > Gameplay > Combat > Targeting.
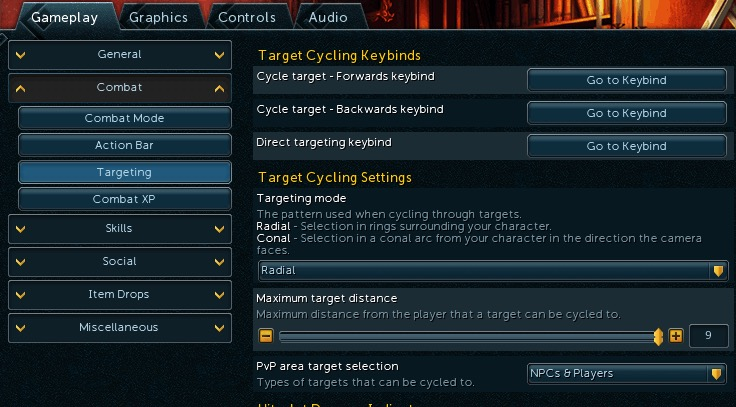
⬥ These settings determine how a target is found when the corresponding keybind (forward or backward) is pressed.
⬥ Radial targeting:
• Cycles from the nearest to the farthest target from the player when pressed.
• In the case of multiple equidistant targets, it will cycle clockwise starting from the north.
• This is useful for simply snapping to the closest target available.
⬥ Conal Targeting:
• Cycles from the closest to the farthest target in the direction the camera is facing.
• The angle for an NPC to be considered eligible for selection is around 75-90°.
• This is most useful for more precise targeting in scenarios with multiple NPCs around.
⬥ The maximum target distance limits the range of available targets to the set value.
Why it is Useful
⬥ Allows for easy target selection with just the press of a keybind.
⬥ Can target some encounters earlier than normal by using target cycling instead of clicking.
• This happens at places like Helwyr or Vindicta, where the boss has spawned but cannot be clicked for a few ticks. Target cycling bypasses this delay.
⬥ It is useful for improving consistency and speed in nearly all boss encounters.
• Being able to target them on the same tick every encounter makes opening rotations at first easier.
⬥ A notable advantage is that you can target cycle to a new target while still charging Detonate without cancelling it.
• This is not possible without target cycle (you would have to release Detonate then select a new target).
Tick System
⬥ RuneScape runs on an internal clock, otherwise known as the 'tick system'.
⬥ This is how often the game updates information. All actions and updates are registered on a tick.
⬥ Each game tick (often just written as 't') is 0.6 seconds long - i.e. 1t = 0.6s.
• For reference, the global cooldown (the time between pressing abilities one after another) is 3t/1.8s long.
⬥ This has enormous impact on virtually all aspects of the game, from movement to abilities used in combat to skilling and everything inbetween.
⬥ One big advantage of the tick system is that even if you have relatively high latency, its impact on the gameplay is not as noticable as in other games like FPS shooters, due to the lengthy in-built tick duration.
Typeless Damage
How It Works
⬥ Typeless damage is a generic damage that appears as a red hitsplat with no symbol next to it. There are two kinds of typeless damage: hard typeless and soft typeless.
⬥ Hard Typeless
• This damage is immune to being affected by almost all damage modifiers.
• Common exceptions include Barricade  and Intercept
  .
.
• Examples include Araxxor's Egg Bomb special attack, Vorago's damage on drop-down or his Red Bomb attacks.
⬥ Soft Typeless
• This damage is affected by most damage modifiers.
• It is also increased by effects like Berserk and Berserker aura variants .
• Examples include Telos' rockfall damage, and Nex: AoD's 'Elements' special attack.
Lossless Heal Other
How It Works
⬥ Heal Other  transfers up to 75% of the caster's current life points to the targeted player as long as the caster has at least 11% of their health.
⬥ To losslessly cast Heal Other (as to not take damage), you need to be in an immune state. Examples of being in an immune state are:
 phase transition (
 (
(⬥ During any of these states, you can cast Heal Other on another player without taking damage.
⬥ This should be utilized when possible to maintain HP without using food/losing adrenaline.
Vengeance
How It Works
⬥ Vengeance  is a Lunar Spell that gives a player the 'Vengeance' buff - the next incoming hit will be rebounded for 75% of its damage.
• It does not prevent damage taken.
• It can be cast every 30 seconds.
⬥ It can reflect up to 8000 damage.
⬥ Group Vengeance  is a variant that applies the effect to the caster and up to 50 players in a 7x7 region centered on the caster.
⬥ Similarly, Vengeance Other  applies the effects of to one other player with accept aid turned on.
Vengeance Interactions
⬥ It cannot damage reflect-immune targets.
⬥ It does not get consumed by typeless damage.
⬥ The following spells/abilities will take priority - Vengeance will not be consumed if they are active:
• Disruption Shield 
• Divert 
• Resonance
• Devotion (assuming correct overhead prayer)
• Barricade
⬥ Vengeance is affected by damage modifiers, and applied at the end.
• Vulnerability and other damage-increasing curses on the target will increase rebounded damage.
• Modifiers that reduce incoming damage will reduce damage since you will take a smaller hit.
⬩ e.g. Reflect / Debilitate  / Intercept
• Modifiers that increase incoming damage will also increase damage as you take a bigger hit
⬩ e.g. Berserker Auras / Berserk
Walking Monsters
Note: Not all targets can be walked (e.g. Ambassador) - this section specifically refers to targets that can be walked.
How It Works
⬥ 'Walking' refers to moving a target from its original position.
⬥ There are two ways to walk targets:
• Move outside its attack range, and it will move to try and attack you.
• Move underneath it, and it will move aside to try and attack you.
⬩ For targets not in MD, movement abilities like Surge and Bladed Dive can be used to get under them losslessly during GCD.
⬥ NPCs can only move in 3 directions when walked under: east, west and south. Never north.
⬥ Bosses will move at 2 squares per tick, just like players running.
Determining Walk Direction
⬥ When walking a target by moving under them, they will first move in a random direction.
⬥ After hitting a wall, monsters will walk in the next cardinal direction counter-clockwise to the direction they are current walking, skipping north. For example:
• Targets moving east will move west after hitting a wall.
• Targets moving west will move south after hitting a wall.
• Targets moving south will move east after hitting a wall.
⬥ If a monster is unable to move in the new direction, it will move in the next counter-clockwise cardinal direction.
• A target walked into the south wall will move west if unable to move east, skipping north.
Why Its Good
⬥ You can walk bosses to position them better for mechanics or to save time.
• e.g. moving Telos out of a beam, or walking Vorago on the waterfall phase to skip mechanics and save time.
⬥ Being able to walk your own bleeds for increased damage is a strong DPS increase.
• Applies to Frag Shot / Combust / Slaughter
Weapon Poison 
How It Works
⬥ Weapon Poison provides provides a buff that allows players to have a 12.5% chance of poisoning a non-immune target every attack.
• Duration of this buff depends on the grade of poison (normal, +, ++, +++) being used.
• After being poisoned targets will take damage every 16t/9.6s, for 3 minutes.
• Poison damage hits 2t after the damage that applied it.
Calculating Poison Damage
⬥ Base poison damage is 20% of ability damage.
• Each tier of weapon poison (+, ++, +++) increases this value by 25% of its base value. Cinderbane gloves  also give an additional 25%.
• The final damage is 65-130% of the total value.
• Unless refreshed, the damage range is reduced by 3% every poison hit.
⬥ Final poison damage averages in terms of ability damage:
• Weapon Poison: 19.5% (1)
• Weapon Poison+: 16.25-32.50% (average 24.36%)
• Weapon Poison++: 19.50-39.00% (average 29.25%)
• Weapon Poison+++: 22.75-45.50% (average 34.13%)
• Cinderbanes+++ 26.00-52.00% (average 39.00%)
⬥ Poison damage is affected by a number of items, covered in the following section.
Poison Interactions
⬥ Cinderbane gloves
• Ignores the 16t poison damage cooldown.
• Gives 1/8 (12.5%) chance per hit to apply poison, doing an extra hit of damage and resetting the 16t damage timer.
• Also gives 1/8 (12.5%) chance for a poison hit to re-apply poison, also resetting the 16t timer.
• Works out to an effective 1/7 (~14.3%) chance of apply poison on any given hit.
• If no poison variant is used, the gloves act as if Weapon Poison+ is used.
⬥ Kwuarm Incense Sticks 
• Per level of potency, will add a multiplicative +2% increase to the final poison damage (up to 10% at potency level 4).
• This therefore stacks with other buffs.
⬥ Bik Arrows 
• Per stack, will add a multiplicative +2% increase to the final poison damage (up to +400% at 200 stacks, or a 5x damage multiplier to poison).
• One arrow is consumed per hit (except bleed hits).
• Stacks last 30 seconds, and vanish entirely if not refreshed within the duration.
• They are recommended to be used at fights that take 3-4 minutes or longer where poison-stacking methods can be utilised.
⬥ Laniakea's Spear 
• Increases the rate of application of poison is by an additive 5%, increasing it from 12.5% → 17.5%.
• After accounting for poison re-applying itself, this gives an effective application rate per hitsplat of ~21.2% (up from ~14.3% with Cinderbanes).
• Also increases poison damage by a multiplicative 5%, similar to Kwuarm Incense Sticks .
⬥ Upgraded Bone Blowpipe 
• Halves poison damage but doubles the number of procs from every 16 ticks → every 8 ticks.
⬩ This effect does halve the damage of poison procs caused by Cinderbane gloves, but does not double its proc chance
• This effectively halves your poison damage if used in combination with Cinderbane gloves.
⬥ Wyvern Crossbow 
• Applies its own "poison" damage separate from normal weapon poison.
⬩ 50% chance per hit to apply a DoT that can stack.
⬩ DoT deals damage 5 times, every 2 ticks, unless refreshed.
⬩ Damage range increases with stacks, from 10-24 per hit → 125-249 per hit.
• The extra hitsplats from the DoT on the target increase the chances for normal poison damage to apply.
⬥ Poison can be applied/refreshed by any player-sourced damage, including:
• All auto-attacks and abilities - including bleeds and DoTs from abilities like / / / / etc.
• Abyssal Parasites
• Bakriminel Bolts (extra hits from Emerald  and Dragonstone
  bolts)
• Blood Necklaces 
• Blood Reaver familiar  (passive effect)
• Dwarf Multicannon (+upgrades) 
• Dominion Mines
• Eldritch Crossbow
• God books and Scriptures 


• Poison Damage (can re-apply itself)
• Puncture bleeds
• Reflect damage
• Wyvern Crossbow (passive effect)
⬥ Self-Healing 


• Poison damage dealt by the player will not heal them through any means.
Poison in Group Encounters
⬥ Global modifiers like Bik arrows or Vuln that are are target-based will affect all poison damage (i.e. sourced from any player).
⬥ Local modifiers (that are player-specific) like Cinderbanes / Wyvern Crossbow / etc. will only affect the hitsplats as a result of that player.
⬥ The single recurring poison hit that occurs on a poisoned target every 9.6s will take its damage based on the last player who applied poison on the target.
Poison Build
⬥ Use !poison to see components of a poison build.