Melee Raksha
Raksha
Introduction
Raksha is a dinosaur dubbed the "Shadow Colossus" located on Anachronia. Raksha can be fought either solo or duo, with linear hp scaling for duo mode. The drop rates for duo are also the same as solo.
Each Raksha kill is worth  3,258,008, with 508,673 of that coming from commons. Advanced players can get up to 20 kph, earning on average 65,160,151 gp/hr.
This guide assumes you are already familiar with Raksha's mechanics, phasing, and attack rotations. If not, please read #raksha-basic.
Melee Strategy
This is an advanced rotation assuming best-in-slot melee gear.
Preset and Relics
Assumptions/Details
⬥ All bleeds are applied using  unless stated otherwise.
⬥ Stalling and releasing (denoted by "s" and "r", respectively) melee abilities below is done by clicking the ability and letting your character run in naturally to release it.
⬥  is used opportunistically in rotations although not explicitly stated.
⬥  are mostly used to dodge swipes.
KPH rotation (No Poolskip)
Use this consistent rotation for standard farming of the boss. If done properly, expect kills around 2:10.
Pre-kill

 →
→  at War's Retreat crystal and get 120% adren.
Phase 1
Enter instance →  → →
→ →  →
→  +
+  + equip
  +
+  → (tc) +
  → 4T
→ 4T  +
+  →
→  → step away s
  → r
→ r →
→  →
→  →
→  →
→  →
→ 
 + → s
+ → s → walk in r → 3-hit
  →
→
Rockfall + Phase 2 + Rockfall
(last tick of ) + walk behind  → →
→ →  → walked
  →
→  → → →
→ → →  → → 3-hit → → →
  + →
+ →
Note: Rocks should be falling during the second of the kill which should be cast on the last tick of . should then by walkable the tick is cast.
Note: If P2 is fast, only do a 2-hit to allow for 3-hit for cooldown reduction.
Phase 3
equip 
 clear pools → equip
  + →
+ →  → → bleed →
  + → + deal with Mind Poison → build
Note: If you managed to maintain stacks during P3, it is advised to during Mind Poison to carry stacks over to P4.
Phase 4
 → + → bleed +
  → → → → + → s → r + → → → → + → s
 → r + → → → +
  → + off
+ quickly collect Anima → →  to area with most Anima → equip + →
  + → bleed + → +
  →
→  +
+
Note: Use as soon as it's off cooldown, usually during . If boss is not dead after , follow up with s → r +
Speeds rotation (Poolskip)
Use this rotation only if going for speeds. You may need to improvise and fill GCDs with good basics if unlucky on adrenaline ( is best under  ). Replace with when if willing to swap to when using and
War's Dummy (closest to portal, max hit mode)
→  for
for  stacks →
 → →
→ →  → → s
→ → s  and go through portal
Instance Dummy
Enter instance and drop  , then run between and
(tc) + r with  using +
  →
→ 
 → → → + if below 118% adren → +
Note: should put you in aggro range and start the fight.
Phase 1
(tc) + → → 4T + + → → → spam ( in between if not enough adrenaline)
Rockfall + Phase 2
upon Rockfall → → → → or or → to end
→ walked → → →  + 2H auto + → build to → → → and/or basics and try to phase with equipped on the last ability
Phase 4
Spam click run right and for a chance to keep stacks post phase transition.
+ → → bleed if high adrenaline → build to  → → → → → → more bleeds if enough time/adrenaline → → → Break shield →
+  + to collect anima → + → + → bleed → → + → →
Old Melee rotation (Pre-Zamorak, no ranged pre-build)
https://img.pvme.io/images/w21tLho.png - Preset, phases 1 and 2
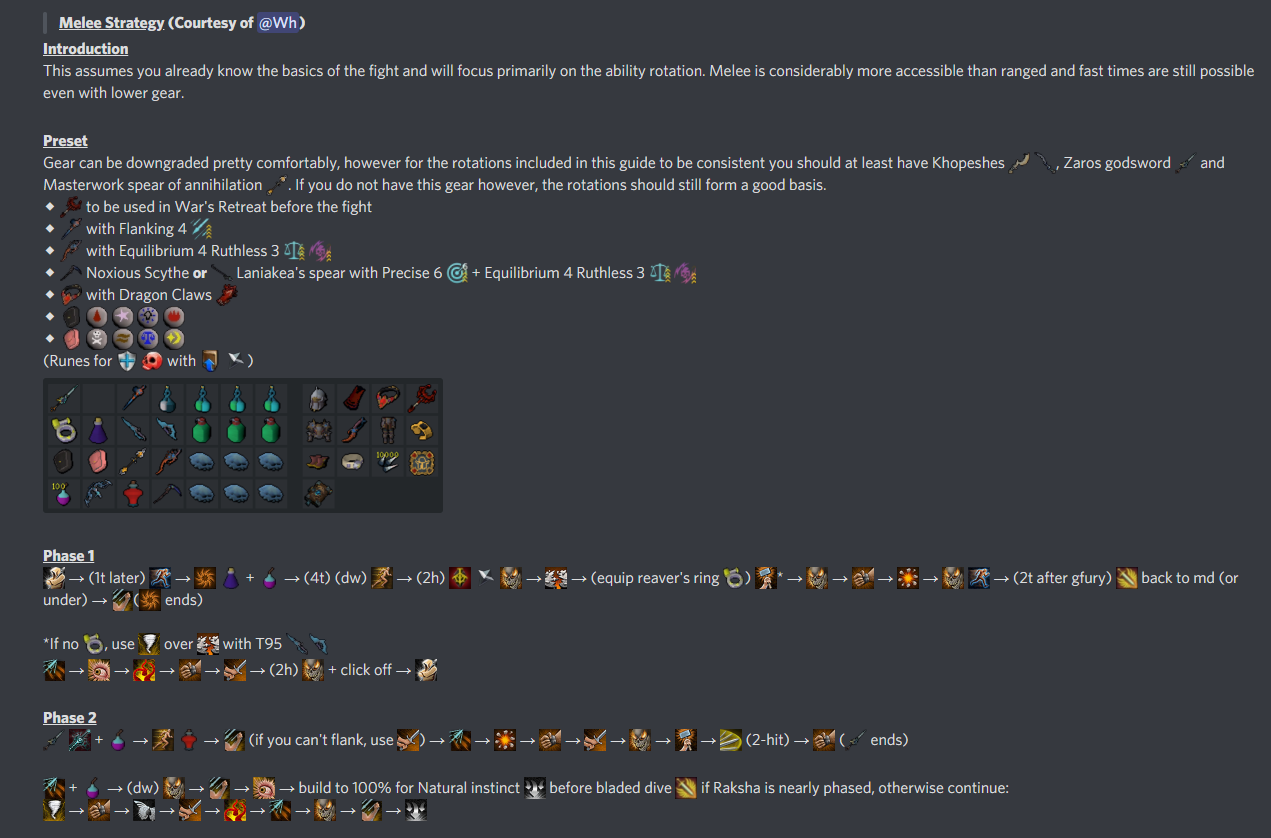
https://img.pvme.io/images/TFcaDau.png - Phases 3 and 4
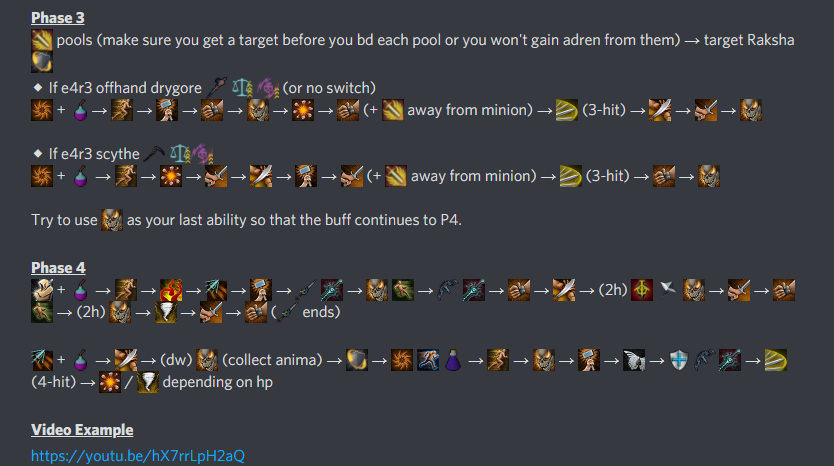
Video Examples
https://youtu.be/BNrLlp5dLUY - 2:07 + 2:09 + 2:10 Standard Kills
https://youtu.be/Ww3IWTvALmU - 1:43 Speed Kill
https://youtu.be/hX7rrLpH2aQ - 2:38 + 2:41 Standard Kills pre-Zamorak