Skip to content

Telos Basic Guide

Basic Guide: Telos

Disclaimer

This guide is made with the idea of getting started at Telos, and does not cover meta strategies, for that refer to #Magic Telos (no FSoA) or #FSOA Magic Telos, or if using other styles visit #Melee Telos and #Ranged Telos (no BOLG) / #BOLG Ranged Telos.

Preset and Relics

Preset Suggestion & Breakdown

Enrage Mechanics

50%: Virus is added on P2 and P3

100%: Phase 5

150%: Telos will freedom stuns and binds with a 50 tick cooldown

200%: Telos HP caps at 600,000 on P1-4

250%: Telos will freedom stuns and binds with a 31 tick cooldown, and P5 will be stun-immunes after freedom for 10 ticks

300%: Telos HP caps at 200,000 on P5

500%: P4 font HP caps at 10,000

1000%: P4 a rock will fall, P5 multiple rocks will fall, immortality no longer works P5, and Telos will freedom stuns and binds with a 16 tick cooldown

⬥ The higher the enrage the stronger the damage Telos and golems deal.
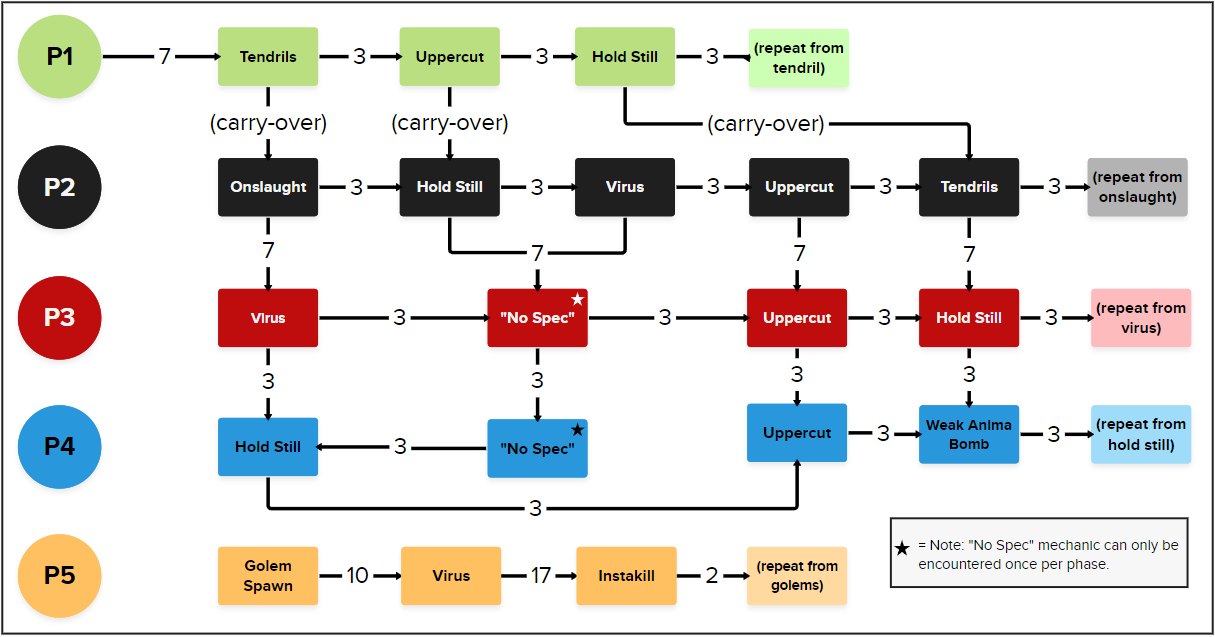
Attack Pattern

This image shows the order of special attacks for each phase. The summary section below only explains newly-encountered ones.

Mechanics Summary

Phase 1
Auto-Attacks
Telos attacks with melee when the player is in melee distance, otherwise magic. If you leave MD, Telos will do one mage auto before walking up to you again.
Tendrils
⬥ Telos binds you in place, drains both your health and adrenaline, and heals himself for every hit the player takes. Example         ⬩ Deal (3,000 + 10 x Enrage) damage to free yourself.
Charge
⬥ Telos charges at the player after a short delay, dealing soft-typeless damage. Example         ⬩ Use surge / escape / dive 1 tick after the text above Telos disappears.         ⬩ Resort to disrupt / res if necessary.
Hold Still
⬥ Telos hits the player with a normal attack followed by a large melee hit that stuns, then jumps to the spot the player was standing on. Example     • The normal attack can be either a melee or a magic hit, depending on how far the player is.         ⬩ anti / freedom beforehand to protect against the stun.         ⬩ res the large melee hit.         ⬩ Move out of the jump radius.
Green Beam
⬥ Spawns at a random location.     • When the player is standing in the beam, they gain rapid adrenaline.     • When Telos is standing in the beam, he attacks 1 tick faster.         ⬩ Phase boss before beam comes out.
Phase 2
Auto-Attacks
Same as phase one: melee when in MD, otherwise mage. Again, if you move away, Telos will do one mage auto then walk back into MD.
Black Beam
⬥ Spawns on Telos.     • When the player is standing in the beam, they deal and take 30% less damage.     • When Telos is standing in the beam, the phase meter charges and he receives 20% less damage.         ⬩ Pull Telos out of the beam and avoid standing in it unless necessary.
Magic Onslaught
⬥ Telos stops moving and fires gradually stronger magic attacks until the phase meter is depleted.     • Move Telos out of the beam before this attack starts so the bar doesn't fill too much.     • If Telos starts this attack while in the beam, block it by standing in it.         ⬩ Use DeflectMage, restort to devo and/or reflect if the meter was charged too much.
Virus
⬥ The player receives a coloured virus that deals constant damage.         ⬩ Stand in the beam to clease the virus.
Phase 3
Auto-Attacks
Telos only attacks with magic throughout this phase.
Red Beam
⬥ Spawns at a random location.     • When the player is standing in the beam, they deal and take 30% increased damage.     • When Telos is standing in the beam, the phase meter charges and he deals 30% increased damage.
Phase Meter and Golems
⬥ Meter naturally decreases. ⬥ Meter increases when Telos is standing in the beam. ⬥ With 1 golem alive, the meter slowly decreases. ⬥ With 2 golems alive, the meter remains stationary (increases and decreases back and fourth). ⬥ With 3 golems alive, the meter increases.
Shockwaves and Drain
⬥ If meter is on the left side → Drain: Telos drains the player's adrenaline and prayer points. Example ⬥ If meter is on the right side → Shockwaves: Rapid, hard hitting soft-typeless attacks. Example         ⬩ Phase Telos before he could use Shockwaves, otherwise resort to reflect
Phase 4
Auto-Attacks
Telos attacks with melee when the player is in melee distance, otherwise magic. Telos will not re-enter MD if you move away from him on P4 after his first attack. ⬥ Phase 4 is split into 4 smaller sections, separated by 3 fonts.     • Deal a quarter of Telos's starting phase HP to phase him into a font.     • Once phased, you lose your target, Telos becomes untargetable, walks up to a font and spawns 3 different-coloured golems.
Golems
⬥ Three different-coloured melee golems spawn at each font. Example     • Red golems attacks are able to stun after their first 3 hits.         ⬩ Utilise anti, resort to freedom if you got stunned.     • Red golems have normal attack range.     • Green and black golems have halberd attack range.
Fonts
⬥ To block Telos's instakill, players must walk up to and charge the fonts with their HP, for a total of 5 hits while dealing with golems. Example         ⬩ Utilise res + reflect to reduce damage taken from fonts.         ⬩ Relevant defensives do NOT work on the last hit of fonts.         ⬩ Once the instakill is negated, all of your defensive abilities get placed on a 6s cooldown.
Font 3
⬥ Wrap around the center of the room and wait for the three golems to spawn.     • When the golems reach you, (tc) furthest golem → ent + corruptblast + surge         ⬩ See example here     • Chrage the font and phase Telos into P5.
Weak Anima Bomb
⬥ Telos fires a slow moving orb that deals soft-typeless damage. Example     • The player's overload timer is constantly drained after getting hit until cleansed.         ⬩ Ideally skip the mechanic, otherwise block using res / disrupt         ⬩ Cleanse the overload debuff by stepping into one of the fonts.
So Much Power (SMP)
⬥ Once phase meter is filled, the next special attack is replaced by an SMP. Example ⬥ Telos fires a deadly soft-typeless attack paired with a normal attack (much like Hold Still).         ⬩ Ideally skip the mechanic, otherwise block with disrupt or res
Phase 5
Auto-Attacks
Telos only attacks with magic throughout this phase. Note: Telos attacks 1 tick faster if green beam is not blocked by the player.
Strategy
⬥ Telos spawns 6 similar-colored minions at the start of the phase. ⬥ Make your way to the green beam.     • Lure golems properly.         ⬩ To do this, always start by going to the left beam.         ⬩ If side beams → enter the 2nd tile in the green beam.         ⬩ If back beam → enter the 4th tile in the beam.
Rock
⬥ A single rock falls at certain times during the phase.         ⬩ Utilise vitality + reflect
Virus
⬥ The player receives a random-coloured virus that deals constant damage.     • To cleanse the virus stand in the beam of the same colour.         ⬩ Utilise reflect/debil +surge / dive
Phase Meter
⬥ Gradually fills up     • Once filled, Telos begins charging an instakill attack and receives heavily reduced damage. Example         ⬩ Ideally kill before he can use this mechanic, otherwise immort

Stunning Guide

Mage has access to 3 different stun abilities:

impact Stuns for 1 GCD (3ticks/1.8s)

deep Stuns for 1 GCD + 2 ticks (5ticks/3s)

asphyx Stuns for the first 3 hits. (5ticks/3s)

‎ ‎ ‎ ‎• Chain these abilities however you see fit when stunning Telos.

‎ ‎ ‎ ‎• If not 4-ticking with mage, ideally leave deep for last.

Basic Rotations

Note: vulnbomb Telos at the start of each phase.

Phase 1

surge towards Telos → sunshinegconcswh spec / gstaff eofspecicebarrage freedom

⬥ Aim to fit:

‎ ‎ ‎ ‎• asphyx + impact + deep

‎ ‎ ‎ ‎• wm

⬥ Use deto + gstaff eofspec to break Tendrils.

Phase 2

⬥ Utilise corruptblast + walked comb

⬥ Utilise stuns; asphyx impact deep

gconc + wm + gstaff eofspec

Phase 3

⬥ Aim to start with ~85%+ adrenaline.

‎ ‎ ‎ ‎• meta → basics (utilise corruptblast + comb)

‎ ‎ ‎ ‎• Get in beam → limitlesswm + asphyx before drain mechanic.

OR

⬥ Start with high adrenaline → build to 100% → enter beam → onsl

Phase 4

To deal with Telos's SMP, ideally phase him into a font with 2 or 3 auto-attacks remaining before the next special.

⬥ Make use of adrenrenewal

⬥ Make sure to swh spec / gstaff eofspec before first font.

Font 1

⬥ Target and kill red golem while charging font.

‎ ‎ ‎ ‎• Utilise reflect

⬥ Finish killing golems while dealing with Telos's special attacks.

⬥ Phase Telos into next font, utilise stuns.

Font 2

⬥ Target and kill red golem while charging font.

‎ ‎ ‎ ‎• Utilise reflect

⬥ Finish killing golems while dealing with Telos's special attacks.

⬥ Phase Telos into next font, utilise stuns.

Font 3

⬥ Stick to the wall of the middle of the room and wait for the golems to reach you.

⬥ Target the farthest golem → SBSent + corruptblast + surge

‎ ‎ ‎ ‎• See example here: https://img.pvme.io/images/dyeeCcK.mp4

⬥ Charge font

‎ ‎ ‎ ‎• Utilise res + reflect

⬥ Phase Telos into phase 5.

Phase 5

Note: for more information on timing & moving efficiently throughout P5, read: #P5 Movement & Timing

⬥ Always start by making your way to left beam.

⬥ You will be under heavy damage so spamming food after sunshine is expected.

⬥ Always start with corruptblast + dbreath as your first two abilities.

⬥ Use DeflectMelee while stunning Telos.

Side Beams

⬥ Enter second tile of the green beam.

sunshine → (anti if red golems) → limitless → (3hit) asphyxdeep

vitality + reflect rock.

⬥ Walk melee distance to Telos → (freedom if red golems) → (tc) middle golems → deto tsunami

debil and clear virus when it comes out.

‎ ‎ ‎ ‎• Utilise surge / dive

Back Beam

⬥ Use impact + deep before reaching beam.

⬥ Enter fourth tile of the green beam.

sunshine → (anti if red golems) → limitless → (2hit) asphyx

reflect + vitality rock

⬥ (freedom if red golems) → (tc) middle golems → deto tsunami

impact + deep before virus.

debil and clear virus when it comes out.

‎ ‎ ‎ ‎• Utilise surge / dive

Example Kills

Full kill: https://youtu.be/jeZnAP4kNb8