Solo Hard Mode Kerapac (Non BIS)
Kerapac, the Bound Solo (Non-BIS)

Introduction
This guide assumes you are already familar with the basic mechanics of Kerapac which can be seen here #kerapac-hm-basic but lack  if using
  or
or  and
and  if using
It is highly recommended to have a Nodon dragonkin slayer task  as the helmet boost does work. You may also use the Premier Artefact
  to have a 10% chance to not decrease the slayer task count with each kill.
Magic - no FSOA
Zamorak Staff  can be used instead of Guthix Staff as you will not be having any hitchance issues during the fight and it lowers Kerapac's magic level and applies a 1-minute accuracy debuff making it less likely for him to hit you. It also does the same damage and has the same adrenaline cost along with a cheap cost to purchase.
Note: Assumes all  are targeted (
 ) and clicked on ground. If not owned, replace with
  or
or  as you see fit.
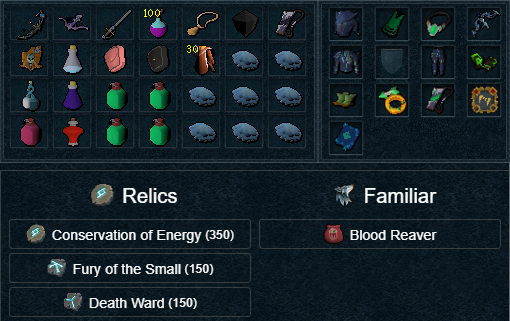
Preset and Relics
Phase 1
⬥ Look at text that appears above the spot where  is going to jump,
  when it disappears
+  → (
→ ( ) (tc)
 → (or
→ (or  if its up from previous kill) →
 → (swap to
  ) →
) →  → (walk under)
  (4-hit) → →
  → → →
→ → →  → → → → (dodge jump with
  /
/  /
/  ) → → → → → if high hp OR / basics if is low enough to phase (save for p2 if available)
Phase 1 to Phase 2 Transition
→  (release when attackable / lifts empty arm) ( instead of if below 80% adren) →
Phase 2
→ →  walk → → (wait 2t)
  → (wait 1t) → →
  → (3-hit) → → → → → → (3t) → (swap to ) (4-hit) → → (dodge jump with / / ) (swap to ) → → (dodge jump with / / ) → → if high hp OR / basics if is low enough to phase → improv to phase end
Phase 2 to Phase 3 Transition
→ (3t) (DW) + → (wait 1t) + OH (can swap autocast to for 1 ability here for extra crit chance from proccing it, then swap back to autocast after) →
Phase 3
(3t) → / → improv basics / thresholds / depending on crit rng (should aim to get most of the time, can get , , and in time warp if lucky) (do not 4TAA during to fit in more abils) → (walk under ) best non-channeled basic → → → → → (4-hit) → → improv (aim to be 80%+ adren end of p3)
Phase 3 to Phase 4 Transition
(pre) + (pre)  Echo 1 →
Phase 4
⬥ Echo 1:
Enter Echo (with DW as entering it makes you and you want to after) → / good basic + keep running to middle spot between 2 clones → → → → (3-hit) → →
Note: If is ≤10k HP after you can safely get on Echo 2 as Ripper should finish Echo 1 if using default familiar targetting
Note: Switch to your  if worried about death.
⬥ Echo 2
→ → (4-hit) → () → ( if low enough to finish) →
Note: Make sure to FULLY heal during this Echo, else you will struggle to survive 3rd Echo
⬥ Echo 3
diagonally from your 1st to between and 3rd Echo → → + → → / /  /
/  → (swap to ) →
  → → (wait 2t) → (wait 1t) → finish with basic if needed
⬥ last 200k
→ → → → → → improv to finish
Example Kills
https://youtu.be/EgWv9plfd1o 3:33, 3:33 and 3:39
Ranged - no ECB no BOLG
Introduction
This strategy involves building Bik arrow  stacks quickly and maximising the amount of hitsplats dealt to Kerapac; 3:4X kills are possible on task while SGB camping.
Preset and Relics
Notes
⬥ The following items are required for this strategy to work:
• Seren Godbow  > Noxious Longbow
  - can use Bik arrows with both.
• Cinderbanes  - increases poison damage output.
• Scripture of Wen  - extra hits from activation can proc poison damage.
• Vampyrism  - synergises with Blood Reaver.
• Limitless - required for rotations given below.
• Weapon Poison  - the fundamental part of the poison build.
• Black crystal (reduced healing)  - to delay reaching max hp for more healing opportunities (obtained from Morvran's Slayer challenge).
• Blood Reaver  with
with  and autofire set to 0
⬥ The following items are recommended but not required:
• Hexhunter bow  for P4 clones only - optional, if you own it.
• Wyvern crossbow  for P4 Kerapac - use with Emerald Bakriminel Bolts (e)
  since Bik arrow stacks will be capped at that point.
• Greater Death's Swiftness  - use a Planted Feet
  switch if not owned.
• Dreadnips  - they don't proc poison but the poison special attack is boosted by Bik arrows.
• Runes for  and - some free additional damage.
⬥ Bik arrow stacks will clear after 30s if not re-applied - remember this for phase 4.
Overview
⬥ For slams use during GCD or run away if channeling 
⬥ Optional - use stalled Incendiary Shot  on War's dummy to make P1 smoother
• If not pre- ing, expect fewer P1 lightning skips
• After releasing , rush inside instance and ensure to not drop combat
⬥ Do not and on the same tick
• Only after seeing the icon on buff bar.
⬥ P1-P3 camp  , P4 depends on point of phase:
• P4 clones: either camp  or flick
• P4 Kerapac: flick
Phase 1
⬥ +  when text above where is going to jump disappears
⬥ Use + as starts raising his head
⬥ If using , replace the two  with a basic and
  if adrenaline permits
⬥ If unlucky with crits, replace  with a basic if no adrenaline
+ → + + →  → →
→ →  → → →
→ → →  →
→  → →
→ →  walk →
  → → → → → → → → → → → → (→ if has > 75k hp) → basics until phased
⬥ While phasing use: basic → / basic →  / basic based on cooldowns
Phase 2
⬥ During Phase 2 and Phase 3 some improv will be needed based on DPM and cooldowns
⬥ During the goal is to use + + + whilst / are used only if adrenaline is needed
⬥ After the goal is to fit in as many strong basics ( / / ) while using + + + +
⬥ If P1 lightning was skipped:
→ walk → → basics until comes off cooldown → → (wait 1t) → → + → → (timewarp ends during ) → → → → → → → → → → → basics until phased
⬥ If P1 lightning wasn't skipped:
→ (wait 1t) → → + (→ if not enough adren for ) → (timewarp ends during ) → → walk → → → → → → → walk → → → basics until phased
⬥ While phasing use: basic → → (wait 1t) → /
Phase 3
⬥ During the goal is to use + + + whilst / are used only if adrenaline is needed
⬥ After the goal is to fit in as many strong basics ( / / ) while using + + +
⬥  to have 7 stacks going into P4
⬥ If is 60-70k HP when starting a slam, tank it and phase him
+ → → (timewarp ends during ) → → → walk → → → → → → → walk → → → basics until phased
⬥ While phasing: East towards → basic to ensure you won't lose stacks. After tagging Kerapac swap to and equip (+ if brought)
Phase 4
⬥ Eat up to high HP during North clone by spamming food and spec
⬥ Equip after killing all clones (if brought)
⬥ For South clone: in between the clone and but then run closer to to ensure you get bleed damage from
⬥ For safety can use instead of during on the last clone
Enter West clone + + → → → (wait 1t) + → Enter South clone + + +  → → → Enter West clone + + → (timewarp ends during ) → → Target North clone + + → → towards Kerapac + basic → Target North clone + + back inside → → → → → finish off North clone with basics if needed → finish off West clone with basics if needed → between and South clone
Target South clone and use basics until 91%+ adrenaline and is off cooldown → Target → basic → → (Wait 1t) → Target South clone + → → → (timewarp ends during ) → → → → → basics / until dead
Example Kills
https://youtu.be/UstSn2sPvFY 3:37 and 3:41
⬥ 1st kill features P1 lightning skip whilst 2nd one does not.