Yakamaru
Yakamaru

Introduction
Yakamaru is the second boss in the Liberation of Mazcab raid, with up to 10 players in a single encounter. While the fight itself does have many mechanics and sections that require coordination between players, with just a little knowledge and practice and communication between your teammates, it can become a relatively smooth and fun boss encounter.
This guide aims to cover the basic mechanics of Yakamaru, and cover some of strategies, tips and tricks that will help you get your first kills and beyond. As this is a mechanically intensive group fight with a longer guide, it is broken into a few sections (all linked in the Table of Contents) for easier navigation:
⬥ To see what roles there are and what each one does, see Roles at Yakamaru.
⬥ To learn about Yakamaru's attacks and pool mechanics, see Auto Attacks, Special Attacks and Pool Mechanics.
⬥ See Fight Overview for a brief description of the fight, and Fight Phases for more in-depth information.
Drops
⬥ Teci 
• Always dropped.
⬥ Yakamaru's Helmet 
• 1/300 (60 threshold).
⬥ Mazcab Ability Codex 
• See below.
⬥ Achto Primeval  / Achto Teralith
  / Achto Tempest
• See below.
Preset and relics
Given that Yakamaru is a fairly advanced boss and that its a group boss, it is reasonable (and ideal) to have a sufficient level of gear before attempting the boss. This helps both make the fight easier and make it easier for you to get into teams.
A guideline set of recommendations might this include:
⬥ T80+ power armour + T90+ weapons, perked with Starter Perks from #perks
⬥ 95+ Prayer  for curses


⬥ 99+ Herblore  for overloads

⬥ Berserker auras 


As always, feel free to adjust the presets according to what you have available.

Standard Preset Notes
⬥ Prefer a DPS familiar like 
 or
or 
 , but if required, use a Hellhound
 or Reaver
 for better survivability.
• See !familiar and !yak for more info.
⬥ Melee is not very learner-friendly, and without sufficient gear will lack DPS compared to other styles - avoid it if you are a learner, or if a low budget.
⬥ As Melee, The Zaros Godsword spec 
 can be used on alternate pools when Berserk
  is on cooldown to increase DPS.
⬥ As melee, you can Hammer 
 without requiring Ingenuity of the Humans
  - this may be useful.
Tank Preset Notes
⬥ This preset is built around survivability - the most important thing as a tank is to stay alive - a Reaver autofiring its scrolls with a short delay can be a signfiicant source of sustain.
• Remember to use Prism of Restoration  to prevent it from dying.
• If this is not sufficient, or you have difficulties using it, a BoB  can be an alternative.
⬥ Raids armour defensive resets can make tanking a lot easier, alternatively Seasingers  , Ganodermic
  etc. will also benefit from using Animate Dead
  if not owned.
⬥ Once you are more comfortable tanking, you can switch to power armour and reduce/avoid shield-camping.
Fight Overview
⬥ Yakamaru is the second boss in Liberation of Mazcab raid, fought after Beastmaster Durzag is killed, and the puzzle section afterwards is completed.
⬥ The loot lock can be reset every 2 days at reset (00:00 UTC), but the boss can be fought more often for KC.
• This gives no loot, but does give chance at pet drops.
⬥ Yakamaru fight takes place at the Mazcab beach, where there are 5 pools located.
⬥ The arena looks like the following:

⬥ The fight consists of two phases:
• Pools phase - Yakamaru jumps between different pools using different mechanics and must be killed in each one.
• Mirage phase - After killing it once in each pool, Yakamaru spawns in all pools simultaneously and must be killed in all the pools and 'closed' permanently, to finish the fight.
⬥ During the pools phase, there will be a special mechanic for each pool - this is covered in the Pool Mechanics section.
⬥ Yakamaru attacks with auto attacks (Range if out of MD, Magic if in MD) and special attacks.
• The default attack cycle uses a number of auto attacks followed by a special attack, and then repeats.
• The number of autos varies from pool to pool.
• The attack cycle starts at a random point in the cycle (i.e. Yakamaru could begin with a spec, and then continue from there.)
Roles at Yakamaru
As it is a group fight, a number of players are assigned roles to make the encounter smoother and faster. Here we cover what they are and their basic responsibilities.
Note: A single player can have more than 1 role, depending on what roles they take.
Base Tank / Base
⬥ Primary tasks
• Tank Yakamaru during each pool until Mirage phase.
• Tank Tendrils pool during Mirage phase until it is dead.
⬥ Other tasks
• Avoid standing near other players, allow them to flank the boss.
• Do not die - prioritise staying alive even at the expense of DPS.
⬥ Notable info
• Yakamaru's enrage mechanic affects the base - they will take the most damage during the fight.
• This role can help do more DPS on faster teams, or go full tank/shield camp route. This depends on the player and expected killtimes for the team. If in doubt - focus on surviving.
Poison Tank / PT
⬥ Primary tasks
• Stand on the correct tile and absorb the poison that Yakamaru spawns after each pool reaches 100k HP left.
• Move into MD of Yakamaru after absorbing poison, then help defeat the pool.
⬥ Notable info
• The tile the poison will land on looks is indicated by green arrows.
• There is no poison to absorb during Mirage phase - only during the first phase with the 4 pools.
• Bladed Dive  helps get to the poison ASAP, and Barge
  can be used to get into MD quickly and consistently.
• Teams will typically assign a Double role - if the first pool is not Stun pool, then the Double will absorb the poison required for stun pool during the sand pool's poison.
⬩ This is to save time and lower chances of failing poison on Stun pool as it can die very quickly.
⬩ If this happens, the Poison Tank only ends up absorbing 3 sets of poison instead of 4.
• After a successful pool, the PT will be washed up on the beach near the south. The CPR role is expected to revive the player in time.
North Tank / NT
⬥ Primary tasks
• Tank Sand pool (and also usually Stun pool) during Mirage phase until the other 3 pools are dead.
⬩ Stand north of the pool when tanking it.
⬩ To aggro both pools: tag Sand pool, then use  on Stun pool.
⬥ Notable info
• Sand pool is almost always the last to die during Mirage phase - on slower teams, this can be a tank test. Use defensives if you have to.
• Jellies may spawn while tanking the pool - dodge them and let the Jelly Wranger handle them, or freeze/stun them and move away.
CPR
⬥ Primary tasks
• Click on the washed-up player on the beach after each pool to prevent them being instakilled.
⬥ Notable info
• Once Mirage phase starts, there are no more players to revive.
Double
⬥ Primary tasks
• Absorb poison on the Sand pool and take the place of the Poison Tank during Stun pool instead.
⬩ The Double will stand on the same tile as the Poison Tank during the Sand pool to do this.
⬥ Notable info
• Stand in MD of the Stun pool the entire time. This is because the Stun pool dies very quickly.
• If Stun pool is the first pool, this role has no responsibilities.
• Be sure to bring extra food to compensate for the extra damage taken, especially on slower teams.
Main Stun
⬥ Primary tasks
• Stun Yakamaru at the appropriate time during the Stun pool, when his damage reduction is too high.
• If all stuns miss, call for a backup stun from another player.
⬥ Notable info
• Ingenuity of the Humans can guarantee a stun without splashing, if you don't have high hitchance.
• Do NOT accidentally kill the team by stunning too early or multiple times.
• A correctly timed stun will only deal 1000 damage to all players, which can rise up to 5000 damage if stunned too early (stun when Yakamaru's health begins to drop very slowly).
• It is preferred to use non-channeled abilities to stun.
• On newer/inexperienced teams, a warning that you are about to stun may let players eat up before stunning.
Stun 0 / ST0
⬥ Primary tasks
• On Mirage phase, help kill the Stun pool first ASAP.
• Then help kill the other pools in order (Shark > Tendrils > Sand).
⬥ Notable info
• This role may not always be assigned, especially on more experienced teams where two Stun 5 roles are sufficient.
• If a Stun 5 role dies, you can easily take their place.
• Do not randomly use stuns during Mirage phase.
Stun 5 / ST5
⬥ Primary tasks
• Kill the Stun pool ASAP after Mirage phase starts and use 5 planks on it by clicking on the pool.
• Then help kill the other pools in order (Shark > Tendrils > Sand).
⬥ Notable info
• Use your strongest abilities to burst the pool down.
• Pick up your planks before Mirage phase starts to make it easier and prevent issues.
• Do not randomly use stuns during Mirage phase.
• The pool only needs to be tanked for a short amount of time as it dies quickly.
Shark 10 / SH10
⬥ Primary tasks
• Tank the Shark pool during Mirage phase, and use 10 planks on it by clicking the pool after it dies.
⬥ Notable info
• Stand behind the Shark pool to prevent other players from getting enrage stacks.
• Pick up your planks before Mirage phase starts to make it easier and prevent issues (area loot can help).
• If inventory space is an issue, ask another player to help with planks when assigning roles.
• Be sure to bring extra food to compensate for the extra damage taken, especially on slower teams. Defensives 


 are useful to mitigate damage.
• Setting up an Ultimate ability  / /
/ /  before Mirage phase starts can help make this a lot quicker.
Jelly Wrangler / JW
⬥ Primary tasks
• Quickly tag and aggro all Jellyfish spawned during Mirage phase and keep them away from other players.
• Keep Jellyfish alive after tagging them.
⬥ Notable info
• Yakamaru will not attack the Jelly Wrangler if they are attacking Jellies, so praying against Melee  works.
• A maximum of 10 Jellyfish may be alive at once, so avoid killing them.
• If JW moves too far away, Jellies will lose aggro, so be careful with  /
/ 
• Use of Ice Barrage  or Entangle
  can help, as well as the Provoke ability to gain aggro.
• Keep moving around to avoid being surrounded by jellies. Defensives are useful to mitigate damage.
Auto-attacks
⬥ Yakamaru uses AoE auto attacks, and the attack style changes based on location:
• Within halberd range (≤2 tiles): Magic attacks
• Outside halberd range (≥3 tiles): Ranged attacks
⬥ Yakamaru has 100% hitchance on all auto attacks.
• Attacks that 'miss' deal 50% damage instead.
⬥ Each auto-attack on the primary target (base) applies 1 enrage stack ('Drenched' debuff).
• This also applies to any player within 7 tiles of the base.
• Each stack increases damage taken by +20% additively.
• Using Freedom  halves the number of stacks.
Jellyfish
⬥ Yakamaru spawns Jellyfish of different colours during the fight.
⬥ There are 6 different types of Jellyfish:
• Normal/Orange: deals melee damage and spawns as part of Yakamaru's 'Jellyfish Spawn' special attack (see Special Attacks).
• Durable: heals other neaby Jellies and Yakamaru while alive.
• Magical: deals Magic damage.
• Meleefish: deals Melee damage.
• Piercing: deals Range damage.
• Reflecting: causes all other Jellies to take less damage, and reflect damage taken onto players - these will die on their own.
⬥ Except before Sand Pool and Mirage, first phase Yakamark in the center pool, then kill the colorful jellies.
Special Attacks
The following 2 special attacks are generic and common to all pools.
Pool-specific special attacks are covered in the Pool Mechanics section.
Jellyfish Spawn
 ⬥ Yakamaru spawns one orange jellyfish and 5 'cracks' on the floor.
⬥ The jellyfish should be killed ASAP as it deals high AoE melee damag.
⬥ Standing on the cracks will shortly deal 10000 damage to the jellyfish, but also deal 1500-2000 Magic damage to the player.
• Defensives  will mitigate this.
⬥ Stuns/binds (like ) are useful here.
Blue
 ⬥ This attack is typically referred to as 'blue'.
⬥ A random player will be turned blue (similar to the Metamorphosis  ability) and take up to 4 increasing typeless damage hits (1500 → 2500 → 3500 → 4500).
⬥ Standing next to someone else will pass the effect to them with no damage taken.
⬥ Passing it to other players is the recommended way of dealing with it. Otherwise, just spam eat.
Note: If this occurs during mirage phase, it will deal a single hit of 2000 damage, so avoid panicking and running around should it occur to you.
Pool Mechanics
Here we go over what each pool at Yakamaru does and how to deal with them. Then we cover the actual fight in the Fight Phases section.
Tendrils Pool (south-most)
 ⬥ Yakamaru gains access to two new special attacks (both used at the same time):
• Choking Tendrils: Yakamaru chokes top 5 DPS, dealing increasing damage per tick. Players must free themselves by doing damage.
• Damage Tendrils: Summons a large pile of tendrils on Yakamaru's current target that hit 2000 damage per tick for several ticks. Players should move away or use Barricade / Immort  to deal with it.
⬥ Attack cycle for this pool is as follows:
• 4 autos → Jellyfish → 4 autos → Blue → 4 autos → Tendrils → repeat
⬥ Let the base tag the pool first - prevents the Damage Tendrils randomly spawning on the DPS pile.
⬥ If poison tank gets choked when poison spawns.
• Someone else can get it.
⬥ This pool is relatively straightforward - just avoid the tendrils and it'll go smoothly.
Shark Pool (south-west)
 ⬥ Yakamaru gains access to one new special attack:
• Sharknado: Yakamaru spins in a whirlpool and throws out sharks on the floor randomly, which explode for 2k damage each.
⬥ Attack cycle for this pool is as follows:
• 4 autos → Jellyfish → 4 autos → Blue → 4 autos → Sharknado → repeat
⬥ Sharks can be clicked to kick them away, or simply move away from them.
⬥ The sharks spawned are blocking - be careful of getting stuck!
⬥ The poison tank should be careful and use Barricade if necessary, if Sharknado occurs during the last 100k HP.
• This can also be helpful when basing or getting hit by multiple sharks.
⬥ Note that sharks will follow the player while being thrown out - move away from the sharks after they have landed.
⬥ A Jellyfish will spawn
⬥ This pool is relatively straightforward - just avoid the shark spawns and it'll go somothly.
Sand Pool **(north-west)
 ⬥ Yakamaru gains access to one new special attack:
• Sand: All but 1-2 players are 'sanded'/stuck and cannot move. Players not stuck must rescue others by clicking on them. If not freed in time, they are instakilled.
⬥ Attack cycle for this pool is as follows:
• 4 autos → Blue → 4 autos → Jelly → 4 autos → Sand → repeat
⬥ Players can continue to eat, attack targets, etc. while sanded, but cannot move.
⬥ If Yakamaru is about to sand, delay phasing it to 100k HP to ensure the Poison Tank does not get stuck and miss poison.
⬥ One person should go and free the base ASAP as they are usually stuck further away.
⬥ As long as players don't panic, and click on each other to be freed, this pool can be finished quickly. Just don't miss the poison.
Stun Pool (north-most)
Note: If using Revo/Revo++, remove all stuns from your bar!
 ⬥ Yakamaru gains access to two new mechanics:
• Defence Gain: Yakamaru takes reduced damage as players continue to attack him. This must be reset by stunning him.
• Stun Reflect Damage: When Yakamaru is stunned, he reflects 1000-5000 typeless damage to all players on the team.
⬥ Attack cycle for this pool is as follows:
• 6 autos → Blue → 7 autos → Jelly → repeat
⬥ The damage from stunning The higher his damage reduction, the less the reflected damage.
• In other words, don't stun him more than once quickly.
• Multi-hit abilities like Asphyxiate  / Destroy
  will almost certainly wipe your team.
⬥ Damage ranges from 1000 (lowest) to 5000 (highest).
⬥ Yakamaru takes increased damage this pool, and poison can be easily missed.
• Assigning a Double to take double poison on Sand pool is strongly recommended.
⬥ The following count as stuns:
• Impact  / Deep Impact
  / Asphyxiate / Shock
  / Horror
• Binding Shot  / Tight Bindings
  / Rout
  / Demoralise
• Backhand  / F. Backhand
  / Destroy / Stomp
  / Kick
⬥ The following do not count as stuns:
• Rapid Fire 
• (Greater) Barge  /
/
• Ice Spells
• Dreadnips 
• Dominion Gloves 


Fight Phases
In this section we go over how the fight flows, general recommendations/rotations for DPS, and so on. It is broadly broken up into two phases: pools phase (i.e. before mirage) and mirage phase.
Phase 1 - Pools
⬥ Start the fight. Yakamaru will start in the middle pool.
⬥ Reduce Yakamaru's health in the center pool to 800k using thresholds, making him randomly choose the first pool to jump to.
⬥ Fight Yakamaru in the new pool and reduce his health to 100k:
• If your ultimate / / is available you can use it, assuming you're not saving it for anything else.
• If cannot ult (due to cooldown or adren issues), use thresholds/strong specs to help phase.
• When he does special attacks, or spawns jellies, deal with them if needed before attacking Yakamaru again.
⬥ At 100k health left, Yakamaru spawns a 'poison' that a player must absorb and then stand in MD of Yakamaru, then players will finish off Yakamaru to 0 HP.
• If this is missed, the pool will not advance and must be re-completed.
⬥ Yakamaru will jump back to the middle pool. Phase the middle pool (200k damage) while Yakamaru is still green, then focus on Jellies.
• Place dominion mines if you brought them at this point to help with the Jellies.
⬥ The following image shows where roughly where to stand during pools:
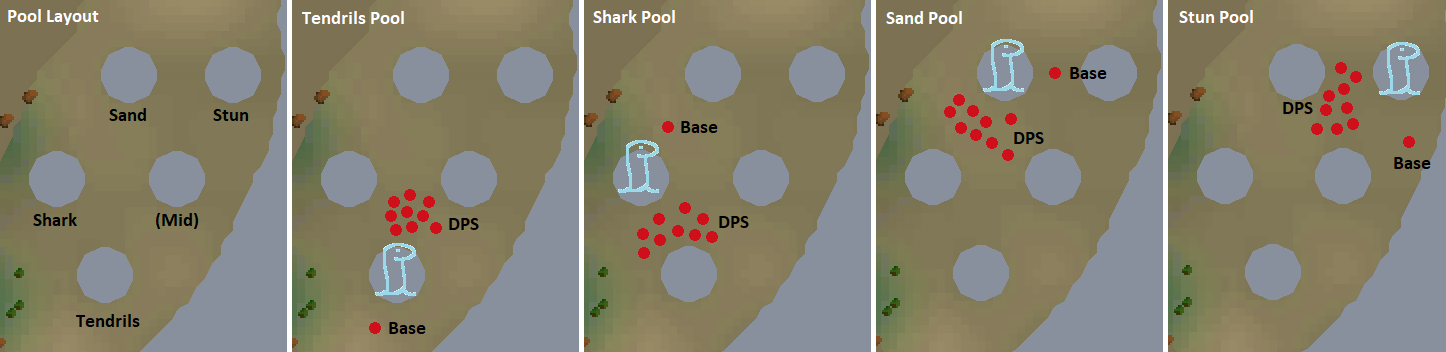
⬥ Repeat the above process until all 4 pools have been dealt with.
⬥ The first pool is random, but after that it is always in the following order:
• Sand Pool → Stun Pool
• Stun Pool → Tendrils Pool
• Tendrils Pool → Shark Pool
• Shark Pool → Sand Pool
Phase 2 - Mirage
⬥ This is a fast-paced phase.
⬥ After Yakamaru returns to the middle after the 4th pool, prepare for mirage phase:
• Stun 5 and Shark 10 roles should pick up their planks.
• Poison tank should be revived.
• Base and Northtank should get ready to tank their pools.
• On less experienced teams: kill all remaining Jellies.
⬥ Begin by reducing Yakamaru's health in the middle pool to 50k HP.
• All 4 pools will again simultaneously spawn with 150k HP each.
• They must all be killed and the pools must be closed by spam clicking the pools after clearing them.
• At this point, the Jelly Wrangler begins tagging and provking jellies off the rest of the team.
⬥ The following image shows where to stand when mirage starts:
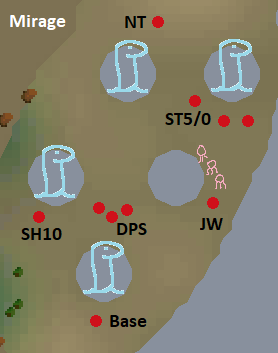
⬥ Usual kill order for pools is: Stun → Shark → Tendrils → Sand.
⬥ Base Tank: voke Tendrils pool and run south and tank the pool until it is dead and help close it, then follow along with the DPSers
⬥ Stun 0/Stun 5: use strong thresholds/special attacks to kill the pool quickly and close with 10 planks, then help DPSers after it is closed.
⬥ North Tank: voke Sand pool and run north, and tank the pool until the other pools are dead and team comes to help kill and close pool.
⬥ Shark 10: voke Shark pool and stay away from DPS; use your ultimate as mirage starts to help make the process quicker, and join the DPSers after it is closed.
⬥ All other players:
• Use your ultimates (if available) before mirage starts and help kill and close Tendrils pool.
• Then finish off Shark pool (ultimate should still be up) and move to Sand pool.
• Kill Sand pool and help close it.
⬥ Finally Yakamaru will respawn with 50k HP in the middle pool, and can be killed to finish the fight.
General Tips for Mirage Phase
⬥ DPSers (i.e. players with no other roles) should try to drop their ultimate / / +  as the phase starts.
• Ideally near both the Tendrils and Shark pools.
• This lets them attack both pools from their ultimate.
⬥ Players focused on tanking a pool should make use of Resonance , Debilitate  , Freedom and Devotion to help reduce incoming damage.
• Except the North tank, prefer to avoid camping shields and focus on damage.
• Faster phase → less mechanics → easier kill.
⬥ Ignore Jellies - let the Jelly Wrangler focus on them.
⬥ Tips for Jelly Wranglers:
• Keep Camera zoomed out and pay attention to other players.
• Use of binding spells can be helpful as well as the ability.
• Keep the Jellies away from other players - going east of the middle pool after aggro'ing all jellies is a good option.
Learning Raids
Example Kills
