Magic HM Zuk
Hardmode Zuk
Introduction and preface
This guide is targeted towards players with a strong basic understanding of the encounter and are aiming for the @Zuk Master and @Zuk Grandmaster roles, and not for players attempting hardmode Zuk for the first time.
Time save breakdown:
⬥ With the current state of powercreep and recent  changes, 2-cycling Zuk is consistent (though harder) so not much time can be gained there.
⬥ Players should focus on wave clear and try to follow this guide as best as possible.
• Note that movements are specific for certain waves, and stepping on the wrong tiles will lead to failed lures.
As such, it is strongly recommended to follow the guide alongside the video example. The rotations are constructed to allow for continuous usage. If followed correctly, players should not lose ticks between abilities unless otherwise stated.
Preset and Relics
The Fight
⬥ In essence the fight can be broken down in two phases: waves and Zuk.
• Waves can be further broken down into three sub-categories (melee, range, and mage waves) where each sub-category is separated by an igneous + challenge wave.
Melee Waves
For waves 1, 2, and 3 you will fight mainly melee enemies. Use Elite tectonic  and use
  on all mobs (except Xil) for these waves.
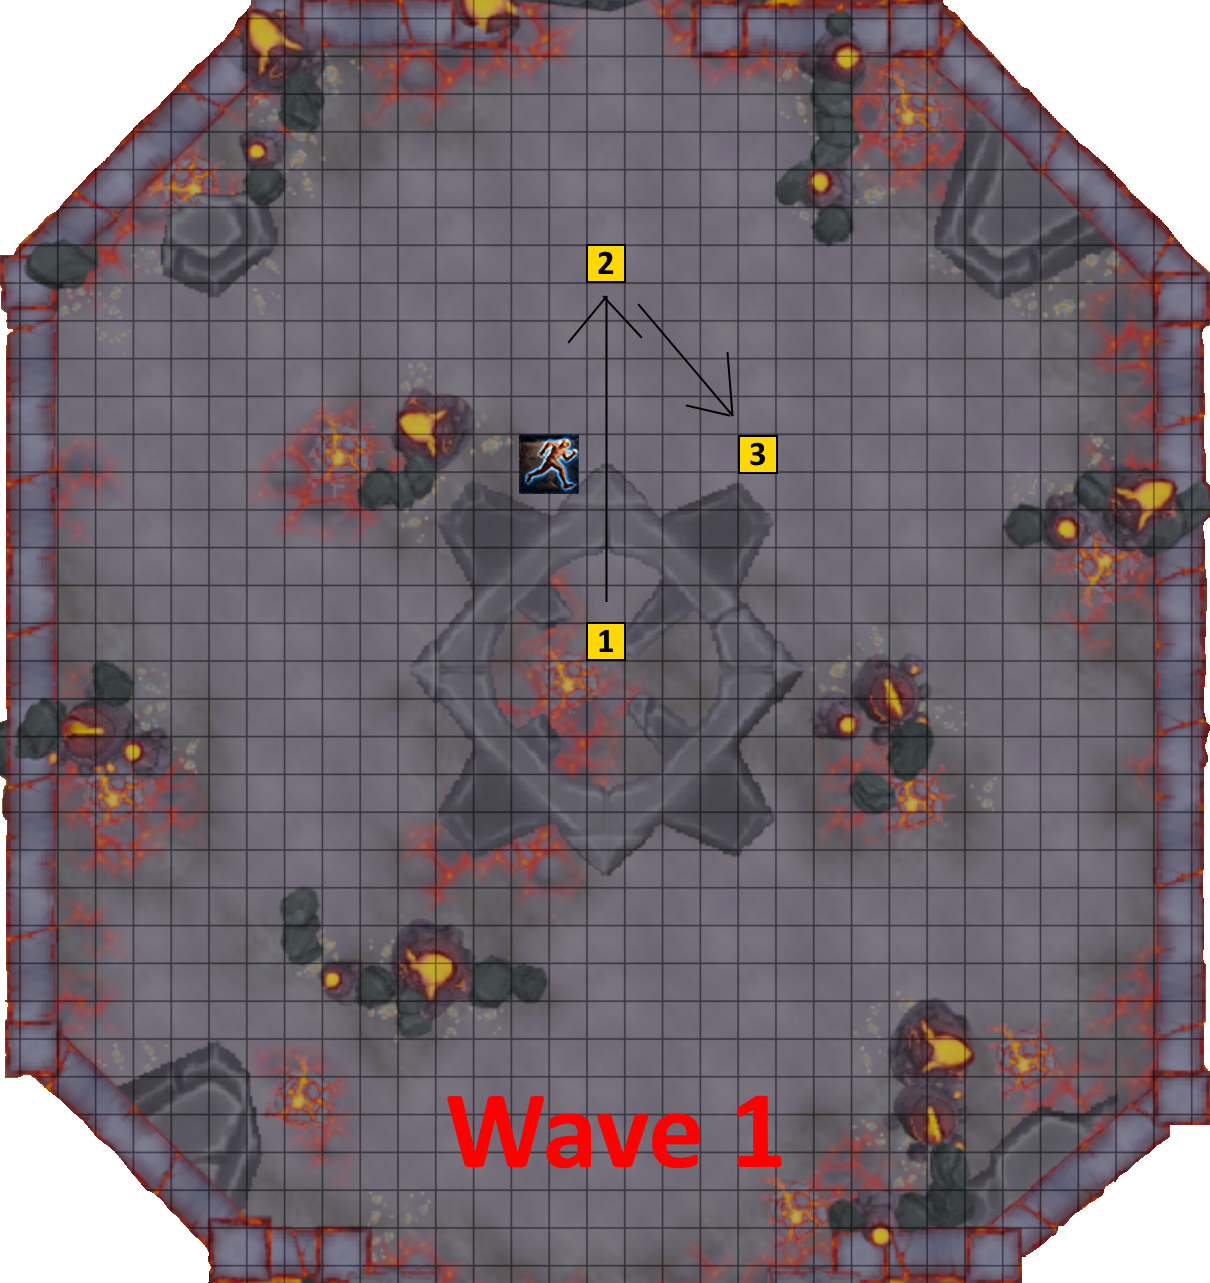
Wave 1
General pointers
⬥ Kill/lower as many Hurs as possible while standing in the middle of the room. Once they are clumped up, 4t 
 →
→ 
 will finish off the rest.
Specific rotations
https://youtube.com/clip/UgkxS0HJLCimNmcaBeaFMCHLdT4Dh8kkQu5e
⬥ On Zuk:  to 2→ (dw)
⬥ West Hur: Pre- → (4t) (tc)
  →
→  → Move to 3
⬥ East Hur: Pre- →  → (3t)
 →
→  (under you)
⬥ West Hur:  → → (4t)
⬥ South-most Kih: + run north →
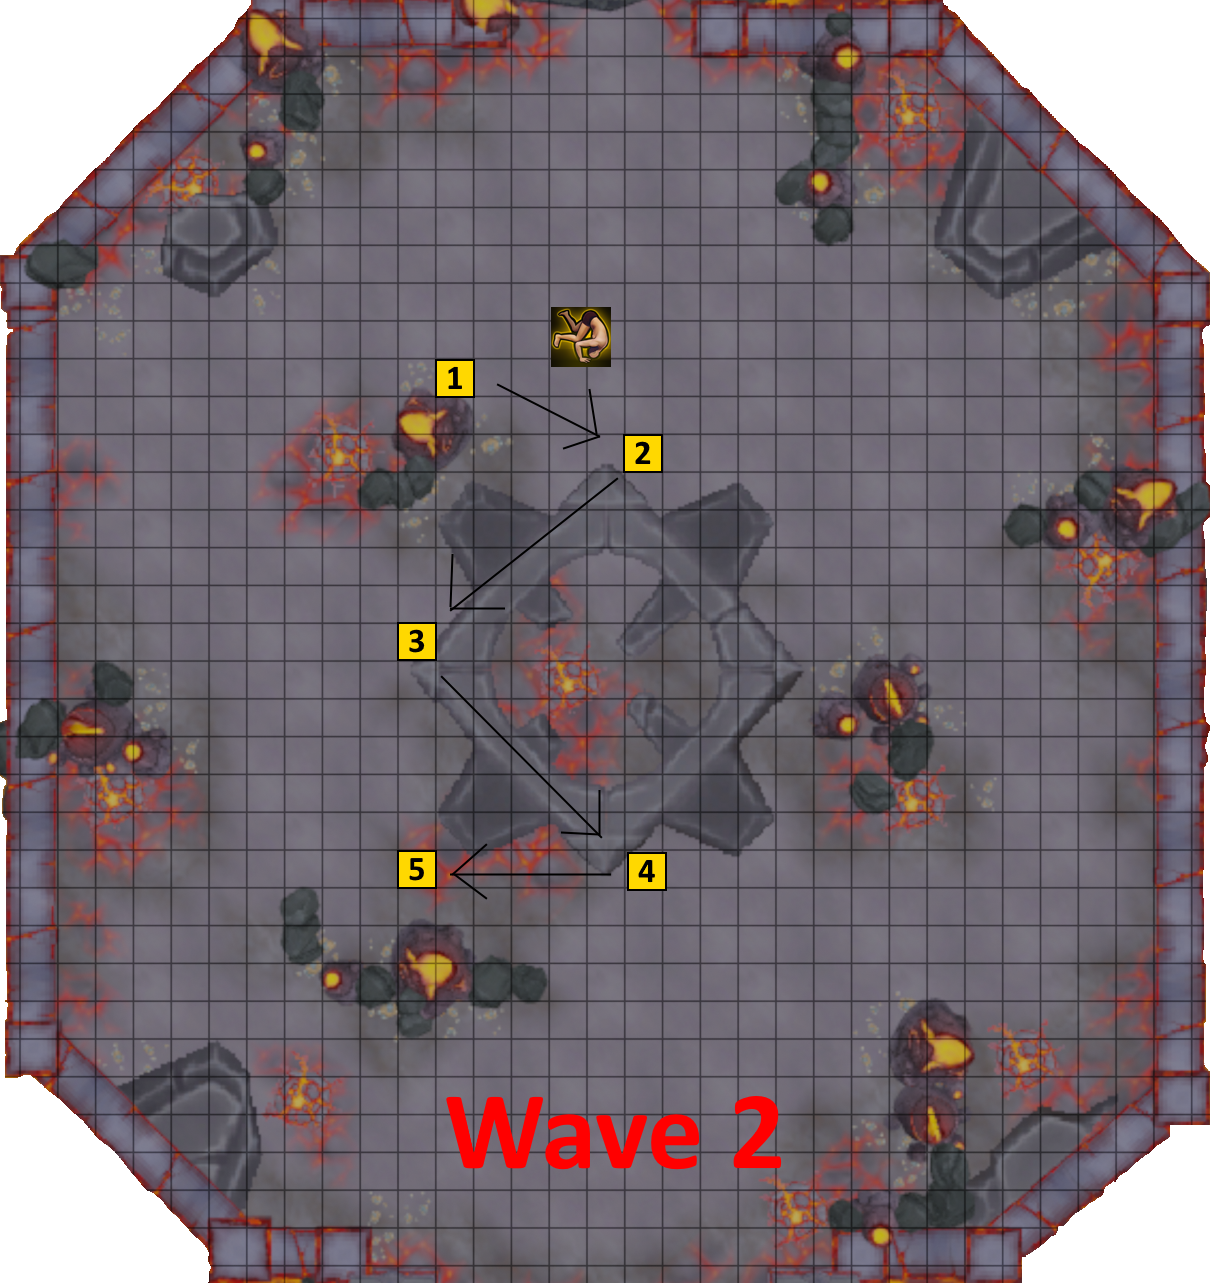
Wave 2
General pointers
Eliminate the Xil that spawns at the start of the wave as fast as possible. After that, move to the middle of the room and lower mob HP while waiting for them to clump up. Use  when they do.
Specific rotations
https://youtube.com/clip/UgkxG3i6GeoWHQAlzwvgkZenwQdVfOyF9RiJ
⬥ West Xil: Pre- → (tc) (dw) → +  to 2 mid GCD
⬥ East Xil: →
⬥ North Hur: (dw)  + Move to 3
⬥ West Hur:  + Move to 4
⬥ Yt-Mejkot: (under you) → wait 1-2t so that they group up → → + Move 5 →
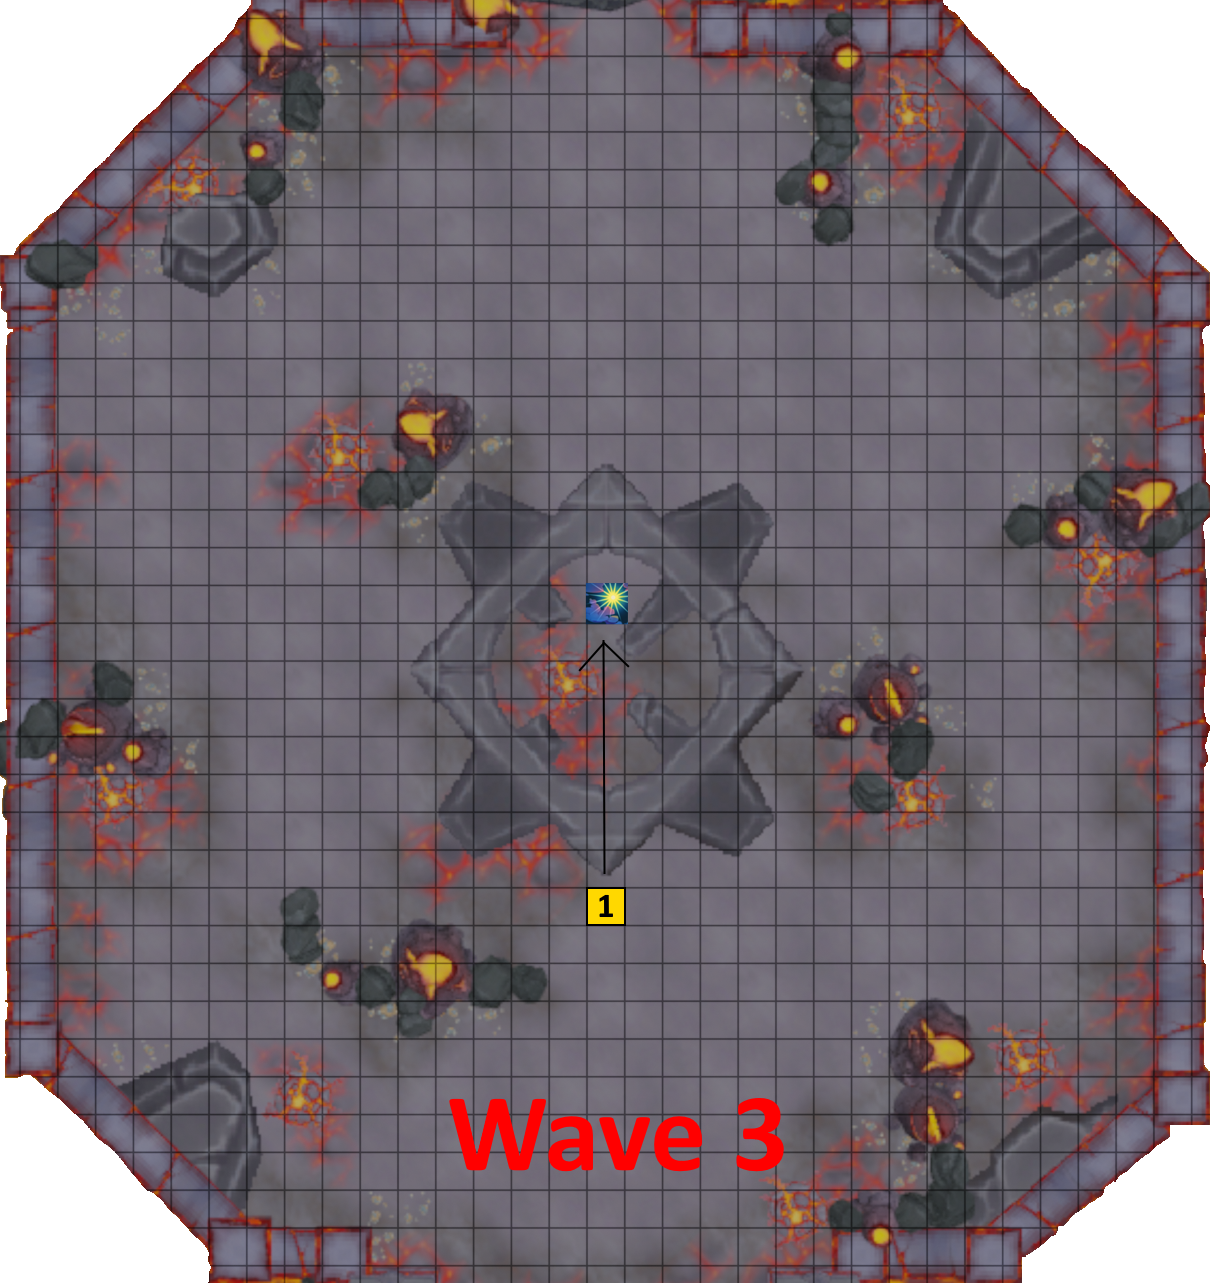
Wave 3
General pointers
Like wave 2, kill the Xils ASAP by standing in the middle of the room and sunning  .
.  while you wait for all mobs to clump up together. Once they do, use .
Specific rotations
https://youtube.com/clip/Ugkx97AFv-88ZHcbZQpT22J7rwXqEAB_zy7f
⬥ Kih: Pre- → (tc) + to 2 → +  → (under you) → →
⬥ East Xil: ( boosted) → 
⬥ West Xil: → → basic to finish up
⬥ West Hur: + the east Hur
⬥ East Yt-Mejkot: →
⬥ South Yt-Mejkot: →
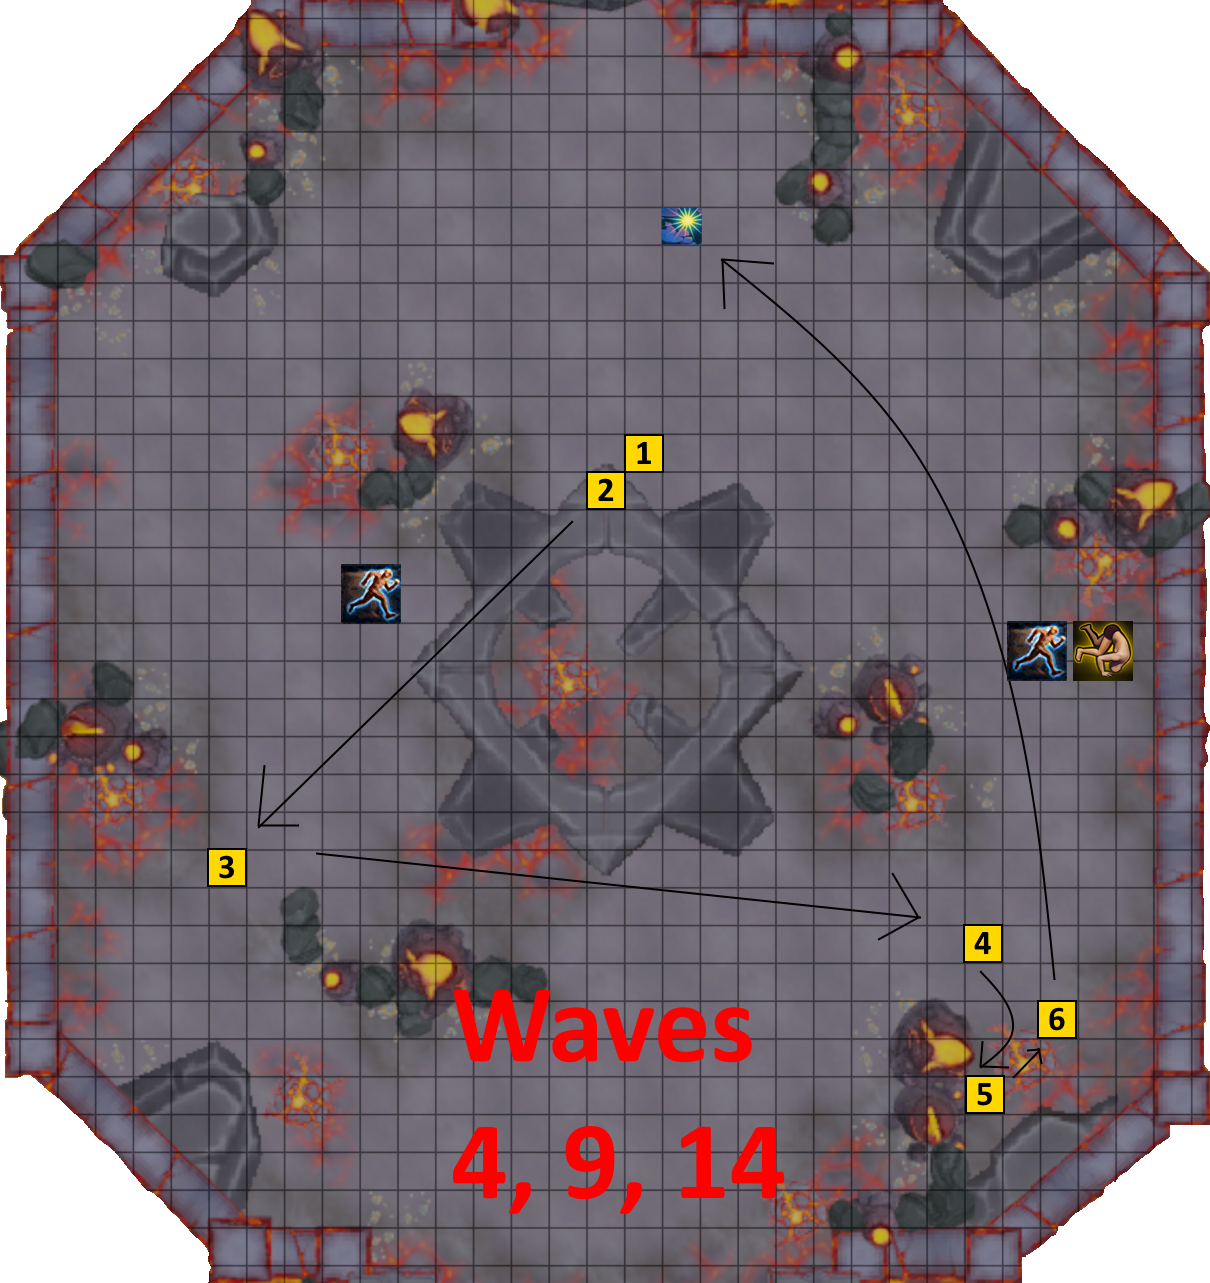
Wave 4 (Igneous wave)
General pointers
Remove the igneous mobs' damage reduction mechanics ASAP ( for Hur, for Xil). Set up your on the Mej and go to  once you have 100% adrenaline and all igneous mobs are dead.
  are to be used on Zuk.
Specific rotations
https://youtube.com/clip/UgkxJ3C_0bR7HolP5GU7hnr74mldPX-SAQzV
Start by equipping  +
+  +
+ 

⬥ Igneous Hur: Pre- + + 
 → ( boosted) (4-hit) → + mid GCD to Xil
⬥ Igneous Xil: + equip 

 → →
→ → 
 → → basic to finish off + mid GCD to mage
⬥ Igneous Mej: Equip  + → + walk south of Mej → →
  + walk east of Mej → → → basics to finish off and get to 100% adren + to Zuk
⬥ Zuk : + equip →  +
+  → → (4 hit) → → + basics to finish → equip
  +
+
Wave 5 (Challenge wave)
 + → → → Basics to finish off stragglers + disassemble dummy
Range waves
In waves 6, 7 and 8 you will face many ranged enemies that can deal a lot of damage. Use wave 6 and wave 7 and 8.
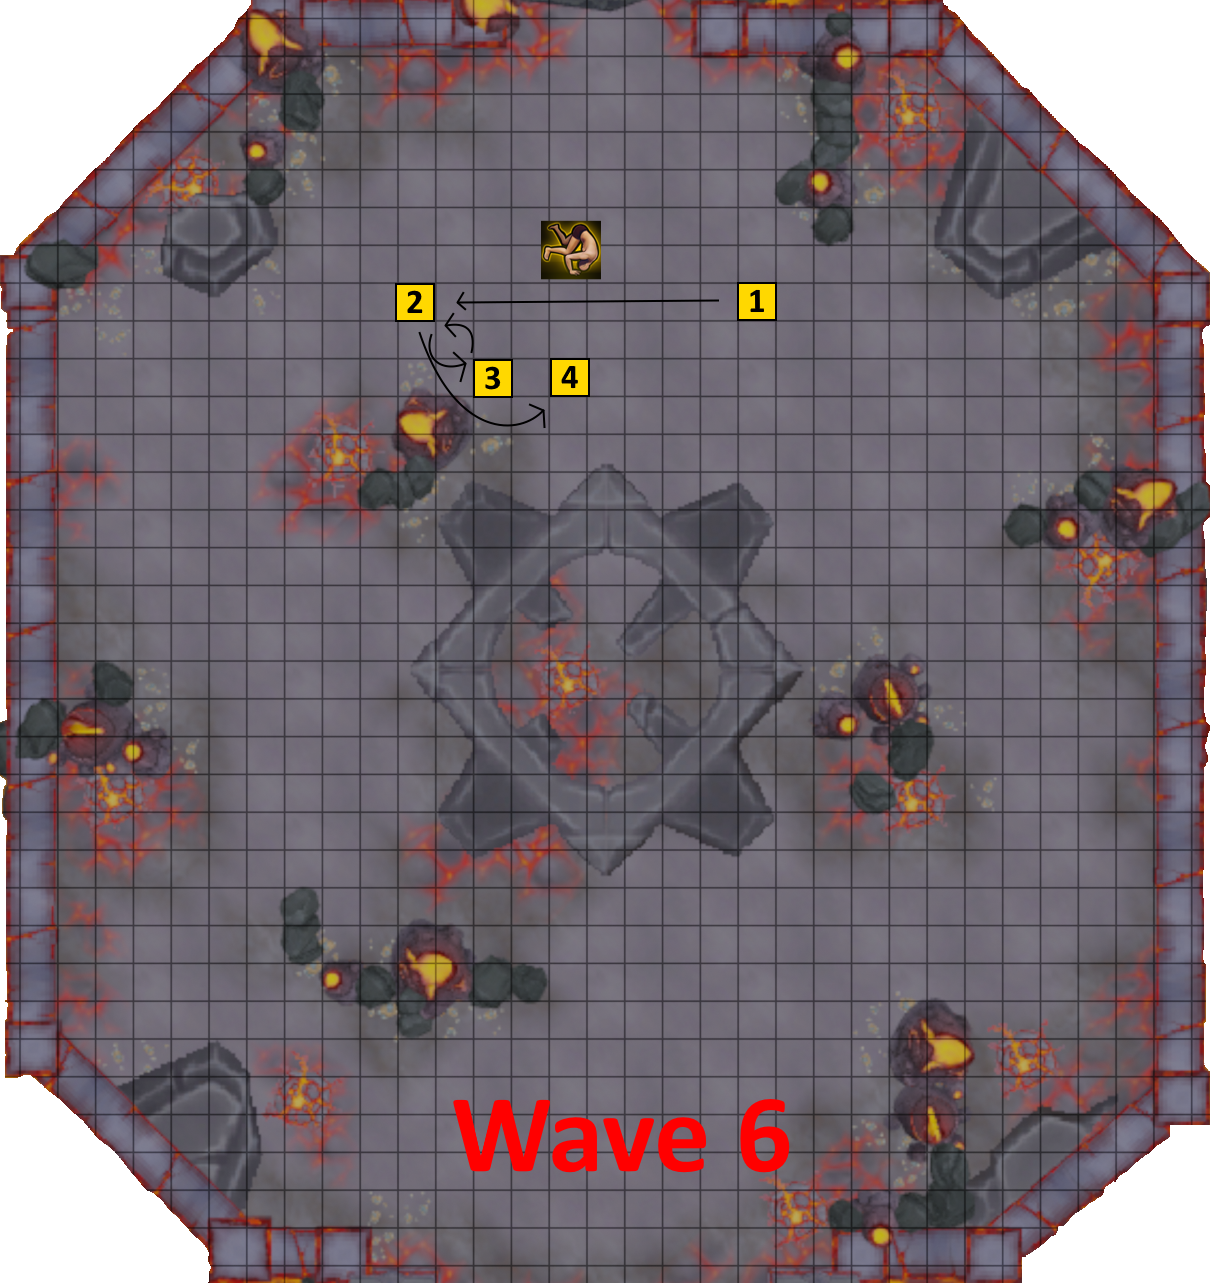
Wave 6
General pointers
Kill east Xils at the start of wave and to west Xils behind north-west rock to clear them as well. After this, walk out and  + on Jad to clear the remaining mobs.
Specific rotations
https://youtube.com/clip/UgkxtSOzFwGUwtGu0fnoB0gLs5dVk49fzMHv
⬥ North Xil: Stand on 1 + pre- + pre- → (dw)
⬥ East Xil: ( boosted) (3 hit)
⬥ North-east Xil: (tc) ( boosted) → + to 2
⬥ South-west Xil: (tc) (2h) 4t → → (dw)
⬥ North-west Xil: (2h) + step out to 3
⬥ Jad: →
⬥ East Yt-Mejkot: + walk back to 2 → (4t) → (4 hit) → walk to 4
⬥ Jad: →  →
→ 
 + → →
+ → →
⬥ South-west Yt-Mejkot: (dw) → → basics/ to finish off
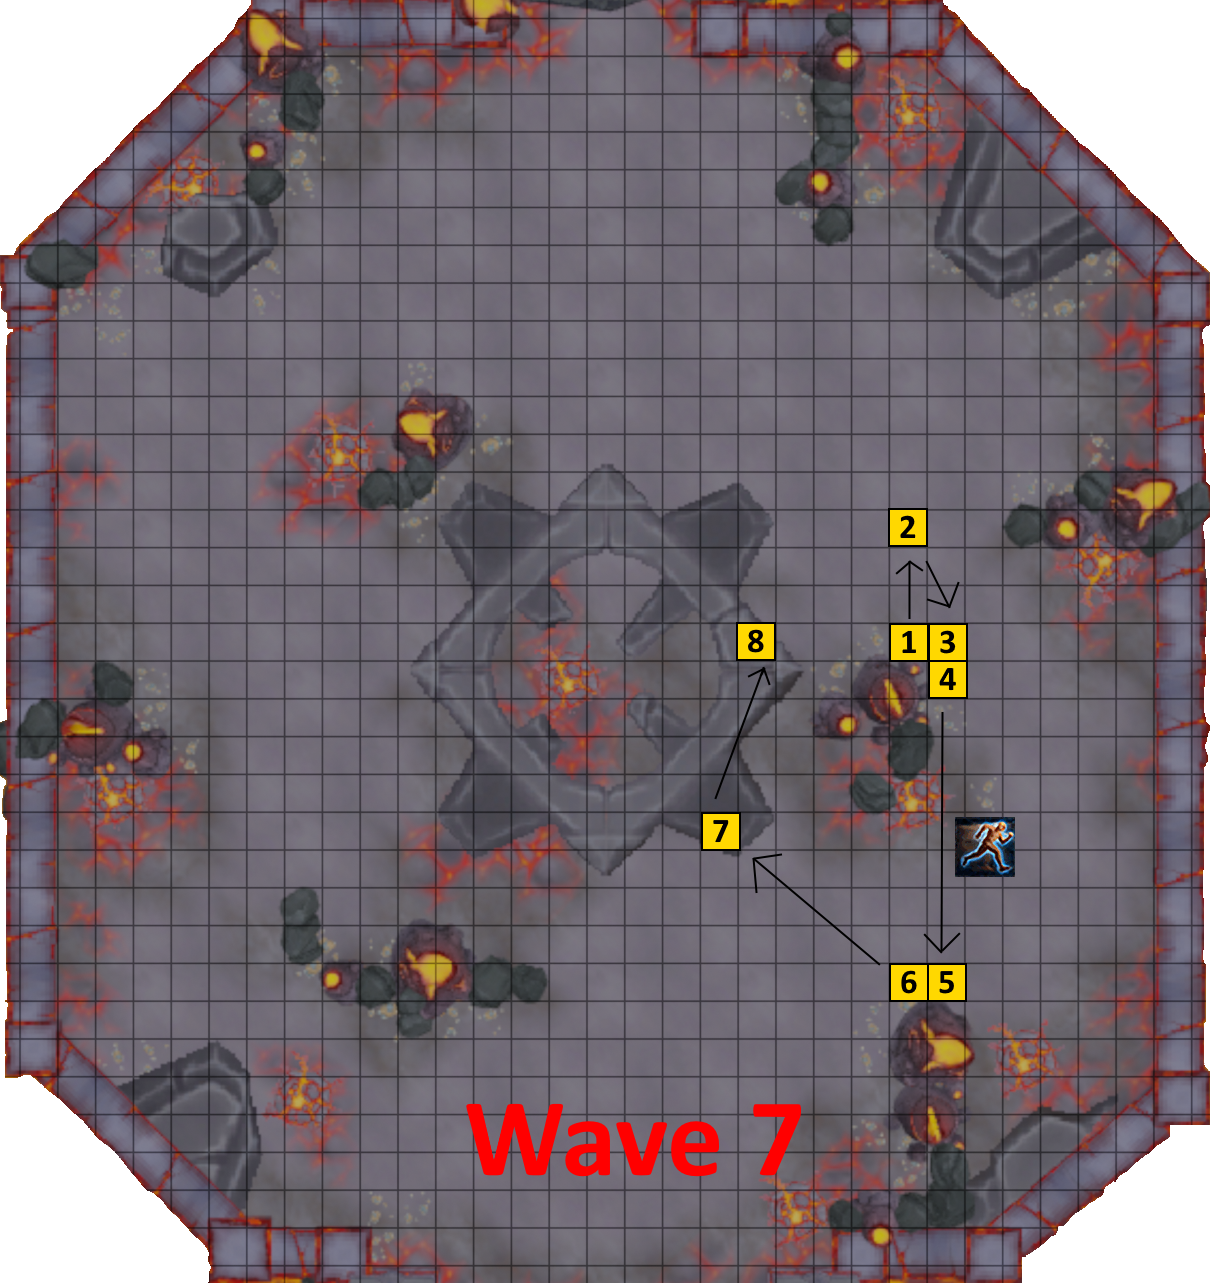
Wave 7
General pointers
Start north of east rock and clear the Kihs and Mejs that spawn at the start of the wave. You essentially want to wrap around this rock in a timely manner to clump the remaining monsters in two groups. South group can be dealt with while the north group can be dealt with 
Note:* If done correctly you will get the flame wall mechanic at the start of the wave. If you get the flame wall while standing on 1, move to 2. If you get it while standing on 2, move to 1*. Other tiles are possible as long as you move 2 tiles away from where you initially were.
⬥ Equip + activate  sometime during the wave.
Specific rotations
https://youtube.com/clip/UgkxPhML4bBk6d3X5Tb_VSGbRs5XWFIZAFd3
⬥ East Kih: Pre- → → + move to 2
⬥ North Mej: (4t) (4-hit)
⬥ West Kih: (dw) → + move to 3
⬥ South-west Tok-Xil: Pre- + pre- before it spawns → + walk 1 tile south to 4 → →
⬥ South Yt-Mejkot: + mid GCD to 5 → + move 1 tile west to 6 →
⬥ West Tok-Xil: Move to 7 as you do the following
→ → (dw) + move to 8
⬥ East-most Xil: (dw) → → (4t)
Wave 8
General pointers
Apply the same idea as the previous wave except this wave hurts more so while being south of east rock.
Specific rotations
https://youtube.com/clip/UgkxeBscybKkJPFLzidiVFEVG6EEdQ4LELMa
⬥ East Mej: Start on 1 and pre- + pre- → → + move to 2
⬥ North Xil: (4-hit)
⬥ West Mej: (dw) → Move to 3 →
⬥ South-east Tok-Xil: Pre- and pre- → + move 1 tile south to 4 → →
⬥ South Yt-Mejkot: →  + mid GCD to 5 → Move one tile west to 6 + →
⬥ South-west Tok-Xil: → (3t) + move to 7
⬥ North-east Tok-Xil: + on 8 → (dw) →
⬥ North Tok-Xil: → → Basics to kill off the stragglers

Wave 9 (Igneous wave)
General pointers
Start the wave with + + . Remove the igneous mobs' damage reduction mechanics ASAP ( for Hur, for Xil). Set up your on the Mej and go to once you have 100% adrenaline and all igneous mobs are dead. are to be used on Zuk.
Specific rotations
⬥ Melee igneous: Pre- + pre- + → (4-hit) → → + mid GCD to ranger
⬥ Ranger igneous: + equip + a couple of tiles west → → → * → + mid GCD to mage
⬥ Mage igneous: Equip + → + walk south of mage → + walk east of mage → → → → basics to finish off and get to 100% adren + to Zuk
⬥ Zuk : + equip → + → → (4-hit) → → Basics to finish → Equip + +
- Note: Skip if melee igneous is already dead
Wave 10 (Challenge wave)
Kill the unbreakable TzekHaar-Ket by using (tc) → → + move 1 tile south-west
Mage waves
Waves 11 to 13 consists mainly of magic based enemies. Use wave 11 and waves 12 and 13.
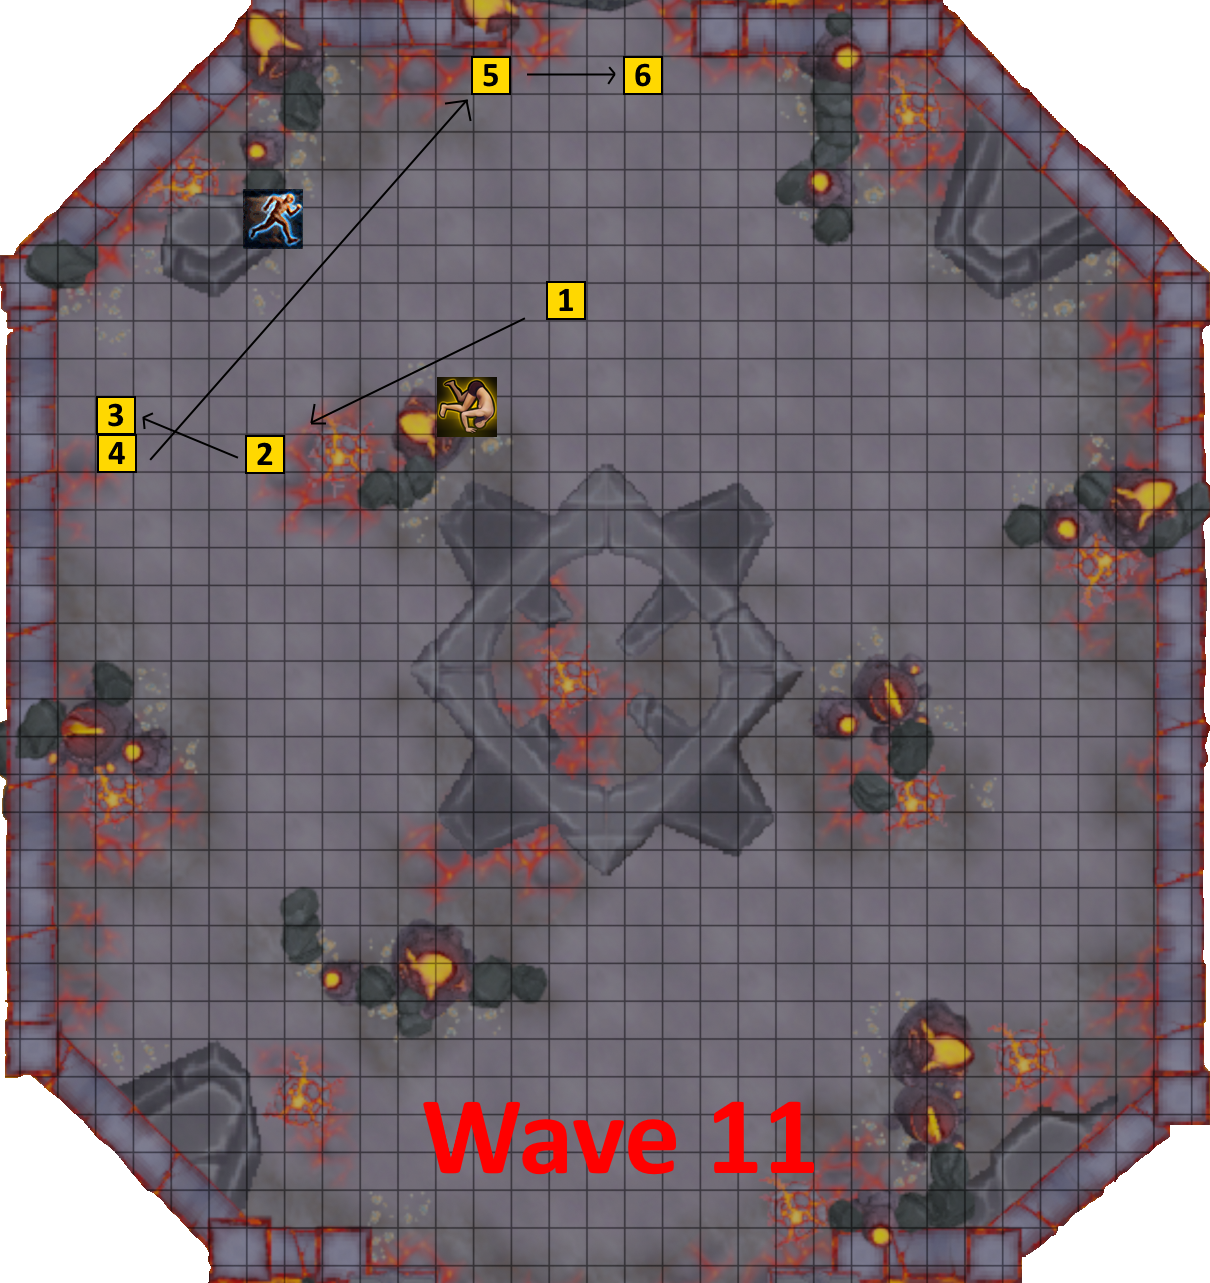
Wave 11
General pointers
Clear initial wave of monsters north-west of the arena. and on north-west Jad. to north of the other Jad and on Jad alongside to clear the remaining monsters.
Specific rotations
https://youtube.com/clip/UgkxUzfL1Jkm-YPo2kSUL6Xhfy-qd2NgGvbL
⬥ North Mej: Pre- + → → / + to 2
⬥ West Mej: (tc)
⬥ South Kih: (dw) + run to 3 →
⬥ West Mej:
⬥ Jad: → → → → → + > + move 1 tile south to 4 → → → /basics to finish off Jad + to 5
⬥ Second Jad: Move 4 tiles east to 6 as you do the following
→ → → (4-hit) → →
⬥ South Yt-Mejkot: You will get dragged in melee distance of Jad so 
→ → basics to finish off the rest
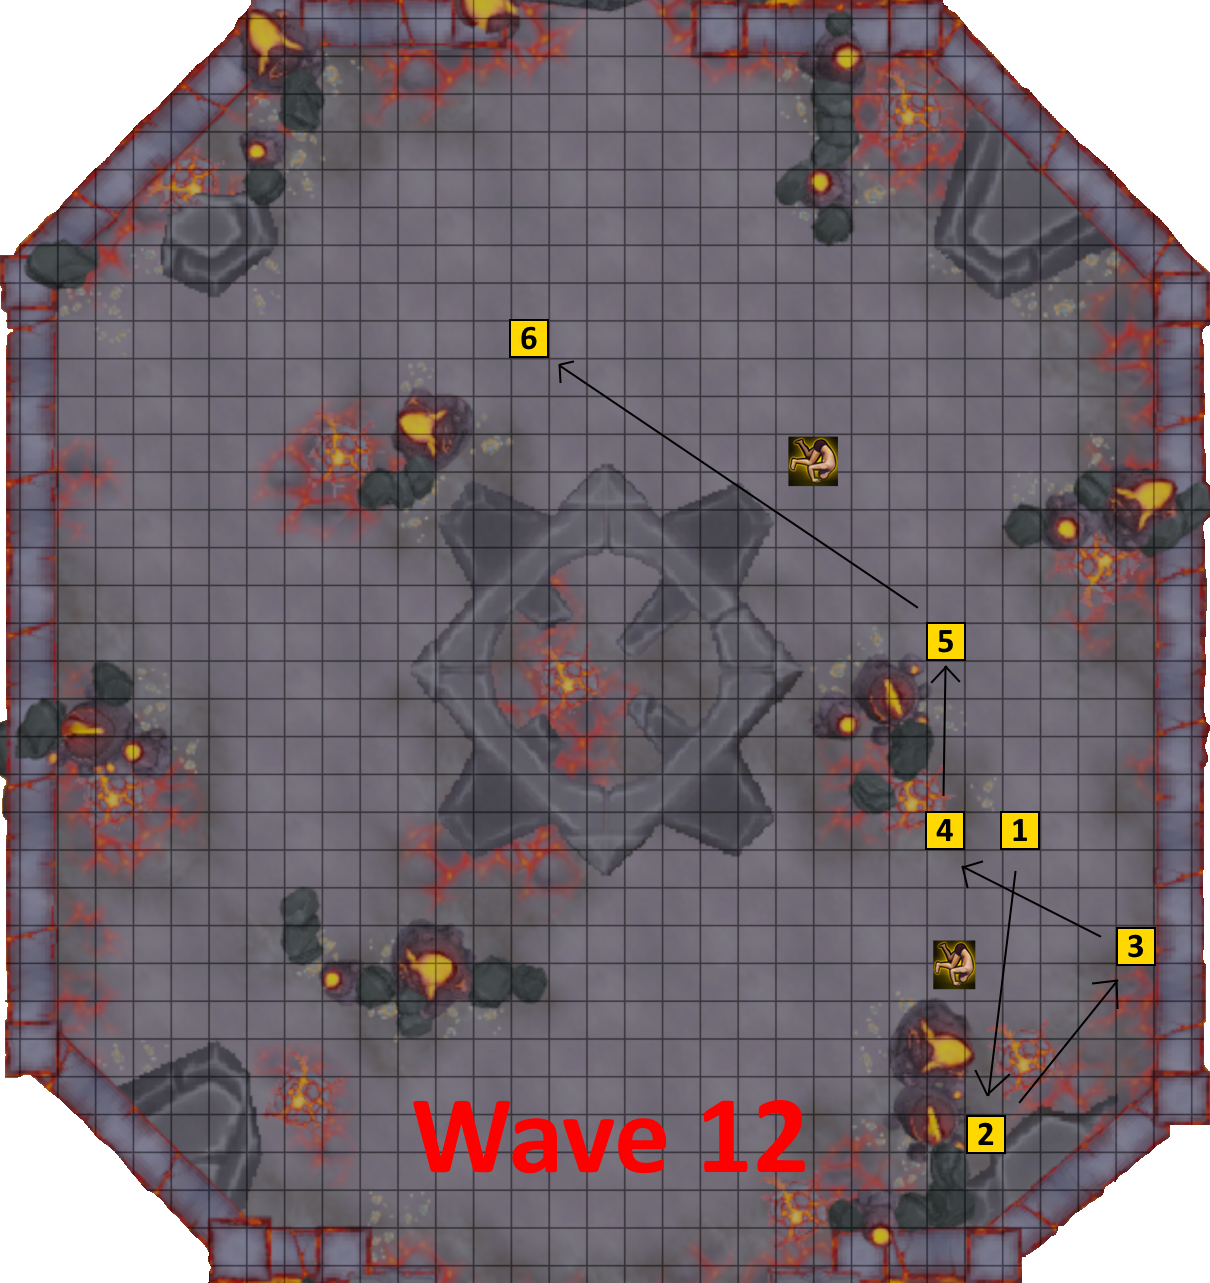
Wave 12
General pointers
Stand south-east of arena and clear initial wave using strong abilities. south to get the south-east monster un-stuck and use on the south group of monsters. After this, move north and clear north-east mages using and to the remaining Ket and finish off using strong abilities.
Specific rotations
https://youtube.com/clip/UgkxCX9t8AX8HG8LB8VC5n-vWRudAYtO_Jq8
Equip + start on 1
⬥ South Mej: Pre- (tc) → →
⬥ North Kih: + move to 1
⬥ North Tok-Xil: → → (should hit north Ket) →
⬥ East Kih: (dw) + south to 2 → + move to 3
⬥ North Tok-Xil: if needed to finish off
⬥ West Tok-Xil: →
⬥ West-most Mej: (dw) + move to 4 → + move north to 5 along rock
⬥ North Mej: → → → (4t) + to 6
⬥ North-west Ket: → (dw) → → Finish off with basic + to southwest area.
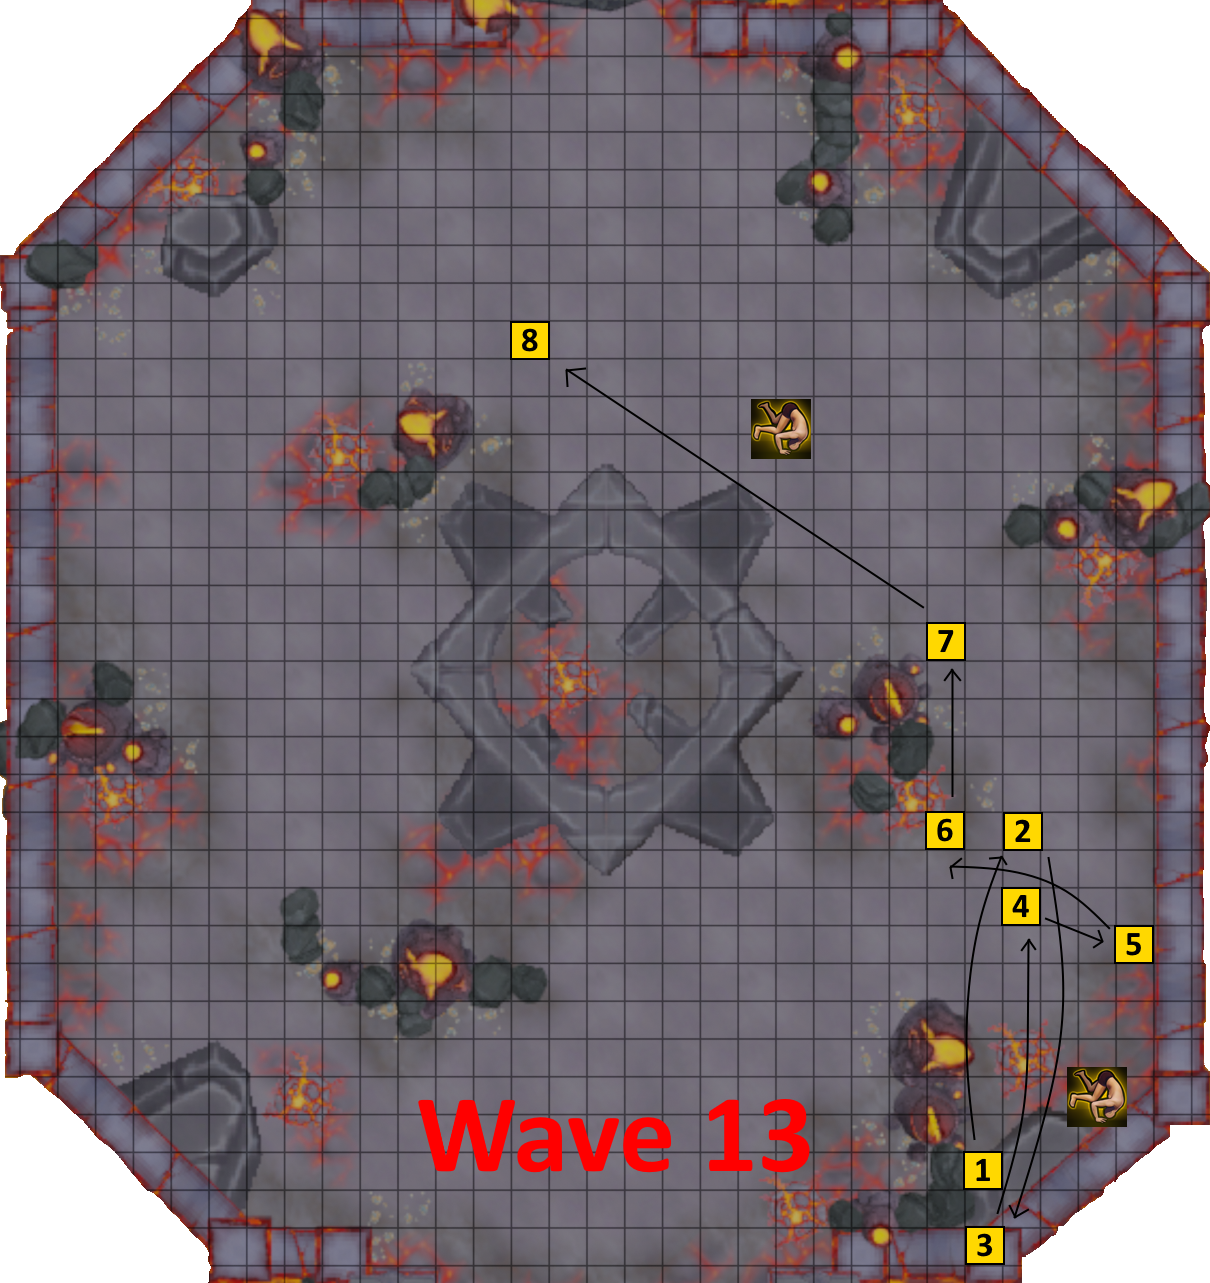
Wave 13
General pointers
Apply the same idea as the previous wave but this wave hurts more can be used. South-east Mej is bigger so one needs to further south to get it un-stuck.
Specific rotations
https://youtube.com/clip/Ugkx5C90fgZvqkfqDLhlaBGaHPAjcZE8fSWq
South-west Ket: Start on 1 and pre- → → + move north to 2 →
⬥ North Tok-Xil: + → → → → + south to 3
⬥ North Mej: Do the following as you move north 4 and then west to 5
→ (dw)
⬥ West small Mej closest to you: (4t)
⬥ West Tok-Xil: → →
⬥ West Ket: (dw) + move to 6 → + move north to 7 along rock
⬥ North Mej: → → (4t) + to 8
⬥ North-west Ket: → (dw) → → Basics to kill off/shard Zuk to have 50%+ adren
Wave 14 (Igneous wave)
Start wave with + + equip
Specific rotations
⬥ Igneous Hur: Pre- + + → (tc) (4-hit) → → + mid GCD to Xil
⬥ Igneous Xil: + equip + move a couple of tiles west → → → * → + mid GCD to Mej
⬥ Igneous Mej: Equip + → + walk south of mage → + walk east of mage → → → → basics to finish off and get to 100% adren + to Zuk
⬥ Zuk : + equip → + → → (4-hit) → + basics to finish → equip +
- Skip if igneous Hur is already dead
Wave 15 (Challenge wave)
 → build to 100% adren using basics


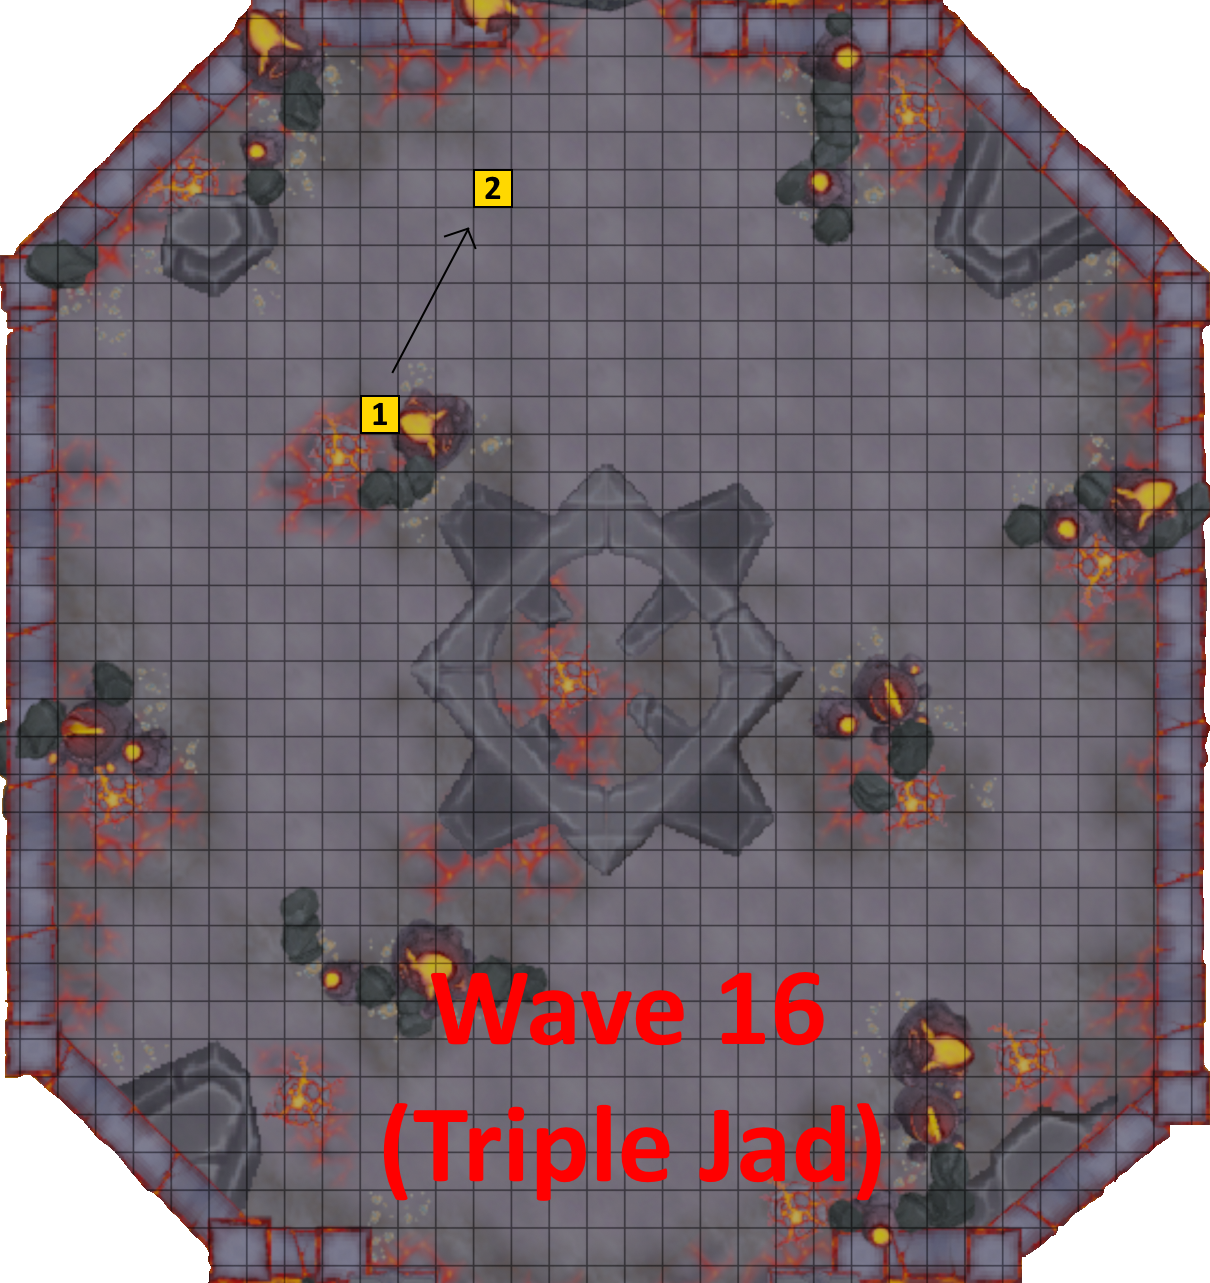
Wave 16 (Triple Jad)
General pointers
Stand beside the north-west rock as shown below and kill the north-west Jad while the other 2 group. Step out and use mostly AoE abilities to clear the other two Jads.
Specific rotations
https://youtube.com/clip/UgkxHyqloWFPpDtOQVisyq-p-J8GyoFG7i91
Start on 1 and pre- and pre- north-west Jad
⬥ North-west Jad: (dw) → → → → → → basics to finish off + move to 2
⬥ North Jad: → between both Jads → → → (3t)
⬥ South Jad: →
⬥ North Jad: → between both Jads → (dw) →
⬥ South Jad: → → Basics to finish off and get to 100% adren by sharding/basics on Zuk.
Wave 17 (Har-aken)
to Har-aken → + → → → → → + move to edge of sun → → → + move to center of sun → → → → → → →
⬥ Ensure to kill Har-aken only after / runs out.
Wave 18 (Tz-Kal Zuk)
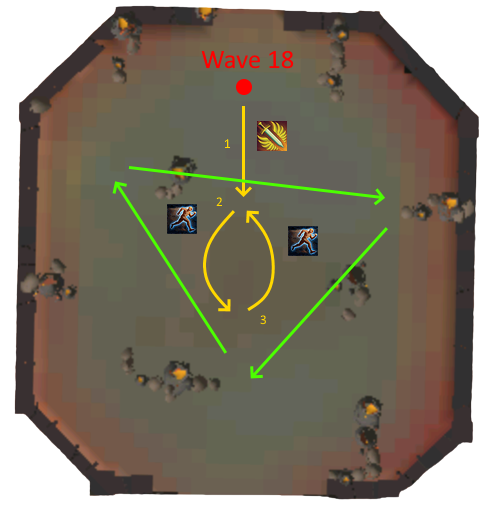
First cycle
Start near the middle (1) and build to 100% adren by sharding/basics.
⬥ Apply and
⬥ Use
⬥ Use for all 2h abilities except
 as soon as he moves from chair → → → → → → → → → → → → + as he melee slams (2) →
  + back to sun (3) → → → + move 2 tiles away from Zuk → →
  +(4-hit) → → →
⬥ Some improvisation will be necessary as it depends on when you started attacking Zuk (and by extension when you get melee slammed) and how much adrenaline you have.
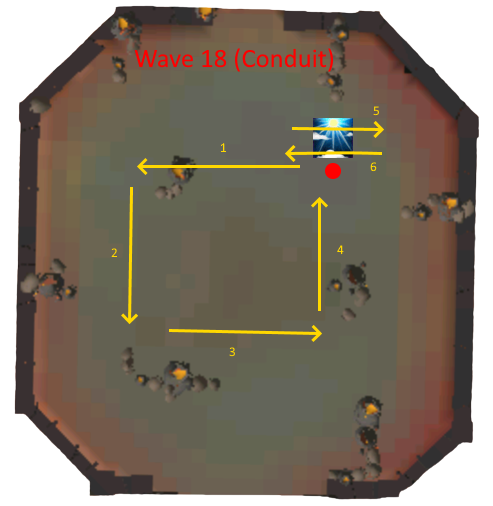
Pizza
Move in the pattern indicated by the green arrows.
Igneous Hur: Zuk → + →  → →
→ →
Igneous Xil: → → → → Finish off and reapply and on Zuk
Igneous Mej: → (dw) → (4t) → → Finish off with basics
Second cycle
Ideally you save for conduits. Use here.
+ pre- → + → → → → → → → (2-hit) → → → → → →  + → + → → →
⬥ Again, some improvisation is required here as it depends on when you started attacking Zuk (and where you get melee slammed in your rotation) and on adrenaline.
Conduits
This assumes has ran out by the time you get conduits. If this isn't the case one can always dump / while still under and . Use for all 2h abilities.
 ⬥ Deal with Zuk's charged attacks using the following:
• C1 → 
• C2 →
• C3 → +
• C4 →  or
or
Conduit 1: Pre- and pre- → → → → → →
⬥ This rotation is done while running in a rectangle (1 → 2 → 3 → 4)
Conduit 2: → → → → → → →
⬥ After you cast , step between the edges of your to dodge fire bombs (5 and 6).
Conduit 3: → → → + improvise for the other conduits with /
⬥ There is no set rotation for the remaining conduits. The main idea is that you try to stick to the standard rotation while dealing with the fire bombs.
• This is not always possible as fire bombs can align with cd.
⬩ In this case use a non-channelled followed by or 4t to help misalign your channels with fire bombs.
⬥ Take advantage of the lack of bombs during Zuk's charging attack to use more channelled abilities (e.g. / / ) during that period.
Example videos
Full kill - https://www.youtube.com/watch?v=GOSJjSmgkWA
Example of waves - https://www.youtube.com/watch?v=LKgkxHHylrs