Duo Hardmode Vorago
Duo Hard Mode
Rotations provided by the Rago Hub discord community

Introduction
This guide focuses on Duo Hard Mode Vorago only. The most important and most difficult part about duo hard mode is that Vorago always fires 2 blue bombs at once, if two persons are in reach. The second blue bomb can be prevented by learning to step under. Up to P10 and P11, this is mostly handled with devo / cade cepting.
Requirements
⬥ Knowledge how to Devotion  / Barricade
  Intercept
⬥ Ingenuity of the Humans 
⬥ Statius's Warhammer 
⬥ Seren Godbow 
Note: To effectively use SGB  in Duo HM as mage, you will need to learn to unequip armour.
Recommendations
⬥ Important: Knowledge how to Target Cycle (tc)
⬥ Knowledge about stalling Vorago in phases 10 / 11
⬥ Knowledge about stepping under to avoid Blue Bombs
⬥ Limitless 
⬥ Malletops for extended Barricade
⬥ 2 dummies each player  for phases 2, 4, 9 and 11
⬥ Nihil (do not use ice nihil  )
)
Nihil vs Pack Yak/Mammoth
Generally speaking, if you are only trying to go for a kill and do not want to bother with doing phases 1 - 9 in an optimal way, using a Pack Yak  or Mammoth
  is going to lead you to a successful duo hardmode kill faster. Yet, using a Nihil will significantly decrease the supply upkeep cost throughout your attempts. Therefore it is recommended to learn the mechanics and strategies properly.
Ability Rotations
Rago Hub maintains a spreadsheet with over 150+ unique ability rotations. Whilst the provided Duo Hard Mode ability rotations are aimed towards advanced and experienced Ragoers, it is still recommended to check them out. You can easily adjust the rotations to your personal preferences.
Rago Hub spreadsheet:
https://docs.google.com/spreadsheets/d/1q7zscYcfJ9qXeIptQmXJiWUloalwDNtmxIOX7bqgkJg/edit?usp=sharing
Strategy Overview
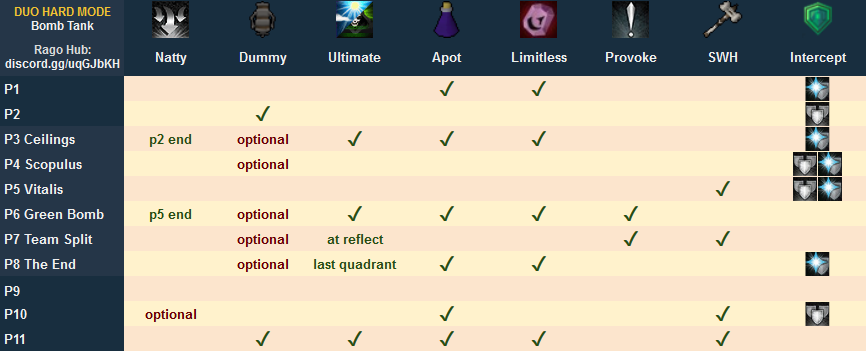
Bomb Tank Strategy Summary
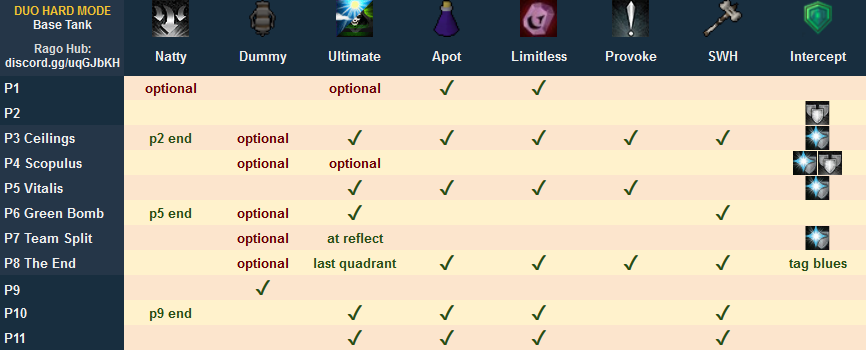
Base Tank Strategy Summary
Phase 1
In phase 1, Blue Bombs have a drastic chance of dragging the Bomb Tank from his climb. To prevent this from happening, the Base Tank has to keep Vorago far enough on the eastern wall, so that no blues are launched at the climber. Only once they reached the final platform from which they can voke  , the Base Tank lures Vorago closer to the west.
Base Tank
Stall Vorago and delay the first Red Bomb until shortly before the Bomb Tank can voke . The goal with stalling the Red Bomb launch that long is to avoid one being launched early during jump. If done correctly, the second Red Bomb will be fired after the Bomb Tank has jumped.
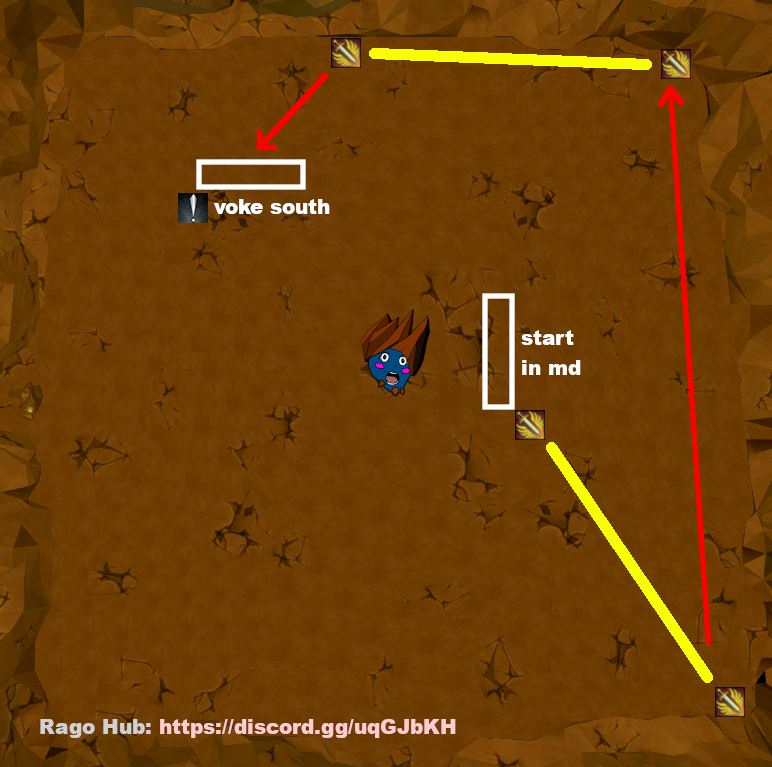
Phase 1 Diagram:
⬥ Disrupt  and Excalibur
  as you drop into Phase 1.
⬥ Starting point is the white rectangle, MD east of Vorago.
⬥ Apply SWH on tick.
• Use thresholds until your bomb tank jumps.
⬥ Bladed dive  to the south east corner.
⬥ At your 3rd - 4th ability after Target Cycle, as Vorago does his first auto attack, start walking to the north east corner, along the eastern wall.
• If done correctly, Vorago is not going to auto you at all while walking north, so you have long soul split  uptime.
⬥ At the north eastern corner, pray flick until the Red Bomb is launched (utilise Devotion if necessary).
⬥ Bladed dive to the west before the non-homing Blue Bomb hits you, so that the Bomb Tank can voke Vorago.
⬥ South-voke Vorago ASAP.
⬥ As the Bomb Tank jumps, escape  and bladed dive to the southern wall, then walk back to the north and keep building to 100% with defensives.
⬥ Ideally Vorago switches aggro to the Bomb Tank, if not, keep pray flicking.
• Vorago does a slight turn-around of ~ 45° clock-wise if he switches aggro.
• You can see Blue Bombs being fired by watching Vorago's animation during the jump.
• If Vorago switches to the Bomb Tank during jump, voke after, to allow your Bomb Tank to step under.
• If Vorago stays on the Base Tank, step under and Heal Other  / Devotion Intercept .
⬥ After jump, use Metamorphosis  .
.
Phase 1 Base Tank Example
https://www.youtube.com/watch?v=GTs6laViJfE
Bomb Tank
⬥ Do a normal climb.
⬥ Once you have reached the final platform, voke Vorago.
⬥ Use SGB , thresholds and a couple of basics.
⬥ Jump 1 - 2 ticks before the first Blue Bomb hits.
⬥ Ideally Vorago switches aggro to you.
• If Vorago switches to you during your jump, Devotion Intercept the Base Tank afterwards (alternatively: step under and Heal Other ).
• If Vorago stays on the Base Tank during your jump, voke afterwards and step away, to allow the Base Tank for stepping under.
Phase 2
Both players should utilise Guthix Staff 
 and Storm Shards
  throughout the phase. Your goal should be to always apply 10 shards by Bring Him Down.
Base Tank
⬥ Bladed dive back under Vorago after escaping the second bleed  , to avoid the launched Blue Bomb.
⬥ Red bombs 1 and 3 cade cept .
⬥ Devotion before second and last reflect  to prevent eating during Bring Him Down.
Bomb Tank
⬥ Cade cept the second Red Bomb.
⬥ Tag all gravity fields.
Bring Him Down
⬥ Ranged 
→  →
→ 
⬥ Mage 

 →
→  →
→ 
Note: If both players use magic, Shatter  should be utilised for consistently passing the damage check.
Phase 3 Ceilings
It is highly recommended to drop a combat dummy in the end of Phase 2 and use Natural Instinct  for Ceilings Phase 3.
Phase Strategy
⬥ Base Tank voke entire phase.
⬥ Both Base and Bomb Tank ultimate  /
/  and Apot
  .
.
⬥ Base Tank apply SWH on tick.
⬥ At Reflect , the Bomb Tank devo cepts .
⬥ After Vorago jumped for the second time, the Base Tank should move closer.
⬥ At the Red Bomb, the Base Tank devo cepts .
Phase 4 Scopulus
The goal is to camp magic protection prayer  for the Blue Bombs and run away from all Scopuli in order to avoid melee slaps.
Pathing Scopulus
⬥ Whoever has 2 Scopuli on them, voke the third.
• During Barricade and Devotion Intercept , both players DD (to avoid Scopuli decoupling).
⬥ Walk around the arena clock-wise in a circle.
• Do not walk out the corners.
• Do not walk too close to the center, or Scopuli will not be in line of sight any longer if they get stuck behind Vorago.
Strategy
Intercept does not register while moving. Make sure you stand still when cepting!
Phase 4 Diagram:
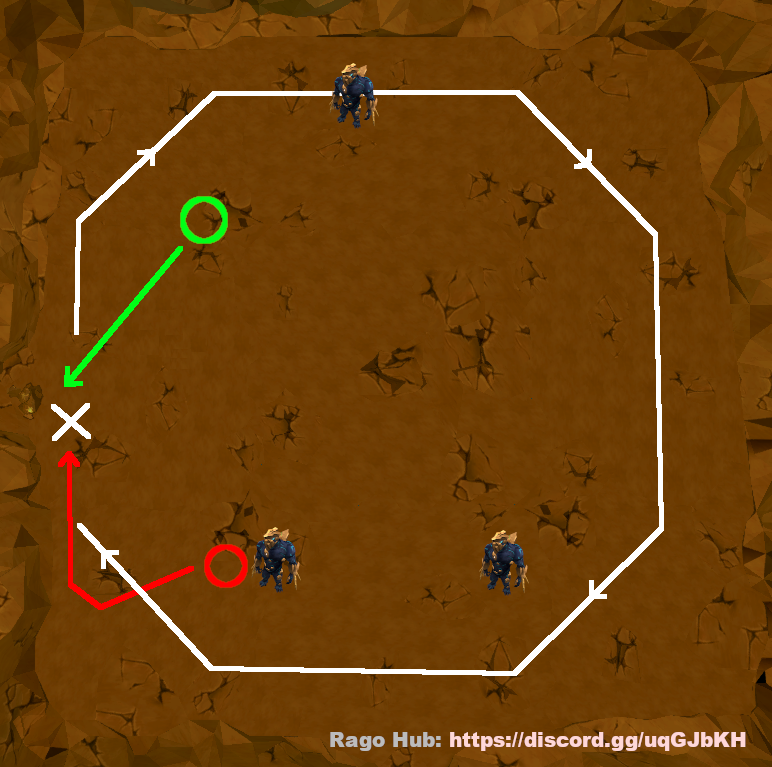
⬥ Base Tank start at the green circle in the north-west and tag the northern Scopulus.
⬥ Bomb Tank start at the red circle in the south-west and tag both of the southern Scopuli.
⬥ Meet your partner at the white cross in the middle of the western wall.
⬥ At the second Blue Bomb, the Bomb Tank cade cepts .
⬥ Bomb Tank vokes the northern Scopulus in order to stack all 3.
⬥ After Barricade runs out, the Bomb Tank devo cepts .
⬥ As Intercept runs out, the Base Tank follows devo cept .
• If the phase is expected to take longer than 5-10 seconds after the Base's devo cept runs out, the Base Tank should Barricade Intercept .
Note: Most of the times, as you kill the last Scopulus, you are going to drop target and will not be able to build adrenaline with defensive abilities any longer. Due to this, it is highly recommended to place a combat dummy as the last Scopulus dies.
Phase 4 Scopulus Example (Base Tank POV)
https://www.youtube.com/watch?v=neAeSDWC4OU
Phase 5 Vitalis
The goal is to camp melee protection prayer  and pray flick every single Blue Bomb you receive on-tick. Make sure to always eat up to 6,000 or higher life points, due to a Blue Bomb easily knocking you out otherwise.
Strategy
⬥ Base Tank pre-ultimate / and Apot .
⬥ Bomb Tank apply SWH on tick.
⬥ At Reflect , the Bomb Tank devo cepts .
⬥ Handling Bleeds.
• Base Tank must voke before Vorago applies the first Bleed .
• Bomb Tank cade cepts bleeds 1 - 4.
• Base Tank Freedom  the fourth Bleed.
• Bomb Tank voke and Freedom the last Bleed.
⬥ If the phase takes a lot longer after Bleeds are over, the Base Tank can utilise Devotion Intercept .
Note: If the Bomb Tank has Malletops Perk unlocked, they can alternatively skip their voke for the last Bleed . Refresh Intercept as Barricade's timer reaches 11 seconds. The Base Tank has to Freedom the last Bleed instead of the fourth.
Tips & Tricks
⬥ Excalibur should be activated in the start of Phase 5.
⬥ Base and Bomb tank position next to each other to ensure no spawned Vitali blocking their line of sight to each other.
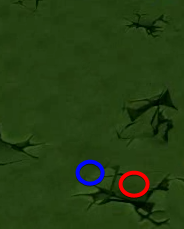
⬥ Ideally, position west of Vorago at the L-Rock, where one player can utilize Flanking  (blue circled tile).
Phase 5 Vitalis Example (Base Tank POV)
https://www.youtube.com/watch?v=KZCW_qE8kP0
Phase 6 Green Bomb
If comfortable, Natural Instinct can be used in the end of Phase 5 on the Vitali surrounding you (make sure you are not killing your last targeted Vitalis, or you will drop target and can not use defensive abilities for adrenaline gain once dropping into Phase 6). This is going to increase the consistency of skipping the second Green Bomb, thus saving you a lot of food.
Strategy
⬥ Bomb Tank voke the entire phase.
• The Base should step under throughout this phase.
⬥ Both Base and Bomb Tank pre-ultimate / and utilise their Apot .
⬥ Base Tank apply SWH on tick.
⬥ Bomb Tank activates Disruption Shield for the first Blue Bomb.
⬥ Handling Green Bomb
• If the first Green Bomb targets the Bomb Tank, sip a dose of your Powerburst of Vitality  .
.
• If the first Green Bomb targets the Base Tank, either sip a dose of your Powerburst of Vitality or, if successfully stepped under for all auto attacks, simply tank the 10,000 and eat once or twice after the detonation.
⬥ Resonance  the second Blue Bomb in Reflect .
⬥ Whoever does not receive the second Green Bomb should Devotion Intercept the other player.
• Make sure to have high enough life points for the Red Bomb following the second Green Bomb.
Phase 6 Green Bomb Example (Base Tank POV)
https://www.youtube.com/watch?v=Mii85UTiTdQ
Phase 7 Team Split
Use Reprisal  situationally, depending on your life points, adrenaline and Vorago's remaining life points.
Strategy
⬥ Bomb Tank vokes the entire phase.
• The Base Tank should step under throughout this phase.
⬥ Bomb Tank apply SWH on tick.
⬥ At the start of Reflect , both players ultimate / .
⬥ Resonance the first Blue Bomb in Reflect .
⬥ Base Tank devo cepts the Red Bomb after the second Team Split.
Phase 8 The End
Strategy
⬥ Base Tank apply SWH on tick.
• It is ideal to use your SGB in the first quadrant, as it is guaranteed to connect all 5 arrows.
⬥ At the quadrant with Blue Bombs, the Bomb Tank devo cepts and the Base Tank tags all bombs.
⬥ At the quadrant with Red Bombs, each player tags 2 bombs.
⬥ Between the third and last quadrant, both players ultimate / with Apot .
⬥ At stand-up, the Base Tank vokes .
• Bomb Tank should step under after stand-up.
Note: If a second stand-up is possibly happening, switch around Devotion Intercept and tagging Blue Bombs. Again, both players tag 2 Red Bombs each.
Alternative Strategy
⬥ Ignore the quadrant with Blue Bombs.
⬥ Tag 2 Red Bombs each.
⬥ At stand-up, one player uses Barricade Intercept .
Phase 9 - Team Split
Both players should utilise Guthix Staff and Storm Shards throughout the phase. Your goal should be to always apply 10 shards by the third Waterfall.
Base Tank
⬥ After each Waterfall, surge  under Vorago and step under.
⬥ If not skipping the Stone Clone, use Anticipation  or Freedom before the clone's spawn.
⬥ After each Team Split, Barricade Intercept .
⬥ Voke for bleeds 3, 4 and 5 ( → + → ).
⬥ Use Devotion for yourself during Reflect (do no Intercept ).
Bomb Tank
⬥ After each Waterfall, keep Vorago voked until Bleeds.
⬥ Devotion for yourself (do not Intercept ) the fourth Blue Bomb (first Blue Bomb after the Stone Clone's spawn).
⬥ Take bleeds 1 and 2 ( → ).
Phase End
Just like in the end of Phase 2, it is highly recommended to place a combat dummy in the end of Phase 9. Use Natural Instinct to have more adrenaline available in the start of Phase 10.
Phase 10 - Team Split
Strategy
⬥ Every odd number of Team Splits (after first, third, fifth, etc), your team rotates applying SWH and Barricade Intercept .
• The person not barricading is the one hammering .
• SWH should be applied at start of Reflect , to not lose DPS uptime.
⬥ Important Line up vertically, so that both players have the same distance to Vorago - You will force both Blue Bombs to hit in the same tick, avoiding one square push back each auto attack Vorago fires.
⬥ Disruption Shield should only be used after the first Team Split of the phase, or after messing up Lining Up.
⬥ Generally speaking, throughout a longer Phase 10, utilising a stable order of thresholds is going to generate more stall than using ultimates.
⬥ Check #deleted-channel for more information about how stall works.
Note: To avoid high food consumption, Reprisal should be used for Team Splits that one person follows with cade cepts
Starting Phase 10
⬥ As you drop into Phase 10, the Base Tank should pre-ultimate / and apply SWH on tick.
⬥ Both players Disruption Shield the first Blue Bomb after the first Team Split.
⬥ The Bomb Tank starts with cade cepting for the second Blue Bomb (tank the first with disrupt ).
⬥ During Reflect , both players move melee distance for the third auto attack.
⬥ After the second Team Split, both players use thresholds.
⬥ The Base Tank should keep in mind they will have to Barricade Intercept after the third Team Split.
⬥ If the Bomb Tank has excess adrenaline, they can eventually ultimate / .
⬥ After the third Team Split, the Base Tank cade cepts the first Blue Bomb.
Mauling
⬥ You should always wait with mauling until the start of a Reflect in order to optimise your Phase 11 start.
⬥ Using Shield Dome right before mauling is going to cancel the maul animation, providing you more time during the phase transition.
⬥ Shield Dome cannot be used off GCD (you have to wait for your GCD to be over, then Shield Dome → Maul).
⬥ The player not mauling should reapply the SWH and place a combat dummy in the very east.
⬥ During the phase transition, both players build up to 100% on the dummy (use defensive abilities + auto attacks).
Phase 10 Example (Base Tank POV)
https://www.youtube.com/watch?v=vaawIOmKJcw
Phase 11 - Team Split
Strategy
⬥ After every Team Split, your team rotates ultimating / and Barricade Intercept .
⬥ At the start of each Reflect , the player not barricading should reapply the SWH .
⬥ Disruption Shield should optimally be used when scuffing lining up or after a Purple Bomb detonation.
⬥ Important Line up vertically, like you did in Phase 10.
Starting Phase 11
⬥ Both players ultimate / start of the phase.
⬥ The person who did not Barricade last in Phase 10 should cade cept the first Blue Bomb after the first Team Split.
• The other player reapplies the SWH .
• The person who barricades builds to 100% quickly in order to ultimate.
⬥ Rotationally switch Barricade Intercept and ultimates / for every Team Split.
Mauling
Finish him! Congrats on your kill! Make sure to find the official Vorago Duo Hard Mode Achievement spreadsheet in #deleted-channel and follow the instructions to submit your personal kill!
Acknowledgements
Check out Rago Hub for a wide variety of strategy guides for everything-Vorago, featuring a Hammer Climbing guide and more.
Rago Hub: https://discord.gg/uqGJbKH