4 Man AoD
4-Man AoD
Introduction
This is a guide for 4-man Nex: Angel of Death. It is assumed that you know how to deal with mechanics in 7-man AoD, described in #AoD Mechanics.
Due to the meta heavily favouring ranged at the time of writing, this guide will assume that the team consists of ranged mt's / free. The base can either mage or hybrid.
These rotations can consistently reaver skip if executed correctly.
Preset and Relics
Note: If the base is uncomfortable on food, they can reaver and a dps kalg instead.
Mechanics
Dealing with mechanics in 4-man AoD is slightly different to how they are dealt with in 7-mans. The following summarizes the major mechanics of the fight and how to deal with them.
Phase 1 (3,000,000 - 2,100,000 HP)
⬥ Elements
• Quadrant with elements:
⬩ Tank it as you would in larger teams.
• Quadrant with reavers:
⬩ Throw sticky bombs  at the reavers until AoD hits her phase hp.
⬩ Sticky bombs last 6s / 10t.
⬩ Before getting bound by consecutive sticky bombs, the reaver will always walk at least 1 tile.
Note: fast teams should not require sticky bombs.
Phase 2 (2,100,000 - 1,800,000 HP)
Handle mechanics exactly the same as in Phase 1.
Phase 3 (1,800,000 - 600,000 HP)
⬥ Smoke Pool
• All tanked pools taken deal 14k damage spread evenly among the people inside.
• Free dps is to tank the first pool making use of a vitality potion 
• The other pools have to be tanked by at least 2 people both with >7k hp.
• If minions are still alive it is preferred to not have MTs take the pools as it will relocate minions.
⬥ Ice
• If the free dps gets iced they need to be freed as their powerburst will be on cooldown.
⬥ All other mechanics work the same as in 7s.
Minion Lure
To lure the minions using 2 minion tanks (UG tank and CF tank) players need to do the movement correctly. The movement outlined below allows for DPSers to have  for first pillar.
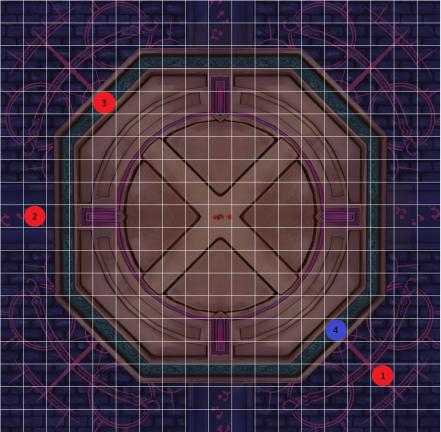
⬥ All 3 DPSers will ult near umbra (see video examples), with UG tank ulting 1sq further out to get aggro (labelled 1 on the images)
⬥ Free should take 2 steps closer to the middle after
⬥ UG Tank will do the following:
• Pre vuln umbra, and surge north after umbra spawns (to 2).
• Vuln glacies, and surge through nex to lure (to 3).
• After luring, dive back to (to 4).
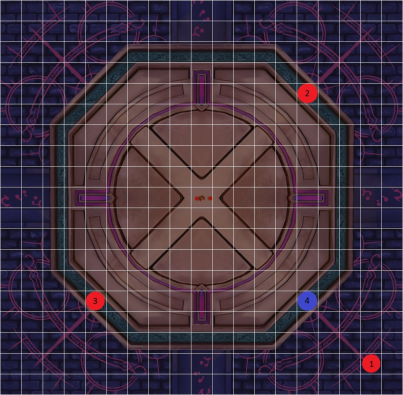 ⬥ CF Tank will do the following:
• Surge through and walk to west midline to get fumus agro (to 2).
• When fumus has aggrod, dive to the surge spot (to 3).
• Once fumus has reached the mid line, surge through into to lure the minions (to 4).
Mage/Melee Base Rotation
Pre-fight
 →
→  →
→  →
→  →
→  →
→  →
→  →
→  →
→ 
 → →
→ →  → →
→ →  →
→  (start)
Phase 1
+  →
→  (4.8s) →
 →
→  + →
+ →  →
→  +
+  →
→  → →
→ → 
Phase 2
 → + r + → → + → →
  →
→  → → →
→ → →
Phase 3
→ → + → → → + → → + r + → → /
Pilars
⬥ → improv with +
⬥ → improv with + ( nex after pillar)
⬥ + → corrupt → → →
⬥  → divert →
  →
→  →
→  (apot)
Zaros
 →
→  →
→  →
→  → →
→ →  → → improv if Nex is not dead yet.
Ranged MT/Free Rotations
Pre-fight
(Equip wand/orb and autocast  ) (base) → → → → → →
  → Equip
  + Auto → Equip
  +
+  → Equip
  +
+  + Auto → Equip + → s → r + Equip + →
  →
→ 
Note: The stall of meteor is optional, however doing it gives more time on crit buff.
Phase 1
 (at 3.0s) → far stall
  → r + → → 7t
  → /
→ /  →
→  → / → → /
Phase 2
→ → → →  → → (swap to on 3/4 stacks) → → → target amalg
  + → → → →
  →
→  → →
→ →
Phase 3
→  →
→  / → → → → → (cancel at 7
  stacks) → → if not phased here improv
Pilars
⬥ → → →
⬥ → → → → → → (apot and equip for cd if needed)
⬥ (cancel on 3 stacks) → → → → →
⬥ → → → →
Note: The pillars rotation is a guideline, feel free to improvise depending on adren, stacks and kill speed.
Zaros
→ → → / → → → → → improv until dead