Aod Basic
Nex: Angel of Death (AoD), Basic Guide 
Introduction
The aim of this guide is provide a basic overview of how to get consistent kills at Nex: Angel of Death with a low-tier geared team. While writing this guide, we aimed to keep each preset within the confines of tier 1 of #unknown-channel. However due to the endgame nature of the boss, this has not been totally possible. Keeping this in mind, we have instead aimed to provide presets that are as low-tiered as possible without consistent strategies becoming unviable.
Disclaimer
This guide is made with the idea of getting started at AoD, and does not cover meta strategies. For those please refer to the main guides in #unknown-channel. For a detailed description of mechanics, please refer to #AoD Mechanics.
Magic 
Magic is both the cheapest and the easiest style to use at AoD. Provided below are presets and strategies for various roles while using the magic combat style.
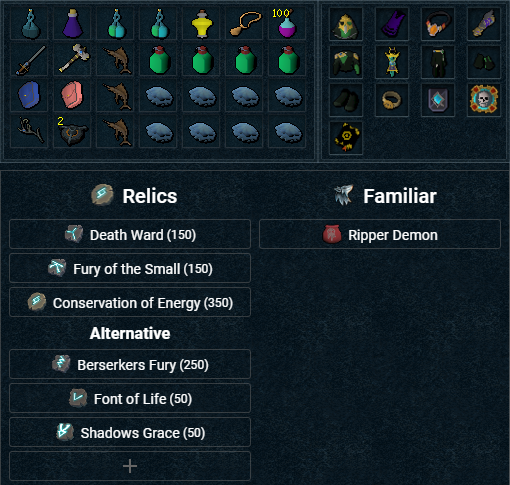
Preset and relics
Magic Base
 and
and  . Place 2
  in the Cruor quadrant. Build back to 100 and start the fight at ~25s on your .
 and
and  the boss. Use your strong abilties such as
  ,
,  ,
,  and
and  till the boss phases at 2.1m hp.
 during this phase on one of the amalgamations.
and build adrenaline until you are able to use your strong abilities such as , and . Use as much as possible in between.
ASAP just before she hits 600k hp. Use strong abilities to phase her if required.
⬥ Once she is lured, apply
during this phase on one of the amalgamations.
and build adrenaline until you are able to use your strong abilities such as , and . Use as much as possible in between.
ASAP just before she hits 600k hp. Use strong abilities to phase her if required.
⬥ Once she is lured, apply 
 + , then and build between last pillar and .
⬥ Pre- last pillar before team arrives.
, and . as much as possible in between.
⬥ Deal with bombs as well as you can, making sure to place them away from your team.
+ , then and build between last pillar and .
⬥ Pre- last pillar before team arrives.
, and . as much as possible in between.
⬥ Deal with bombs as well as you can, making sure to place them away from your team.
Magic Minion Tank
with your base and . Build back to 100 and wait till your base starts the fight. Place 2 in your respective quadrant.
, , ,  ,
,  and till the boss phases at 2.1m hp.
 spot and lose target to centre it. Instructions on losing target provided below:
• Drop
spot and lose target to centre it. Instructions on losing target provided below:
• Drop  → any basic ability on → disassemble → any offensive ability →
• If using queueing replace any offensive ability with an eof spec instead
⬥ Throw a at the amalgamation spot just before it spawns. Release on once amalgamations spawn and use strong abilities till she is almost at 1.8m hp. (Deto Example Clip)
• It is beneficial to use
→ any basic ability on → disassemble → any offensive ability →
• If using queueing replace any offensive ability with an eof spec instead
⬥ Throw a at the amalgamation spot just before it spawns. Release on once amalgamations spawn and use strong abilities till she is almost at 1.8m hp. (Deto Example Clip)
• It is beneficial to use  and while standing behind the amalgamation for this step, so as to help phase and kill the amalgamation.
⬥ Kill your amalgamation.
and while standing behind the amalgamation for this step, so as to help phase and kill the amalgamation.
⬥ Kill your amalgamation.
 across the centre of the arena to lure it to the centre.
⬥ Once this is done, and build adrenaline until you are able to use your strong abilities such as , and , and . Use as much as possible in between.
to the first pillar just before reaches 600k hp.
⬥ Use a on each pillar, then kill them using your strong abilities as available.
⬥ Use
across the centre of the arena to lure it to the centre.
⬥ Once this is done, and build adrenaline until you are able to use your strong abilities such as , and , and . Use as much as possible in between.
to the first pillar just before reaches 600k hp.
⬥ Use a on each pillar, then kill them using your strong abilities as available.
⬥ Use  if necessary to move between pillars or to the middle to pick up bombs. Aim to exit the 3rd pillar with 100% adren or close to it.
between last pillar and .
⬥ Use your strong abilities such as , and , and . as much as possible in between.
⬥ Deal with bombs as well as you can, making sure to place them away from your team.
if necessary to move between pillars or to the middle to pick up bombs. Aim to exit the 3rd pillar with 100% adren or close to it.
between last pillar and .
⬥ Use your strong abilities such as , and , and . as much as possible in between.
⬥ Deal with bombs as well as you can, making sure to place them away from your team.
Free Magic
with your base and . Build back to 100 and wait till your base starts the fight. Place 2 in the Umbra quadrant.
, , and till the boss phases at 2.1m hp.
spot and lose target to centre it. Instructions on losing target provided below:
• Drop → any basic ability on → disassemble → any offensive ability →
• If using queueing replace any offensive ability with an eof spec instead
⬥ Release on once amalgamations spawn and use strong abilities till she is almost at 1.8m hp. (Deto Example Clip)
• It is beneficial to use and while standing behind the amalgamation for this step, so as to help phase and kill the amalgamation.
⬥ Help kill the Umbra and Fumus amalgamations.
on the south centre line. Then use your strong abilities such as , and . Use as much as possible in between.
to the first pillar just before reaches 600k hp.
⬥ Use a on each pillar, then kill them using your strong abilities as available.
⬥ Use if necessary to move between pillars or to the middle to pick up bombs. Aim to exit the 3rd pillar with 100% adren or close to it.
between last pillar and .
⬥ Use your strong abilities such as , and . as much as possible in between.
⬥ Deal with bombs as well as you can, making sure to place them away from your team.
Range 
Ranged is the most expensive style to use at AoD even at an entry level due to  . While making this guide we considered the possibility of excluding the ability. Unfortunately, this was not possible as minion tanking with range simply becomes unviable if you do not have it.
Chinning is possible without , however since we included it for range minion tank we also decided to include it for all roles using the ranged combat style.
Preset and relics

Chinner
with your base and  . Build back to 100 and wait till your base starts the fight. Place 2 in the Glacies quadrant.
 then swap back to your range weapon. Use your strong abilties such as
  ,
,  ,
,  ,
,  ,
,  and
and  till the boss phases at 2.1m hp. Use
  , if available, whenever off cooldown.
 . Once amalgamations have spawned, and use strong abilities until is almost at 1.8m hp. Proceed to help amalgamations as needed.
is phasing and undamageable.
⬥ Once minions are in the centre, use
. Once amalgamations have spawned, and use strong abilities until is almost at 1.8m hp. Proceed to help amalgamations as needed.
is phasing and undamageable.
⬥ Once minions are in the centre, use  and then swap to
  . Use your strong abilities such as , and to kill the minions.
⬥ Once minions are cleared swap back to
. Use your strong abilities such as , and to kill the minions.
⬥ Once minions are cleared swap back to  and
and  . Continue to damage until the next phase.
to the first pillar just before reaches 600k hp.
⬥ Kill the pillars using your strong abilities as available.
⬥ Use if necessary to move between pillars or to the middle to pick up bombs. Aim to exit the 3rd pillar with 100% adren or close to it.
between last pillar and .
⬥ Use your strong abilities such as , , , , and . as much as possible in between.
⬥ Deal with bombs as well as you can, making sure to place them away from your team.
. Continue to damage until the next phase.
to the first pillar just before reaches 600k hp.
⬥ Kill the pillars using your strong abilities as available.
⬥ Use if necessary to move between pillars or to the middle to pick up bombs. Aim to exit the 3rd pillar with 100% adren or close to it.
between last pillar and .
⬥ Use your strong abilities such as , , , , and . as much as possible in between.
⬥ Deal with bombs as well as you can, making sure to place them away from your team.
Range Minion Tank
with your base and . Build back to 100 and wait till your base starts the fight. Place 2 in your respective quadrant.
, , , , and till the boss phases at 2.1m hp. Use , if available, whenever off cooldown.
is almost at 1.8m hp.
⬥ Proceed to and kill your amalgamation. It is beneficial to save your for this step.
across the centre of the arena to lure it to the centre.
⬥ Once this is done, and build adrenaline until you are able to use your strong abilities such as , , , , and . Use as much as possible in between.
⬥ If your chinner requires assistance clearing the minions, you may swap to for the first part of this phase until minions are dead.
to the first pillar just before reaches 600k hp.
⬥ Kill the pillars using your strong abilities as available.
⬥ Use if necessary to move between pillars or to the middle to pick up bombs. Aim to exit the 3rd pillar with 100% adren or close to it.
between last pillar and .
⬥ Use your strong abilities such as , , , , and . as much as possible in between.
⬥ Deal with bombs as well as you can, making sure to place them away from your team.
Free Range
with your base and . Build back to 100 and wait till your base starts the fight. Place 2 in the Umbra quadrant.
, , , , and till the boss phases at 2.1m hp. Use , if available, whenever off cooldown.
is almost at 1.8m hp.
⬥ Proceed help kill the Umbra and Fumus amalgamations. It is beneficial to save your and / for this step.
on the south centre line. Then use your strong abilities such as , , , , and . Use as much as possible in between.
⬥ If your chinner requires assistance clearing the minions, you may swap to for the first part of this phase until minions are dead.
to the first pillar just before reaches 600k hp.
⬥ Kill the pillars using your strong abilities as available.
⬥ Use if necessary to move between pillars or to the middle to pick up bombs. Aim to exit the 3rd pillar with 100% adren or close to it.
between last pillar and .
⬥ Use your strong abilities such as , , , , and . as much as possible in between.
⬥ Deal with bombs as well as you can, making sure to place them away from your team.
Melee 
While being a relatively high damage style at entry AoD, melee does require quite a few more switches to be able to comfortably get through a kill.
Preset and relics

Melee Minion Tank
with your base and  . Build back to 100 and wait till your base starts the fight. Place 2 in your respective quadrant.
 and
and  the boss once attackable. Use your strong abilities such as
  ,
,  ,
,  ,
,  ,
,  and
and  while rotating good basics. Do this until the boss phases at 2.1m hp.
is undamageable. Use your
while rotating good basics. Do this until the boss phases at 2.1m hp.
is undamageable. Use your  on the ZGS spot.
⬥ Cease attacking the boss to charge . Once is damageable, use and bleed a channeled ability.
⬥ Run to your ZGS spot and equip your halberd weapon. and
on the ZGS spot.
⬥ Cease attacking the boss to charge . Once is damageable, use and bleed a channeled ability.
⬥ Run to your ZGS spot and equip your halberd weapon. and  so that they hit both your amalgamation and . (ZGS Example Clip)
⬥ Once is almost at 1.8m hp, proceed to finish killing your amalgamation.
across the centre of the arena to lure it to the centre.
⬥ Once this is done, →
so that they hit both your amalgamation and . (ZGS Example Clip)
⬥ Once is almost at 1.8m hp, proceed to finish killing your amalgamation.
across the centre of the arena to lure it to the centre.
⬥ Once this is done, →  → . Use your strong abilities such as , , , , and while rotating good basics.
⬥ If your chinner requires assistance clearing the minions, you may swap to your halberd weapon for and .
to the first pillar just before reaches 600k hp.
⬥ Kill the pillars using your strong abilities as available.
⬥ Use if necessary to move between pillars or to the middle to pick up bombs. Aim to exit the 3rd pillar with 100% adren or close to it.
→ → .
⬥ Use your strong abilities such as , , , , and while rotating good basics until both the pillar and are dead.
⬥ Deal with bombs as well as you can, making sure to place them away from your team.
→ . Use your strong abilities such as , , , , and while rotating good basics.
⬥ If your chinner requires assistance clearing the minions, you may swap to your halberd weapon for and .
to the first pillar just before reaches 600k hp.
⬥ Kill the pillars using your strong abilities as available.
⬥ Use if necessary to move between pillars or to the middle to pick up bombs. Aim to exit the 3rd pillar with 100% adren or close to it.
→ → .
⬥ Use your strong abilities such as , , , , and while rotating good basics until both the pillar and are dead.
⬥ Deal with bombs as well as you can, making sure to place them away from your team.
Free Melee
with your base and . Build back to 100 and wait till your base starts the fight. Place 2 in your respective quadrant.
and the boss once attackable. Use your strong abilities such as , , , , and while rotating good basics. Do this until the boss phases at 2.1m hp.
is undamageable. Use your on the Umbra ZGS spot.
⬥ Cease attacking the boss to charge . Once is damageable, use and bleed a channeled ability.
⬥ Run to your ZGS spot and equip your halberd weapon. and so that they hit both your amalgamation and . (ZGS Example Clip)
⬥ Once is almost at 1.8m hp, proceed to help kill the Umbra and Fumus amalgamations.
is undamageable.
⬥ Once she becomes damageable, → → . Use your strong abilities such as , , , , and while rotating good basics.
⬥ If your chinner requires assistance clearing the minions, you may swap to your halberd weapon for and .
to the first pillar just before reaches 600k hp.
⬥ Kill the pillars using your strong abilities as available.
⬥ Use if necessary to move between pillars or to the middle to pick up bombs. Aim to exit the 3rd pillar with 100% adren or close to it.
→ → .
⬥ Use your strong abilities such as , , , , and while rotating good basics until both the pillar and are dead.
⬥ Deal with bombs as well as you can, making sure to place them away from your team.
Necromancy
Necromancy is currently one of the best styles in general at AoD, and it can be used both at entry level and at the high end.
Preset and relics
Necromancy Minion Tank/Free/Hammer
 →
→  →
→  →
→  →
→  before the boss spawns. Place 2 in your respective quadrant if reavers are expected.
 the boss once attackable. Use your strong abilities such as
  /
/  /
/  /
/  /
/  while rotating good basics. Do this until the boss phases at 2.1m hp. Hammer should use
  + Special Attack as the first ability on the boss.
 with basics while is undamageable.
⬥ Command Skeleton before the boss becomes damageable and use strong abilities to phase it.
⬥ AOD will phase at 1.8m hp.
⬥ The Necromancy base will kill the amalgamations using
with basics while is undamageable.
⬥ Command Skeleton before the boss becomes damageable and use strong abilities to phase it.
⬥ AOD will phase at 1.8m hp.
⬥ The Necromancy base will kill the amalgamations using  →
→  → →
→ →  → (assuming Soundbound Lantern
  and 3/4+ Residual Souls ).
.
⬥ This is a good time to use
and 3/4+ Residual Souls ).
.
⬥ This is a good time to use  +
+  →
→  → → → → .
⬥ Once minions are lured, you can use → → → → to kill the minions and do good damage to .
to the first pillar just before reaches 600k hp.
⬥ Kill the pillars using your strong abilities as available, such as (which can be bounced between pillars if timed correctly).
⬥ Split Soul can be used safely on pillars 2-3 if is lured into the fourth correctly.
⬥ Use if necessary to move between pillars or to the middle to pick up bombs. Aim to exit the 3rd pillar 4/5 Residual Souls so you can use on .
(if you are confident in bouncing it onto ) → → .
⬥ Use your strong abilities such as , , , and while rotating good basics until both the pillar and are dead.
⬥ Deal with bombs as well as you can, making sure to place them away from your team.
→ → → → .
⬥ Once minions are lured, you can use → → → → to kill the minions and do good damage to .
to the first pillar just before reaches 600k hp.
⬥ Kill the pillars using your strong abilities as available, such as (which can be bounced between pillars if timed correctly).
⬥ Split Soul can be used safely on pillars 2-3 if is lured into the fourth correctly.
⬥ Use if necessary to move between pillars or to the middle to pick up bombs. Aim to exit the 3rd pillar 4/5 Residual Souls so you can use on .
(if you are confident in bouncing it onto ) → → .
⬥ Use your strong abilities such as , , , and while rotating good basics until both the pillar and are dead.
⬥ Deal with bombs as well as you can, making sure to place them away from your team.