Github Comprehensive Tutorial
Introduction
GitHub is a service that lets users maintain a repository of information that is organized, version controlled, and allows for easy contributions from many users. PvME uses GitHub to maintain its guides and information.
This guide covers how to use Github for contributing to PvME. If you would like to directly skip to the instructions, you can directly navigate to the Tutorial section using the pinned links, and if you would like a quick tutorial, use #Github Quick Guide.
Once you have completed this tutorial, you can look at #Github Tips and Troubleshooting for more tips, tricks, and other information.
How GitHub Works
⬥ GitHub is an Internet hosting service that offers the use of Git repositories, which is how PvME stores its information and guides.
⬥ A repository is a collection of all the files and folders for a project, that is tracked and version controlled.
⬥ Anyone can contribute to the PvME repository.
⬥ The basic contribution process looks like this:
fork PvME repo → make changes → commit changes → make pull request → changes get accepted
⬥ A brief explanation of the steps:
• Make a copy of the repository, also known as forking the repository. You now have an up-to-date copy of the PvME files.
• Make changes to the files in your repository and commit them to your own repository. You can think of this as "saving" your changes.
• To add your new changes to the PvME repository, make a pull request. This tells PvME that you have changes you want pulled from your files into PvME's files.
• Wait for your pull request to be accepted. When this is done, your changes will now be a part of PvME's guides!
• You can now re-sync, or delete and re-fork the repository once you want to make more changes.
Tutorial
The goal of this tutorial is to add your name to the list at the bottom of this guide.
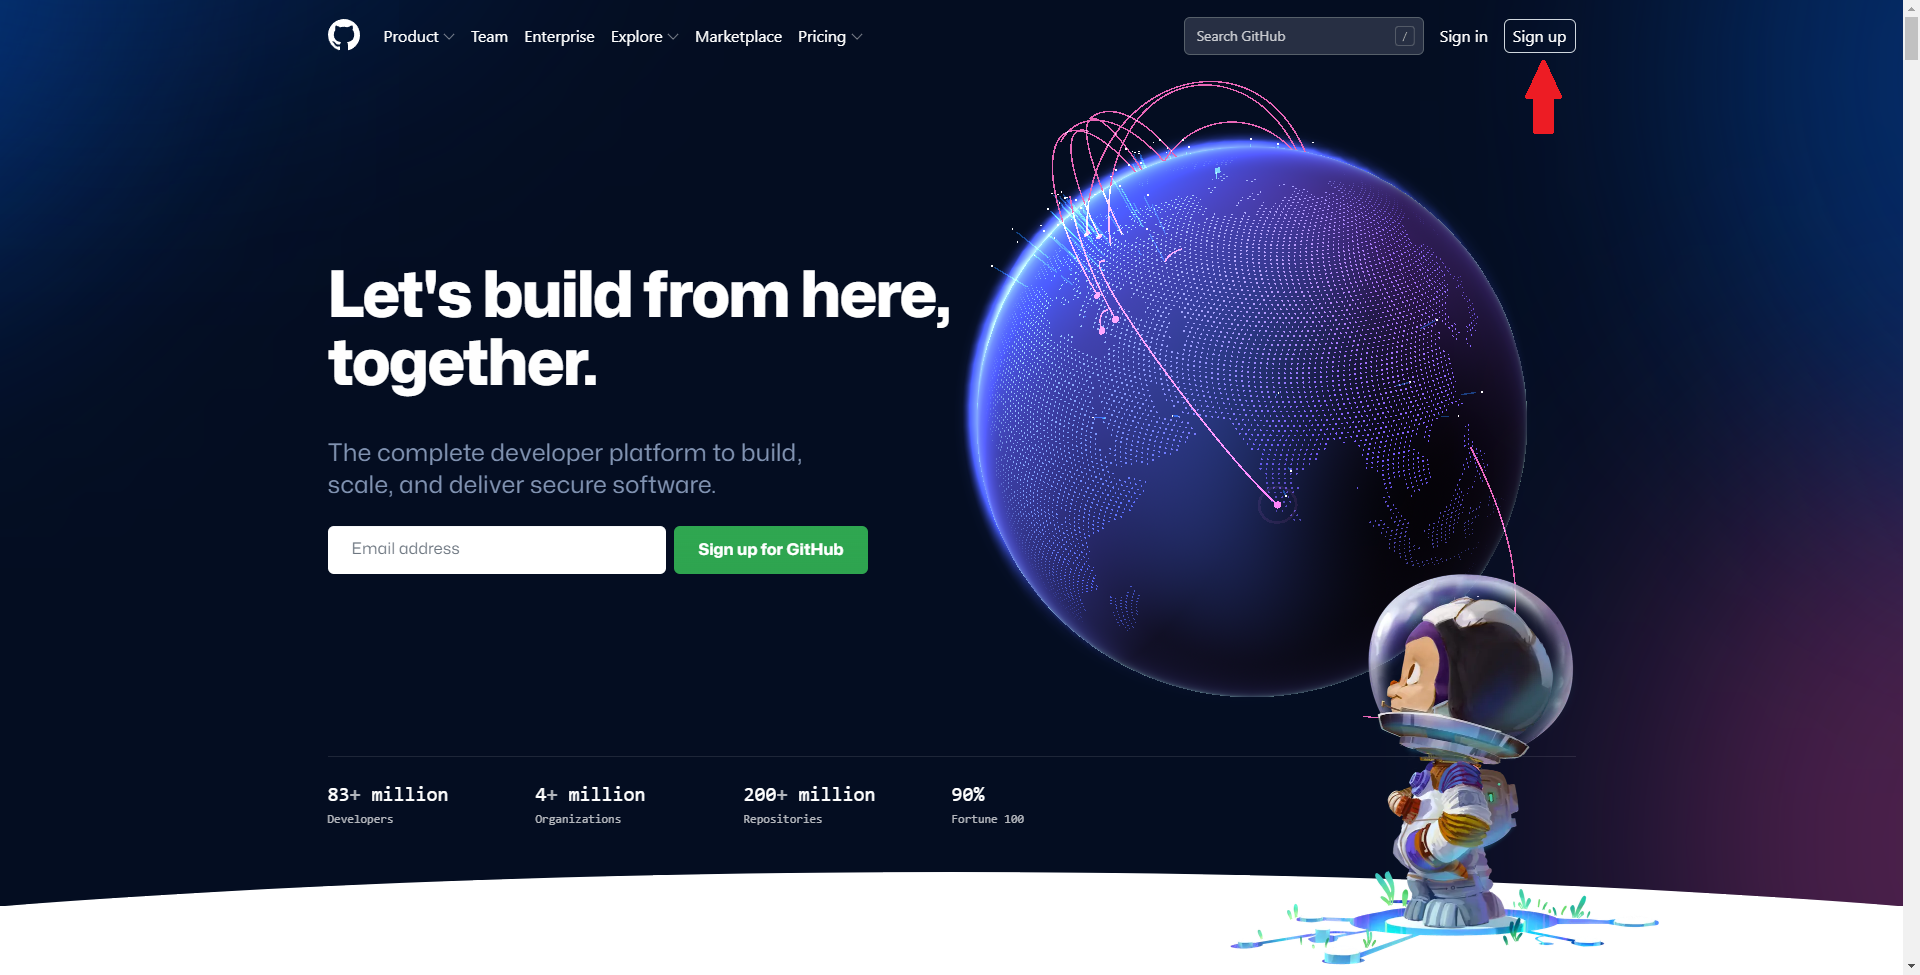
Step 1: Create a GitHub Account**^^ (https://github.com)
⬥ Go to GitHub and use the Sign Up button on the top right of the page.
⬥ Your username and e-mail account will be visible, so ensure you don't include personal information.
⬥ If you have a GitHub account already, it is advised to make a new one for PvME unless you are certain that you haven't doxxed yourself in your commit histories.
For experienced users: If you use the Git CLI, make sure you check your git config [user.name|user.email] configs, as these settings can still dox you, even if you use a new account.
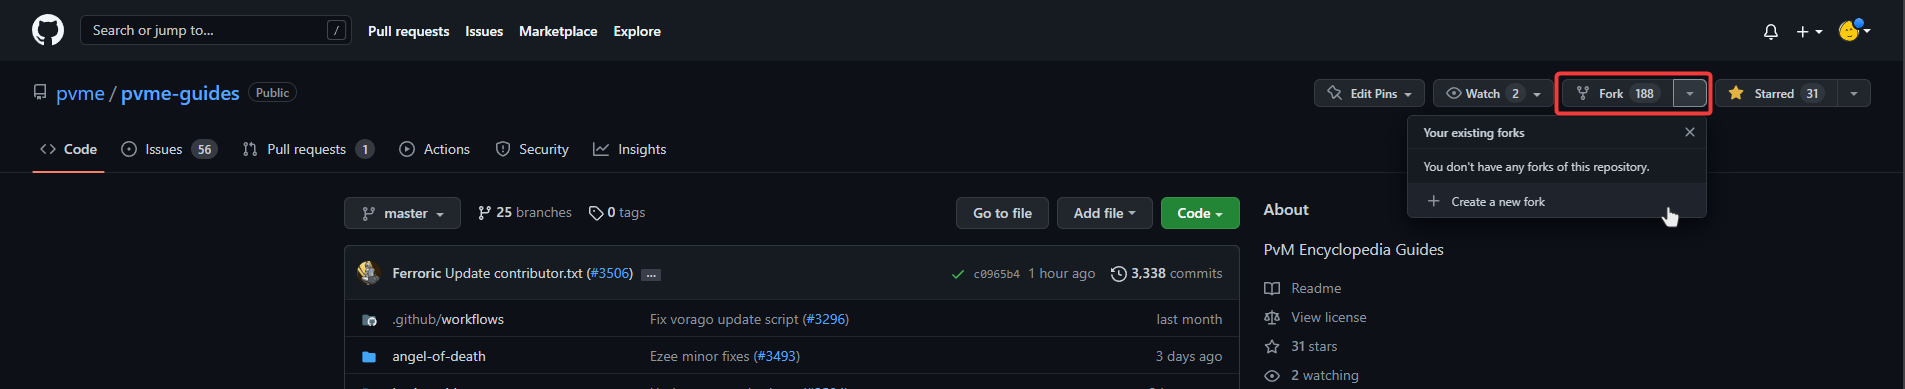
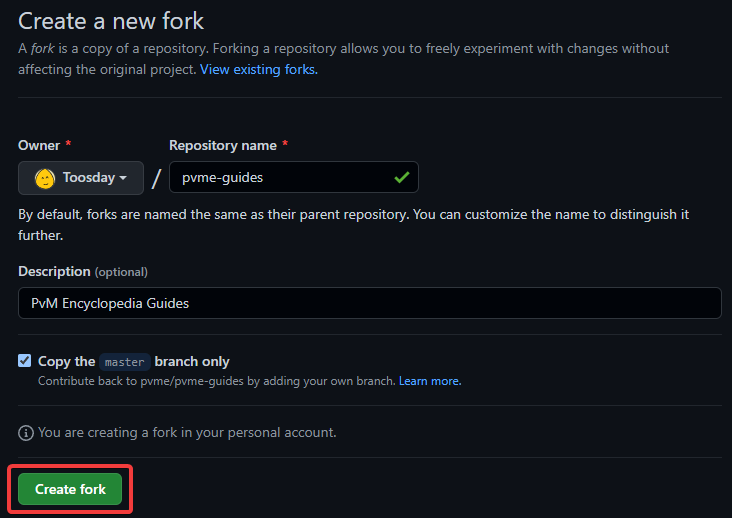
Step 2: Fork the PvME Repository**^^ (https://github.com/pvme/pvme-guides)
⬥ This creates a personal copy of the repository that you can then edit at your leisure.
⬥ Click the Fork button at the top right of the page, then confirm the creation of the fork.
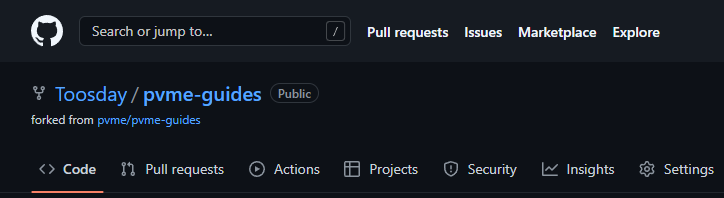
Step 3: Open Your Forked Repository In Your Browser
⬥ You can find it by selecting Your Repositories in the dropdown menu, found by clicking your profile at the top right.
⬥ You will know you are in your forked repository when the top-left of the website looks like this:
For experienced users: You can just clone the repository locally and work from your local machine, whatever you prefer.
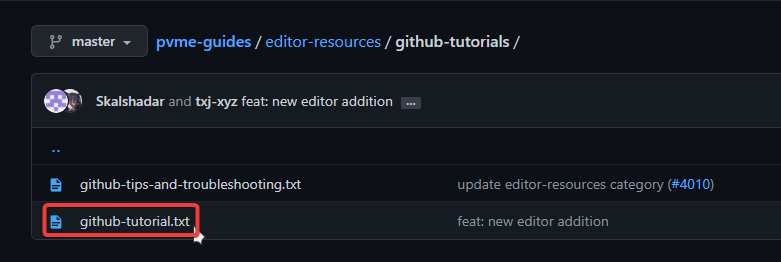
Step 4: Navigate to the github-tutorial.txt File
⬥ The structure of the PvME repository mimics the server category/channel structure, to navigate through the repository click through folders that share the name of the discord categories, until you find this guide in the GitHub repository.
• If you are struggling to find a file you can use the search bar at the top.
⬥ The file is located at editor-resources > github-tutorials > github-tutorial.txt.
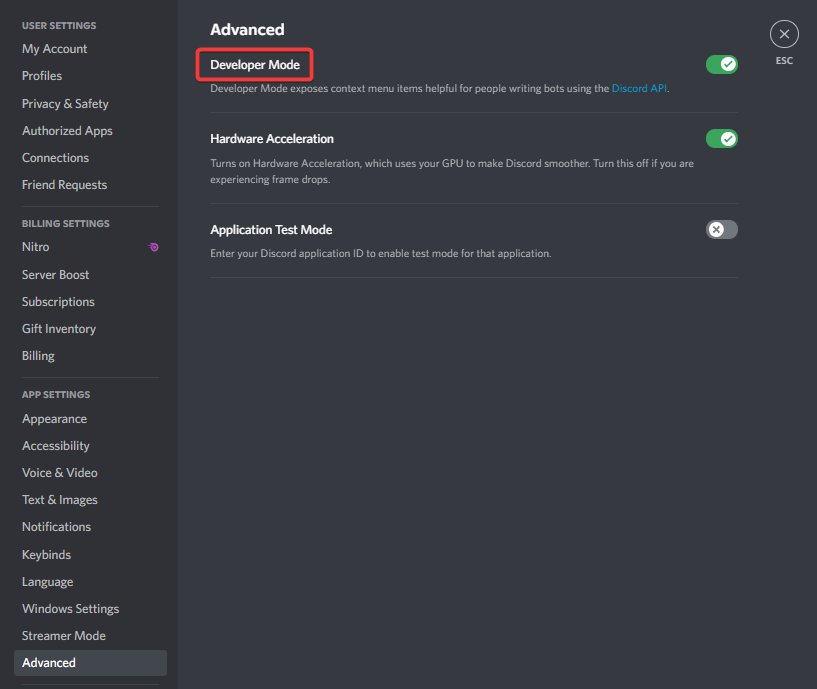
Step 5: Enable Discord Developer Options and Copy Discord ID
⬥ This is required to be able to copy your own Discord ID.
⬥ These settings are accessible at Discord App Settings > Advanced > Developer Console > (turn on).
⬥ After enabling them, you can right-click your name or profile picture to copy your own Discord ID.


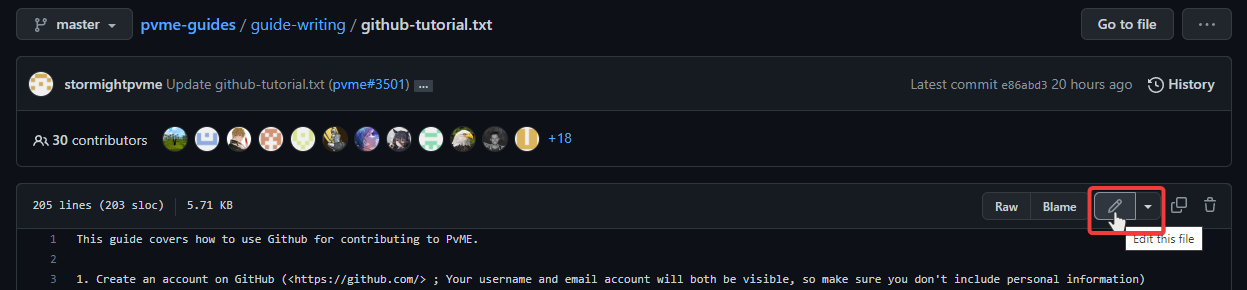
Step 6: Your First Change and Contribution
⬥ Click the Edit icon at the top right to begin editing the file. It looks like a pencil.
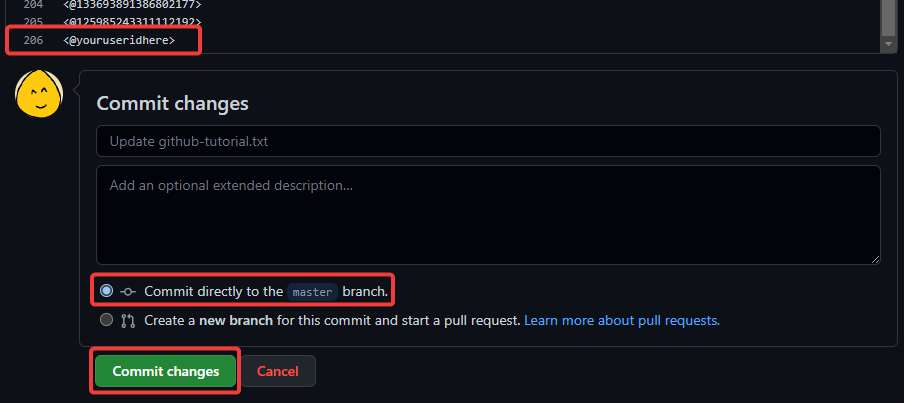
⬥ Paste your Discord ID at the bottom of the file, below the other IDs, in the format <@yourusedidhere>.
• Replace the text with your Discord ID.
⬥ Then commit (i.e. save) your changes.
• Leave the settings at their default (i.e. "Commit directly to the master branch").
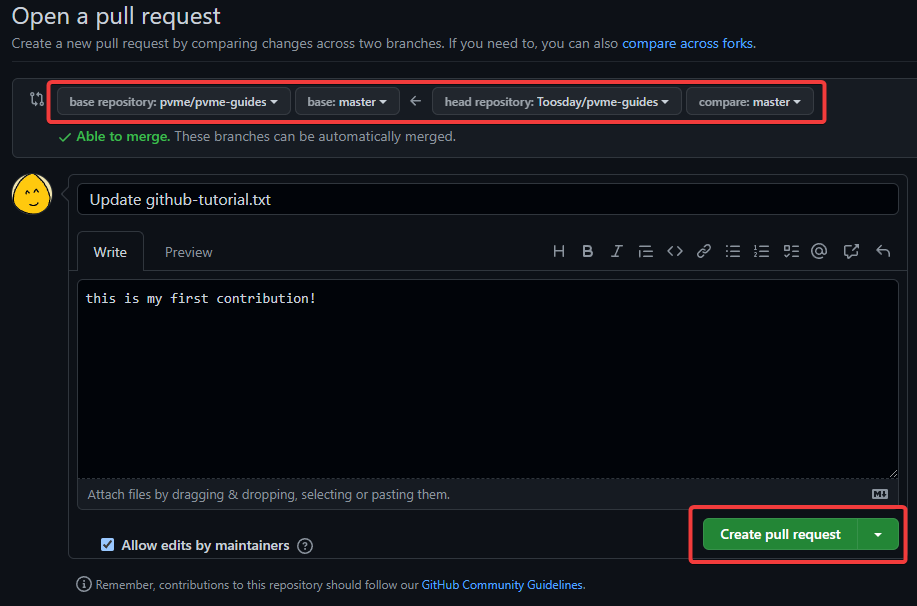
Step 7: Create A Pull Request
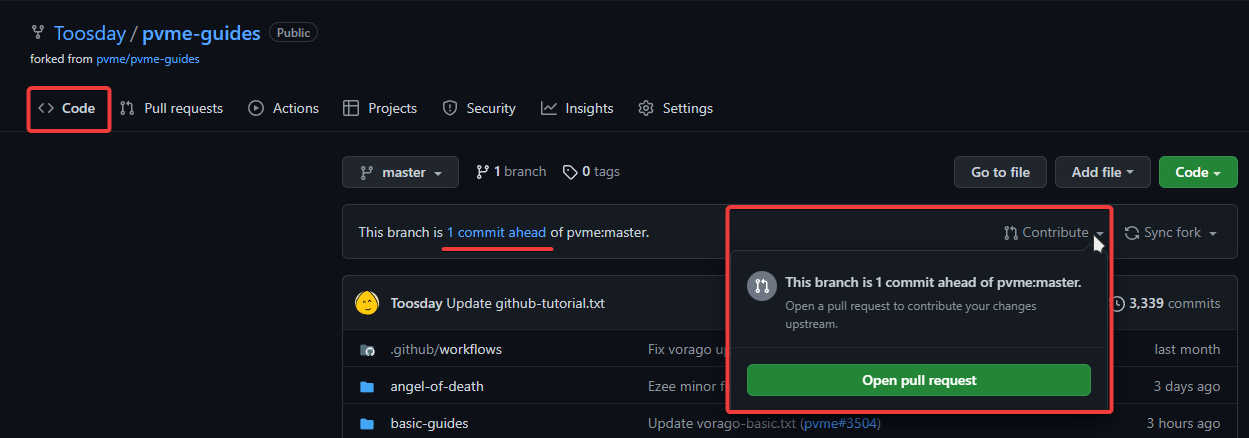
⬥ Navigate to the Code tab in your personal repository. You will notice that you are now 1 commit ahead - this means you have changes ready to contribute!
⬥ Click the Contribute button and select Pull Request from the drop-down.
⬥ You can add type something like "add my name to github-tutorial" as the commit message, and then create the pull request.
Step 8: That's it!
⬥ You're done! If your changes are approved, then your pull request will be merged into PvME.
⬥ The #unknown-channel channel will get updated, and your name will appear in the channel.
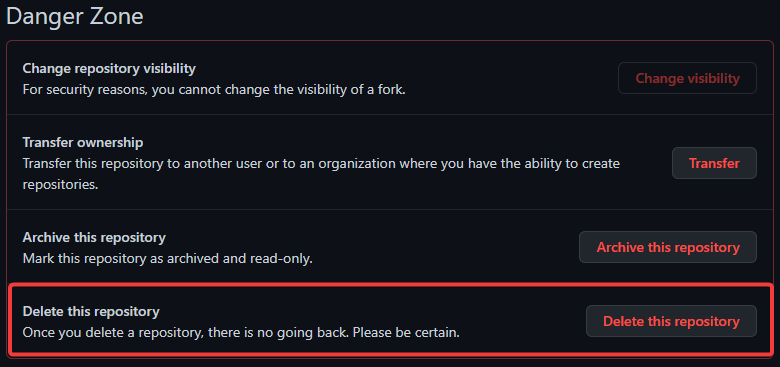
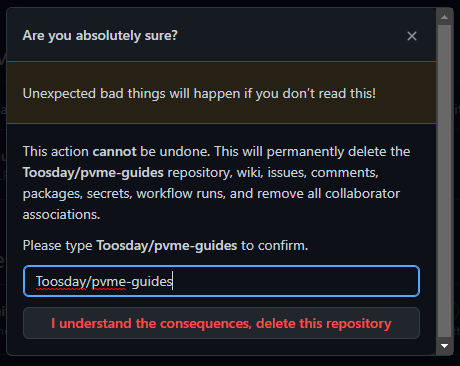
⬥ You can resync or delete your fork after the pull request is accepted. To delete a fork, go to your repo Settings, and scroll down till you find the option to delete. Then follow the confirmation process.
Successfully Completed PvME's Github Tutorial
#ptazolite
#brainrs
#Unknown user
#joshge
#robomi
#Unknown user
#Unknown user
#pernix
#enhi
#grime2
#.ndy
#rinswaps
#geherman
#Unknown user
#Unknown user
#Unknown user
#Unknown user
#trackandxc
#Unknown user
#Unknown user
#Unknown user
#Unknown user
#Unknown user
#Unknown user
#zerocheus
#Unknown user
#Unknown user
#ado111
#Unknown user
#Unknown user
#durmoth
#ykrors
#brightrailgun
#Unknown user
#Unknown user
#roar.roar
#Unknown user
#Unknown user
#senie
#godmandevil8
#mionee.
#Unknown user
#Unknown user
#Unknown user
#emmett_shark
#Unknown user
#pvme
#Unknown user
#oraknight
#basetank
#Unknown user
#Unknown user
#Unknown user
#kukkelis
#Alex Grooders
#Unknown user
#Unknown user
#Unknown user
#Unknown user
#aussieman422
#Unknown user
#turtle9491
#Unknown user
#Unknown user
#kyroh
#cakeaholic.
#terpsichore
#diealive
#dming
#pixel.green
#Unknown user
#Unknown user
#Unknown user
#Unknown user
#Unknown user
#annietheeagle
#bankserino
#Unknown user
#miagroves
#Unknown user
#Unknown user
#Unknown user
#finah
#.takyon.
#Unknown user
#Unknown user
#phatkez
#friggityfrank
#hightdetal
#Unknown user
#Unknown user
#Unknown user
#w62
#alluneve
#Unknown user
#inferium
#Unknown user
#Unknown user
#Unknown user
#Unknown user
#Unknown user
#Unknown user
#Unknown user
#Unknown user
#sunforged
#Unknown user
#Unknown user
#Unknown user
#akritia
#Unknown user
#sambanator
#Unknown user
#Unknown user
#Unknown user
#Unknown user
#Unknown user
#Unknown user
#Unknown user
#Deleted User 08176809
#Unknown user
#washlyjay
#dr.fishbones
#blockdude
#Unknown user
#Unknown user
#txj
#codemati
#Unknown user
#whimbtw
#Unknown user
#.ezee
#ferroric
#Unknown user
#Unknown user
#sreveryn
#oscar
#stormight
#Unknown user
#Unknown user
#rcm37
#Unknown user
#Unknown user
#moxielf
#.orangespice
#Unknown user
#Unknown user
#epsilon39
#Unknown user
#skalshadar
#Unknown user
#Unknown user
#chrash.
#Unknown user
#Unknown user
#obelex
#zombunny
#adderinoo
#neonx222
#Unknown user
#sad.wolf
#Unknown user
#tinky1
#Unknown user
#Unknown user
#Unknown user