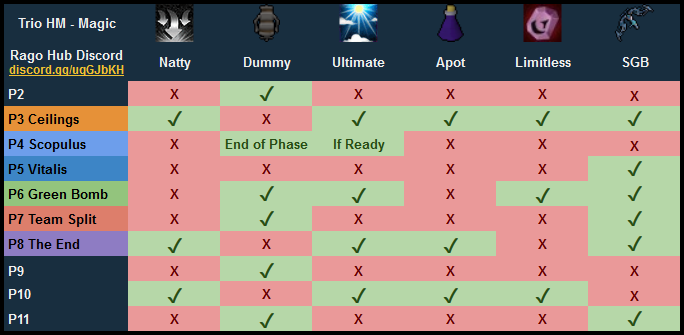
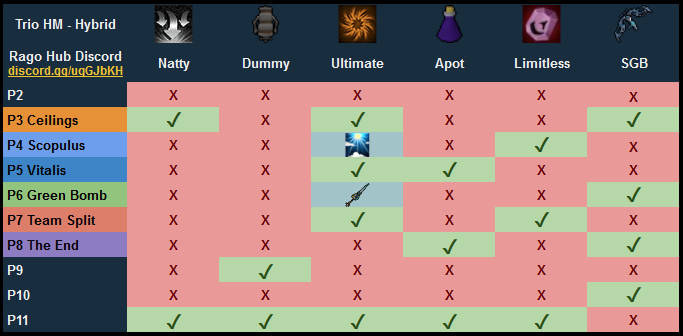
Trio Hardmode Vorago
Trio Hard Mode
For more information visit the Rago Hub Discord community
Introduction
Trio Hard Mode is one of the most challenging fights at Vorago. Weekly changing special mechanics, several combat style compositions, and an individually varying player skill level - All of this results in the fight being very dynamic and at times extremely difficult.
This Trio Hard Mode Strategy Guide will be separated into roles, combat styles, and skill levels. Generally speaking, the strategies described can be applied to most, if not all combat style compositions.
General Requirements
⬥ Proper gear (T90+ weapons, T80+ power armour, Invention perks)
⬥ The team's Base Tank (melee) is responsible for applying the Statius's Warhammer  special attack in all phases
⬥ A base knowledge for approaching Vorago in Hard Mode, all its weekly special attacks and appropriate intuition for occurrences such as random Red Bombs
⬥ Intercept 
⬥ Heal Other 
⬥ Powerburst of Vitality  (14k entry hit, Green Bomb damage, Team Split damage)
Recommendations
⬥ Seren Godbow 
⬥ Zaros Godsword  for the Base Tank
⬥ Eldritch Crossbow  for ranging Bomb Tanks
⬥ Target Cycle
⬥ Nihil 
Base Tank - Introduction 

Introduction
Basing Trio Hard Mode is typically performed by a Melee. The Base Tank has several responsibilities, the most important being to apply the Statius's Warhammer special attack in every phase. Additionally you are expected to properly lure Vorago in phase 1 on the eastern wall so that the Climber (referred to as Bomb Tank #2) does not receive any Blue Bombs.
Required
⬥ Statius's Warhammer (stored in an Essence of Finality  , you will be using at least 10 SWH specs per kill, this can be very costly otherwise)
Recommended
⬥ Heightened Senses  (this relic is essential for approaching fast kills with advanced strategies)
⬥ Stalling Abilities
⬥ Refer to the official Rago Hub spreadsheet for advanced ability damage rotations: https://docs.google.com/spreadsheets/d/1q7zscYcfJ9qXeIptQmXJiWUloalwDNtmxIOX7bqgkJg/edit?usp=sharing
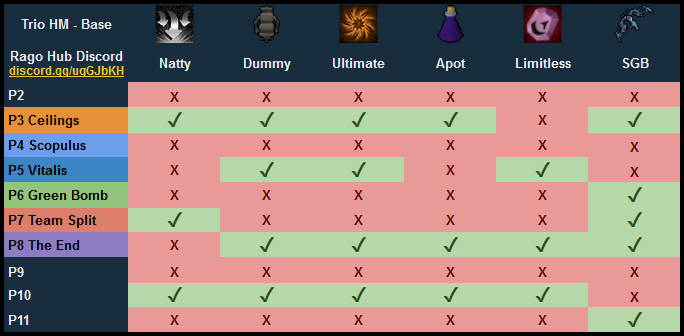
Strategy Summary
Base Tank - Phases 1 & 2
Base Tank - Phase 1
⬥ In phase 1 the Base Tank is responsible for luring Vorago in such a way that the top lure cannot receive Blue Bombs. This also causes the Base Tank to receive Blue Bombs on top of melee Swipes, therefore pray flicking between melee  and magic
  is required. Additionally, when the kill timer reaches ~ 30 seconds, you must bring the boss close enough to the final platform of the climb, from where the Climber will voke
  Vorago into jump spot.
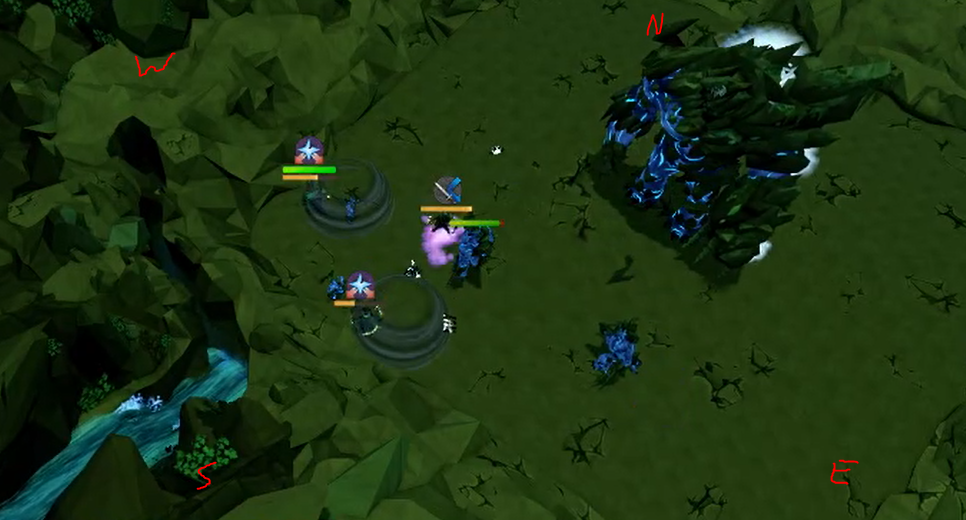
⬥ The easiest way to position correctly in the start is by standing east of Vorago's spawn location, tagging the boss, moving two tiles to the east, and finally two tiles to the south. By moving two tiles east, Vorago is far enough away from the Climber. Moving two tiles south and then attacking the boss causes you to face north-west, enabling the capability of simply surging  north-west when it is time to take the boss closer to the Top Lure.
⬥ You should surge as the top lure is jumping the last ledge. Continue running to stall Vorago until the Top Lure vokes, then bladed dive  south. Provoke Vorago, and wait for the Top Lure to jump.
⬥ One of the most important aspects of Phase 1 is to pay attention to Vorago's lifepoints - You do not want to deplete it too quickly, as you may accidentally reset the HP. Due to the ease of getting Vorago's HP low enough in time, you will generally have to slow your damage down intentionally before surging.
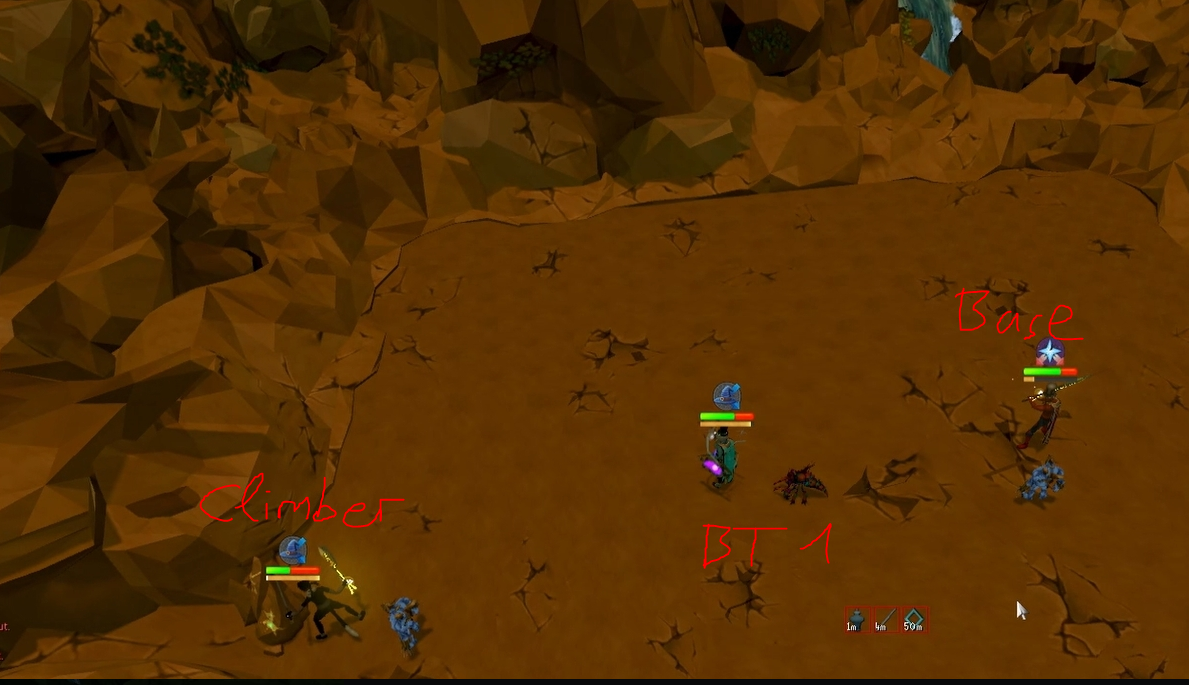
⬥ Phase 1 initial positioning
Base Tank - Phase 2
The Base Tank's responsibilities throughout Phase 2 are not any different to basing Normal Mode.
Base Tank - Phases 3 - 8
Base Tank - Phase 3 Ceilings
⬥ Strategy
• (optional, advanced) Use Natural Instinct  in the end of Phase 2
• Pre-Ultimate  as you drop into Phase 3
• Drink from your Adrenaline Potion 
• Place a Combat Dummy  in the start of the phase
• Apply SWH as soon as possible
⬥ Fast teams should simply aim for 0-linking the phase.
⬥ If a Reflect  occurs in this phase, it is best to utilize your Seren Godbow special attack
  shortly after.
⬥ For slower teams you may also make use of your Limitless  ability during Berserk .
Base Tank - Phase 4 Scopulus
The Base Tank has to lure all Scopuli, in addition to hammering the eastern and northern Scopulus. A frequent usage of Vulnerability bombs  is very useful for keeping up all Scopuli's stacked and aggressioned towards you, due to vuln bombs dragging Scopulus' aggro.
⬥ Strategy
• Stand directly west of the western Scopulus
• Throw a Vulnerability Bomb 3 - 4 seconds before Target Cycle to the eastern Scopulus's spawn location
• Throw another bomb as soon as possible (after 3 ticks) directly under you in order to drag the western Scopulus's aggression
• Attack both southern Scopuli with a few abilities  >
>  first Scop > second Scop
• As the northern Scopulus comes close enough, target, attack and voke it
• Run directly south by a few tiles and back north, straight through the Scopuli (this should stack the Scopuli next to / on top of each other)
⬥ For slower phases you should utilize Devotion  and eventually Reflect .
Base Tank - Phase 5 Vitalis
Trio Hard Mode approaches Phase 5 similar to a fast Duo Normal Mode Vitalis Phase 3. All players stay in melee distance and must pray flick between melee deflme4 and magic deflm4. The Base Tank commonly takes the south-western corner in melee distance to Vorago.
⬥ Strategy
• Pre-Ultimate as you drop into Phase 5
• Place a Combat Dummy in the start of the phase
• Apply SWH as soon as possible
• Activate Limitless for this Berserk
⬥ Fast teams should simply aim for 0-linking the phase, just like Phase 3.
⬥ If a Reflect occurs in this phase, it is best to utilize your Seren Godbow special attack shortly after.
Base Tank - Phase 6 Green Bomb
At the beginning of the phase, it is recommended to voke Vorago and walk the boss far enough so that you will not be harmed by a mid mist, and can attack vorago from at least two different of the 9 grid arena sections of the arena.
⬥ Strategy
• Apply SWH as soon as possible
⬥ On this phase, you will simply be dumping thresholds. On Target Cycle, release your hammer with a bled assault and continue to thresh.
⬥ SGB can be perfectly implemented in your pre-Reflect ability damage rotation.
⬥ If you receive a Green Bomb, simply drink a sip of your Powerburst of Vitality in order to easily survive it. If the Green Bomb is not on you, it is an optimal strategy to heal the respective Bomb Tank, shortly after they tanked the 10,000 detonation damage.
Base Tank - Phase 7 Team Split
Similar to Phase 6, you will again only be hammering and thresholding.
⬥ Strategy
• Apply SWH as soon as possible (in Target Cycle)
• Reprisal  the first Team Split if you used Target Cycle
⬥ There exist several advanced strategies. Based on your preference, you can either utilize your Adrenaline potion during Phase 7 to have adrenaline to Natty at the end of the phase, or perform a slightly less adrenaline-intensive rotation and save your the Apot for Phase 8.
Base Tank - Phase 8 The End
⬥ Strategy
• (optional, advanced) Use Natural Instinct in the end of Phase 7
• Pre-Ultimate as you drop into Phase 8
• (optional, if available) Drink from your Adrenaline Potion
• Place a Combat Dummy in the start of the phase
• Apply SWH as soon as possible (on Target Cycle)
• (optional, if available) Activate Limitless for this Berserk
⬥ Fast teams should easily be capable of skipping this phase's Stand Up.
⬥ If a Stand Up is expectably happening, your team should tag either Red Bombs or Blue Bombs, depending on what you agree on. This aspect is a responsibility of your Bomb Tanks and the Base Tank does not have to worry about it.
⬥ Drink a sip of the Powerburst of Vitality a few seconds after Stand Up. Alternatively, your bomb tanks may just choose to Barricade  and Intercept on Stand Up, due to the relative ease of 0-linking this phase.
Base Tank - Tips & Rotations
General Tips
⬥ The Statius's Warhammer special attack enables all following abilities in that tick cast by yourself with 100% hitchance
⬥ Following advanced ability rotations as provided on the Rago Hub spreadsheet
⬥ This includes pre-Berserk and pre-Barge rotations, or at a highest skill level utilizing Darkbow  auto attacks for optimal adrenaline gain
⬥ Heightened Senses and Fury of the Small  cause a drastic improvement for your Berserk ability rotations, significantly more than Berserker's Fury
  would
would
⬥ Optimizing the usage of Natural Instinct
⬥ Remove the Mobile perk  from your armour so that Surge , Escape
  , and Bladed Dive generate adrenaline
⬥ Disruption Shield  should be used during P2 BHD, end of P3, end of P4 / start of P5, during first TS P7 and before P8 Stand Up
⬥ Greater Fury  the Combat Dummy in the start of P7 (since you are not pre-Barging)
⬥ Take Crackling  off for Reflects and end of P2 / P9
Rotations
For advanced ability damage rotations, refer to the official Rago Hub spreadsheet:
https://docs.google.com/spreadsheets/d/1q7zscYcfJ9qXeIptQmXJiWUloalwDNtmxIOX7bqgkJg/edit?usp=sharing
Strategy Summary
Ranged Bomb Tank - Introduction 

Introduction
Bomb Tanking at Trio Hard Mode can be performed in several setups. This section focuses Ranged, covering both Bomb Tank's responsibilities: Bomb Tank #1 and Bomb Tank #2 (the Climber). If you are Ranged bomb tanking with a Hybrid on your team, read up on both this and the Hybrid section. This guide section also covers strategies for approaching Double Ranged bomb tanking in Trio Hard Mode.
Required
⬥ Mechanised Chinchompas  for Scopulus Phase 4
⬥ Up to 4 Combat Dummies
Recommended
⬥ Heightened Senses
⬥ Ruby, Onyx and Hydrix bakriminel bolts 


⬥ Seren Godbow and Darkbow special attacks each stored in an Essence of Finality
⬥ Refer to the official Rago Hub spreadsheet for advanced ability damage rotations:
https://docs.google.com/spreadsheets/d/1q7zscYcfJ9qXeIptQmXJiWUloalwDNtmxIOX7bqgkJg/edit?usp=sharing
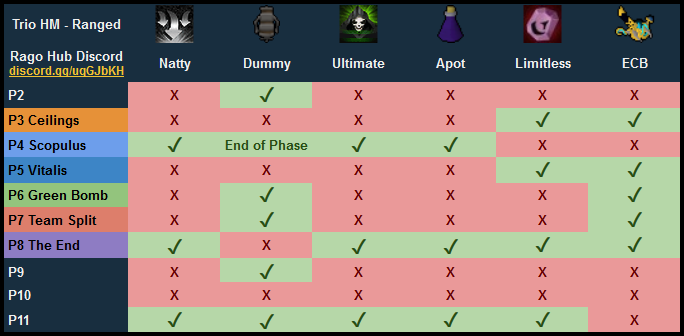
Strategy Summary
Ranged Bomb Tank - Phases 1 & 2
Ranged Bomb Tank - Phase 1
⬥ It is always recommended to have one Bomb Tank ranging in Trio Hard Mode, who will pre-Ultimate  start of Phase 1 and deal damage to Vorago, referred to as Bomb Tank #1. The other Bomb Tank is responsible for Climbing and Top Luring, also referred to as Bomb Tank #2.
⬥ A simple Death's Swiftness standard rotation should be enough to bring Vorago's lifepoints low enough before the Climber jumps. Your Ultimate should be placed right in melee distance, west of Vorago's spawn location. This position should provide you 100% uptime of your Ultimate for most locations that Vorago is lured to. Slow down dealing damage as Vorago reaches 50,000 HP and off early enough to avoid a reset.
⬥ If the Base Tank receives the second Red Bomb (random), you should cast Heal Other to support the Base Tank's food management.
⬥ Phase 1 initial positioning
Ranged Bomb Tank - Phase 2
⬥ The Bomb Tank's responsibilities throughout Phase 2 are not any different to bomb tanking Normal Mode.
⬥ Usually the Bomb Tank #2 (the Climber) takes over Barricading and intercepting the first and third Red Bomb. The Bomb Tank #1 cade cepts the second one.
⬥ You should have one person dedicated to shattering  the end of Bring Him Down (preferably the Ranger).
⬥ One Bomb Tank is assigned to placing a Combat Dummy during Bring Him Down.
Ranged Bomb Tank - Phases 3 - 8
Ranged Bomb Tank - Phase 3 Ceilings
⬥ Strategy
• Pre-ECB
• Dump SGB and thresholds
⬥ Fast teams should simply aim for 0-linking the phase.
⬥ If a Reflect occurs in this phase, it is highly recommended to utilize Devotion and intercept the other Bomb Tank.
Note: If your team consists of a Hybrid Bomb Tank, it is very important to voke Vorago as he jumps for the first time.
Ranged Bomb Tank - Phase 4 Scopulus
Your Base Tank is responsible for stacking all 3 Scopuli. At times though, a Scopulus might reaggro to one of the Bomb Tanks. In this case: run! Make sure to stay at the outside of the arena in order to avoid passing any Blue Bombs to your Base Tank.
⬥ Strategy
• (optional, advanced) Use Natural Instinct in the end of Phase 3
• Pre-Ultimate as you drop into Phase 4
• BT#1 Devotion Intercept
• Equip Mechanised Chinchompas once the first 2 Scopuli are stacked up
• If available, prioritize using the Darkbow special attack (stored in EoF ) with Chins equipped
• Drink from your Adrenaline Potion after your first Darkbow
• Place a Combat Dummy in the end of the phase (decide which of your Bomb Tanks)
⬥ The BT#1 utilizes Devotion Intercept on the other BT for the second or third Blue Bomb in order to avoid taking too much damage. For slower phases, the other BT#2 should follow it up shortly after the first Devotion runs out.
Note: Do not use Vulnerability Bombs as Bomb Tank throughout Phase 4!
⬥ The Ranged Bomb Tank should always take the southern position during P4, due to lower attack range of Ranged dual wield compared to Magic. Positioning for Bomb Tanks in Phase 4 Scopulus
Ranged Bomb Tank - Phase 5 Vitalis
Trio Hard Mode approaches Phase 5 similar to a fast Duo Normal Mode Vitalis Phase 3. All players stay in melee distance and must pray flick between melee deflme4 and magic deflm4. The Bomb Tanks commonly take the north-western corner and the eastern side in melee distance to Vorago.
Note: In the start of the phase, you can position 1 tile out of melee distance, but be ready to step into MD as the Vitalis orb explodes in order to avoid getting blocked or lost Line of Sight from spawned Vitali.
⬥ Strategy
• Pre-ECB
• Dump SGB and thresholds
⬥ Fast teams should simply aim for 0-linking the phase, just like Phase 3.
⬥ If a Reflect occurs in this phase, it is best to Devotion or Reflect yourself, although it will mostly be on cooldown if you had a fast Phase 4.
Note: If your team consists of a Hybrid Bomb Tank, it is recommended to voke the start of Phase 5.
Ranged Bomb Tank - Phase 6 Green Bomb
One Bomb Tank is assigned to placing a Combat Dummy as you drop into the phase.
⬥ Strategy
• Pre-ECB
• Dump SGB and thresholds
⬥ Fast teams should simply aim for 0-linking the phase, just like Phases 3 and 5. This phase is significantly easier due to longer time until Reflect start.
⬥ If you receive a Green Bomb, simply drink a sip of your Powerburst of Vitality in order to easily survive it.
⬥ If a Reflect occurs in this phase, the Bomb Tank who did not receive the Green Bomb should Devotion Intercept the other one. You can also Resonance  the first Blue Bomb after Reflect start safely, even with the caused defensive cooldown by a Green Bomb detonation.
Note: If your team consists of a Hybrid Bomb Tank, it is very important to voke Vorago at the start of Phase 6.
Ranged Bomb Tank - Phase 7 Team Split
One Bomb Tank is assigned to placing a Combat Dummy as you drop into the phase.
Note: Following a base guideline of abilities in this phase will significantly improve the overall outcome of Phase 7.
⬥ Strategy
• Tag on tick with a Snap Shot  (quick hitting override required)
• If you tagged on tick, reprisal right away (optional: sip of your Powerburst of Vitality if ready)
• Activate ECB special attack on this phase's Combat Dummy - Do not target the dummy until you activate Reprisal
• (optional, but recommended) Disruption Shield during first the Team Split
• Dump SGB and thresholds
Note: If your team consists of a Hybrid Bomb Tank, it is very important to voke Vorago immediately after the first Team Split.
Ranged Bomb Tank - Phase 8 The End
In Phase 8 there exist different strategies (beginner & advanced).
⬥ Beginner Strategy (Recommended)
• Dump SGB and thresholds
• BT#1 tags all Blue Bombs and BT#2 Devotion Intercept
• Ultimate between third and last quadrant
• Utilize your Adrenaline Potion
⬥ Beginner Strategy (Safe)
• Dump SGB and thresholds
• Each Bomb Tank tags 2-3 Red Bombs (avoid increased damage by one BT positioning at the outside, the other surging to the following quadrant asap)
• BT#1 Ultimate between third and last quadrant
• BT#2 Barricade Intercept on Stand Up
⬥ Advanced Strategy
Note: This strategy is only recommended to very experienced teams and highly discouraged to use for beginner/intermediate teams.
• Use Natural Instinct in the end of Phase 7
• Pre-Ultimate as you drop into Phase 8
• Drink from your Adrenaline Potion
• Tag on Target Cycle with a Snap Shot (quick hitting override required)
• Utilize ECB and SGB for first quadrant
• Dump everything and aim for killing it before the 3rd quadrant
Note: If your Death's Swiftness happens to not be placed in the first or second quadrant of Vorago's arms, you should move to the second quadrant, even if you have to leave your ultimate for it. Otherwise you are very likely to die due to suffocation damage.
Ranged Bomb Tank - Tips & Rotations
General Tips
⬥ If performing the BT#2 role, transfigure  for the 14k entry hit
⬥ Stalling abilities is sometimes easier by mouse clicking a dummy placed far away from your drop location and far-casting an ability, instead of equipping Excalibur  .
.
⬥ Disruption Shield should be used during P2 BHD, end of P3, end of P4 / start of P5, during first TS P7, after tagging bombs P8
⬥ Stay MD +1 in the start of P5 until Reflect
⬥ Take Crackling off for Reflects and end of P2 / P9
⬥ Remove the armour piece with Mobile for Escape / Surge / Bladed Dive generating adrenaline
⬥ Heal Other your Base Tank in P1 if they receive the Red Bomb and end of P2, P3, P4, P6 and P7
⬥ Rather skip Natty than nattying too late
Rotations
For advanced ability damage rotations, refer to the official Rago Hub spreadsheet:
https://docs.google.com/spreadsheets/d/1q7zscYcfJ9qXeIptQmXJiWUloalwDNtmxIOX7bqgkJg/edit?usp=sharing
Strategy Summary
Magic Bomb Tank - Introduction 

Introduction
Bomb Tanking at Trio Hard Mode can be performed in several setups. This section focuses on Magic, covering both Bomb Tank's responsibilities: Bomb Tank #1 and Bomb Tank #2 (the Climber). If you are Magic bomb tanking with a Hybrid on your team, read up on both this and the Hybrid section.
Required
⬥ Up to 4 Combat Dummies
Recommended
⬥ Guthix Staff  stored in an Essence of Finality
⬥ Fury of the Small
⬥ Seren Godbow
⬥ Biting 17 
⬥ Converting to a Ranged Bomb Tank
⬥ Refer to the official Rago Hub spreadsheet for advanced ability damage rotations:
https://docs.google.com/spreadsheets/d/1q7zscYcfJ9qXeIptQmXJiWUloalwDNtmxIOX7bqgkJg/edit?usp=sharing
Strategy Summary
Magic Bomb Tank - Phases 1 & 2
Magic Bomb Tank - Phase 1
⬥ It is always recommended to have one Bomb Tank ranging in Trio Hard Mode, who will pre-Ultimate  start of Phase 1 and deal damage to Vorago. The other Bomb Tank is responsible for Climbing and Top Luring, also referred to as Bomb Tank #2.
⬥ As Magic Bomb Tank you will most likely be the one climbing in Phase 1.
⬥ Yet, if you happen to be the one DPSing, a simple Sunshine standard rotation should be enough to bring Vorago's lifepoints low enough before the Climber jumps. Your Ultimate should be placed right in melee distance, west of Vorago's spawn location. This position should provide you 100% uptime of your Ultimate for most locations that Vorago is lured to. Slow down dealing damage as Vorago reaches 50,000 HP and off early enough to avoid a reset.
⬥ If the Base Tank receives the second Red Bomb (random), you should cast Heal Other to support the Base Tank's food management.
⬥ Phase 1 initial positioning
Magic Bomb Tank - Phase 2
⬥ The Bomb Tank's responsibilities throughout Phase 2 are not any different to bomb tanking Normal Mode.
⬥ Usually the Bomb Tank #2 (the Climber) takes over Barricading and intercepting the first and third Red Bomb. The Bomb Tank #1 cade cepts the second one.
⬥ You should have one person dedicated to shattering the end of Bring Him Down (preferably the Ranger).
⬥ One Bomb Tank is assigned to placing a Combat Dummy during Bring Him Down.
Magic Bomb Tank - Phases 3 - 8
Magic Bomb Tank - Phase 3 Ceilings
⬥ Strategy
• (optional, advanced) Use Natural Instinct in the end of Phase 2
• Pre-Ultimate in the center of Phase 3
• Drink your Adrenaline Potion
• (BT #1) Devotion Intercept start of Reflect
• Detonate  and SGB post-Reflect
⬥ Fast teams should simply aim for 0-linking the phase. Executing a stable Metamorphosis  ability damage rotation will increase the consistency of 0-linking Phase 3.
Note: If your team consists of a Hybrid Bomb Tank, it is very important to voke Vorago as he jumps for the first time.
Magic Bomb Tank - Phase 4 Scopulus
Your Base Tank is responsible for stacking all 3 Scopuli. At times though, a Scopulus might reaggro to one of the Bomb Tanks. In this case: run! Make sure to stay at the outside of the arena in order to avoid passing any Blue Bombs to your Base Tank.
⬥ Strategy
• Pre-Ultimate as you drop into Phase 4
• (BT #1) Devotion Intercept
• If Greater Chain  is unlocked, follow it up with a Guthix Staff special attack early in the phase (the Greater Chain buff applies the Guthix Staff affinity stacks and defence drain to all targets)
• Prioritize AOE damaging abilities and 4taa
• Detonate as soon as all 3 Scopuli are stacked up
• Place a Combat Dummy in the end of the phase (decide which of your Bomb Tanks)
⬥ The Bomb Tank #1 utilizes Devotion Intercept on the other BT for the second or third Blue Bomb in order to avoid taking too much damage. For slower phases, the other BT#2 should follow it up shortly after the first Devotion runs out.
Note: Do not use Vulnerability Bomb as Bomb Tank throughout Phase 4!
⬥ If you 0-linked Phase 3, your Sunshine will be on cooldown for Scopulus. Simply dump Thresholds and Guthix Staff special attacks.
⬥ Positioning for Bomb Tanks in Phase 4 Scopulus
Magic Bomb Tank - Phase 5 Vitalis
Trio Hard Mode approaches Phase 5 similar to a fast Duo Normal Mode Vitalis Phase 3. All players stay in melee distance and must pray flick for melee swipes and Blue Bombs. The Bomb Tanks commonly take the north-western corner and the eastern side in melee distance to Vorago.
Note: In the start of the phase, you can position 1 tile out of melee distance, but be ready to step into MD as the Vitalis orb explodes in order to avoid getting blocked or lost Line of Sight from spawned Vitali.
⬥ Strategy
• Pre-Detonate
• Dump Thresholds
⬥ Fast teams should simply aim for 0-linking the phase, just like Phase 3.
⬥ If a Reflect occurs in this phase, it is best to Devotion or Reflect yourself, although it will mostly be on cooldown if you had a fast Phase 4.
Magic Bomb Tank - Phase 6 Green Bomb
One Bomb Tank is assigned to placing a Combat Dummy as you drop into the phase.
⬥ Straetgy
• (optional, advanced) Use Natural Instinct in the end of Phase 5
• Pre-Ultimate start of Phase 3
• Drink your Adrenaline Potion
• Pre-Detonate and make use of SGB pre-link
• (BT #1) Devotion Intercept start of Reflect
⬥ Fast teams should simply aim for 0-linking the phase, just like Phases 3 and 5. This phase is significantly easier due to longer time until Reflect start. If you are going for fast phases, you should skip your Apot in this phase and save it for Phase 8 instead.
⬥ If you receive a Green Bomb, simply drink a sip of your Powerburst of Vitality in order to easily survive it.
⬥ If a Reflect occurs in this phase, the Bomb Tank who did not receive the Green Bomb should Devotion Intercept the other one. You can also Resonance the first Blue Bomb after Reflect start safely, even with the caused defensive cooldown by a Green Bomb detonation.
Note: If your team consists of a Hybrid Bomb Tank, it is very important to voke Vorago at the start of Phase 6.
Magic Bomb Tank - Phase 7 Team Split
One Bomb Tank is assigned to placing a Combat Dummy as you drop into the phase.
Note: Following a base guideline of abilities in this phase will significantly improve the overall outcome of Phase 7.
⬥ Strategy
• (pre) and tag on tick with an Auto Deto GStaff 
• If you tagged on tick, reprisal right away (optional: sip of your Powerburst of Vitality if ready)
• (optional, but recommended) Disruption Shield during first the Team Split
• Dump thresholds
Note: If your team consists of a Hybrid Bomb Tank, it is very important to voke Vorago immediately after the first Team Split.
Magic Bomb Tank - Phase 8 The End
In Phase 8 there exist different strategies (beginner & advanced).
⬥ Beginner Strategy (Recommended)
• Dump thresholds
• BT#1 tags all Blue Bombs and BT#2 Devotion Intercept
• Ultimate between third and last quadrant
• Utilize your Adrenaline Potion
⬥ Beginner Strategy (Safe)
• Dump thresholds
• Each Bomb Tank tags 2-3 Red Bombs (avoid increased damage by one BT positioning at the outside, the other surging to the following quadrant asap)
• BT#1 Ultimate between third and last quadrant
• BT#2 Barricade Intercept on Stand Up
⬥ Advanced Strategy
Note: This strategy is only recommended to very experienced teams and highly discouraged to use for beginner/intermediate teams.
• Pre-Metamorphosis as you drop into Phase 8 (drink from your Adrenaline Potion renew)
• Pre-Detonate and tag on Target Cycle with an Auto Deto GStaff
• Release a stalled Wild Magic  with a 2hit Asphyxiate
  , followed up by an SGB spec (your Ingenuity of Humans will eventually be on cooldown from Phase 6)
• You can dump everything and aim for killing it before the 3rd quadrant.
Magic Bomb Tank - Tips & Rotations
General Tips
⬥ Detonate should be pre-charged in most phases, as charging it during Reflects would cause Detonate to be on cooldown for the following phase
⬥ Use Barrage as primary spell, Blitz might be nulled by Reflect (also P4 Scopulus benefits heavily from Barrage)
Rotations
For advanced ability damage rotations, refer to the official Rago Hub spreadsheet:
https://docs.google.com/spreadsheets/d/1q7zscYcfJ9qXeIptQmXJiWUloalwDNtmxIOX7bqgkJg/edit?usp=sharing
Strategy Summary
Hybrid / Melee Bomb Tank - Introduction

Introduction
A general Hybrid setup for Trio HM consists of Melee as primary and either Ranged or Magic as secondary combat style. Magic is recommended due to the naturally increased hitchance on Scopuli. At the current unbalanced state of combat styles, there exists only one method of making Hybrid effective over a double Ranged Bomb Tank setup. Hybridding is only recommended if your goal is improved kill speed, as your team is a lot more likely to lose a kill.
⬥ It is highly discouraged to take a BoB familiar (Mammoth scrolls with Soups  ), due to the lost accuracy from a Nihil familiar already making Ranged a better choice over Hybrid. Therefore a Hybrid setup ends up having a very small amount of food (1 - 3 inventory slots). The selected aura should be Berserker
  .
.
⬥ In phases 1, 2, 4 (Scopulus) and 9 the Hybrid Bomb Tank uses the secondary combat style, Ranged or Magic.
⬥ Throughout phases 3 - 8 (excluding Scopulus P4) Melee is to be used. A primary portion of these phases will require you (the Hybridder) and the Base Tank to step under Vorago, with the BT#1 voking the boss.
⬥ Depending on the outcome of your Phase 10, you will either camp Melee for the start of P11 or switch to your secondary combat style immediately during phase transition.
⬥ As Hybrid Bomb Tank you will be the one climbing in Phase 1.
⬥ Refer to the official Rago Hub spreadsheet for advanced ability damage rotations:
https://docs.google.com/spreadsheets/d/1q7zscYcfJ9qXeIptQmXJiWUloalwDNtmxIOX7bqgkJg/edit?usp=sharing
Strategy Summary
Hybrid Bomb Tank - Phases 1 & 2
Hybrid Bomb Tank - Phase 1
⬥ Generally speaking, a Hybrid Bomb Tank takes over the BT#2 responsibilities. The other Bomb Tank #1 ultimates Phase 1 while the Hybridder climbs.
⬥ Equip your secondary combat style for the Phase 1 to allow for tagging from the final platform of the Top Lure.
Hybrid Bomb Tank - Phase 2
⬥ The Bomb Tank's responsibilities throughout Phase 2 are not any different to bomb tanking Normal Mode.
⬥ Usually the Bomb Tank #2 (the Climber) takes over Barricading and intercepting the first and third Red Bomb. The Bomb Tank #1 cade cepts the second one.
⬥ You should have one person dedicated to shattering the end of Bring Him Down (preferably the Ranger).
Note: Due to lacking inventory space as a Hybridder, it is recommended to have either the Base Tank or the Bomb Tank #1 take an additional Combat Dummy . One Bomb Tank is assigned to placing a Combat Dummy during Bring Him Down (preferably the BT#1).
Hybrid Bomb Tank - Phases 3 - 8
Hybrid Bomb Tank - Phase 3 Ceilings
⬥ Strategy
• Use Natural Instinct in the end of Phase 2
• Pre-Ultimate as you drop into Phase 3
• SGB post-Reflect
⬥ Your team should simply aim for 0-linking the phase. It is very important for the Bomb Tank #1 to voke Vorago as he jumps away.
Hybrid Bomb Tank - Phase 4 Scopulus
Your Base Tank is responsible for stacking all 3 Scopuli. At times though, a Scopulus might reaggro to one of the Bomb Tanks. In this case: run! Make sure to stay at the outside of the arena in order to avoid passing any Blue Bombs to your Base Tank.
⬥ Strategy
• Pre-Ultimate as you drop into Phase 4
• Prioritize AOE damaging abilities and 4taa
• Detonate as soon as all 3 Scopuli are stacked up
• Utilize Limitless for this Sunshine
⬥ Place a Combat Dummy in the end of the phase (preferably the BT#1).
⬥ The Bomb Tank #1 utilizes Devotion Intercept for the second or third Blue Bomb in order to avoid taking too much damage. For slower phases, the Hybridder should follow it up shortly after the first Devotion runs out.
Note: Do not use Vulnerability Bombs as Bomb Tank throughout Phase 4!
⬥ Positioning for Bomb Tanks in Phase 4 Scopulus
Hybrid Bomb Tank - Phase 5 Vitalis
Trio Hard Mode approaches Phase 5 similar to a fast Duo Normal Mode Vitalis Phase 3. All players stay in melee distance and must pray flick for melee swipes and Blue Bombs. The Hybridder commonly takes the north-western corner in melee distance to Vorago, with the BT#1 standing on the east side (opposite of L-Rock).
⬥ Strategy
• Pre-Ultimate as you drop into Phase 5
• Drink from your Adrenaline Potion
⬥ Fast teams should simply aim for 0-linking the phase, just like Phase 3.
⬥ If a Reflect occurs in this phase, it is best to utilize your Seren Godbow special attack shortly after.
⬥ It is recommended to have your team's Bomb Tank #1 voke Vorago throughout Phase 5 in order to allow for both the Base Tank and the Hybridder to step under from the opposite side.
Hybrid Bomb Tank - Phase 6 Green Bomb
⬥ Strategy
• ZGS spec as you drop into Phase 6
• Implement an SGB spec in your P6 ability rotation pre-Reflect
⬥ If the Hybridder or the Base Tank receive a Green Bomb, it will be bridged multiple times. A 0-link in this phase is basically guaranteed.
⬥ It is recommended to have your team's Bomb Tank #1 voke Vorago throughout Phase 6 in order to allow for both the Base Tank and the Hybridder to step under.
Hybrid Bomb Tank - Phase 7 Team Split
⬥ Strategy
• (pre) shortly before Target Cycle (optimally 2 GCDs prior, to allow for a stalled basic released with another basic as soon as you Target Cycle)
• Utilize Limitless for this Berserk
⬥ It is recommended to have your team's Bomb Tank #1 voke Vorago immediately after the first Team Split in order to allow for both the Base Tank and the Hybridder to step under.
Hybrid Bomb Tank - Phase 8 The End
⬥ Strategy
• Dump thresholds (pre-Barge with Mobile to allow for a double Greater Barge rotation)
• SGB spec in the first quadrant
⬥ If a Stand Up is expected to happen, have the other Bomb Tank #1 tag all Red Bombs and then Barricade Intercept on stand. The Hybridder should pre-Ultimate for Stand Up.
Hybrid Bomb Tank - Tips & Rotations
General Tips
⬥ Transfigure for the 14k entry hit
⬥ DBow autos
⬥ Disruption Shield should be used during P2 BHD, end of P3, end of P4 / start of P5 and during first TS P7
⬥ Step under for phases 5, 6 and 7
⬥ Take Crackling off for Reflects and end of P2 / P9
⬥ Do not use the Mobile perk on your armour directly and put it on your Excalibur instead
⬥ Heal Other end of phases P3, P4, P6 and P7
⬥ Rather skip Natty than nattying too late
Rotations
Refer to the official Rago Hub spreadsheet for advanced ability damage rotations:
https://docs.google.com/spreadsheets/d/1q7zscYcfJ9qXeIptQmXJiWUloalwDNtmxIOX7bqgkJg/edit?usp=sharing
Strategy Summary
Weekly Special Mechanics - Phases 9, 10, & 11
Introduction
Trio Hard Mode approaches Phase 9 similar to Duo / Trio Normal Mode Phase 4. The person barricading last on P9 should be the person that does not barricade start of P10.
Phases 10 and 11 vary the most, relying on the same factors as described in the intro to this Trio Hard Mode guide: Weekly changing special mechanics, several combat style compositions and an individually varying player skill level. This section of the guide will cover 2 basic guidelines of strategies for differently approaching phases 10 and 11: Safe vs Advanced.
Safe Strategies
A stable order of Ultimates and Barricades for consistently finishing a Trio Hard Mode kill fast with safe strategies.
Advanced Strategies
Powercreep goes brrrrrr. Essentially simply follow the Rago Hub spreadsheet ability damage rotations:
https://docs.google.com/spreadsheets/d/1q7zscYcfJ9qXeIptQmXJiWUloalwDNtmxIOX7bqgkJg/edit?usp=sharing
Safe Phases 10 & 11
Phase 10
⬥ Base Tank and Bomb Tank #2 Ultimate start of Phase 10
⬥ Bomb Tank #2 Barricade Intercept timings
• Ceilings / Team Split - First auto attack after Team Split
• Scopulus / The End - Third auto attack
• Vitalis - First auto attack or before Vitalis orb explosion (depending on what happens first)
• Green Bomb - Barricade only if the Green Bomb targets someone else (Vitality if on BT#2)
⬥ Refer to the following for a general overview of alternative maul timings
⬥ If you miss the optimal opportunity of mauling, continue through Vorago's mechanics and maul at alternative maul timings, as stated in the weekly mechanic channels. If you go through another whole cycle of mechanics, the Bomb Tank #1 cade cepts at the same time as the BT#2 did in the start of P10.
⬥ One of the Bomb Tanks is usually assigned to placing a Combat Dummy in the end of P10 (shortly before maul). This dummy must be placed in the east and you have to be distanced at least 1 tile to the southern wall. The Base Tank should always maul with a prior cast Shield Dome!
Note: Ranged Bomb Tanks should apply BSA  throughout phases 10 and 11 to compensate for decreased hitchance once the Base Tank's SWH spec runs out.
Phase 11
⬥ Base Tank Ultimate whenever it is ready.
⬥ Bomb Tanks switch Barricade Intercept and Ultimates rotationally.
Bomb Tanks Cade Cept / Ultimate Timings
Note: Assume BT#2 caded last on Phase 10.
⬥ Ceilings
• BT#1 cade cept either after Team Split or start of Reflect
• BT#2 ultimate and thresh, build to cade cept for the second Team Split throughout P11
⬥ Scopulus
• BT#1 cade cept either the third auto attack after Purple Bomb release or start of Reflect
• BT#2 ultimate and thresh, build to cade cept for the second cycle of Purple Bomb / Reflect throughout P11
⬥ Vitalis
• BT#1 cade cept either the first auto attack after Bleeds  or the Vitalis orb explosion
• BT#2 ultimate and thresh, build to cade cept for the second cycle of Bleeds
⬥ Green Bomb
• BT#1 cade cept once the Green Bomb chose its target (if a Bomb Tank is targeted and neither cade cept nor Vitality is available, the Base Tank should cade cept or the other Bomb Tank utilizes Devotion Intercept )
• Rotationally repeat cade cepts for every Green Bomb and keep track of cooldowns (Vitality , Barricade , Devotion cevo4)
⬥ Team Split
• BT#1 cade cept after Team Split or start of Reflect
• BT#2 ultimate and thresh, build to cade cept for the second Team Split throughout P11
⬥ The End
• BT#1 cade cept either start of Reflect or the Vitalis orb explosion
• BT#2 ultimate and thresh, build to cade cept for the second Reflect
Advanced Phases 10 & 11
Approaching phases 10 and 11 in advanced teams is independent of weekly mechanics.
Overview
⬥ In Phase 10 you always aim for 0-speccing (get to maul before the spec release, e.g. Purple Bomb or Vitalis orb ). This is achieved by pushing consecutively every 3 ticks for 8 tiles from Target Cycle on. Once you reached maul spot, you wait for the spec to release and maul right after.
⬥ If Phase 10 was executed correctly, Phase 11 should always start with 3 auto attacks (5 if first P10 spec is Green Bomb or Purple Bomb) into the second spec of P11.
Rotations
For optimal execution of phases 10 and 11 simply refer to the Rago Hub spreadsheet:
https://docs.google.com/spreadsheets/d/1q7zscYcfJ9qXeIptQmXJiWUloalwDNtmxIOX7bqgkJg/edit?usp=sharing
Acknowledgements
This guide was developed by the Rago Hub Discord community.
Check out Rago Hub for a wide variety of strategy guides for everything-Vorago, featuring a Hammer Climbing guide and more.
Rago Hub: https://discord.gg/uqGJbKH