General DPM FAQ
Introduction
In RuneScape PvM, the meta at the time of writing is about pushing out as much damage in as little time as possible. It is important to understand that good and efficient PvM, especially at the higher tiers, is about squeezing out as much damage as possible in between mechanics.
This channel will cover fundamental terminology, discuss full manual vs. revolution, how to put together a rotation, and common hiccups that players run into while getting into PvM.
Related Channels
For futher information and reading, you can refer to the following resources.
Note: If you have any difficulties in using the tools or understanding what the information means, you can always ask in #pvm-help.
Terminology
Common Abbreviations in PvM
⬥ Ability - the combat actions you can perform for each style, unique to EoC.
• Basic ability - abilities that require no adrenaline to use, such as Sonic Wave 
• Threshold - abilities that require 50% adren to use, and cost 15% adren, e.g. Wild Magic 
• Ultimate - abilities that require and cost 100% adren to use, such as Tsunami 
• Special attack - some weapons have in-built special attacks, e.g. the Dragon Battleaxe 
⬥ Auto – an auto attack (not an ability).
⬥ DPS – damage per second, or referring to damage in general.
⬥ DW – dual-wield weapons.
⬥ 2H – two-handed weapons.
⬥ Juggling/Swapping – generally referring to switching between DW and 2H weapons to gain access to more damaging abilities.
⬥ Camping – refers to using only one type of weapon - e.g. 2H camping or DW camping.
⬥ Rotation – refers to the usage of abilities in sequence, and managing ability cooldowns.
⬥ Switch – refers to a piece of gear worn and used only temporarily for some effect.
⬥ Tick – a unit of time in which a game action can occur - Runescape runs on 0.6 second ticks.
⬥ Lossless - meaning no ticks are lost in performing an action.
⬥ GCD - global cooldown - an innate cooldown built into every ability that lasts for 3 ticks (1.8 seconds).
A full list of abbreviations can be found here.
Combat Modes
⬥ Runescape 3 combat can vary in how much user input is required during the encounter depending on what combat mode is selected. From least to most input required, they are:
• Revolution++ - all basic, threshold and ultimate abilities in your bar will be used automatically when possible.
• (Basic) Revolution - only basic abilities in your bar will be used automatically when possible, everything else must be used by the player.
• Full Manual - you will have to manually activate all abilities.
⬥ You can change combat modes by clicking the yellow cog icon on the action bar.
• The settings can also be found at: (Press Esc) > Settings > Gameplay > Combat & Action Bar > Combat Mode
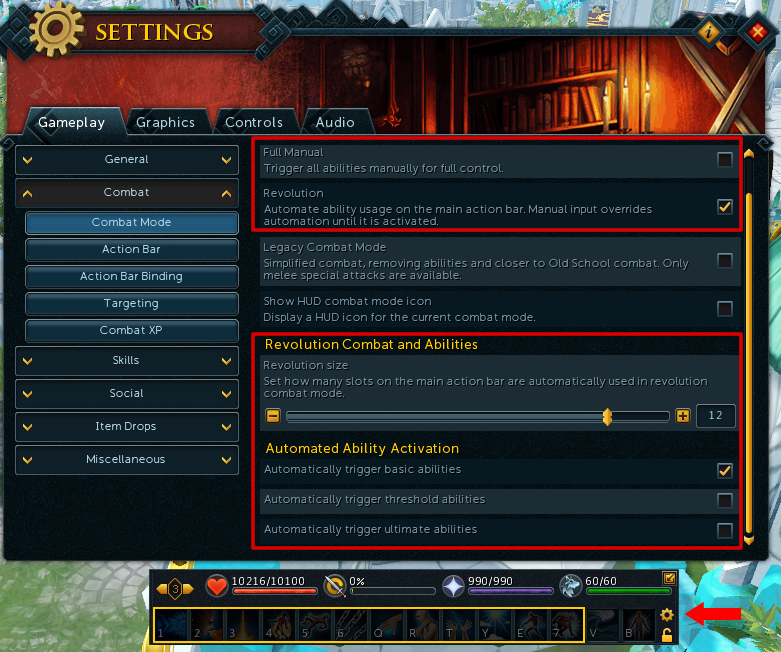 ⬥ When revolution or revolution++ is enabled, a yellow bar will appear around your abilities. This indicates which abilities the system has access to.
• Abilities outside this box will not be used automatically.
• The bar can be made bigger or smaller by adjusting Revolution Size in the settings menu.
Basic Revolution
What is Revo
⬥ With Basic Revolution (often just called Revo), basic abilities are used automatically, but everything else must be used by the player.
• You can still override this with manual inputs!
⬥ Newer players may find this combat mode helpful, as it gives some control over your ability rotation but takes away the burden of managing your basic abilities.
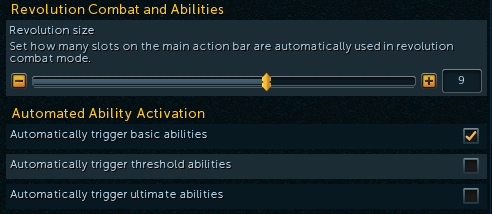
⬥ To enable Revolution, only allow basic abilities to be used by the game automatically:
Combat Strategy with Revo
⬥ Set up your ability bar properly (see below).
⬥ When you reach 100% adrenaline, activate your damage-boosting Ultimate abilites.
• These are Sunshine  , Death's Swiftness
  and Berserk
  depending on your combat style.
⬥ From there, use your thresholds, modified ultimate abilities and special attacks as adrenaline and ability cooldowns permit.
• Examples include Wild Magic , Snapshot  , Assault
  , etc.
⬥ This simple pattern can be used to achieve a moderate level of DPS with low-medium player input
• Build to 100% → damage-boosting ultimate → thresholds/modified ultimates/special attacks → Repeat
• If you have full adrenaline, but cannot use a damage-boosting ultimate, you can use a couple thresholds while waiting for the cooldown.
Setting Up A Revolution Bar
⬥ Strong basics are prioritized over weaker basics.
⬥ At least one short cooldown ability is placed at the front to help with ability cooldowns.
⬥ Avoid normal Fury  and normal Concentrated Blast
  if you do not manually cancel them after 2 hits.
• Revolution does not do this for you, it channels them for the full 3 hits.
⬥ Thresholds and ultimate abilities can be placed anywhere on the bar − you will be manually activating them, so the order does not matter.
Magic Basic Revolution Bars
Note 1: can move  right if using
  to save runes
Note 2: replace  with if 2H and no
⬥ Dual-wield:
[ 


 ]
]
⬥ Two-handed:
[ ]
Ranged Basic Revolution Bars
Note: if 2H camping, replace Needle Strike  with (Greater) Dazing Shot
  /
/ 
⬥ Standard Unlocks:
[ 


 ]
]
⬥ With Greater Ricochet  and Caroming 4
[ ]
Melee Basic Revolution Bars
Note: if no  , simply remove it
⬥ Dual-wield:
[ 


 ]
]
⬥ Two-handed:
[ 
 ]
]
Revolution++
What is Revo++
⬥ Revolution++ (often just called revo++) is similar to normal Revolution, but now the game also activates thresholds and ultimate abilities when adrenaline permits.
⬥ Revo++ is generally not recommended for most bossing encounters, as it is severely limiting. Normal Revo or Full Manual are preferred.
⬥ However, there are some situations where it can be useful:
• Low-input play such as AFKing or Slayer.
• Specific setups designed to AFK some bosses. You can see examples of this in #unknown-channel.
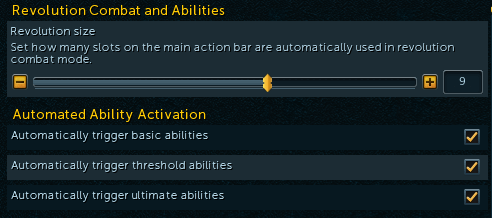
⬥ To enable Revo++, ensure you tick the following settings:
Setting Up a Revo++ Bar
⬥ This is more complicated than before as you now have to manage cooldowns of your important thresholds and ultimates to maximize damage.
⬥ Luckily, there are some sample bars set as examples for this that you can use instead.
Magic Revo++ Bars
Note 1: replace  with
with  if no Igneous Kal-Mej
Note 2: if 2H camping with no , use the dual-wield bar and replace with
⬥ Dual-wield:
[  ]
]
⬥ Two-Handed:
[ ]
Ranged Revo++ Bars
Note: if 2H camping, replace Needle Strike with (Greater) Dazing Shot /
⬥ Standard Unlocks:
[ 
 ]
]
⬥ With Greater Ricochet and Caroming 4  :
:
[ ]
Melee Revo++ Bars
Note 1: if dual-wield and using any Leng or Dark Ice Shard/Sliver combination, replace  for
for 
Note 2: if dual-wield but no , simply remove it, and add as the last ability on the bar
⬥ Dual-wield:
[  ]
]
⬥ Two-Handed:
[ 
 ]
]
AoE Revo++ Bars
⬥ These are some example bars for AFK-type content that requires good AoE damage. These are not optimal bars, just a reference for you to get started with.
• If Greater Chain  is not owned, replace with normal Chain after instead, and remove
  .
.
• To use it is assumed that Igneous Kal-Mej is owned, remove it if not owned.
• Remove Magma Tempest if not owned.
• If Greater Fury or Greater Conc. Blast are not owned, do not use the regular versions in an AFK Revo++ bar, just remove them.
⬥ Mage 2-Handed:
 ⬥ Mage Dual-wield:
 ⬥ Melee 2-Handed:

Full Manual
What is Full Manual
⬥ Full manual is a combat mode where all abilities are manually activated by the player. The game will not help you with any automatic ability usage.
⬥ This requires a high degree of player input.
⬥ It is also the style with the greatest degree of control over ability usage and flexibility in combat.
⬥ Most high-level PvMers will opt to use full manual.
How to Approach Using Full Manual
Note: For a more in-depth guide, you can look at #revo-to-full-manual.
⬥ It does not matter where you place your abilities on your bar with Full Manual, but you may still find it helpful to organize how you set it up.
• e.g. basics first, then thresholds, then ultimates.
⬥ Going from Revo to Full Manual can seem intimidating, but the key to success is practice, practice, practice.
⬥ You can begin with Revo to use your basics, and manually using thresholds and ultimates.
⬥ Once comfortable, you can also press your basic abilities, but leave Revo on as a backup (to avoid losing ticks doing nothing).
⬥ Once you feel confident with your keybinds, try turning off Revolution entirely.
Practicing Full Manual
⬥ One way to practice is to try attacking a Combat Dummy  for a full minute, using only basics.
⬥ Your goal is to not lose any ticks between basic abilities, while still using as many high damaging basics as you can.
• This helps you learn about ability cooldowns and get used to pressing inputs.
⬥ Then you can practice a more realistic rotation including thresholds and ultimates.
⬥ Once you get comfortable at a combat dummy, try it out on a real boss at GWD1 (e.g. K'ril Tustsaroth) or GWD2 (e.g. Vindicta).
⬥ There is no easy "trick" to skip past the practice. It takes time to learn full manual, so don't give up!
⬥ Do not worry if your damage lessens during this process - it is normal have worse DPS while learning full manual.
How to Build a Rotation
Note: This is just one example for one style. More detailed and style-specific information can be found in their respective channels: #Magic Basic DPM Advice / #Melee Basic DPM Advice / #Ranged Basic DPM Advice and #Magic DPM Advice / #Melee DPM Advice / #Ranged DPM Advice.
Factors to Consider
⬥ A rotation is a general order of abilities we try to follow to maximize our DPS. This is achieved taking into account a number of factors, such as:
• Ability Damage - we want to use strong abilities!
• Ability Cooldowns - we can only use each ability every so often.
• 2H/DW reqs - some abilities can only be used with two-handed or dual-wield weapons specifically.
⬥ This is a lot to take in, so consider the following example. Using a 2H melee weapon, such as a Noxious Scythe  , and starting at 0% adrenaline, we randomly use some of the strong melee basics and see what happens:
• Sever → Dismember → Cleave → Fury → Smash → ?
• All the strong basics are now on cooldown! and we have to use weak filler abilities like Slice or Tuska's Wrath
⬥ How can this be fixed?
Rotating Your Basic Abilities
⬥ To avoid running into situations where there are no good abilities to use, we pick a strong basic that has a relatively short cooldown to build around.
⬥ The Noxious Scythe is a two-handed weapon, so we pick Fury because:
• It is not too weak - 157% maximum ability damage over 2 hits (cancelled correctly).
• It has a short cooldown - 5.4 seconds / 9 ticks, or 3 global cooldowns (GCDs).
• In other words, we can use Fury as every 3rd ability.
⬥ We also notice Cleave :
• It is one of our strongest basics (188% maximum damage)
• It also has a short cooldown - we can use Cleave every 4th ability.
⬥ Putting it together, we get a rotation:
• [ → → ] → [ → → ] → [ → → Filler ability ] → Repeat
⬥ This rotation, using groups of 3 abilities around Fury, can be indefinitely repeated, and only requires a single 'filler' ability in every 3rd group.
⬥ This gives us a strong foundation to build adrenaline that we can then consume to use thresholds and ultimates.
• The filler ability could be a strong threshold such as Quake  / Blood Tendrils / Hurricane / etc.
When To Use Thresholds / Ultimates
⬥ We want to use our damage-boosting ultimates ( ) as often as we can, if the fight will last longer than the duration of the ultimate.
⬥ Inside the ultimate, the goal is to use as many good thresholds, modified ultimates (like Overpower with an Ingeous Kal-Ket  ) and special attacks
  as possible, and minimize the use of weak abilities.
• During cooldowns, we will continue to use strong basics.
⬥ After the ultimate ability ends, while waiting for it to come back off cooldown, we can use a few thresholds.
What to Use Inside Ultimates
⬥ Players have worked out some of the best ways to use abilities inside ultimates.
⬥ There are rotations available depending on your gear and what abilities you have unlocked.
⬥ Knowing such information helps plan out ability rotations, and commit them to muscle memory over time with practice.
⬥ For example, using T85 Lengs 
 , Greater Barge
  and an Adrenaline Renewal
  we can fit the following abilities within a single Berserk :
• 1x Destroy
• 1x Greater Flurry 
• 1x Assault
• 1x Hurricane
Note: Many different ultimate rotations for different scenarios can be found in the style-specific #dpm-advice channels.
Common Mistakes and How to Fix Them
The following sections cover some common mistakes made by players in PvM. It is likely that as you work towards improving your PvM ability, you will need to improve in one or many of these areas. The first step is recognizing what mistakes you're making, then working on the solution. Don't be discouraged if you don't get it right away, some of these issues can be harder to fix than others. Remember, everything just takes practice.
PvM Checklist
It may seem obvious, but ensuring that you are not missing anything in terms of gear loadout and character buffs can help with avoiding frustration during PvM. Here are some things that you may want to check if you run into difficulties, or to avoid them.
Checklist
⬥ Gear/equipment
• Enough divine charges 
• Equipment is repaired 

• Jewellery is charged 
 /
/ 

• Rune pouches are filled 

• Quivers are filled 

• Pocket slots are charged 

• Familiar + scrolls 

⬥ Character Buffs
• HP boosts 
• Overloads 
• Weapon poison 

• Activated aura 


• Correct spellbook 

• Incense sticks 


⬥ Other
• Action bar switches set up correctly.
• Keybinds set up correctly.
• Quick prayers set up 


Quick Banking Preset
⬥ It can be helpful to have a preset dedicated to general PvM setup, for quickly preparing for a bossing hour and to ensure that you don't miss the items on the checklist.
⬥ Use the !bankingpreset command to learn more.
Cancelling Channelled Abilities Late/Early
Why Channeled Abilities Are Important
⬥ Most abilities in the game take 1.8 seconds / 3 ticks, or 1 GCD, to cast. Channeled abilities take longer than this duration to cast fully.
⬥ These abilities can be cancelled, by activating the next ability early.
⬥ It is important to properly cancel abilities in order to not lose any ticks, or damage potential.
• Animations can be unreliable, and longer than the actual hit duration of the ability.
• It can be higher damage-per-tick, or net you more adrenaline, to cancel long channels early.
• Some channels incur an extra 1t delay when using Revolution - e.g. Greater Concentrated Blast or Snipe
Channeled Abilities
Note: 2-hit implies that you channel the ability for 2 hits, and so on. How long you channel will depend on your rotations. 3 ticks = 1.8 seconds = 1 GCD.
⬥ Magic Abilities 
• Concentrated Blast - 2-hit (3t/1.8s)
• Greater Concentrated Blast - 3-hit (3t/1.8s)
• Asphyxiate - 2-hit (3t/1.8s), or 4-hit (7t/4.2s)
• Smoke Tendrils  - 4-hit (7t/4.2s)
⬥ Ranged Abilities 
• Snipe - 1-hit (4t/2.4s)
• Rapid fire - 8-hit (8t/4.8s)
⬥ Melee Abilities 
• Fury - 2-hit (3t/1.8s)
• Assault - 4-hit (7t/4.2s)
• Destroy - 4-hit (7t/4.2s)
• Greater Flurry - 2-hit (3t/1.8s), or 3-hit (5t/3.0s)
Ability Prioritisation
Why It's Important
⬥ As obvious as it may sound, using stronger abilities increase your DPS, more so than any other gear upgrade.
⬥ Abilities can be prioritised differently based on the scenario. For example, DoTs, or damage-over-time abilities (e.g. / / ) have lower priority while under damage-boosting ultimates ( / / ) since their damage doesn't get boosted.
• In fact, if using a Berserker-variant aura , these abilities will actually be worse than if used outside these ultimates, as the auras don't boost damage while in an ultimate.
⬥ In other words, you should know which abilities are strong in which scenarios, and use that to your advantage.
How to Fix
⬥ Read the Ability Prioritisation sections in the style-specific channels to get an idea of how to prioritize abilities for each style (#Magic DPM Advice, #Melee DPM Advice, #Ranged DPM Advice).
⬥ For more information, check out the Ability Damage Maths spreadsheet in #spreadsheets.
⬥ Also, an explanation of how most abilities work can be found in #unknown-channel.
Managing Cooldowns
Why It's Important
⬥ Strong abilities often come with long cooldowns. If you use all your strong abilities at once, you will be forced to use many weak abilities during the cooldown.
⬥ By contrast, managing the cooldowns lets you use a balance of very strong and and moderately strong abilities, and for the most part, avoid weak abilities altogether.
How to Fix
⬥ Your goal should be to make use of "filler" abilities, ones with decent damage and short cooldowns, in-between your strong abilities in order to "manage" their cooldowns.
⬥ Managing your cooldowns effectively will translate to a direct DPM increase, as you will be using fewer weak abilities overall
⬥ Example filler abilities by style:
• Magic : Sonic Wave , (Greater) Concentrated Blast /
• Ranged : (Greater) Dazing Shot / , Needle Strike
• Melee : (Greater) Fury / , Cleave , Decimate
Losing Ticks
Why It's Important To Be Aware of Losing Ticks^^
⬥ Not using the next ability in the sequence fast enough causes lost ticks, where your character stands still doing nothing.
⬥ This may be due to slow ability input, or being slow with weapon switches, or forgetting to click a target again while using revo if you stop attacking for any reason.
⬥ This is similar to not cancelling channeled abilities properly - it can add up to a large amount of wasted DPS potential over time.
How to Fix
⬥ Practice more! Try to anticipate what abilities you will need to use in advance, so that you are prepared to input them as required.
⬥ This will be especially noticeable during the transition to full manual.
Not Using Auto Attacks
Why It's Important
⬥ Lossless auto attacks can be made during PvM under certain circumstances, which can result in 'free' damage.
⬥ For example, after using a damage-boosting ultimate like , you can get a free 2-handed auto attack  if done properly.
• To get this, use a non-channeled dual-wield ability before the ultimate, and switch to a 2H weapon afterwards and click your target again.
⬥ Similarly, a lossless 2H auto attack can be gained when using Shadow Tendrils with Ranged, if you use a fastest-speed dual-wield ability beforehand.
• Note that this does not work with glaives due to their attack speed.
⬥ There are more situations, but the summary is - not taking advantage of auto attacks is essentially giving up free damage.
How to Fix
⬥ This is a slightly more advanced topic, and as such merits its own channel as there is a lot of information to cover.
⬥ For information on auto attacks in general, #auto-attacks has you covered.
⬥ For more information on defensive autos, check out the !defauto command.
Not Using Invention Perks
Why It's Important To Use Perks
⬥ Invention perks offer large increases to both your damage and survivability, and are absolutely recommended to be used. The benefits of perks far outweigh the costs of using augmented gear.
⬥ There are two kinds of perks - the perks that you camp, or base perks, and the perks that go on switches, that we'll call switch perks.
⬥ It is strongly recommended to unlock Ancient Invention, requiring 85  Invention (boostable with an extreme invention potion from level 67 and blueprints for gizmos can be bought on the Grand Exchange).
• Ancient invention perks are stronger, and in many cases far easier to get, than their normal counterparts.
Note: You can get starter perks going as low as level 68 Invention + an Extreme Invention potion. For a detailed list of perks and why they're used, check out #perks and #perk-information.
Base Perks
⬥ These are the perks you would camp on your weapons and armour. For players beginning their PvM journey, the following starter perks are recommended:
• Weapons: Precise 6  + Eruptive 4
• Body: Biting 3  + Crackling 4
• Legs: Impatient 4  + Enhanced Devoted 4
• Defender: Planted Feet  (can be on a switch weapon too)
⬥ These perks offer substantial DPS increases over no perks at all, boost your adrenaline gains with Impatient and offer large defensive damage mitigation with Enhanced Devoted 4 .
⬥ Not using at least some level of starter invention perks is a large damage and defence loss.
Switch Perks
⬥ Some invention perks like Flanking  , Caroming and Lunging
  can drastically change how good certain abilities are to use.
⬥ However, depending on the situation, these perks may not be good to permanently put on your items - in which case, they may end up as switches.
⬥ Not using these perks under the right circumstances can be significant lost DPS potential.
How to Fix
⬥ Always use augmented, properly perked gear! Even the 'starter' invention perks are miles better than no perks at all.
⬥ Practice adding in the switches slowly, and it will become muscle memory with time.
⬥ With Flanking your basic stun abilities like Impact  / Binding Shot
  / Backhand
  become some of your strongest basics, and add more options to your rotations. It also buffs the corresponding threshold stun abilities!
⬥ Caroming combined with Greater Ricochet makes it your strongest ranged basic by far, in a style that suffers from a lack of strong basics.
• With Greater Chain  it can become an exceptionally good way to clear large groups of monsters.
⬥ Lunging combined with a Masterwork Spear of Annihilation  makes
makes  your strongest melee basic ability.
Incorrect Weapon Switching
Why It’s Important
⬥ Changing your weapon during a channeled ability such as during Rapid Fire will cancel the ability abruptly.
⬥ Some abilities and special attacks are tied to your main-hand weapon. Changing weapons loses the buff.
• After using Greater Concentrated Blast your next ability must be dual-wield as well, to use the crit chance buff.
• Some special attacks like ECB spec  are tied to your main-hand weapon as well, and changing weapons loses the buff.
⬥ Understanding abilities used with 2H vs. DW weapons is critical to understanding how to 4TAA, which has nice utility in combat.
⬥ Mistakes like these, and more, can cost significant lost damage potential, and are essential to avoid.
How to Fix
⬥ Learn when you can and cannot switch weapons, and deliberately practice proper juggling rotations to ensure that you commit the correct actions to muscle memory.
⬥ In the long term, it is easier to learn good habits than to unlearn bad ones.
Cheaping Out On Supplies
Why It’s Important
⬥ It may seem convenient and cost-effective to save on supplies, doing things such as:
• Using normal spells over ancient spells 

• Using cheap ammo like ascension bolts instead of bakriminel bolts 

• Using low tier food instead of  or
or 
• Wearing cheaper alternatives 

 instead of better equipment


• Not using perked gear
• and the list goes on...
⬥ It may seem appealing to save money in these little ways, but it is not worth it.
⬥ The loss of any one of these upgrades may look small, but together they can add up to a large impact on your PvM ability.
⬥ Being able to have more utility spells at hand, to not waste time casting vuln, to do more damage with better ammo/spells, to heal more health quickly, to take less damage with better armour and perks, and so on can make PvM far less tedious and more enjoyable.
Note: in some extreme scenarios, it is worth considering cheaper alternatives. For example, it is almost never worth using Elite Sirenic 

 over other alternatives, as it is simply too expensive and has high reclaim costs. Or it might not be worth using a Grimoire at low tier bosses due to the high cost of pages
 . Use common sense.
How to Fix
⬥ Supply costs are the price to pay for the chance to do exciting PvM encounters, and fight fun bosses. Just accept them as a part of PvM.
⬥ Treat it as an incentive to get better at PvM - the faster you kill things, the fewer supplies you use and the more money you make.