Magic DPM Advice
Introduction
In RuneScape PvM, the meta at the time of writing is about pushing out as much damage in as little time as possible. It is important to understand that good and efficient PvM, especially at the higher tiers, is about squeezing out as much damage as possible in between mechanics.
This channel will go over general damage output lessons, ability prioritisation, crafting a rotation, a learning path, common mistakes, and tips and tricks.
Related Channels
For further information and reading, you can refer to the following resources.
Note: If you have any difficulties in using the tools or understanding what the information means, you can always ask in #pvm-help.
Revolution Bars and General Background Knowledge
For general PvM terminology, DPS tips, and revolution bars, check out their respective sections in #General DPM FAQ.
Ability Information
Note: If you have any difficulties in using the tools or understanding what the information means, you can always ask in #pvm-help.
Ability Prioritisation
Ability Ranking
⬥ Generally, high damaging abilities should be prioritised and used more often than low damaging abilities.
● This can be affected by what equipment the player owns, such as Kerapac's wrist wraps  (makes Combust
  stronger) or a Fractured Staff of Armadyl
  (Smoke Tendrils
  is very strong under it's special attack) and so when upgrading gear, it's worth spending a little time to understand how it impacts your abilities.
⬥ The following image shows the relative strengths of abilities in different scenarios, ranked by damage per tick.
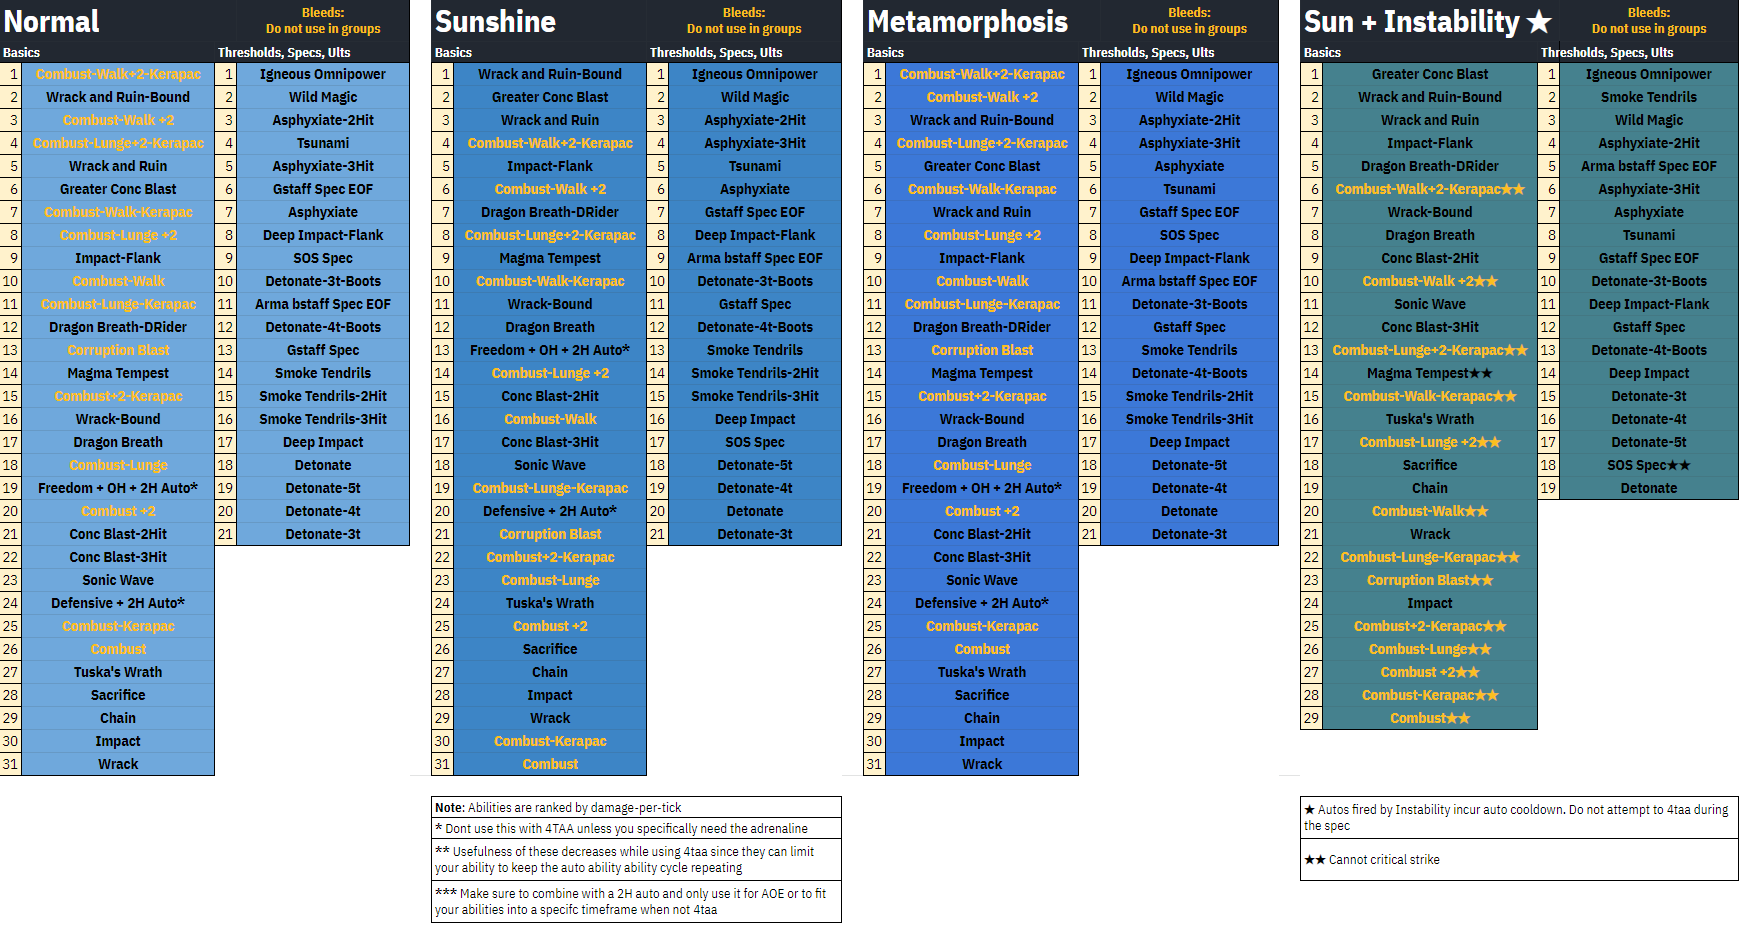
Note: This is not an ability rotation, only a damage comparison chart. It does not consider ability cooldowns or any specific PvM encounter, simply damage-per-tick in a vacuum. For information on how to incorporate these into a proper rotation, see the Building A Magic Rotation section below or in the pinned links.
Dual Wield vs Staff Camp
Note: This compares strictly camping dual-wield vs. camping 2H, but it is recommended to juggle, as it gives access to all the following benefits and more.
Dual Wield Camp Benefits 

⬥ Access to Greater Concentrated Blast  .
.
● This is one of the strongest basics and can be used every 3 abilities.
● It also synergises much better with the City of Senntisten spells 
 compared to Sonic Wave
  .
.
● It is so strong that camping dual-wields, even several weapon tiers lower, can be significantly stronger than camping 2H.
⬥ Easier to use switches.
● Can use  or off-hand switches like Flanking
  easier, as no extra main-hand switch is required.
Staff Camp Benefits
⬥ Access to Magma Tempest  /
/  which can be beneficial for AoE content.
⬥ Can be more revolution-friendly, such as for Slayer  tasks or AFK grinding methods.
⬥ Access to 2H Autos  , which are much stronger than dual-wield autos.
● When 2H camping this lets you make use of Defensive Autos  to replace weaker abilities like Tuska's Wrath
  .
.
Building a Magic Rotation
Here we'll cover some of the points to keep in mind to build a strong Magic DPS rotation. For more information on how these rotations are affected by certain items or switches, such as see the Important Items section.
Note 1: In the current meta, camping dual-wield > camping 2H, although ideally we use both.
Note 2: If Greater Concentrated Blast is not unlocked, use the regular version  below.
Managing Cooldowns
⬥ High damaging abilities often come with long cooldowns - when building a rotation, ability prioritisations and cooldowns should be on your mind.
⬥ If you use all of the high damaging abilities at once, their cooldowns will force you to use multiple weak abilities in succession while waiting to use them again.
⬥ To avoid this problem, you want to use filler abilities to space out your high damage abilities, to pace yourself and manage cooldowns.
⬥ The primary magic filler abilities are (Greater) Sonic Wave  / , (Greater) Concentrated Blast / , and Wrack
  .
.
● All of these abilities have decent damage and short cooldowns.
● Note that (Greater) Sonic Wave / and (Greater) Concentrated Blast / share cooldowns.
Basic Pattern
⬥ Greater Concentrated Blast should form the foundation of your rotation.
● Aside from being the ideal filler ability, it also provides a crit chance buff on the following dual-wield ability.
⬥ The basic pattern uses often, in 'blocks' of 3 abilities:
● [ → Ability → Ability ] → Repeat
⬥ If camping 2H, replace it with (Greater) Sonic Wave / instead:
● [ → Ability → Ability ] → Repeat
⬥ When building adrenaline, fill the empty slots with strong basics like the following, prioritising those that can crit:
● Wrack and Ruin 
● Dragon Breath 
● Impact (Flanking) 
● Wrack
● Corruption Blast 
● Combust (Walked)
Note: and cannot crit but are still strong abilities.
⬥ Once your rotation gets going, you can start using abilities like thresholds or better to fill in the blanks.
Building The Rotation
Note: It is assumed that Sunshine lasts for 38.4 seconds. You can do this with using Planted Feet  or by unlocking Greater Sunshine
  - both alternatives work. Examples of full Sunshine rotations can be found at the bottom of this guide in the General Sun Rotations section.
⬥ Sunshine lasts 38.4 seconds, but only has a 60 second cooldown. We want to prioritise building to 100% adrenaline and using Sunshine often, as it boosts damage by 50%.
● The exception to this is when the fight would end too quickly, or mechanics occur, and you can't benefit from the full duration.
● Ideally, enter boss fights with 100% adrenaline so you can activate it immediately at the start.
⬥ You can think of your overall rotation as two repeating sections:
● [ 38.4s inside ] → [ 21.6s outside ] → Repeat
⬥ Both in and out of Sunshine , you will want to prioritise your strong thresholds, special attacks, and modified ultimates:
● Wild Magic 
● Asphyxiate 
● Detonate 

● Deep Impact (Flanking) 
● Guthix Staff 

● Igneous Omnipower 
● etc.
⬥ The goal is to fit as many of these strong abilities within the duration of as you can to maximise the damage potential.
● You spend the majority of time inside - take full advantage of this.
● Continue using the basic 3-ability pattern to space your cooldowns.
⬥ While waiting for cooldown, you can use a few more thresholds/etc.
● You do not want to needlessly camp 100% adrenaline.
● You can start building to 100% adrenaline when is nearly ready to use again.
Note: To see examples of how to maximise your damage inside see the section at the bottom called General Sun Rotations.
Tips
⬥ Any basic ability with damage lower than Wrack , Sonic Wave , or Concentrated Blast is considered a weak ability and should be avoided when possible. Sometimes you may be forced to use them. Don't sweat it too much.
● Sacrifice 
● Chain 
● Tuska's Wrath
● Impact (no Flank) 
⬥ The critical chance buff gained through / is wasted if the follow-up ability cannot crit / but sometimes it is unavoidable.
⬥ If using Exsanguinate , Wrack and Ruin is a good basic if the alternative is weaker than Dragon Breath .
● This means Blood Tithe stacks are saved to buff strong basics like or but weak abilities are still avoided using .
What Spells to Use 
Note: These are just general guidelines, not rules set in stone.
Magic spells can be set to autocast, which essentially 'selects' them to use with your abilities. Think of this like picking your ammo for a ranged weapon. When using abilities, stronger spells can increase your ability damage, similar to ranged ammo. If you don't press an ability, then the selected spell gets used to cast auto attacks.
Important Notes:
⬥ All spells have a damage limit they can scale up to. For example, Air Surge is unlocked at level 81, but scales up to level 99, with the damage being capped by your weapon tier.
⬥ This is important, because your autocast must scale at least up to your weapon tier.
● e.g. You should not autocast Air Strike  with a Noxious Staff
  because it stops scaling at level 16, but the staff has a requirement of level 90.
⬥ The element of a spell generally does not affect its damage, but it can affect hitchance if a monster is weak to that element.
● e.g. and  would do the same damage to a target weak to Air spells.
● However, if you are not at 100% hitchance on a target, then using the correct weakness will increase it.
● Some exceptions exist, such as Ice Strykewyrms  / Glacors
  taking boosted damage from Fire spells spells.
⬥ Some spells like or will only give their passive benefits if selected as autocast.
What Autocast to Use
⬥ To autocast a spell, right-click it in your spellbook and select 'autocast'.
⬥ Generally you should be autocasting Exsanguinate .
● If you plan to use Tsunami  then switch to Incite Fear until 5 stacks, then switch back.
⬥ If the City of Senntisten quest is not completed, use Blood Blitz/Barrage  /
/  .
.
● Aim to finish this quest ASAP.
⬥ If on the standard/normal spellbook, use Air Surge (cheapest Surge spell).
● Use the highest rank of air spell available if is not yet unlocked.
What Auto to Use
⬥ It is possible to autocast one spell but use another spell to cast magic autos, such as with 4-tick Auto Attacks (4TAA) or defensive autos. Use !defauto and !4taa to learn more, or see the 4TAA section linked in the pins.
⬥ Weaker variants of spells like Blood Burst  vs. Blood Barrage can be used to auto without losing damage if manual spellcasting is enabled. Use
 !manualspellcasting to learn more.
● This is usually done to save runes.
⬥ To select a spell for manual/defensive autos, drag it from your spellbook onto your ability bar.
⬥ Typically use Blood spells for healing:
● Barrage/Burst / if AoE or faster hit timings matter.
● Blitz/Rush /  otherwise.
⬩ Can use Exsanguinate instead if healing does not matter.
⬥ Use Ice spells for freeze effects:
● Use Barrage/Burst  /
/  if AoE or faster hit timings matter.
● Blitz/Rush  /
/  otherwise.
Note that and have shorter freeze durations than their higher level equivalents.
⬥ If on the Standard spellbook, use Air Strike/Surge / .
Debuff Spells to Use
⬥ You should always have Vulnerability  and Smoke Cloud
  applied wherever bosses are not immune to the effects.
⬥ It is preferred to use Vulnerability bombs  instead of the spell as they are lossless.
● Cost of bombs is minor compared to the earnings from mid-tier or higher bosses.
⬥ Bosses immune to these effects:
● Vorago  except on phase 5/10/11
● Araxxor / Araxxi  except on phase 4
● Rise of the Six 
● Sinister Fragments at Ambassador 
⬥ Use Entangle  if you need a long bind while on the Standard spellbook.
Cancelling Channels
Why Channelled Abilities are Important
⬥ It is important to properly cancel abilities in order to not lose any ticks, or damage potential.
● Animations can be unreliable, and longer than the actual hit duration of the ability.
● It can be higher damage-per-tick, or net you more adrenaline, to cancel long channels early.
● Greater Concentrated Blast suffers a 1t delay when revolution is enabled.
⬩ See the following example.
When to Cancel Channels
Reminder: 1.8s = 3t = 1 GCD
⬥ Concentrated Blast
● Cancel after its 2nd hit as global cooldown ends (3t/1.8s).
⬥ Greater Concentrated Blast
● If revo/revo++ is on, Greater Concentrated Blast should be "cancelled" as global cooldown ends (3t/1.8s).
⬥ Asphyxiate
● Usually cancelled after the 2nd hit as global cooldown ends (3t/1.8s), or the 4th hit (7t/4.2s).
● 2 hit can net higher damage-per-tick, or higher adren gain, when compared to 4 hit.
● → → is still a strong option, especially if not using 4TAA.
● To cancel on the 3rd hit you would cancel after 5t/3s.
⬥ Smoke Tendrils
● Same as Asphyxiate timing, but typically only cancelled after 4 hits.
⬥ Armadyl Battlestaff 
● Generally used for its full duration of 5t/3s.
 Abilities
Important Magic Abilities
Certain Magic abilities are worth noting in particular, due to their behaviour and how they can be used. Here, we cover some of these abilities.
Greater Concentrated Blast
Note: For a brief summary, use !dwmagic and !gconc.
How It Works
⬥ Greater Concentrated Blast is an upgraded version of regular Concentrated Blast , unlocked by reading a Greater Concentrated Blast ability codex  costing
  13,200,809.
⬥ It remains a channelled ability, but it has increased damage, and all 3 hits can be used within 3t/1.8s, or 1 global cooldown.
Why It's Good
⬥ It makes dual-wield camping much stronger than 2H camping.
● This holds true even if the dual-wield weapons are lower tier than the 2H alternative; e.g. 
 versus .
⬥ It hits multiple times rapidly, and has a short cooldown.
● This gives it good synergy with spells like Exsanguinate and Incite Fear .
● Strong synergy with and/or  as the second and third hits of the ability, as well as the following ability, all benefit from increasingly bigger crit chance buffs.
Detonate
How It Works
⬥ Pressing once charges the ability, and pressing again releases it, dealing AoE damage.
● Takes 4t/2.4s to reach 100% with Blast Diffusion Boots , 6t/3.6s otherwise.
● AoE radius depends on charge % - see reference image: https://img.pvme.io/images/KP6RCFz4ym.png.
⬥ is centred differently with and without a target:
● If you cast without a target, it is centred on your player.
● If you cast with a target, it is centred on that target's coordinate at the time charging started.
⬩ If a target is 2x2 or larger, this is their southwest tile.
⬥ If a selected target dies while detonate is still being cast:
● If you target cycle to another target, the detonate will remain centred on the original (dead) target's coordinate.
● If you do not target cycle, the centre will be shifted to your player coordinate.
Note: the southwest tile being used as is quite important. If two large monsters stand side-by-side, and you would like to hit both of them, you should charge on the northeast-most monster, such that its southwest tile is within detonate range of the other monster.
What Makes Detonate Unique
Note: is just for demonstration - replace with another spell as desired.
⬥ Detonate is technically not a channel, however, it is often considered one due to its unique charge-and-release mechanism.
⬥ Unlike channels, Detonate acts like a defensive in the context of defensive autos.
● Auto cooldown is not incurred until its release, meaning you can release it with an auto.
⬩ Example: charge → auto + (release) .
⬥ Detonate is typically released with both an auto and the next ability at the same time, to maximise damage.
● Example: → (3t/1.8s) →
⬩ The hit timing and input order here are crucial: must be executed in exactly that order, on the same tick.
⬥ You can do the following while charging , without interrupting the ability:
● Switch weapons
● Throw bombs 
● Spellbook swap 

● Shield Dome 
⬩ This will result in a lost auto, but can be prevented by drinking a potion or eating food to cancel before releasing detonate.
⬥ You can stall the release of .
● Generally speaking you cannot stall channels (except melee channels 


 where you can stall 1 hit of the channel).
⬥ Detonate is not affected by Channeler's Ring  .
.

Known Issues with Detonate
⬥ Sometimes, Detonate will cost 30% adrenaline instead of 15%.
● This can be explained as follows: the game thinks you both have and don't have a target at the same time, so it uses adrenaline from both your target and the adrenaline inherently used from using it without a target.
● To prevent this, try casting any damaging ability before Detonate .
⬥ Casting Detonate on the same tick your target dies will cancel the charge completely.
Greater Chain 
Note: For a brief summary, use !gchain.
How It Works
⬥ is an upgraded version of , unlocked by reading a Greater Chain ability codex  costing 421,235,971.
⬥ It hits the target, as well 2 additional targets within a 6 tile radius. These targets then taken 50% damage from the next ability used on the main target.
● With Caroming 4  , the number of additional targets hit with
  can be increased up to 6.
⬥ If the main target dies, the AoE effect will be lost.
Why It's Good
⬥ It provides excellent opportunity for AoE damage.
● e.g. using a powerful ability on the main target like Igneous Omnipower after , or with high hitting special attacks such as .
⬥ Using damage-over-time abilities like Combust and Corruption Blast will apply their full damage to all targets, rather than only 50%.
⬥ It can be used to briefly stun multiple targets with stun abilities such as and  , however Asphyxiate will not stun secondary targets.
⬥ Effects of Debilitate  will apply to all targets.
Notes
⬥ AoE effect does not apply to the following abilities:
● Magma Tempest
● Sacrifice
● Reprisal 
● Shatter 
⬥ The following abilities will damage you for each additional target:
● Smoke Tendrils
● Onslaught 
Greater Sunshine
How It Works
⬥ Greater Sunshine is an upgraded version of regular Sunshine  , unlocked by reading a Greater Sunshine ability codex
  costing 233,267,120.
⬥ It increases the duration from 52t/31.2s to 65t/39s, and retains the damage-over-time effect that regular Sunshine has.
● This effect may be replicated using the Planted Feet perk  however this loses the damage-over-time component.
Why It's Good
⬥ It removes the need for a switch, potentially freeing up one inventory slot or making certain perks like Caroming 4 Planted Feet no longer needing to be combo'd.
⬥ The damage-over-time component can deal a moderate amount of damage, but it can also trigger other on-hit effects such as weapon poison 
 making it stronger than it appears.
Important Items
This section will examine equipment that is useful for Magic , and should be incorporated where relevant as you get comfortable with handling them. Not all items are applicable in all scenarios, so use your best judgement.
Guthix/Zamorak Staff Switch / 
How It Works
⬥ These are amongst the first upgrades that Magic users should get. This switch is used for its special attack.
● The special attacks are a good way to dump adrenaline for damage.
● The increases affinity by +2 for 1 minute → this is a great way to effectively increase hitchance.
● The lowers the target's magic level by 5% (of the previous value) and lowers its accuracy by 5% for 1 minute.
⬥ When an Essence of Finality  is acquired, / should be placed into it immediately.
⬥ If you 4TAA, you will generally wish to auto into this special attack as it is a Staff weapon with Average speed.
Planted Feet Switch
How It Works
Note: If you own Greater Sunshine this switch is not required.
⬥ This is a very strong, very low effort switch that increases the duration of Sunshine at the cost of its damage-over-time component. It is one of the strongest switches you can have, assuming you do not have Greater Sunshine.
● Sunshine's duration is extended from 52t/31.2s total (t0→51) to 64t/38.4s total (t0→t63).
⬥ Generally, always Sunshine with your Planted Feet switch, except when the encounter would end in 30 seconds or less.
⬥ Common choices for the switch include defenders  and the Enhanced Excalibur
● Placing on can potentially save one inventory space, as it doubles up both as a shield and a switch.
● Placing on could also save an inventory space wherever you would normally bring it.
⬩ Many bosses do not require a shield at all, in which case can save another extra inventory space.
⬩ It also means you can use the same switch for both Ranged  and Magic .
⬩ Placing it on makes it slightly more involved to use, as you have to click on the floor to not be dragged into melee distance.
● You can also put it on a cheap wand like 

 , though this is not generally recommended for the above reasons.
Flanking Switch
How It Works
Note: To learn more about how flanking angles work, check out NPC Facing and Flanking in #mechanics.
⬥ This is a simple, easy-to-get, relatively inexpensive and strong switch, especially for group-based content.
⬥ When standing 'behind' bosses, turns Impact and Deep Impact into far stronger abilities at the cost of their stun. At it's maximum rank of Flanking 4:
● The damage range of is increased from 20-100% up to 52-260%, making it one of the strongest basics.
● The damage range of is increased from 40-200% up to 64-320%, making it much stronger.
Note: (Flanking) Deep Impact is still not heavily prioritised due to the availability of stronger thresholds, however it can help salvage a rotation in a pinch.
Caroming Switch
How It Works
Note: see the section on Greater Chain above for more information.
⬥ This switch can be highly effective in multiway-combat scenarios.
⬥ Per rank, this perk makes (Greater) Chain / hit one additional target.
● With Caroming 4 this means a total of 6 targets hit.
● This benefits the most.
● A combination of and strong abilities like Igneous Omnipower can give excellent AoE clear.
⬥ only needs to be equipped when casting / and can be removed after.
⬥ This perk can be on an off-hand switch, a cheaper staff, or a defender depending on preference.
● An off-hand switch like 
 can be cheaper and higher damage, however it will almost certainly cost an inventory space.
● An affordable staff can be fewer inputs (versus equipping dual wield) on occasion, at the cost of an inventory space and potentially lower accuracy than your standard mainhand.
● A defender like will mean lower damage on but can save an inventory space.
⬩ You could combine Caroming 4 and Planted Feet into one gizmo if you choose to use a to save more.
⬥ Recommended for:
● Elite Dungeons 

● Arch-Glacor 
● Tzkal-Zuk 
● AoD 
● Slayer
⬩ For slayer consider on a staff, as typically 2H AFK revo++ bars are recommended for slayer-type AFK content.
Sliver Enchantments
How It Works
⬥ Slivers can be consumed with some other items to create enchantments.
● Enchantments are one-off consumables that permanently unlock certain effects.
⬥ There are 3 enchantments relevant to :
● Enchantment of Affliction  , costing 210,340,344.
⬩ Increases the effect of the Inquisitor's Staff  by a further 5%.
● Enchantment of Flames  , costing 181,944,749.
⬩ Increases the damage-boosting effect of enhanced Kerapac's wrist wraps by a further +15%.
● Enchantment of Metaphysics  , costing 152,617,888.
⬩ Channeler's Ring now also grants 2.5% critical strike damage, plus 2.5% more for each channelled hit.
Kerapac's wrist wraps
How It Works
Note: If an Enchantment of Flames is consumed, this boosts the effect of upgraded T90 by an additional 15%.
⬥ If an enemy is not susceptible to Cinderbane gloves , these gloves are generally the best alternative.
● They can be used as a switch even at poisonable content, but this is relatively high effort.
⬥ If equipped when casting , the next to hit within 10t/6s will have its remaining hits instantly apply at 25% more damage.
● You can cast and in any order, and the effect still works.
● Any hits will be separate hitsplats, not one big hit.
● If is cast on t0, has to hit within t0-9, so the latest you can cast is t7.
⬥ This effect will work together with other mechanics that affect Combust:
● You can + walk target (that order, same tick) after to double the damage.
● Lunging perk  .
.
● Using within 10s of will still grant 2 extra hits.
⬥ It can be upgraded from T85 to T90 Enhanced Kerapac's wrist wraps using 1000 Glacor Remnants  , and a Leng Artefact
  .
.
⬥ If an Enchantment of Flames is consumed, this boosts the effect of upgraded T90 by an additional 15%.
Dragon Rider Amulet 
How It Works
⬥ This switch has become irrelevant with powercreep, however it is still listed for posterity.
⬥ Gives Dragon Breath the following effects:
● Boosts damage by 10%.
● 10% chance of applying a bleed that hits 3 times, dealing 10% of max hit (rounded down) per hit.
⬩ This excludes boosts that do not normally boost bleeds.
Fractured Staff of Armadyl
⬥ The FSOA's immensely powerful special attack, Instability, costs 50% adrenaline, has a 60 second cooldown, and has two effects:
● An initial hit of 49.6%-200% ability damage.
● Fires a Time Strike for every critical hit on the primary target.
⬩ They are ability damage; their strength is proportional to the tier of equipped weapon.
⬩ They are cast on the tick the critical hit lands.
⬩ They can themselves crit but will not fire another Time Strike if they do (no recursion).
⬩ They do not incur auto-attack cooldown. This means 4TAA is possible during .
⬩ They are boosted by .
⬥ has excellent synergy with Tsunami due to the critical hit adrenaline gain buff.
⬥ Where possible, you will overlap +  + to get the most out of each effect.
Key Considerations
⬥ An effective rotation relies on landing critical hits as often and reliably as possible.
⬥ This makes Biting 4  , Erethdor's Grimoire
  , and either a Reaver's Ring
  or Channeller's Ring essential to success.
● Additionally, a Kal'gerion demon familiar  and Crit-i-Kal scrolls
  should also be used when possible.
Note: Use the !hitchance command to calculate to ensure your hitchance is at 100% with .
Basic Example Rotation
Note: Many variations of FSOA rotations exist, and crit RNG is involved. This is simply a starting point.
The following assumptions are made:
⬥ Igneous Kal-Mej  equipped.
⬥ Conservation of Energy relic  active.
⬥ Ring of Vigour  used (or its passive effect unlocked).
⬥ Manual spellcasting enabled, therefore is simply a 4TAA.
● AoE autos generate adrenaline late, therefore will grant 10% adrenaline if it crits.
(autocast )  → → → → → (autocast ) → → → (2-hit) → → (improvise) → (2-hit) →
When improvising, focus on using as often as possible. Then, fill with many and aim to fit one each of:  + + .
+ + .
Spell-Swapping During FSOA
Once has been activated, and desired stacks are reached, it is advisable to switch spells considering the following:
⬥ Time Strikes are boosted by Exsanguinate .
⬥ Frost Surge from Incite Fear can proc once per 12s and can crit.
⬥ Ruby Aurora  can provide a damage buff to nearby players in group content.
With the above considerations, it is recommended to start with to build sufficient stacks for discounted , then switch to in order to buff Time Strike damage. If willing to put in higher effort, it is most optimal to switch back to once every 12s so as to proc Frost Surge, before reverting to . In group content, weave in as desired.
Seren Godbow 
How It Works
Note: See !sgb command for a list of boss sizes.
⬥ This is an advanced switch to incorporate into rotations, but it can be beneficial to do so where applicable.
⬥ This switch is primarily to use its special attack.
⬥ Some considerations when using with Magic:
● Off-style is only used for bosses that are 5x5 in size or larger.
● Ingenuity of the Humans (Ingen)  is required to avoid splashing, or remove enough armour pieces to avoid splashing.
● It is recommended to pray flick to Anguish  / Desolation
  for the attack to increase accuracy and damage.
⬥ If you 4TAA, you will generally wish to Auto into this special attack (as it is an Average Speed weapon similar to a 2H Staff ability).
⬥ This is a relatively difficult input sequence to execute in a single tick:
● → → → → .
● The order of events does not matter so long as the auto is first and the special attack is last.
Important EoFs
This section covers weapons that are worth placing into an Essence of Finality  amulet for access to their special attacks.
Guthix/Zamorak Staff EoF
How It Works
⬥ As discussed in the Important Items section, a / are one of the first upgrades Magic users get and should be placed into an EoF as soon as possible.
● The special attacks are a good way to dump adrenaline for damage, dealing 140%-300% ability damage.
● The increases affinity by +2 for 1 minute → this is a great way to effectively increase hitchance.
● The lowers the target's magic level by 5% (of the previous value) and lowers its accuracy by 5% for 1 minute.
Armadyl Battlestaff (ABS) EoF 
How It Works
⬥ The special attack of the Armadyl Battlestaff (ABS) , Tempest of Armadyl, is a channel that lasts 5t/3s, dealing 18-90% ability damage per tick.
⬥ Historically, it was exclusively used in an EoF during FSOA special attack .
● However, after the FSOA rework update in June 2023, this is no longer recommended.
Defensive Autos
While colloquially referred to as 'defensive' autos, it is more accurate to call them 'non-damaging' autos, since some non-defensive abilities have similar interactions with autos. Examples include Sunshine , Metamorphosis  and (targeted) Magma Tempest
For a thorough explanation of how defensive autos (and auto attacks in general) work, refer to #auto-attacks. Here, we will simply cover some of their uses.
Why Defensive Autos Exist
Note: Air Surge is used to signify any magic auto spell in general.
⬥ Generally, casting any ability will put your auto-attack on cooldown based on your weapon speed.
⬥ However, non-damaging abilities do not cause this cooldown.
● This means that defensive autos can be used within your main ability rotation.
⬥ Magic in particular can keybind auto attacks by dragging spells on to the ability bar. This makes for some interesting gameplay mechanics.
Common Applications
⬥ Applying Smoke Cloud with Sunshine .
● Sunshine is a non-damaging ability, giving a defensive auto with the next ability:
⬩ → +
● This is commonly used to apply Smoke Cloud but can be used for other debuffs like Vuln or Enfeeble  etc.
etc.
⬥ Free auto after Magma Tempest (Targeted) .
● The targeted version of this ability can act as a non-damaging ability, giving a defensive auto with the next ability.
● For this to work, it must be targeted on the ground, not directly on a target.
⬩ → (ground) →
⬥ Defensive autos can replace weaker abilities in a DPS rotation.
● A defensive 2H auto can take the place of a weaker ability like Tuska's Wrath or Sacrifice to do more damage.
⬩ e.g. →  → (3t)
⬩ e.g. (DW)  → (2H swap) gives an OH auto + 2H auto.
⬥ Rapidly casting autos for utility or adren-building.
● Spamming multiple defensives with a target selected and using dual-wield can also generate adrenaline faster, since auto-attacks provide adren if they hit a target.
4-Tick Auto Attack (4TAA)
This section briefly covers the different ways to use 4TAA and some tips for learners. For more detailed information on 4TAA, 5TAA and auto attacks in general, check out #auto-attacks.
Note 1: DW/Dual-wield abilities refer to abilities cast with wand/orb.
Note 2: Wrack and Air Surge are only used for demonstration purposes.
What is 4TAA
⬥ 4TAA is an extension of weapon juggling.
⬥ As mentioned before, casting damaging abilities will put your auto-attack on cooldown based on your weapon speeds:
● Staff abilities (average speed) place it on a 6t (3.6s) cooldown.
● Wand/Orb abilities (fastest speed) place it on a 4t (2.4s) cooldown.
● Magic in particular can keybind auto attacks by dragging spells on to the ability bar.
⬥ Combining these, we get 4TAA: delaying the next ability by one tick, to force an auto and ability together on the 4th tick.
● 2H autos are multiple times stronger than DW autos; for this reason, 4-tick autos are almost always 2H (staff) autos.
⬥ The basic 4TAA structure is: non-channelled DW Ability → 2H auto + ability → continue.
● The ability before the auto must be DW so that a 4-tick auto cooldown is incurred.
⬩ If the ability was 2H, a 6-tick auto cooldown would be incurred, meaning 4TAA would not be possible.
● The ability before the auto must also be non-channelled, since channels incur auto cooldown multiple times, one for each cast.
⬩ For example, incurs a 4t auto cooldown 3 separate times: once on T0 (first cast), and again on T1 and T2. Therefore, forcing an auto on T4 is not going to be possible, as auto cooldown is not available until T2 + 4 = T6.
⬥ With Greater Concentrated Blast unlocked, it is important to ensure its usage is not delayed. This means that, generally, rotations will be structured using two types of patterns. Both patterns are built in groups of three abilities, with one and one 2H auto per group.
● Method A: 2H + DW/Staff ability → → non-channelled DW ability → Repeat
● Method B: 2H + → DW/Staff ability → non-channelled DW ability → Repeat
⬥ It is important to note that both patterns should be used together, rather than just always choosing one or the other.
● Only being able to execute one method will mean your rotations are less flexible and you will lose damage as a result.
Method A
⬥ How to do it, starting with staff equipped:
● Step 1: 2H auto + ability, in that order, same tick (e.g. )
● Step 2: Equip DW and
● Step 3: Cast a DW non-channelled ability (e.g. )
● Step 4: Wait one tick after global cooldown, then repeat from step 1
⬥ This means forcing an auto every 3 abilities, for example:
● 2H → → → (wait 1t) → 2H → → → (wait 1t) → repeat
Method B
⬥ How to do it, starting with staff equipped:
● Step 1: 2H auto + equip DW + in that order, same tick
● Step 2: Cast an ability (preferably DW to benefit from crit buff)
● Step 3: Cast a DW non-channelled ability (e.g. )
● Step 4: Wait one tick after global cooldown, then repeat from step 1
⬥ This is still forcing an auto every 3 abilities, for example:
● 2H → → → (wait 1t) → 2H → → → (wait 1t) → repeat
Notes
⬥ Method A can be easier for learners to execute as it has less actions in a single tick.
● Again, try not to fall into the habit of only using one method. Both should be leveraged.
⬥ Differences before and after buying Greater Concentrated Blast :
● Autos are now 3 abilities (10 ticks) apart instead of 2 abilities (7 ticks).
⬥ As described before, the ability before the auto must be a non-channelled DW ability.
⬥ It is generally ideal to auto into your channels, or at least not channel before you plan to auto.
⬥ When using Detonate or Asphyxiate , use it as the ability before .
⬥ When doing auto into a channel, generally always prefer dual-wield channels.
● This is because the cooldown after channel ends will be based on the weapon used.
● This lets you 4TAA one ability after the channel ends, rather than two.
● You can see the difference in the following rotations.
With, 2H Asphyxiate, you MUST do:
2H Auto + Asphyxiate → Ability → DW Ability → 2H Auto + Ability

With DW Asphyxiate, you can instead do:
2H Auto + Asphyxiate → DW Ability → 2H Auto + Ability
Common Mistakes and Tips
⬥ Going too fast
● Not waiting for 1t delay after global cooldown ends will prevent the auto from being cast.
⬥ Going too slow
● If you delay longer than 1t it usually results in a 5TAA, delaying the auto/ability (lost ticks).
● This is a big DPS loss.
⬥ When done correctly, you will see the auto attack fired with no animation.
⬥ Use a combat dummy on max-hit mode to practice, to check if you are doing 2H autos properly.
⬥ Use proper, easy-to-reach keybinds as some steps require you to perform multiple actions in one tick.
● e.g. ( equip Wand + equip Orb + press Ability ) in 1 tick.
⬥ You can click your auto attack on your bar instead of using a keybind if you prefer.
General Sunshine Rotations
This section will cover usage of strong abilities (thresholds or better) within your Sunshine under different scenarios.
If you are using an FSOA please see the !fsoa command or the Fractured Staff of Armadyl section for more information, as the rotations with that staff are more dynamic/improvised.
The following unlocks are assumed:
⬥ Ring of Vigour or its passive effect after Extinction quest.
⬥ Planted Feet or Greater Sunshine unlocked .
⬥ Igneous Kal-Mej .
⬥ Blast Diffusion Boots .
⬥ Incite Fear used for Tsunami .
Keep in mind the following:
⬥ These are only suggestions work from, and will not necessarily be applicable at all bosses or all scenarios.
● For boss-specific rotations, see their respective guides.
⬥ If Igneous Kal-Mej is not unlocked, replace with Guthix Staff and/or Deep Impact (Flank) .
⬥ Conservation of Energy relic is recommended for adrenaline refunds from , , and in order to execute a stronger rotation.
Sunshine w/ Adren Renewal
⬥ 2x Wild Magic
⬥ 2x Asphyxiate (2-hit)
⬥ 1x Igneous Omnipower
⬥ 1x Detonate (3t, with auto + ability release)
⬥ Guthix Staff as adrenaline permits
Sunshine w/ Limitless 
Note: Try to before for more adrenaline.
⬥ 2x Wild Magic
⬥ 2x Asphyxiate (2-hit)
⬥ 1x Igneous Omnipower
⬥ 1x Detonate (3t, with auto + ability release)
⬥ Guthix Staff as adrenaline permits
Sunshine w/ Adren Renewal + Pre-Tsunami +
⬥ 2x Igneous Omnipower
⬥ 2x Wild Magic
⬥ 2x Asphyxiate (2-hit)
⬥ 1x Detonate (3t, with auto + ability release)
⬥ Guthix Staff as adrenaline permits