Mechanics Overview
Solak Mechanics

Introduction
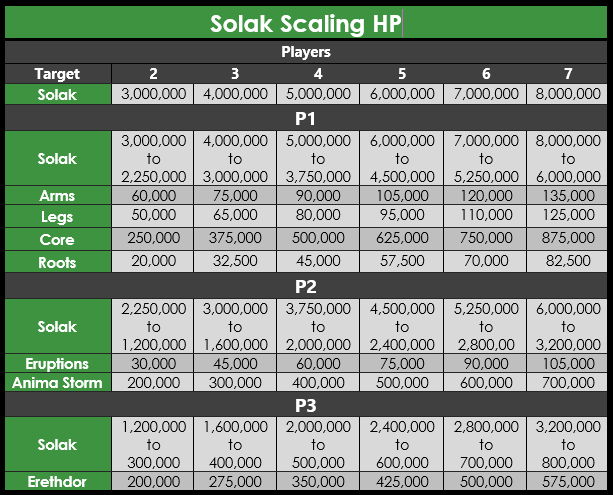
Solak is an anima guardian, enslaved by the dark elf Erethdor to siphon energy from the Lost Grove. The player is tasked with freeing Solak from Erethdor's grasp, aided by his sister, Merethiel, who provides aid during the fight. Solak is a high-level boss, boasting a variety of dangerous mechanics, and can be found in The Lost Grove. The encounter scales according to the number of players, ranging from 2-7 man. The mechanics and life point thresholds change across team size, which is detailed in a table below, with the loot droprates remaining constant. The boss is recommended to be fought in team sizes of 2-4, where the boss can be easily co-ordinated to avoid any issues. However, team sizes above 4 are also viable, just requiring more co-ordination and differing strategies.
This channel is intended to be the overall guide to the Solak bossfight, listed below are the complete overview of each mechanic, the recommended methods of dealing with them, advanced mechanics for players more comfortable with the fight, a guide to hybriding, realming, and benchmarks for the boss fight. The #deleted-channel, #deleted-channel and #deleted-channel channels contain optimal rotations for those strategies.
General Overview
Solak is a mechanically heavy boss, broken up over the 4 phases, with various targets. Some of these mechanics are optional, such as killing Erethdor. The boss makes use of the Extra Action Button multiple times during the fight, make sure to make it accessible in a suitable area of your screen.
Solak attacks the main target (Base) with Melee auto-attacks, and secondary targets (DPS) with Ranged auto-attacks. Solak's melee autos cannot splash on the base, however ranged attacks are affected by the player's defence.
⬥ These autos have travel time, so splashes can be seen pre-emptively via the shield icon on the player.
⬥ Solak has a 5-tick auto-attack speed, which speeds up to 4-tick at certain parts of the fight.
The Solak boss fight has many stationary targets, such as Volatile Rootlings and Anima Eruptions. All stationary targets in this fight face south by default, and can therefore be flanked  from the north. Movable targets must be positioned correctly relative to the target as per usual.
Over the fight, players can receive Blight Stacks from various mechanics, these increase the player's damage taken by 1% per stack, and can be cleansed via Merethiel in phases 2 and 3.
The use of Storm Shards  is heavily recommended throughout the fight, as the Shatter
  on P4 is vital to the success of the kill. Typical times to shard are as follows:
⬥ P1 after HP cap
⬥ P2 during Eruptions
⬥ P2 after HP cap
⬥ P4 during invulnerability
Drops
Solak drop values
Solak can be a lucrative boss, dropping valuable uniques, such as:
⬥ Erethdor's Blightbound Crossbow  - 1/400
⬥ Erethdor's Off-hand Blightbound Crossbow  - 1/400
⬥ Erethdor's Grimoire  - 1/200
⬥ Torn Grimoire Page  - Always (1/200 chance to receive 25)
These droprates are consistent across all teamsizes
Each Solak kill is worth  7,997,488, with 5,422,765 of that being from commons. Advanced players can get up to 9 KPH in Duos, leading to a revenue of 71,977,390.
Fight Information
Scaling HP chart
Auras
Players have 100% hit chance on Solak using the recommended gear, so accuracy auras are useless.
⬥ For hybriding:  >
>  (If Ranging) >
⬥ For camping one style:  /
/  /
/  are always the strongest auras
Dominion Mines
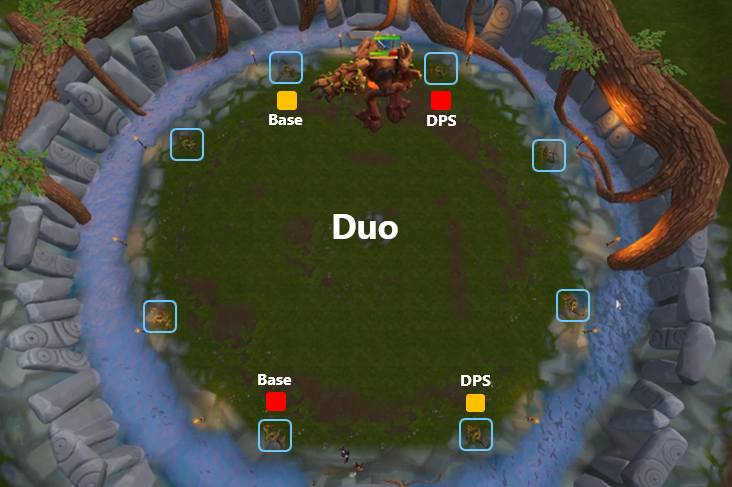
Dominion mines  are particularly useful for dealing damage to the Roots, dealing 10k damage per mine. These can be pre-placed before starting the fight, and then again after the cooldown has ended. In Duo, two mines can kill a root alone, but they must be placed on the same tick in order to kill a target. The images below shows the location of the 8 Root spawns and the locations that players should pre-place mines.
Duo
4-Man
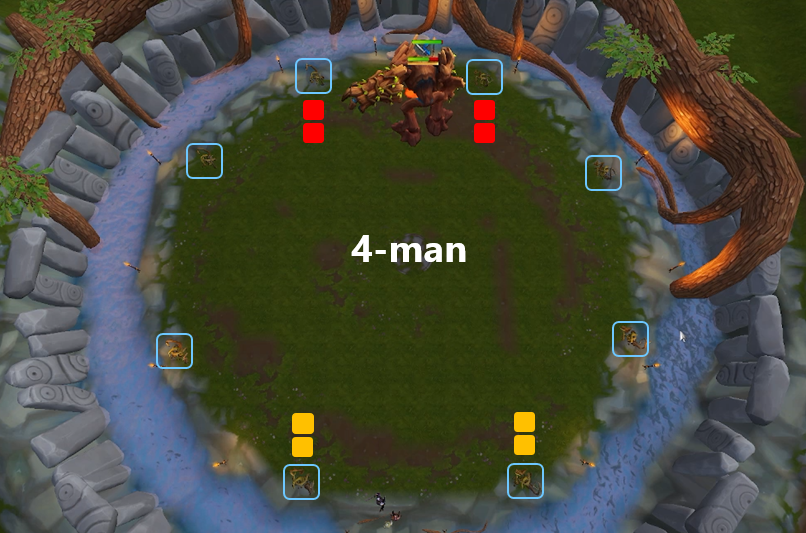 The orange squares represent pre-placed mines, the red squares represent the next set of mines placed during the kill.
Phase 1
Solak Attack Rotation
2 Autos → Green Pads → 3 Autos → Bombs Explode & Roots Spawn → 13 Autos → Root Arrows → 7 Autos → Blight Bomb 1 → 7 Autos → Blight Bomb 2 → 3 Autos → Arms and Legs → Core → 7 Autos → Green Pads + repeat from there
Phase 1 Notes
⬥ The rotation will restart from green pads until core is dead.
⬥ When Solak reaches his hp cap for the phase, he will phase into Arms instead of his next special attack
⬥ After the Blight Bomb 1, Solak increases his attack speed from 5 ticks to 4 ticks, for 10 auto-attacks.
Green Pads
2 auto-attacks into P1, Solak will throw toxic spores into the air and Green Pads will spawn scattered around the arena. These can spawn in any location, even on top of each other, and occupy 3x3 squares. 1 pad is spawned for each player in the instance, and must be stood on by a player within 6s (10t) seconds of their spawn. For every pad that is missed, the players are dealt ~7k+ damage, and 5 blight stacks are applied to the player. It is recommended that the player uses Bladed Dive  to move to these pads. Once absorbed, they reset , allowing you to quickly move back to where you were.
⬥ For advanced players, this can be done in 1 tick, and abilities can be stalled for release on Solak. An example clip can be seen below in the advanced section.
Blight Bombs
2 individual Blight Bombs (Bomb 1 and Bomb 2) are spawned in P1, with a third as part of the Pads mechanic. The timings for these bombs are set in the attack rotation above. These are indicated by a green bar above the player's head, and take 10 seconds to charge, after which they explode for ~7k+ damage.
⬥ Bombs 1 and 2 are AoE, in a 3x3 area, and deal reduced damage based on the player's proximity to their team-mates.
⬥ There are a few ways to deal with the bomb from the green pads
• Using disruption shield  is the most optimal way as it is lossless.
• Resonance  : This will fully negate the bomb’s damage at the cost of a GCD.
• Debilitate  / Reflect
  . This is not recommended at all, but is a safe method.
• Tank it. You will take maximum ~8k damage with a zerk aura. A Vitality powerburst  may be helpful here.
Note: The melee hit will land 1 tick before the bomb damage, so use Resonance / Disruption Shield as you see the melee hit. Depending on how far away you are from Solak, the bomb will hit before the range attack.
Volatile Rootlings and Blightbound Lashers
After the Green pads mechanic ends, 26 seconds into the fight, Solak spawns 8 Volatile Rootlings, with differing HP depending on team size. These are important to deal with, as if left unchecked for 1 minute, they will begin to transform into Blightbound Lashers. These Lashers deal highly accurate, highly damaging ranged hits, and as they spawn, turn other roots into lashers and heal other spawns up to a maximum of 660,000 HP. Multiple spawns must be avoided at all costs, as they are almost guaranteed to kill you.
⬥ If 1 lasher is left alive, it can be ignored whilst dealing with other mechanics, and killed during downtime.
⬥ Solak will also spawn 2 Blightbound Lashers, with 50,000 HP, if the player fails to kill both of his arms or legs.
Root Arrows
13 auto-attacks after the Volatile Rootlings spawn, arrows will spawn on the map for players on the team, with varying timers based on ordering, indicated with an arrow and a chat message "Roots are preparing to rush you from the edge of the arena! Look out! [#] (seconds)". These arrows indicate the spawn location of the centre of 3 Root lines, which converge on the marked player. If caught in this attack, it deals ~2,000 damage per tick, and stuns the player, and damages anybody in it's path. As such, these arrows must be dealt with to avoid killing teammates.
⬥ The player does not have to go directly to the arrow, just ensure the direction is clear of any teammates, and then take 1 step away from the arrow as the timer hits 0. Use Anticipate  or Freedom
  beforehand to avoid any chance of being stunned.
Solak's Arms
Solak punches his arms into the ground, these spawn with varying HP and must be killed in ~30 seconds to progress. Both arms can be damaged by the Dragon Breath  ability, if standing on the correct spot.
Solak's Legs
After the arms are killed, Solak's legs become attackable, requiring less damage but must be killed faster, in ~25 seconds, to release the Blighted Core. These are 3x3 targets with 2 squares space in between them, allowing a fully charged Detonate  to hit both legs, but requiring the use of a halberd or a dummy for Melee and Ranged respectively. A non-halberd weapon can be used, but requires precise positioning, blocked by Solak's hitbox.
Blighted Core
Solak's Core is required to be killed to progress into Phase 2, with varying HP based on teamsize, 125k HP per player in the arena. The core is attackable for exactly 29 ticks, and is a 3x3, rotating target.
In order to consistently flank the core, players must step underneath it, as it rotates towards attacking players.
Phase 1 Advanced Mechanics
With increased DPS, many of Solak's mechanics can be avoided entirely. As such, there are many advanced mechanics and strategies to deal with these skips:
Skips
⬥ Bomb Skips - If Solak reaches his P1 HP cap within 1:31, he will phase into arms.
⬥ Root Skips - If Solak reaches his P1 HP cap within 1:06, he will phase into arms.
⬥ 1-cycle core (1cc) - Killing Solak's Core in one rotation, skipping the repeat P1 rotation.
Ability Stalling on Pads
As mentioned above, due to the ability of the Pads to reset Bladed Dive , the player can use this to stall an ability as they deal with the mechanic, releasing it in their ultimate to increase damage. This is done by bladed diving whilst the GCD is active, casting an ability, then bladed diving back to your original position and clicking Solak to release it before the next ability.
Chin Legs
As the legs are 3 squares apart, a correctly placed MKII Invention Dummy  can be used to attack both legs at the same time with Mechanical Chinchompas. Video examples of how to place the dummy correctly can be found below.
Sunshine Spot
Both of Solak's arms can be hit with the Dragon Breath ability, which requires the player to be standing on specific squares. This is shown in an image below, marked by the dirt circle directly west of the middle of the arena. When achieving the meta skips, this  should be pre-placed on these squares, to deal with the arms and legs faster.
Phase 2
Phase 2 Rotation
Eruptions → Anima Bombs → 12 Autos → Blight Rain → 7 Autos → Binding Crush (Arm Climb) → 4 Autos → Blight Rain → 7 Autos → Hurricane → 7 Autos → Blight bomb → 4 Autos → Root Arrow → 4 Autos → Blight Bomb → 4 Autos → Blight Rain
Phase 2 Notes
⬥ Upon killing the Blighted Core, P2 starts, and all players are granted 5 blight stacks. From this point onwards, Merethiel can be interacted with to clear blight stacks, with a 25 second cooldown.
⬥ The secondary mechanic, Corruption, is required to reach 0% to begin phase 3. Solak will phase on the next special attack when the bar hits 0%.
⬥ The rotation will restart from anima bombs if not at 0% corruption
Corruption
Corruption is the over-arching mechanic of P2, displayed as a secondary bar underneath Solak's HP bar, shown below. This bar must be completely drained in order to phase into P3, and is drained by a variety of factors.
⬥ The first factor is Solak's HP, draining HP directly drains the Corruption %
• However, in Duo and Trio teamsizes, draining his HP to hit the HP cap will not lead to him phasing until a special attack, it will end on the first hit of the 2nd Blight Rain in Duo, or after the Arm Climb in Trio. He must be healed via a Calorie Bomb  or damaged through the use of the ECB
  special attack in order to drain the bar enough, or a combination of both in Trio. The Split Soul special attack drains the corruption % directly.
• The Corruption bar is also drained via the mechanics, each Blight Rain and Hurricane will drain the bar by 2% per hit, and successfully climbing the arm drains 20% Corruption.
Anima Eruptions
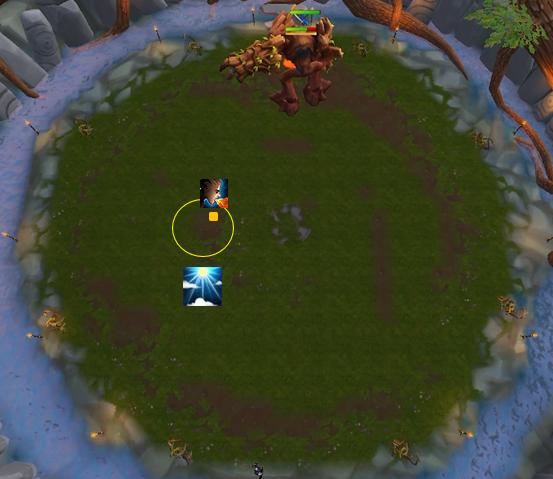
The beginning of P2 starts as Solak's Blighted Core dies. 4 eruptions spawn, which must be killed in order to progress into the rest of P2, as he gets capped HP until all Eruptions die. Upon killing an eruption, a blue circle appears in it's place, which teleports the player up to deal with the Blight Storm. This takes 7.2 seconds from the death of the Eruption, leaving time to cleanse your blight stacks with Merethiel and Bladed Dive or Surge  into the circle. These are the only secondary target aside from Erethdor that are not affected by the effect of the Inquisitor's Staff
Blight Storm
⬥ Directly linked to the Anima Eruptions, the Blight Storm is a secondary target in P2. Across the phase, it constantly drops anima bombs, applying 1 blight stack and hitting for ~1500-2000 base damage, every 10 seconds that the storm is alive. These bombs also increase the size of the blight pool on the floor of arena, starting small in the centre and increasing in size as more bombs drop. This deals low damage and grants blight stacks, so avoid stepping in it. It is cleared with the first Blight Rain attack.
⬥ The storm has varying HPs, and can only be directly damaged by teleporting using the blue circles spawned by Eruptions. The player deals damage to the storm based on the number of blight stacks they have, dealing 10k damage per click with 0 stacks, 0 damage at 10 blight stacks, and any stacks after 10 will cause the player to heal the storm. After teleporting up, the player can use defensive abilities and move around on the platform, but the main focus is to spam click the storm until it dies.
• The recommended method of dealing with the storm involves cleansing with Merethiel as you kill the first Eruption, click her as you cast your last ability and move to her cleansing pad. Surge or Bladed Dive can be used to get back into the blue circle, and allows you to deal 10k damage per click. Doing this only requires a total of (team size + 1) people to go up to damage the storm, i,e: for Duos, the base should go up once with the DPS together, and DPS once more on their own to deal with the remaining HP, and only requires you to cleanse once at the start.
Anima bombs (Minefield)
After killing the Eruptions, Solak turns the arena into a minefield, with Anima Bombs appearing in random positions for 30 seconds. These damage in a 5x5 area, and are marked by a purple ball rising from the floor, before slamming back down into the ground after 5 seconds. They start off dealing ~750 damage, and increase in damage over the course of the special attack ending around ~8k+.
⬥ The "safest" place to stand is directly north, between the two northernmost torches. This does not guarantee safety from the bombs, so you will have to make sure to keep an eye out.
Blight Rain + Nature's Blessing
As the final Anima Bombs fall, an interactable Nature's Blessing will spawn in the north of the arena. This gives 3 players a 7x7 blessing shield that can be activated via the Extra Action button. 2 auto-attacks after the blessing spawns, Solak calls a Blight Rain special, where 5 highly damaging blight hits rain down on the player. These each hit for ~8k+ damage, which is reduced to ~2k when inside the blessing, and drain the Corruption bar by 2%.
⬥ Each hit of the rain grants 5 blight stacks, reduced to 2 when inside the blessing.
⬥ It is recommended to use Debilitate to reduce the damage taken by the rain hits, then uses Resonance to heal up once at low HP, by stepping out of the blessing, being careful to not snipe it with Solak's auto-attacks.
• For the player intending to climb the arm, make sure to use on an earlier hit, in order for it to be off cooldown later.
⬥ The interactable Nature's Blessing can be taken 3 times, regardless of team size, and it is recommended that one is taken by the Base and one DPSer first, then after the first Rain is finished, the Base takes the second.
• This allows players to make use of Flanking during the mechanic, in order to speed up the phase.
⬥ A second Blight Rain is called 4 auto-attacks after the Arm Climb special, which follows the same mechanics.
• As you will have used 2 shields for the first Rain, the players should all stand together under the same blessing.
⬥ A third Blight Rain is called after the second Root Arrow, after which the P2 rotation will restart.
• It is extremely unlikely that you will ever see this attack, however if you expect to get this, use one shield per Rain, in order to have one for this attack.
Arm Climb
After the first Blight Rain finishes, Solak will root a random target to the floor, and slam his arm down on their location shortly after. This will deal an instakill to any players standing on the direct square, and a ~3.5k melee hit to players in the area around it.
⬥ Through the use of Anticipate or Freedom before the rooting, the rooted player can move away freely. If these cannot be used, another player can click at their feet to free them.
If Solak misses his slam, his arm remains stuck in the floor for a player to climb upon and greatly reduce the Corruption by 20% with a cutscene-style attack, after which Solak retaliates with a hard-hitting melee attack.
⬥ During this climb, the player can continue to attack if using Magic or Ranged, but not with Melee.
⬥ You can use Resonance to heal or Divert  to gain a large amount of adrenaline from the melee hit.
Hurricane
After the second Blight Rain, Solak becomes surrounded by purple swirling rings, and he spins into a hurricane which releases 5 hits in quick succession, similar to the Blight Rain. Each hit deals around ~8k+ damage, and is impossible to survive without the use of defensive abilities.
⬥ If the player expects this attack, they should build to Barricade  before the attack starts, and it will last the duration of the special attack.
⬥ By this point, the player will have amassed a large amount of blight stacks, which can be cleansed with Merethiel to reduce damage taken.
Root Arrows
This attack is similar to the Root Arrows in Phase 1, two of these follow the Hurricane special attack. The player's screen shakes, Solak slams his arms into the ground, and an arrow of roots will spawn 7 squares behind the Base and converge on their location when the mechanic started, moving towards Solak. To avoid these, simply move away from where you were standing.
⬥ A Blight Bomb occurs between the two root arrows, to up to 3 players without Solak's aggro. When the bomb explodes, the second arrow will start.
Blight Bomb
This is directly linked to the Root Arrows mechanic, where players without Solak's aggro will be given a blight bar above their head, the same as the bombs in P1.
Phase 2 Advanced Mechanics
In Duo and Trio teamsizes, Phase 2 is timegated by the Arm Climb mechanic, and the Anima Eruptions are a vital part of fast kills. As such, advanced strategies for dealing with them are detailed below:
Anima Eruptions
As mentioned, dealing with Anima Eruptions quickly is a determinant for fast kills. Two examples of quickly clearing eruptions are shown below.
Advanced players can also choose to kill the Eruptions but avoid going up to deal with the storm, and instead tank the bombs until the fight ends. This is known as Storm-tanking, and can save ~10s per kill. This significantly increases your food consumption and is only recommended as one of the very last ways to improve time.
4-man South Eruptions - https://youtu.be/KQcYpoxf0mo
Melee north Eruptions - https://youtu.be/dESMelseYF0
Natural Instinct
Due to the timegated nature of P2 in duo and trio, the time can be utilised wisely to speed up P3, through the use of Natural Instinct  at the end of the phase. With a well timed , players can save their
  for use later in P3. Two examples of the correct timing are shown below.
Base - https://youtu.be/ab51E7Y3fIg
DPS - https://youtu.be/EGDinCAECB0
Phase 3
Solak Attack Rotation
8 Autos → Stun → 5 Autos → Blight Bomb → 2 autos → Stun
Phase 3 Notes
As this phase starts, 8 sigils spawn on the floor around the arena, 4 in the cardinal directions and 4 in between those. Alongside these, the mind realm becomes accessible through the Extra Action button, where the players can fight Erethdor. The phase ends when either all 8 sigils are filled, or Erethdor dies, and the fight progresses on to P4. As each Blight Bomb spawns, Solak increases his attack speed to 4 ticks until the stun mechanic.
Sigils (Pads)
These sigils charge as Solak is stepping on them, indicated by a circular progress bar surrounding them, which takes 15s. Once charged, they turn purple, a blight bomb falls from the sky onto the sigil, and Solak is immobilised and shakes violently, unable to attack for 15 seconds. During this time, Solak cannot attack, and the Extra Action button can be used to enter the Mind Realm, where Erethdor can be fought.
⬥ This is a good point to regenerate a lot of HP via Soulsplit  and position yourself to use Flanking
⬥ As Erethdor has quite low HP, it is recommended to end the phase by killing him instead of charging all 8 pads, as this takes significantly longer.
Blight Bombs
There are two types of Blight Bombs in P3
⬥ One type are dropped by Erethdor from the Mind Realm, which land on the sigils both randomly and when they finish charging. These deal ~2k damage per hit. Reflect or Vengeance  reflects the damage directly to Erethdor, helpful to finish him off if he has very little HP remaining.
⬥ The second bomb spawns throughout P3, tied to the Stun special attack. Up to 3 players that do not have Solak's aggro will recieve a bar above their head, the same as bombs in P1. However, when these explode, a line of roots directly connect all players with the bomb, which can stun and deal large damage to players caught within. These do not affect the players who recieve the bomb, but position yourself carefully to avoid killing teammates, away from the boss.
Stun
After the first 8 autos of the fight, Solak raises his arm into the air, stuns the player, and inflicts a blight bleed on every player in the fight until he is stunned back. This bleed hits every 2 ticks, and starts off with a low damaging hit of only ~200 damage, but increases by the same amount for every hit, which builds up very quickly. Following this, he will repeat this attack every 7 autos.
⬥ Solak requires multiple stuns to stop the bleed, X-2 stuns for all teamsizes, capping at 1, where X is the number of players not in the Mind Realm when the attack begins.
⬥ Solak only checks for stun abilities, so your stuns can be flanked and still work.
⬥ This blight bleed starts off dealing low damage, but scales up rapidly and can even hit players who teleport to the Mind Realm, so make sure to stun immediately.
It is recommended to use Anticipate or Freedom beforehand in order to avoid getting stunned by Solak, and then use stuns naturally as part of your rotation, taking into account this mechanic. These abilties are: ( /
/  /
/  /
/  /
/  /
/  /
/  /
/  )
)
⬥ Standing in the very north of the arena, by the stairs, allows you to avoid being stunned, however due to the placement of the pads, this is usually not feasible.
Erethdor
Erethdor is the Elf controlling Solak's mind, and is a secondary mechanic for the boss fight, offered as an alternative to charging all sigils. Killing Erethdor rewards the player by reducing the damage Shadow Manifestations deal to Solak on P4, alongside significantly faster kills. This is the recommended method of ending P3. When the sigils are charged, the Extra Action button can be used to enter the mind realm, where the player can fight Erethdor, a ranger who uses EoC abilities. When Erethdor dies, P3 ends, regardless of Solak's HP.
⬥ Erethdor can use these abilities, in random order:  /
/  /
/  /
/  /
/  /
/  /
/  /
/  and uses quickly after being bled with ,
  or
or  .
.
⬥ The player is allowed to be in the Mind Realm for ~20s, before being teleported back to Solak's arena. The animation for leaving begins around ~17s, however abilities can still be cast on Erethdor in that transition.
⬥ Inside the Mind Realm, the player cannot heal from any direct sources, such as foods, potions, and portents. This will be covered in more detail in P4.
⬥ Up to 2 players can enter the Mind Realm at once, regardless of teamsize.
More advanced players will require less ventures into the Mind Realm in order to kill Erethdor, as in duo they will aim to kill him in 1 "cycle". Rotations for both melee and range Elf kills can be found in #deleted-channel and #deleted-channel.
Phase 4
Phase 4 Notes
In this phase, Solak is solely focused on Merethiel, and is unable to attack the players. This part of the fight is kill or be killed, similar to Vorago P5, and Solak must be defeated before his mind is consumed by Erethdor's manifestations. As such, there are few mechanics outside of the over-arching mechanic, Solak's Mind.
Burst of Nature
During P4, Solak gains the ability to deal a large blight hit to all players in the arena, dealing upwards of ~12k damage if not dealt with. Solak takes time to charge this attack, it is released every ~28 seconds, marked by a purple hurricane surrounding him. The damage he deals with this attack can be reduced to ~3k via the use of several stuns, which are as follows: ( / / / / / / / ). These abilities should therefore be used early into the phase, as part of your DPS rotation, and flanked abilities still work to reduce the damage.
Blight Bomb
Exactly the same as the P1 Blight Bombs, these are given to 2 random players in the arena, with the bar beginning shortly before the Burst of Nature is fully charged.
⬥ If a player enters the Mind Realm after receiving a blight bomb, upon detonation, they will take no damage from it.
Mind Realm
In the final Phase of Solak, Erethdor attempts to consume Solak's mind, through his manifestations inside of the Mind Realm. The player's job is to defeat Solak before the manifestations consume Solak. The Mind Realm can be entered in order to protect him, known as "realming", and completely avoiding this mechanic and killing Solak is known as "no-realm" and requires strong damage.
⬥ Solak's Mind has 100k HP, regardless of teamsize. This is damaged by manifestations, their damage increases over time and will kill Solak in ~18-24 seconds from when he becomes attackable if left unchecked. The player's health can be sacrificed to heal Solak's mind, healing the equivalent damage taken, each click dealing ~2k damage to the player. This damage is blocked by Barricade , which can be used to safely heal Solak's mind.
⬥ If Solak's mind is consumed, all players are insta-killed, bypassing the Sign of Life.
⬥ If the player dies at the same time as Solak, Merethiel will revive them, avoiding their death mechanics. This will still clear the effects of Incense Sticks.
⬥ Mind Realm Mechanics
• Accessed via the Extra Action button, available from the start of the phase, with a short cooldown.
• The Mind Realm blocks direct forms of healing such as eating food  , drinking potions
  , or healing portents. Other forms of healing, such as Soulsplit , Excalibur
  , Phoenix Necklaces
  , or healing familiars can be used, and are recommended to be used to heal if available.
• Up to 2 people can be in the Mind Realm at once, and unlike in P3, players can remain indefinitely.
⬥ Manifestations
• If Erethdor was killed to progress from P3, Manifestations will deal reduced damage to Solak and targeted players.
• Erethdor's Manifestations continuously damage Solak's mind, when not aggro'd to a player. Upon being tagged, they shift their focus to the player, and deal weak ~1k magic hits to the player. The longer they are alive, the more damage they deal.
• Manifestations have 2 spawn mechanics, they spawn on a set interval timer of 11.4s, and also spawn as Solak takes damage, in consistent intervals depending on team size. They spawn every 50k damage dealt for duo teamsizes, and the damage required increases by 10k for every player that enters P4, up to 110k for 7 man. If struggling with no-realming, delay large damage such as in order to back-load the damage and reduce spawns.
• These have 25,000 HP regardless of team size, and if killed in the Mind Realm, become transported to the overworld, where they begin to attack all players in the arena.
Attack Timing
The timing to barge Solak before he's vulnerable can be gauged, you should be barging as he flies back from Merethiel (Assuming the animation does not glitch out for you)
⬥ Barge timing - https://youtu.be/c1wbZZQX7yI
⬥ Pre-Barge timing - https://youtu.be/DXUujotIZKU
Realming
Overview
When learning or in the case of missing teammates, correctly dealing with the Mind Realm is vital to securing the kill. This can be done effectively in one of two ways, entering immediately or entering late:
⬥ When in the Mind Realm, make sure to always be praying  , activate
  to heal when needed, and use Fortitude
  to reduce damage taken.
Immediate Entering
⬥ Entering immediately gives the largest amount of control over the manifestations, as you can easily tag them as they spawn and focus on defensives. This is slower than entering late, but is worthwhile depending on team DPS.
⬥ As you won't be dealing damage to Solak or Manifestations, all of your adrenaline can be utilised for defensives.
⬥ Start with Immortality  , for the 25% damage reduction for 30s. If the manifestations do not proc immortality before it ends, heal Solak until it procs, to make the most out of it. Whilst building adren, use Reflect and Devotion
  at low HP to reduce more damage, building for Barricade as the final defensive. Once barricaded, spam click Solak to heal him, whilst tagging new spawns to take their aggro.
Entering Late
⬥ This method is employed if you feel team DPS is lacking, and is a high-risk high-reward strategy. This involves dealing large amounts of damage early into the phase, then entering the Mind Realm to tag manifestations whilst your team finishes the rest of the fight.
⬥ After dumping thresholds outside, enter the realm and immediately tag every Manifestation available, focusing old before new, making use of Chain  and auto-attacks with defensives. Make sure to pray , use Reflect until low HP, then Devo and Barricade as it runs out. As before, spam heal Solak when caded, whilst tagging new manifestations.
⬥ For Hybrid -  → Build until attackable →
  →
→  → → →
→ → →  → Enter
⬥ For Mage - (pre) →  before attackable → + /
  →
→ 
 → → → → Enter
Examples
The rotations aren't set in stone, and are entirely dependent on the team DPS. Some teams may find their damage is higher, as such less thresholds must be used in the late method, and Reflect can be skipped in favour of Devo → Cade
⬥ Immediate realming - https://youtu.be/HeOJVdY5Ibk
⬥ Late realming - https://youtu.be/NicaCm-FxAo
Introduction to Hybrid
Solak is a boss with low defence and low damage output, allowing for the use of hybrid strategies in order to maintain as much uptime in ultimate abilities as possible, greatly increasing the player's damage output. However, starting off with hybrid can be unfamiliar, and is taxing on inventory space, since it greatly reduces the amount of food you can take.
It is recommended to be comfortable with both Solak as a boss and with multiple combat styles before learning to hybrid.
Hybriding assumes the player starts from a mage or range setup, adding in melee gear in order to make use of Berserk , the ZGS  special attack, and the effect of the MW Spear of Annihilation
  . As such, the most important switches to add are listed below, in order of priority:
Mage Hybrid
⬥ Base Magic setup (DW+2H, Flank, Planted Feet)
⬥ Melee Legs+Body + Melee DW
⬥ Melee 2H
⬥ Masterwork Spear
⬥ Melee Flanking
⬥ Melee Helmet
⬥ EoF Gstaff
⬥ Melee Boots
⬥ Borrowed Power Smoke Cloud  (
( )
)
The presets below give a rough idea of how presets adapt from a base Magic setup, to a learner Hybrid setup, to an advanced Hybrid Setup. Some items are more or less useful depending on the role, Base vs DPS:
Mage Camp
 Learner Brid
 Full Mage Brid
Range Hybrid
⬥ Base Ranged setup (DW+2H, Flank, Planted Feet, EoF Dbow)
⬥ Melee Legs+Body + Melee DW
⬥ Melee 2H
⬥ Masterwork Spear
⬥ Melee Flanking
⬥ Melee Helmet
⬥ EoF ECB
⬥ EoF SGB
⬥ Melee Boots
⬥ Borrowed Power Smoke Cloud ()
The presets below give a rough idea of how presets adapt from a base Ranged setup, to a learner Hybrid setup, to an advanced Hybrid Setup. Some items are more or less useful depending on the role, Base vs DPS:
Range Camp
Learner Brid
Full Range Brid
Explanation
These switches typically replace food, however as you bring more switches for the hybrid setup, you will have to employ more advanced strategies, such as pre-potting at the bank for inventory spaces.
Hybriding isn't just about bringing gear with you, making effective use out of the gear requires well-thought out strategies and optimal ultimate usage to increase damage output. To start off, this can be quite overwhelming, so the strategies below list how to make the most use out of your hybrid setup.
Mage Hybrid
Start out with the 2 most important Zerks, which are on Solak's Core and P4. These are low risk, as you are not being damaged so you can enjoy the full damage increase without any worry. After this, the next zerks to work into your rotation are listed below, in order of priority:
⬥ Zerk Core + P4
⬥ Zerk Erethdor (If going in solo)
⬥ Zerk P3 start
⬥ ZGS Erethdor (If going in duo)
⬥ Zerk+ZGS Start
⬥ Zerk P2 start
Once you get more comfortable, making more use of the ZGS special attack such as in P1 and on Erethdor is recommended. However, when starting out in larger teams, or for lower DPS teams, using Berserk on Erethdor to start off may find more success, until better strategies are learned.
Ranged Hybrid
Due to the effectiveness of the ECB special attack, the ZGS special attack sees no use in Range Hybrid. However, the damage from Berserk and the effect of the MW Spear of Annihilation are highly useful for damage output. The next zerks to work into your rotation are listed below, in order of priority:
⬥ Zerk Core + P4
⬥ Zerk Erethdor (If going in solo)
⬥ Zerk P3 start
⬥ Zerk Start
⬥ Zerk P2 start
Ranged Hybrid is quite different to Mage Hybrid, as the ECB special attack is so strong. As such, only critical zerks are recommended, and unless the player finds their team DPS lacking, ECB is recommended to use on Erethdor
Benchmarks
What Times Mean
Learning a boss requires practice and time, and learning happens at different speeds for everyone. As such, listed below are the benchmarks of killspeeds with certain skips taken into account, and how to transition between them.
⬥ 12+ mins - 3 or 2 cycle core (3/2cc), Hurricane P2, Charging pads P3, Realming P4
⬥ 10+ mins - 2 cycle core (2cc), 2nd Rain P2, 2 cycle Erethdor, Realming P4
⬥ 8+ mins - 2 or 1cc (with Bomb skips), 2nd Rain P2, Erethdor, No Realm
⬥ 6+ mins - 1cc (with Root skips), Arm Climb, 1-cycle Erethdor, No realm
Improving with your Kill Times
Starting off, players are expected to take the boss slowly, and focus more on mechanics. As they become more comfortable, then they can focus more on damage, and obtaining faster kills.
⬥ 12-10 mins - At this point, players are expecting to take it slowly. To improve from here, spend less time dealing with Roots and other mechanics on P1, and aim to make good use of the flank shield for the first Rain attack. Aim to reach the P2 HP cap by the 2nd Rain attack in order to avoid having to use Barricade to deal with the Hurricane. Transition from charging all pads p3 to dealing with erethdor, as this saves easily 2 minutes if the phase can be done in 4 pads. At this point, becoming more comfortable with mechanics is the main focus.
⬥ 10-8 mins - Here you will be working on refining your kills from the 10 min range, getting consistency in your 1 cycle cores, and implementing advanced skips like Bomb skips in P1. After this, phasing Solak in P2 consistently with the first hit of the second rain attack, killing Erethdor in 2 cycles and making efficient use of pads. Starting P3 without cleansing is expected by this point. With the use of Berserk or Death's Swiftness  and strong damage, No Realm kills are expected to be implemented here, saving 10-15+ seconds.
⬥ 8-6 mins - Here you will be working on consistent 1 cycle cores with advanced skips, Bomb or Root skips. Aim to end P2 with the Arm Climb attack, killing Erethdor in 1 cycle, and consistent, quick No Realm kills.
⬥ 6 mins - At this point, speeding up is a matter of consistency, reaching the timegates of each phase. Fast P1s end around ~1:50, Storm tanking can be used to save ~10s per kill, P2 is timegated to the Arm Climb attack. Aim to finish P3 in 2 pads which are charged immediately, and P4 is a quick No Realm kill.