Solo Hardmode Vorago
Vorago - Solo Hardmode
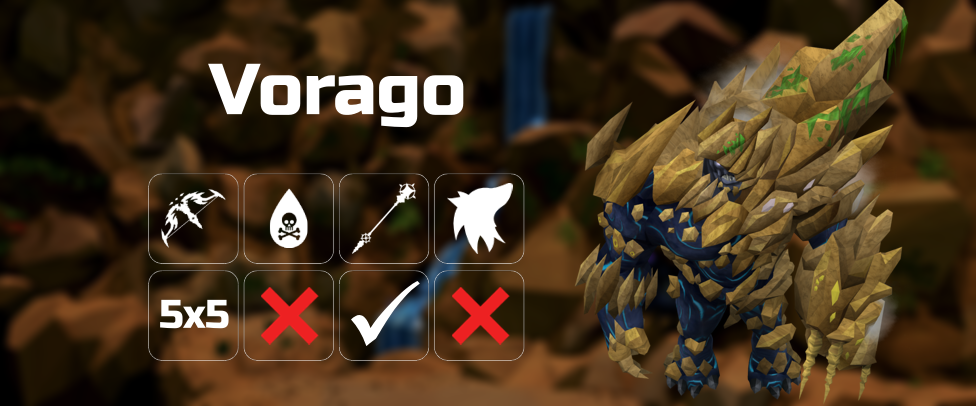
Intro
⬥ Solo hardmode Vorago is one of the hardest PvM encounters in the game and often requires you to improvise on the fly.
• Therefore, a strong understanding of the combat system is required.
⬥ A basic understanding of the boss and P10/11 pushback is assumed.
• A strong knowledge of solo normal mode P5 will translate well over to hardmode and save time learning.
⬥ It is recommended to read #Solo Vorago first for base knowledge of solo Vorago.
⬥ This guide will focus primarily on getting a first kill. So, with experience, some strategies can be improved to be faster.
Drops
⬥ There are five drops per kill.
⬥ Each drop has a 4/5 chance of 2 Tectonic Energies  .
.
⬥ Each drop has a 1/100 chance at a Seismic weapon 
 , with both weapons having an equal chance. Only one Seismic can drop per kill.
⬥ Each drop has a 1/2500 chance of an Ancient Summoning Stone  , with a threshold of 1000 kills.
⬥ Each drop has a 1/50 chance of an Ancient artefact  , with no threshold. This drop is only available if the player has mauled Vorago in all hardmode rotations.
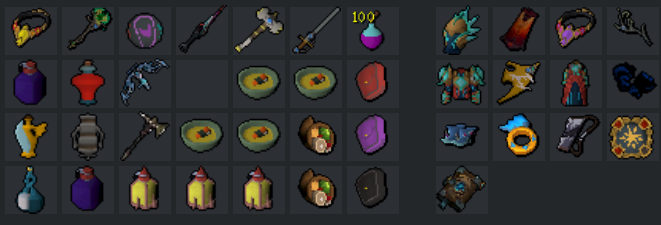
Minimum Requirements
⬥  Divert
Presets
⬥  Ingenuity of the Humans
⬥  Double Surge
• Essential for clearing bleeds
⬥ 

 Ful, BSA and Seren Godbow with Caroming 4
• Used to apply Black stone arrows with  on P10 and 11.
• Ful arrows for  on P11.
⬩ Can be skipped if doing the ammo swap inputs is difficult.
• This is not required but it's highly recommended.
⬥  Combat dummy MKII
• Used for P2 and P11 (placed end of P10 while shield dome mauling)
Choosing a Familiar
⬥ The advantages from Blood Reaver are:
• Free damage from Souls Split  , Blood Barrage
  and Blood Siphon scrolls healing.
• Consistent healing through, preventing your adrenaline and stats draining from solids  and brews
  .
.
⬥ The disadvantages from using Blood Reaver are:
• Your inventory is very limited, because of this you can't afford to use panic eat due to common mistakes a learner would do on Phases other than Vitalis, Green Bomb and Purple Bomb.
• You need to set the special attack rate at the start of every phase.
• You need to keep track of the Reaver's HP to make sure it doesn't die.
• In order to heal the Reaver you need to use the spell Prism of Restoration  which can't be casted during GCDs.
⬥ Note that you should be comfortable with doing P10 and 11 with little to no food.
Buffs not Shown
⬥  Ogre flask (thermal)
• It is important to have a high max HP for Vitalis phase
• This is on top on bonfire
⬥  Penance powder
• Reduces the impact of spirit shield prayer drain
⬥  2x Malletops
• Increased Barricade  duration for P10/P11
⬥ Archaeology Relics
⬥ Optional
•  and/or
  Spirit Weed/Lantadyme incense sticks
⬩ Mammoth spec spamming and overload duration
•  Ogre flask (salt water)
⬩ Prevents P1 run energy drain while climbing
•  Attuned portent of restoration X
⬩ Prevents adren drain for 300 HP less healing.
⬩ Useful for bleeds on Vitalis, second green/red stack on GB, and second stand on PB.
Preset and Relics
Preset Notes
⬥ This assumes around 40 minutes of Spirit Weed and Lantadyme incense sticks.
⬥ Pre overload at bank to be safe in case the kill extends too much.
⬥ 3 soups are saved for P5 to survive through bleeds 
⬥ The Powerburst of Vitality  is used on Phases 5 and 8, saving 2 doses for bad P10 Teamsplit spawns.
⬥ The Invention dummy can be replaced for another MTX dummy to bring an extra primal feast  or brew .
⬥ When using Blood Reaver you will need to set up the faimilar to passive, this way it will always follow you and you won't need to recall it every time you move away from it.
BoB Preset
BoB Notes
⬥ BoB food setup and yak vs mammoth is completely preference based.
• Mammoth is used for the familiar special attack P1-P9.
⬩ 1-2x primal feast are brought for P10/P11 to make up for the inventory space lost from not being able to yak familiar spec cryptbloom back.
⬥ If using a yak remove 3 brews and add 3 yak scrolls
Physical Statius' Warhammer vs Dark shard of Leng + Statius' Warhammer EoF
⬥ Advantage of physical  : saves an inventory space on P10/P11
⬥ Advantage of  +
+  : is 7 tiers of higher accuracy when hammering without ingen
• Therefore use + unless using strategy
Unique Invention Perks
⬥  Arcane Spirit Shield -
  +
+ 
• is utilized over  as the substantially longer barricade cooldown is not worth the longer cade duration.
• is used to ease adrenaline building during teamsplit spawns on P10.
• + combo: 6  + 1
+ 1  + 1
+ 1  + 1
+ 1  (1/8 at 137 invention, components added in order).
⬥ or your Main hand Melee weapon - 
• Perk choice is not impactful as long as any tier of  is not used as it can PK on P10/P11 reflects.
⬥  Energising - Use either option
•  Planted Feet Wand -
  +
+  (recommended option for P11 purposes)
⬩ Increased  adrenaline build is especially important on P10 reflect.
⬩ Mainhand allows for early  on P11 reflect.
• +  /
/  +
+
⬩ Replace  on tectonic, recommended to have
  +
+ 
Phase 1
⬥ Vitality pot last tick of dropdown message. The damage taken will be calculated off of your previt pot HP but will be applied on your boosted hp value.
⬥ Use  and eat 1-2 soups before climbing to give space for maul piece and equipping 2h. Use an ability right before entering jump animation so that adrenaline isn’t lost.
⬥ Rotation
• (pre)  →
→  → click the rock a tick after doing the previous inputs
⬩ The following climb will prevent your run energy from draining to 0. Note that tagging when reaching the top is extremely important for this:
•  (OR if didn’t hammer climb) →
  (skip if didn’t start) → →
  → →
→ →  →
→  →
→  → →
→ → 
 → (
→ ( if needed)
  → improvise
⬩ You may need to fill with a few basics to get the first or with bad crit rng.
⬥ If Blood Reaver:
• Skip Powerburst of Vitality and set the familiar special attack rate to 3.
• Place a Prism of Restoration after jumping .
Phase 2
⬥ Do a naked rotation before first reflect.
⬥ Apply or (if off cd) early into the phase.
⬥ Devotion  after 2nd reflect auto to save adrenaline over using Barricade in order to lower Vorago's HP to the cap by 2nd orb.
⬥ Safe bleeds strategy:
•  , ,
, ,  (flick
  ), ,
), ,
•  can be used if a mistake is made to clear any bleed
• If a mistake is made, use
⬥ Bring him down
• Place  →
→  instantly → → →
⬩ Aim to be 90%+ adrenaline by the time Vorago is attackable.
• Switch to Tectonic right before the bar is fully filled.
⬩ Switch back to crypt after phase ends.
• (pre)  →
→ 
 → →
→ →
⬩ Swap to during for faster auto speed.
⬩ Try to stand as close as Vorago as possible without leaving your to ensure fast hitting autos and abilities.
⬥ If Blood Reaver:
• Set the familiar special attack rate to 0 if you don't need the healing to save scrolls.
⬩ Otherwise, can set it to 5 to be safe so it doesn't die.
General Phase 3 - Phase 8 Tips
⬥ P3-P8 written below focuses on surviving even if substantial time is lost.
• There are instances where a phase is elongated to add ease to the follow phase by waiting for cooldowns.
⬩ Turn away if looking for speed.
⬥ Divert is better than Resonance  , unless you would die otherwise.
⬥ Incite fear  autocast start of phases → blood barrage autocast after
⬥ Spam between channels.
⬥ You can (pre) → equip at least 2t before Vorago is attackable →
• can get sniped by if you don’t equip your melee weapon at least 2 ticks before using it.
⬥ Can  →
→  + defensive on reflects since doesn’t clear like
⬥ Dark form  is worth using for bonus healing from blood barrage
⬥ Can use as your last ability on P3, P5, and P6 reflects.
• If doing so replace prep  with anti
  , and then replace anti with magma .
⬥ Remember to reapply if a phase drags on
⬥ Generally camp crypt.
• Can swap to Tectonic for portions of phases where not much damage is taken
⬩ E.g.: start of most phases.
⬥ Place MTX dummies at the end of phases 3, 4, 6 and 7 if it's necessary to build adrenaline.
P3: Ceiling Collapse
⬥ Simplified rotation:
• → (Build) → (Reflect) → → (End of reflect) + → → → DPS
⬥ Detailed rotation:
• (pre) → →  (walk) → → → /
  → → → + → → → → → →
  → → → →
  → → → improvise
⬩ Vit pot to clear rock #1 or #2 if mid spawn (optionally can use on red bomb as well)
⬥ If Blood Reaver:
• Set the familiar special attack rate to 1 on drop.
• Place a Prism of Restoration in the middle right before Magma Tempest .
P4: Scopulus
⬥ Stand just west of the southwest Scopulus spawn, pray  start.
⬥ Ideally you want the Scopuli to be close enough to each other so that blood barrage autos will hit them all without stacking them on a single tile.
• Greater Chain  will not spread if the Scopuli are stacked.
⬥ Simplified rotation:
• release → lure scops → run (with on) + → → + strong abil off cooldown
• off cooldown after ends
• Should be able to sustain with just ,  , , , and .
⬥ Make sure to set spell to blood barrage after .
⬥ Eat to full at end of phase and prepare your inventory for Vitalis
• 4 soups and 2 brews in inventory or 3 soups , 1 portent , and 2 brews would be recommended.
⬥ If Blood Reaver:
• Set the familiar special attack rate to 5 on drop.
• Place one or two Prisms of Restoration where you are going to be running around and don't forget to refresh them if necessary, before Magma Tempest .
P5: Vitalis
⬥ Simplified rotation:
• → → → → → → DPS
• If second reflect: → →
⬥ Detailed rotation:
• (pre) → → (walk) → → →  → → / → + → → → → → → → → → → → → → → improvise
⬩ during reflect
⬥ If Blood Reaver:
• Set the familiar special attack rate to 1 on drop
• Place a Prism of Restoration in the middle right before Magma Tempest .
• After bleeds spam Prism of Restoration , it is very likely that your familiar will have low HP and you cant place the prism when surrounded by vits, however, after bleeds it's very likely that some vits around you will die and give you space to place it.
⬩ If this is not the case, take out the scrolls from the familiar to avoid it dying and put them back in the next phase.
• Because of the familiar dps it is likely that this phase and the next will end too fast and it won't be necessary to stall the phase for cooldown.
⬥ Bleeds
• Be close to full health as bleeds is starting
• Vit pot a few ticks after first bleed lands but before 2nd.
• 10k hit → tank second bleed and eat to 10k+
• 10k hit → freedom third bleed, eat, and spirit flick for the blue.
• Continue to build hp as fourth bleed lands, eat to 10k+
• 10k hit → tank 5th bleed and eat to 6k+ as upcoming blues + tanking bleed.
⬩ If you are taking too much damage during or after bleeds just camp arcane . Even perfect pray flicks will make you take more damage from the combined bleed and Vitalis  damage than a blue bomb .
⬥ Can get two / off on second reflect by using preparation because of all of the Vitalis autos.
⬥ It is advised to stall the phase out until after second reflect to ensure is off cooldown for the following phase.
⬥ In case of a second set of bleeds (More than 1 should be rare)
• Tank first bleed, eat to 10k+
• 10k hit → freedom second bleed
• Try to clear third bleed with distance ( for blue)
• Clear 4th/5th bleeds with distance
• Freedom early if boss dies or will die early
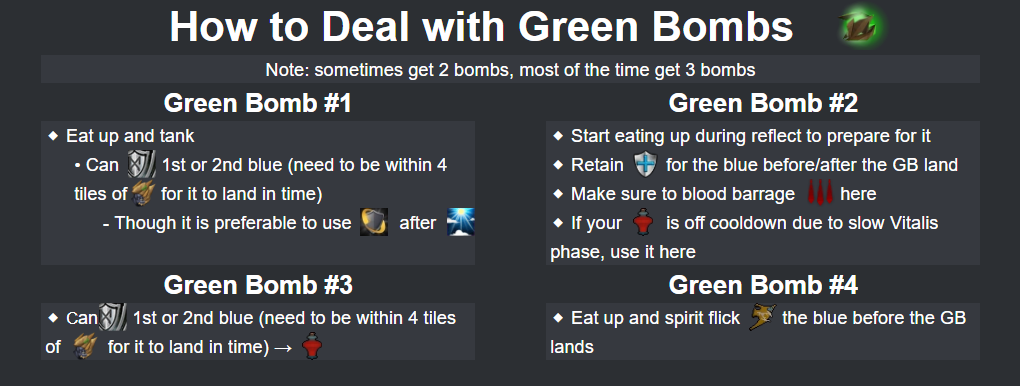
P6: Green Bomb
⬥ Simplified rotation:
• → (Reflect start) → → (Reflect end) → → → DPS
• If second reflect: → →
⬥ If Blood Reaver:
• Set the familiar special attack rate to 1 on drop.
• Place a Prism of Restoration in the middle right before Magma Tempest .
• If is on cooldown you can unequip your armour and  or just , Gstaff alone is enough to have a smooth phase given that you heal a lot from the Blood Reaver and it gives you free damage.
⬥ Detailed rotation:
• (pre) → → (walk) → → → / → (Reflect start) → ( if low hp) → + → → → (Reflect end) → → → → → → → → → → → improvise
• when off cooldown
⬩ Extra emphasis on this phase as is on cooldown early on.
P7: Teamsplit
⬥ Simplified rotation:
• (Before  spawns) (tc) → ( end) → → → out of 2nd → → DPS
⬥ Detailed rotation:
• (Before spawns) (tc) → → → → ( end) → ( / under to walk) or → → → (Reflect start) → → + → → → → ( start) → → ( end) → → → → → → → improvise
⬩ / early out of second so that damage isn’t nulled from 3rd spawn.
⬩ Blood barrage is particularly useful right before 3rd spawn for recursive autos.
⬩ Be careful autoing out of TS if combust walk pushed rago away from your spawn.
⬩ Magma before each explosion.
⬥ Don’t waste vitality pot , it is needed on PB.
⬥ If Blood Reaver:
• Set the familiar special attack rate to 1 on drop.
• Place a Prism of Restoration in the middle right before Magma Tempest .
P8: Purple Bomb
⬥ Simplified rotation:
• drop → DPS while tagging reds → stand up → on reflect → → on first quadrant → within second quadrant → tag reds → → → eat to full → DPS stand up + as blues land
⬥ Detailed rotation: Improvise
⬥ (pre) before each arm lands and stand ups
⬥ If Blood Reaver:
• Set the familiar special attack rate to 1 on drop
• Place a Prism of Restoration in the middle right before using Target Cycle and another when you use Sunshine.
P9: Waterfall
General Phase Notes
⬥ Stack  to have for P10 entry.
⬥ Do a naked rotation out of first waterfall, apply or early on.
⬥ Safe bleeds strategy
• , , (pray flick for the blue bomb), ,
• can be used if a mistake is made to clear any bleed
• If a mistake is made, use
⬥ Prepare inventory for P10 start
• You can place very early into the phase to free up some space in your inventory before dismissing your beast of burden.
• Summon nihil  .
.
⬩ If out of summoning points use prism of restoration .
⬥ Use end of phase as rago jumps for a third time.
Preset Examples for P10
⬥ If using a mammoth:
⬥ If using a yak:
• A full  is recommended in case P10 and 11 get extended a lot to get the most practice out of it.
• The cryptbloom switch can be useful if you run out of food, to tank if is on cooldown, or to stack blues with melees on P11.
• 2 are recommended for the length of the remaining part of the kill and having more adrenaline is extremely helpful here.
• 1 should be enough, you don’t get too much from tanking , it is mostly an emergency pot in case of bad spawns or placements.
• Make sure to have enough inventory space to pick up the maul pieces, build the maul as soon as possible and pick up the food that you dropped making sure you have an inventory space to equip your 2h weapon.
P10: Teamsplit-Broken
General Notes
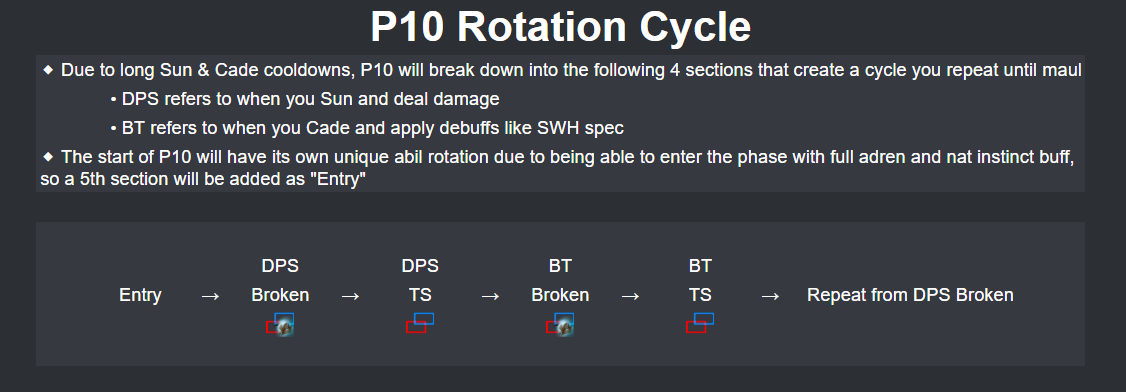
⬥ For simplicity we will refer to normal TS as and broken TS as  .
.
⬥ Vorago’s attack pattern:
• →  (x3) → (Reflect) (x3) → → (x3) → Repeat
⬥ Entry:
• → (x3) → (Reflect) (x3)
⬥ (DPS):
• → (x3)
⬥ (DPS):
• → (x3) → (Reflect) (x3)
⬥ (BT):
• → (x3)
⬥ (BT):
• → (x3) → (Reflect) (x3)
⬥ Due to the nature of pushback, strictly following rotations is ill advised.
• Instead, use the following as a guideline and adjust depending on the scenario.
⬥ All broken and unbroken teamsplit spawns should be (pre) → [ability].
• Skip if on cooldown and skip if out of range.
⬥ You can glitch TS spawns 1 tile towards Vorago (1 tile east) which is extremely helpful for sunshine placements on P10.
⬥ Consistently apply and 
⬥ Avoid using food as much as possible to prevent draining adrenaline and stats, will help with this.
• The damage debuff is not very important but the accuracy drain is huge.
Entry
⬥ → (x3) → (Reflect) (x3)
⬥ (-27) → () (tc) → →  (run to max attack range) → (4t) → → → → + → build
DPS
→ (x3)
⬥ You should always have 100% adrenaline by the end of this
• Your goal should be to get off , and before next spawn, if you can sneak in a that would be ideal.
• Alternate between and →
⬥ Be mindful of Vorago's position relative to the spawn when using
• If your sunshine will be placed too far away from Vorago use to tank the and instantly close to Vorago
⬩ Using can help to avoid using food.
⬩ Can swap to crypt for 3 autos if wanting to save or if it's on cooldown.
⬥ There will be times, although rare, where skipping will be ideal
• If you get a bad spawn (as mentioned previously) and is on cooldown
• If you are close to maul spot and won't need sunshine damage, this would guarantee that , and will be up for the start of P11
⬥ Example rotations
• → → → → → →
⬩ There will be times where you will be around 2 adren off and if splashes you will lose ticks by being unable to use tsunami. To avoid this try to do +  on the same tick. This way if your auto doesn't splash you will get tsunami off and if your auto splashes your sonic will go off.
⬩ If you don't manage to get 100% adren you can use early if you are 92%+ adren, otherwise skip .
• → → → → → → →
⬩ Skip if not already 100% of out the broken teamsplit
• → → → → → improvise
⬩ Save if off cooldown
Notes: Set autocast to after , switch back to during or after the following reflect, this is to avoid using food and get fast hitting autos from .
When you tsunami out of the being out of range make sure it gets released before using another ability.
DPS
⬥ → (x3) → (Reflect) (x3)
⬥ This section is where you do most of your push, you should have , and active at this point, if not, and will be your first priority.
⬥ What follows in your rotation will depend on the adren you have going out of this
• If on cooldown:
⬩ If very high adren, → → / → / → → → improvise
⬩ If 50%+, → / skip → → → improvise
⬩ If < 50%, → → → → improvise
• If off cooldown:
⬩ If 50%+, → → → → improvise
⬩ If < 50%, →
⬩ If you didn't before TS spawn, → → → / → improvise
⬥ If no :
• can be a good option if you don't have to eat to tank it as draining your stats is bad.
• → → → improvise
⬥ Important particularities to consider
• → will often result in 3 tile pushback alone
• → → / (3t) / → repeat or → / (3t) / → is good filler
• Affinity debuffs should be running out soon so prioritize as a filler
• If far spawn, use an ability → → click out of melee range out of Vorago or and tank
• Try to  last blue bomb before reflect, this blue will almost always go off inside reflect, meaning you can't use it to stall reflect start to deal more damage.
• Do not out of if out of immediate attack range as you will not receive the Instability effect but will lose adrenaline, for some reason it doesn't get stalled and you lose the spec.
⬩ In this clip you can see the adren going down from 51% to 6% (45% adren ), 2 ticks later it gets released as an auto that crits (3% auto adren + 10% from the crit) and adren goes to 19%, following by a 9% basic to 28%.
⬥ Reflect
• Run 9-11 tiles away from Vorago out as reflect starts to prepare for a stack
• Perform a standard 3 autos stack
• You can do one of the following rotations, the first will stall Vorago more often than the second but the second will guarantee ()  to go off before next :
⬩ + / while running MD → wait 1t →  + ( if splashed) → → / () →
⬩ + / while running MD → (the tick after you receive the damage) dw → () → →
• If you are pushed too far back and can’t stack 3 autos, stack the first 2 autos instead.
Notes: Always try to stay on the edge of your sunshine close to Vorago, that way you don't get walked as much if any if you push Vorago too much, you can also leave your sun early to use channels if you already know you are getting walked anyway.
Reminder to set autocast to and switch back to during or after reflect.
*BT
⬥ → (x3) → Repeat
⬥ You should have high adrenaline out of this , your aim in this section is to break the and re-apply
• In a broken teamsplit Vorago will throw autos way faster than it should, however, if you push him or get pushed you break the , meaning it resets back to its normal auto attack rate.
⬩ Because of this, going to a far can be extremely bad as it can throw all 3 blues before the first blue hits you, causing that it doesn’t reset its auto attack rate and spawning next extremely quickly.
⬥ To break the the most consistent way is to out of it to guarantee a push and not having to wait for the first blue to push you.
• If you don't have enough adrenaline to or it's on cooldown, the second best option is
⬩ If you have less than 50% adrenaline just focus on building and applying
⬥ Pay attention to cooldown as it is very likely it will barely be back off cooldown.
• If it won't be back off cooldown just and skip
⬥ Example rotation
• / → → → → improvise
• From here, depending on cooldown, you can right after , or apply () , or
⬩ You can also try to as soon as you get the 2nd blue to try stacking it with a melee auto when you walk MD, as demonstrated in the following clip:
Notes: instead of if max stacks
Remember you will be cading out of next so be careful with your adrenaline
Reminder that by now you should have autocast set to
BT
⬥ → (x3) → (Reflect) (x3)
⬥ The main goal here is to barricade to completely reduce the pushback, apply and get 100% adrenaline to after next .
⬥ Depending on your adrenaline out of this you can throw a threshold or finish building to
• If full adrenaline: /  → → → → +
• Otherwise: → → →
• If desperate for adren: → (or ) →
⬩ You can also skip and () instead
Notes: as first blue lands or even before to make sure you have enough adren to after next . If a mistake is made and first blue is tanked, instantly when you can rather than waiting for second blue, so that cooldown is not too delayed and you can start building adren for upcoming
If you  do → build →
If splashes do → → +
Mauling
→ (x3) → (Reflect) 

⬥ The ideal timing to maul is exactly when reflect starts, this will make P11 start with (x3) →  → (x5), which means you can only maul during 2 of the previous sections:
• (DPS)
⬩ 3rd blue to keep Vorago in maul spot
⬩ before reflect
⬩ Optimally, it is best to stall the boss even once in maul spot so that is off cooldown quickly P11. Need to balance this with also saving cooldowns to ensure you can push Vorago back into maul spot after 2nd blue lands.
• (BT)
⬩ early if already at maul spot
⬩ / if possible
⬩ if
• Walk MD or → place → → → build on abusing and defensives for free autos. Make sure to not use / to build.
Note: Affinity debuffs carry over to P11
P11: Teamsplit PurpleBomb
General Notes
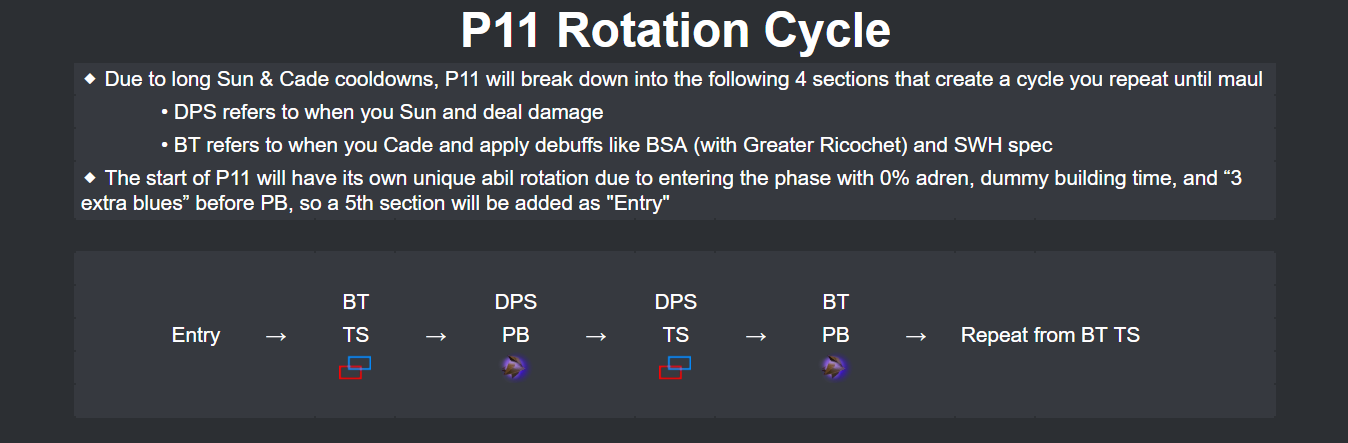
⬥ Vorago’s attack pattern:
• (x3) → → (x5) → → (Reflect) Repeat
⬥ Entry:
• (x3) → → (x5)
⬥ (BT):
• → (x3) → (Reflect) (x3)
⬥ (DPS):
• → (x5)
⬥ (DPS):
• → (x3) → (Reflect) (x3)
⬥ (BT):
• → (x5)
⬥ When learning it is advised to follow the 4 main sections in that exact order, however, when you get more P11 experience you will realize that unlike P10, P11 sections order doesn’t necessarily have to be strictly followed
• This means, instead of always doing (BT) → (DPS) → (DPS) → (BT) → repeat, you can jump from (DPS) to (DPS) multiple times, or from (DPS) to (BT).
⬥ Due to the nature of pushback, strictly following rotations is ill advised.
• Instead, use the following as a guideline and adjust depending on the scenario.
⬥ All teamsplits should be (pre) → [ability].
• Skip if on cooldown and skip if out of range.
⬥ Can glitch spawns 1 tile away from Vorago (1 tile east)
Entry
⬥ (x3) → → (x5)
⬥ The main goal at the start of P11 is to push and stall Vorago as much as you can.
• For this you will → → as soon as possible.
⬩ If has a long cooldown, either or before , this is also a good time to re apply ()
• Use shortly after with the first blue bomb that allows it
⬩ Having and cooldowns as close as possible would be ideal.
• Only use or , not both, so that you have something off cooldown for second
• Remember to maintain enough adren so that you can on time out of the following .
BT
⬥ → (x3) → (Reflect) (x3)
⬥ The main goal here is to barricade to completely reduce the pushback, apply and get 100% adrenaline to after reflect.
⬥ Depending on your adrenaline out of this you can throw a threshold or finish building to
• If full adrenaline: / → → → → +
• Otherwise: → → →
• If desperate for adren: → (or ) →
⬩ You can also skip and () instead
• after if off cooldown
Notes: as first blue lands or even before to make sure you have enough adren to after reflect. If a mistake is made and first blue is tanked, instantly when you can rather than waiting for second blue, so that cooldown is not too delayed and you can start building adren for upcoming
If you use as soon as possible.
If splashes do → → +
DPS
⬥ → (x5)
⬥ The main goal here is to , and as soon as possible and push Vorago as much as you can.
• in between and will help with this.
• Can every if you use it early.
•  if high stacks and desperate for push (or close to ). Worth using when near instakill ledge if it opens up enough space for 3 auto stack on reflect.
⬥ Rotation suggestions and examples:
• Early
⬩ → → → → → → / → / → () → skip / / → → → → improvise
⬩ Needing to skip to get / combo off before spawn is worthwhile.
• Late
⬩ earlier, probably before
⬩ Generally have to save / for out of
Notes: after , switch back to after next teamsplit spawns
Be mindful of future spawn location when choosing where to
DPS
⬥ → (x3) → (Reflect) (x3)
⬥ At the start of this section it is likely that , and will be up if you didn’t stall Vorago too much during the previous section, if that is not the case, depending on your cooldowns ( and ), you can jump to the BT section
• Ideally →  / → improvise out if you have enough adrenaline and you didn’t already before the .
• Make sure to gstaff here if you didn’t before the .
• Can especially if is off cd and isn’t overlapping the spawn.
⬥ Reflect
• Run out as reflect starts to prepare for a stack
• Perform a normal 3 auto stack
• You can do one of the following rotations, the first will stall Vorago more often than the second but the second will guarantee give you more adrenaline in case it's needed:
⬩ + / while running MD → wait 1t → + ( if splashed) → → / () →
⬩ + / while running MD → (the tick after you receive the damage) dw → () → →
• If you are pushed too far back and can’t stack 3 autos, stack the first 2 autos instead.
Notes: You should have set as autocast here, remember to switch back to during or after reflect.
BT
→ (x5)
⬥ Here you will want to mitigate as much pushback as you can and use this time where DPS is not too important to apply debuffs like or or
⬥ To reduce pushback the easiest way is to 2 auto stack.
• 2 auto stacking means standing 2-3 tiles away from Vorago to force a blue bomb and moving to melee distance before the next auto releases, hoping it will be a melee swipe to hit the same tick the blue bomb does, reducing a tile of pushback.
⬩ You can generally do this with 1st + 2nd autos and 3rd + 4th or 4th + 5th autos.
⬩ It is important to consider that you can take way more damage as you are going to be praying magic and taking the full damage from the melee swipe if it doesn’t splash, on top of a potential extra blue bomb. Flicking to can help reduce this damage drastically.
⬥ If stacking:
• Instantly → → on release.
• Apply ()
• After first stack do → →
• Important to sometime before spawn so that you don’t splash the start of the following
⬥ If not stacking:
• Instantly → → on release.
• after first stack.
• Important to find time to before spawn (not too early as it would run out very fast on your next ).
Notes: and will help sustain HP
You use right before the spawns (especially when is on cooldown) to get off an early . Build with defensives during to out of it.
Important P10/11 Information
⬥ Disrupt
• P10
⬩ either 2nd blue of (DPS) or 3rd blue of (DPS)
⬩ If you are hoping to maul on an upcoming (BT), 2nd or 3rd blue of (BT)
• P11
⬩ sometime during (BT) or 3rd blue of (DPS)
⬩ first blue out of if close to maul
⬩ Do not the auto after lands as it will not reduce pushback.
⬥ Reflect caution
• There are 5 main ways to PK on reflect: autos, ,  , , and damaging abilities.
⬩ Equip mh melee weapon on non-caded reflects so that recursive autos will not cast.
⬩ Perk mh melee with just (no ) so that aftershock cannot proc on reflect.
⬩ Don’t  as last abil of reflect as it can proc and
⬩ Use a defensive as the last abil of reflect regardless of if you are caded
⬥ Nulled Blue
• If a blue lands the same tick as a spawns, it will null the blue’s pushback
• If 4-6 tiles away from Vorago, pushing him 2t after he throws a blue will null that blue if no other autos were already in the air
⬥ Broken TS
• A broken TS will occur for every teamsplit immediately after a reflect. Vorago will be able to attack way sooner than normal during a . If Vorago pushes you due to receiving damage after the spawns the teamsplit will be more broken than usual, meaning it can throw even 2 blue bombs one a tick next to each other during or before the explosion. If Vorago doesn't push you back it’s gonna be a usual broken teamsplit, throwing the first blue bomb during or shortly after its explosion. Adjust ability rotations accordingly.
⬩ Here is an example of an extremely broken teamsplit, where you get pushed back after the teamsplit spawns:
⬩ Here is an example of a usual broken teamsplit, where you don’t get pushed back after the teamsplit spawns:
⬥ Stacks
• Anytime you are melee distance to Vorago, you run a chance of still getting a blue or a melee hit + blue, so stacks are not perfectly consistent
• 3 auto stack
⬩ Consists of a 9-11 tile blue → 2-3 tile blue → md auto to potentially negate 2 autos worth of pushback
⬩ So, stand 9-11 tiles away, wait for the first blue to release, into 2-3 tile range, wait for the second blue to release, walk md.
⬩ This requires the player to not attack the boss in order to prepare for a 9-11 square auto. Also, pushing the boss during a triple stack will ruin it.
⬩ For solo hm in particular, this is useful for P10/P11 reflects that are not caded
• 2 auto stack
⬩ Consists of a 2-3 tile blue → md auto to potentially negate 1 auto worth of pushback
⬩ If done not during a reflect, take this time to use weaker abilities to build adrenaline. Pushing the boss while trying to stack will stagger the auto timings.
⬩ For solo hm in particular, this is useful for P10 (BT) to stack 2nd with 3rd auto, P11 (BT) to stack 1st with 2nd and 3rd with 4th autos, and P10/P11 to stack 1st and 2nd autos of reflect if close to instakill ledge.
• PB stack
⬩ Consists of a PB landing + blue to potentially negate 1 auto worth of pushback.
⬩ Can go a step further and combine this with other stack methods to negate even more pushback.
Example Kills
https://www.youtube.com/watch?v=OrXMeEkP96g - P1-9 with Blood reaver
https://www.youtube.com/watch?v=cEFmAkFA-5A - P10-11 Teamsplit