Hardmode Vorago Overview
Hardmode Vorago
Introduction
Hard Mode Vorago (HM) is a variant of Vorago where the fight is extended from 5 to 11 phases, of which only phases 9 to 11 depend on the weekly rotation. Knowledge of all the Normal Mode (NM) rotations as well as Reflect timings are essential when learning this mode. Strategies do not vary from 4 - 7 man, thence the recommended team size is 5.
⬥ This guide will be separated into roles, combat styles and skill levels - It will not cover DPS rotations by any means
⬥ This guide focuses on transferring and adapting gained knowledge from NM to HM, rather than explaining mechanics and role responsibilities from scratch
⬥ Most warnings and specific comments can be found in the DPS section and will not be repeated for other roles
⬥ After each phase finishes, you are supposed to build to 100% adrenaline for the next phase (usually the team coordinates dummies  for each phase)
The first section of this guide explains every phase and how to deal with it using general strategies. Every phase will have the respective attack order and relevant mechanics. This section will also treat TL5 as a DPS: the DPS strategies and responsibilities will be explained only. This section covers phases 1 - 8.
The second section is dedicated to tank roles. The Base Tank section is applicable to all styles, but the recommended combat style is melee  . The Bomb Tank section is applicable to ranged
  and mage
  , with the only differences being the use of ultimates


 . This section covers phases 1 - 8.
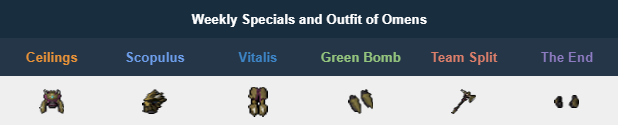
The last section explains phases 9 - 11 depending on the weekly special mechanic and is split into all 6 rotations with roles and their respective responsibilities.
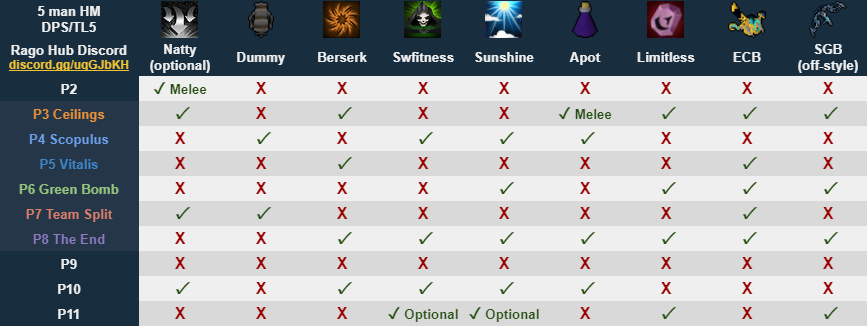
For DPS rotations refer to the official Rago Hub spreadsheet:
https://docs.google.com/spreadsheets/d/1q7zscYcfJ9qXeIptQmXJiWUloalwDNtmxIOX7bqgkJg
Requirements
Note: Mauling all NM rotations is not a requirement. That is only needed to create an instance or start the challenge, but you can still join someone else.
⬥ Proper gear (T90+ weapons, T80+ power armour, Invention perks)
⬥ Knowledge of all weekly special mechanics / rotations in Normal Mode
⬥ Intercept  is required for all roles and there should always be at least one person capable of replacing a Bomb Tank in case they die
⬥ Anyone meleeing is responsible for applying the Statius's Warhammer special attack  in DPS phases (split by phases if there are multiple meleers on the team)
⬥ Vorago should be debuffed for the majority of all phases, including SWH , Guthix Staff  and potentially Blackstone Arrows
  for phases 10 / 11
⬥ A Powerburst of Vitality  (Entry hit, Green Bomb and Team Split team split) as well as having
 14,000 life points to avoid failing the entry hit
⬥ Nihils 

 are mandatory for all team sizes and roles.
Note: Do not use Ice Nihils 
Recommendations
⬥ Heal Other 
⬥ Zaros Godsword  for meleers
⬥ Eldritch Crossbow for rangers
⬥ Seren Godbow 
⬥ Basic knowledge of Target Cycle
Preset and Relics
Entry Hit
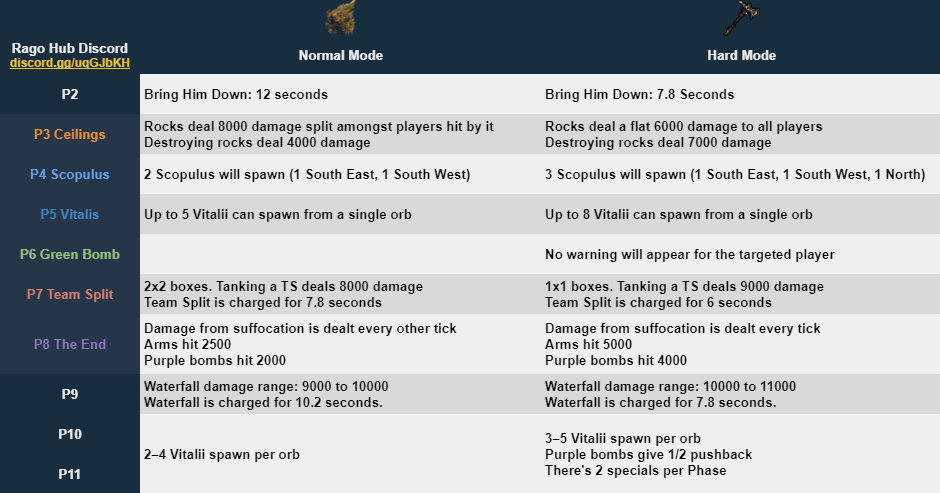
The entry hit is the first difference with Normal Mode: It is 90% of health per player, instead of 70%.
• This damage also cancels defensive abilities, and the  healing effect.
⬩ Use  and after taking the entry damage
⬥ There are 12s between challenge and entry damage. Advanced players can use this time to use  .
.
• There are 36 ticks from challenging Vorago to Target Cycle, and 35 ticks from the Accept Challenge message to Target Cycle.
• Drop down damage is 20 ticks after challenging Vorago.
• Sample rotation:
⬥ To time , use it 20 ticks after challenging Vorago/accepting challenge.
• This can be done by counting each tick from when you challenge by looking at prayer point drain
• It can also be done by looking at the bar above Vorago and clicking on it when it is about to fill, as in the following clip:
https://www.youtube.com/watch?v=MG00fhlSnKA
Tips
Things that help getting the HP needed: Fortitude prayer  and a solid food
  . You may also use your Vitality potion 15 seconds after challenging. The best way to time this is using Preparation
  as soon as the challenge prompt appears. Sip your Powerburst of Vitality when the cooldown is at 5 seconds left on Preparation. Using Vitality and having the HP needed is recommended, because if you fail the entry hit due to timing your poorly, the team will most likely wait until its CD wears off, resulting in a waste of aura time.
Other helpful things to get entry hp:
⬥ Font of Life (Archaeology Relic) is helpful to get extra HP
⬥ Using the Thermal effect from Oo'glog is also helpful
Phases and Mechanic Breakdown
Phase Breakdown
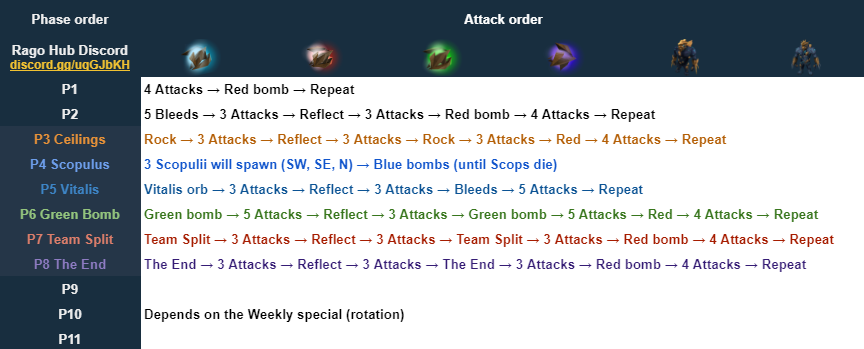
There are 11 phases in Hard Mode.
⬥ Phases 1 - 8 stay always the same.
⬥ Phase 9 HM is the same as Phase 4 NM (Waterfall-phase) with some additional changes as described following.
⬥ Phase 10 and 11 are maul phases with the same pushback mechanic as Phase 5 NM. The order is always:
Phase 1: Top Lure (Piece)
Phase 2: Bring Him Down (Piece)
Phase 3: Ceiling Collapse
Phase 4: Scopulus
Phase 5: Vitalis
Phase 6: Green Bomb
Phase 7: Team Split
Phase 8: The End
Phase 9: Waterfall (Piece)
Phase 10: Maul
Phase 11: Maul
https://img.pvme.io/images/pB3bo1z.png
Rewards
⬥ Mauling in Phase 11 will grant you the in-game title the Defeater as well as an outfit piece depending on the weekly rotation.
⬥ Having obtained all outfit pieces (6/6 rotations) is a requirement to be eligible to receive the Ancient Artefact (Bombi pet) drop.
https://img.pvme.io/images/F61kKIC.png
Differences from Normal Mode
⬥ Warnings: This is the most important change in Hard Mode. Warning messages do not appear in Hard Mode, which means that Reflect will not be announced, and thus it is easy to PK on accident if you do not know when the respective mechanic happens. Make sure you memorize all the Reflect timings for all the weekly special mechanics to avoid these issues. The only "warning" that appears is on The End (Phase 8) with the Purple Bomb timer (this is also true for The End p9/10/11).
⬥ Entry Hit: Total damage is increased from 50,000 to 70,000 and the per player damage cap from 12,500 to 14,000
⬥ Reflects: Players who attack during a Reflect will deal damage to both themselves and the linked players
⬥ Blue Bombs: Up to 2 bombs are fired at the same time instead of only one (independent of team size)
⬥ Red Bombs: Damage increased by 50%
• Minimum damage is increased from 2,000 to 3,000
• Maximum damage dealt by standing close to other players is increased from 7,000 to 10,500
⬥ Phase 1 Climb: Vorago has a chance of dragging the climber back into the arena every time the player is hit by a Blue Bomb
⬥ Smashes: Bleed damage is increased from 1,200 to 3,000 and stacked bleeds increase from 6,000 to 10,000
Additionally, there are also phase-specific changes:
DPS/TL5 - Introduction
The DPS and TL5 are essentially the same role with a few exceptions. On Phase 1, the TL5 must do the usual climb just like in Normal Mode and Provoke  . The DPS acts like a Normal Mode DPS: standing close to Vorago and helping lower the HP.
Notes
⬥ On phases 2 and 9 the TL5 takes bleeds  , which leaves all other phases unchanged for all DPS and the TL5
⬥ For this section of the guide, the TL5 is only mentioned when specific responsibilities are required on top of being a DPS.
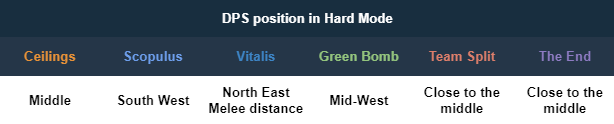
⬥ The DPS should stand at a maximum of 2 - 3 tiles away from Vorago throughout phases 1 - 9, and up to 2 tiles for phases 10 - 11.
Positioning for DPS and TL5 throughout Phases 3 - 8
Strategy Summary
DPS/TL5 - Phases 1 & 2
DPS/TL5 - Phase 1
In the start, every player will receive a Red Bomb that deals 2,000 damage, except the person who stood on the TL spot at face. However, if someone is nearby, that hit can increase, scaling like in Normal Mode. After the first wave of reds, all following bombs will scale with the HM base damage of 3,000.
⬥ Spread out and stay in distance to other players in order to avoid increased damage
⬥ Surge  is not recommended, as you might get too close to another player, resulting in PKs with the Reds
⬥ By the time the Red Bomb explodes, the Tl5 should be at the entry obstacle in the west
⬥ Due to all Blue Bomb's potential of dragging the climber, the TL5 must jump as soon as possible
There is always a chance of a random Red Bomb happening. If you get one, pray Magic  and move away from all players until it explodes. Do not go farther out than the Bomb Tanks.
The following gif shows what's been explained above: the TL5 must get to the spot, Provoke and Jump as soon as possible, regardless of Vorago's HP.
DPS/TL5 - Phase 2
⬥ The TL5 takes the 5th Bleed , approaching the phase similar to NM
⬥ Bring Him Down: The time available to retrieve the Maul Piece (b) is reduced to 7.8 seconds
⬥ Use 1 - 2 thresholds, then continue building with basics
⬥ Build on the placed Combat Dummy once Vorago dies
Disruption Shield can be utilized at the start of BHD. It will be off CD early in Phase 3, easily allowing for more damage mitigation.
DPS/TL5 - Phases 3 - 8
DPS/TL5 - Phase 3 Ceilings
⬥ You must have shadows enabled to at least medium to be able to see rocks falling
⬥ All DPS should spread out centrally in the southern half of the arena
⬥ After Vorago jumps, pay attention on the rock's location and pray Deflect Magic in case you get hit by a Blue Bomb during the jump
⬥ If you are far away post-jump, utilize Surge or Bladed Dive as soon as Vorago lands to avoid dragging additional bombs
DPS/TL5 - Phase 4 Scopulus
Pray Deflect Melee  as soon as the phase starts and do not try to pray flick. You will receive heavy damage from nearby scopuli.
⬥ Even though you are not required to Provoke any Scopulus, you should do so in case they start chasing one a Bomb Tank
⬥ Initially, position in the south-western quadrant and stand near the crack on the floor (refer to the image below)
⬥ Ultimate before the scopuli spawn and start attacking the eastern Scopulus
⬥ Keep them stacked and prioritize AoE damage
⬥ You may use Devotion  after you are out of strong thresholds and special attacks (SWH , Dark Bow
  , Guthix Staff )
⬥ Once all have died, you can move to the nearest Bomb Tank to Resonance  the last Blue Bomb
⬥ 1 DPS should drop a Combat Dummy as soon as 2 scopuli have died or at latest when the last one dies
DPS/TL5 - Phase 5 Vitalis
Every person in the team that is not a Bomb Tank must stand north-east of Vorago and in melee distance (MD). Vitalii can block you from moving, so if you are not in melee distance (MD) there is a chance of losing your Line of Sight, preventing you from using any offensive abilities.
⬥ Use your SGB after Reflect if needed (or before if you are ranging)
⬥ Ignore all Vitalis Orbs as well as all spawned vitali
⬥ If Vorago happens to inflict bleeds , the Base, Bomb Tanks and TL5 will deal with them as usual
⬥ For 4 man teams it is recommended to deal with Bleeds like this: Base (1 2), TL5 (3 4), BT (5) due to the TL5 being in melee distance (MD)
Once the phase is finished, build to 100% on a Combat Dummy or an alive Vitalis.
DPS/TL5 - Phase 6 Green Bomb
⬥ Drop a Combat Dummy immediately as you drop into the phase
⬥ DPS usually position centrally in the western half of the arena.
⬥ For Mages - it is recommended to Sunshine (or Metamorphosis ) and apply Guthix Staff , followed by thresholds
⬥ Rangers - should pre-ECB or only dump thresholds
⬥ If both are available, utilize your Ingenuity of the Humans  in combination with the Seren Godbow special attack in order to optimize your damage output pre-Reflect.
If you receive a Green Bomb, simply stay close to another player and let it bounce off you. For 4 man you can let it bounce and then use your Powerburst of Vitality when it targets you a second time. Since the Bomb Tank provokes Vorago in this phase, you should not receive any additional damage, assuming proper positioning.
DPS/TL5 - Phase 7 Team Split
Team Split cancels all defensive abilities, including Disruption Shield . Make sure to eat well above 9,000 to avoid dying.
⬥ Drop a Combat Dummy in the start of the phase, close to the edge of the arena
⬥ Due to TS cancelling all defensive abilities, the optimal timing for Resonance is shortly after Reflect started (aiming to resonance the third or fourth Blue Bomb)
⬥ Reprisal  can be used if tanking the TS damage
DPS/TL5 - Phase 8 The End
⬥ Due to the Stand Up being skipped in most scenarios, avoid tagging any bombs
⬥ Pre-ultimate before using Target Cycle, and use your strongest abilities
⬥ Try to glitch out of arms if possible so you can Ultimate without having to move (due to Quadrants moving)
⬥ In case a Stand Up happens, eat to full HP and use Disruption Shield and your Powerburst of Vitality (if either is available)

⬥ Glitching out of arms
Base Tank - Introduction
Basing Hard Mode does not change much from Normal Mode. It is all about not moving the boss when it is not needed, and tanking hits without wasting food. Prayer flicking is also very useful to maintain HP without eating or using Resonance . Basing is usually performed by a meleer , who is also in charge of applying the Statius's Warhammer special attack throughout the fight. Range or Mage can be used just as well, but most strategies of this guide will focus on melee . If the Base Tank is not meleeing, a DPS should be in charge of applying SWH .
Strategy Summary
Base Tank - Phases 1 & 2
Base Tank - Phase 1
If not executing the described Solo Lure, perform the following steps.
⬥ Move east of Vorago's spawn location as shown in the following clip
⬥ Once Vorago spawns, use an ability and Provoke shortly after (within the ability's GCD)
Note: It is important to not right away as if base vokes before the TL5 goes past the rock, they will lose aggro.
⬥ Take Vorago close to the North-East corner
⬥ Keep Vorago there until the climber reaches the final platform
⬥ At roughly 30 seconds, or before the TL5 jumps the to the last ledge, head west quickly (take 1 or 2 steps followed by Surge )
⬥ Once the Top Lure voked Vorago into spot, position south in MD and Provoke (utilize Bladed Dive )
Base Tank - Phase 2
The Base Tank's responsibilities throughout Phase 2 are not any different to basing Normal Mode. During Phase 2 Bomb Tanks will deal with Red Bombs. Intercept is usually not needed for the base tank in P2. A Combat Dummy will be placed South once Bring Him Down is finished.
Base Tank - Phases 3 - 8
Base Tank - Phase 3 Ceilings
⬥ Optionally: Use Natural Instinct in Phase 2 after Bring Him Down
⬥ Pre-ultimate and drink your adrenaline potion  as you drop into Phase 3
⬥ Place a Combat Dummy towards an edge but far from both the middle and the wall
⬥ Apply SWH soon as possible
⬥ Since a Bomb Tank is supposed to voke this phase, the Base Tank should not do so in order to avoid melee auto attacks
Base Tank - Phase 4 Scopulus
The Base Tank's job in this Phase is to lure and stack all scopuli. Make sure the rest of the team is focusing them as well in case they go to the Bomb Tanks. A frequent usage of Vulnerability Bombs  increases the probability of keeping all scopuli stacked.
⬥ Stand directly west of the western Scopulus and throw a Vulnerability bomb 3 seconds before Target Cycle
⬥ Once the scopuli are spawned, use one ability on the closest Scopulus, then target the eastern Scopulus and apply SWH
⬥ Walk a few steps north and attack the northern Scopulus quickly
⬥ Walk south-east to lure all scopuli and throw vuln bombs to keep them stacked
⬥ Utilize Devotion once you start consuming too much food rapidly
⬥ Avoid moving the scopuli more than required as it can lead them changing aggro.
⬥ Once all scopuli are defeated, build adrenaline on the placed Combat Dummy
Note: You should NOT be voking any scopuli unless they go for the Bomb tank.
Hammering the western Scopulus is not recommended because it usually takes the heaviest damage, thence dying the fastest with or without SWH.
Base Tank - Phase 5 Vitalis
Base tank should position themselves in northeast md.
⬥ If meleeing 4attack, pre-ultimate  , otherwise use thresholds and special attacks
⬥ Place a Combat Dummy at the start
⬥ Apply SWH as soon as possible
⬥ Utilize SGB right after Reflect if Vorago's life points are high (80k+)
⬥ Ignore and avoid all Vitalis Orbs as well as any spawned vitalii
⬥ Provoke Vorago shortly before the first Vitalis Orb explodes and avoid moving Vorago (do not leave MD)
⬥ If Vorago happens to inflict bleeds , the Base, Bomb Tanks and TL5 will deal with them as usual
Base Tank - Phase 6 Green Bomb
Base tank should remind Bomb tanks to voke if needed after dropdown. Do not revoke Vorago once his aggression is switched to avoid melee auto attacks.
⬥ No ultimate is required, simply apply SWH and use thresholds
⬥ A Combat Dummy will be placed on dropdown for the team to build adrenaline
⬥ If Ingenuity of the Humans is ready, you may use SGB to optimize your damage pre-Reflect
If you receive a Green Bomb, simply stay close to another DPS and let it bounce off you. For 4 man you can let it bounce and then use your Powerburst of Vitality when it targets you a second time.
If the Green Bomb targets a Bomb Tank, heal them before it explodes.
Base Tank - Phase 7 Team Split
⬥ Apply SWH on Target Cycle
⬥ Use thresholds for the rest of the phase. Reprisal the first Team Split if you managed to Target Cycle
⬥ Provoke Vorago shortly before Reflect and stay MD (this saves the entire team quite some food)
⬥ Exit the phase with enough adrenaline to activate Natural Instinct in the end of Phase 7
Base Tank - Phase 8 The End
⬥ Use Natural Instinct in the end of Phase 7
⬥ Pre-ultimate and drink your adrenaline potion as you drop into Phase 8
⬥ Place a Combat Dummy in the start
⬥ Apply SWH on tick and then build adrenaline with defensive abilities
⬥ Use all your strong thresholds in the first quadrant and try to kill Vorago before Stand Up
⬥ Utilize SGB and avoid being close to other players in case a Stand Up happens (also use your Powerburst of Vitality to boost survivability)
Base Tank - Tips
⬥ SWH EoF  and Dragon Claws EoF
 are useful for optimal ability rotations
⬥ Use Disruption Shield every time you can (Phase 2 during BHD, end of Phase 4 Scopulus, during Phase 7 Team Split, end of Phase 9 / start of Phase 10)
⬥ Pre-ultimating and using Natural Instinct is not needed but significantly increases your contribution to progressing DPS phases quickly
⬥ Performing a Solo Lure in Phase 1 is a massive QoL improvement for the entire team
Bomb Tank - Introduction
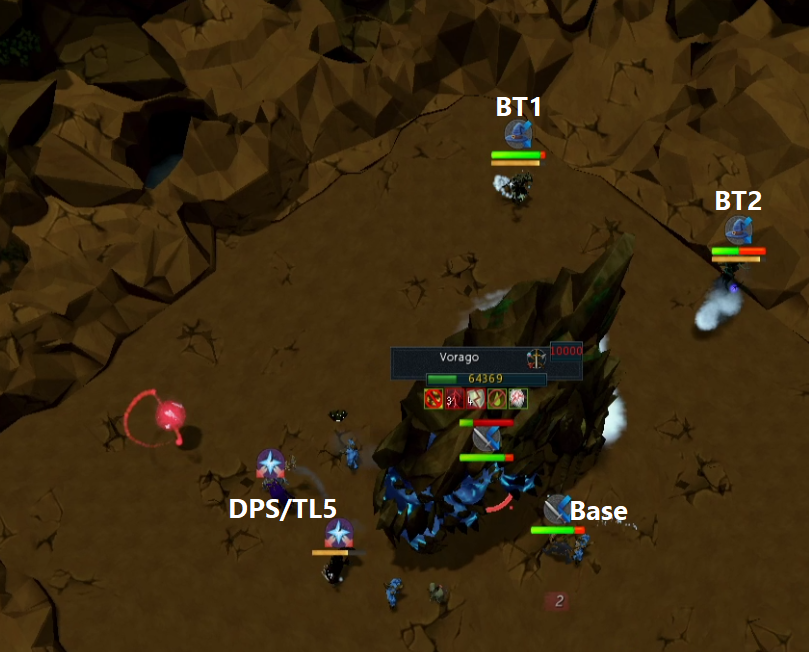
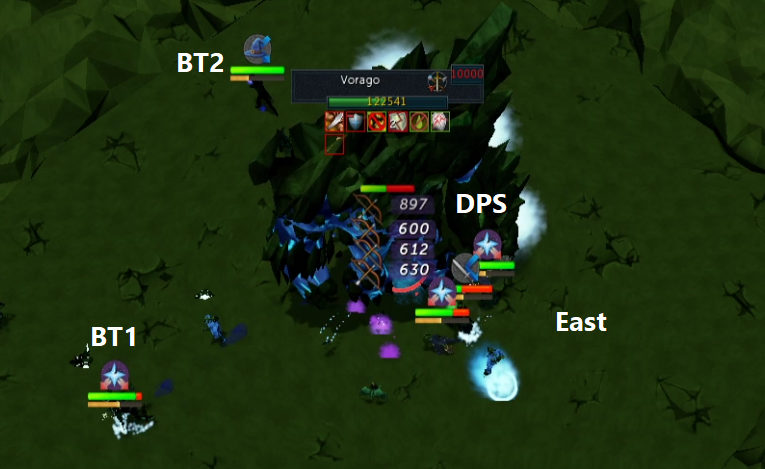
In Hard Mode Vorago throws 2 Blue Bombs at once, requiring a second Bomb Tank throughout the kill. Bomb Tanks will be referred to as BT1 and BT2. To perform this role, Intercept is required. BTs with knowledge of cept timings should split cepts before the hour begins. In case of using Heal Other , the Bomb Tanks always heal each other. Both BTs position south for most phases.
Strategy Summary

Bomb Tank - Phases 1 & 2
Bomb Tank - Phase 1
After the initial Red Bomb hits, build on Vorago and ultimate. Even if the team deals enough damage in time, utilizing an ultimate is yet recommended, in order to prevent excessive food usage.
⬥ Activate Disruption Shield after the initial wave of reds dealt its 2,000 damage
⬥ Afterwards, the person who devo cepted steps farther away to force the next Red Bomb on themselves
⬥ If the phase takes long, Barricade Intercept can be useful
⬥ Perform crack heals after every phase
In case of a random Red Bomb, one of the Bomb Tanks should either devo or cade cept the targeted player. Additionally you should cast Heal Other whilst under the effect of Barricade.
Bomb Tank - Phase 2
Phase 2 is mostly similar to Normal Mode.
⬥ The Bomb Tanks should stand south of the boss at all times (also escape bleeds from the south)
⬥ Only one BT will be responsible for taking the third and fourth Bleed
⬥ BT1 cade cepts  the first and third Red Bomb, BT2 cade cepts the second always intercept the Base Tank too
⬥ Cast Heal Other during Barricade, situationally on the player with the lowest HP
⬥ Place a Combat Dummy close to the south-western corner during Bring Him Down
⬥ Activate Disruption Shield at the start of BHD
Bomb Tank - Phases 3 - 8
Bomb Tank - Phase 3 Ceilings
Both BTs stay north in this phase due to all others standing on the south side of the arena.
⬥ Start the phase with thresholds and Provoke Vorago as soon as possible
⬥ Watch out for the rock's landing location
⬥ The team will spread out post-jump, be careful and avoid sharing bombs
⬥ Use Surge / Bladed Dive carefully to get closer to Vorago post-jump, you always have to stay out the farthest in order to receive all bombs
⬥ Devotion is not required but can be used if a Reflect occurs
Bomb Tank - Phase 4 Scopulus
In the beginning, go to the south-west corner and ultimate as shown in the image. Utilize your apot in this phase.
⬥ Positioning in Phase 4 Scopulus
⬥ Wait a few seconds before attacking the scopuli to avoid dragging aggression from the base tank
⬥ You can use Disruption Shield to null a Blue Bomb, followed by Resonance if you need the HP
⬥ BT1 should Devotion Intercept first, with the BT2 following up another 10 seconds of devo cept
⬥ The intercepted person should use Soul Split  until the effect wears off
⬥ Rangers should bring Mechanized Chinchompas  and mages should apply Guthix Staff (pair GStaff with a prior Greater Chain
  )
)
⬥ One of the Bomb Tanks should drop a Combat Dummy once the last Scopulus has died
If a Scopulus switches aggression and starts running towards you, immediately run away until it is provoked off you (make use of Surge and Bladed Dive ).
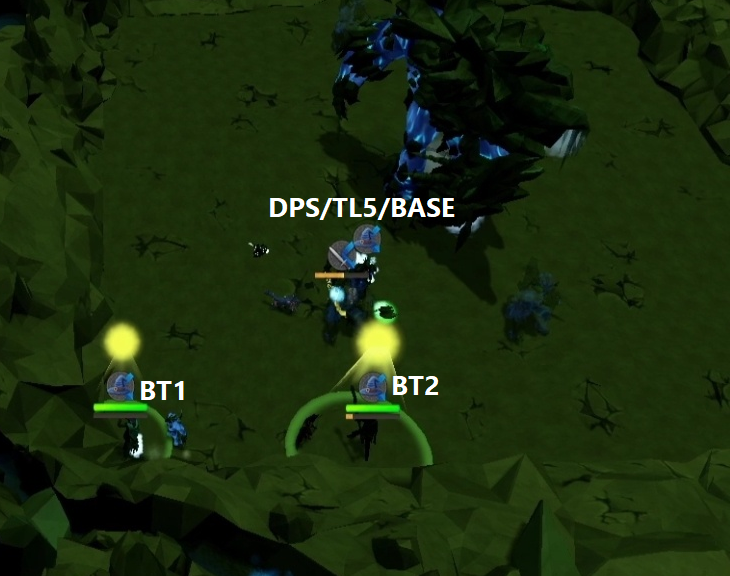
Bomb Tank - Phase 5 Vitalis
Even though the meta used to require both BTs position in melee distance to Vorago throughout the entire phase, the most commonly used strategy is changed nowadays.
⬥ Both Bomb Tanks stand out of melee distance for the whole phase to prevent Blue Bombs targeting other players and to avoid the need for prayer flicking
⬥ Use thresholds and special attacks
⬥ Do not use Resonance during Reflect if there are vitalii nearby as they may snipe its effect
⬥ If needed, use your SGB after Reflect
⬥ If Vorago happens to inflict bleeds , the Base, Bomb Tanks and TL5 will deal with them as usual
Bomb Tank - Phase 6 Green Bomb
⬥ The BTs should position in the South
⬥ One Bomb Tank provokes 2 - 3 GCDs after Target Cycle
⬥ If Vorago switches his aggression, revoke in order to avoid melee auto attacks
⬥ Rangers should activate ECB spec  , mages should utilize Sunshine or Metamorphosis
⬥ Apply SWH and use thresholds
⬥ A Combat Dummy will be placed on dropdown for the team to build adrenaline
⬥ If Ingenuity of the Humans is ready, you may use SGB to optimize your damage pre-Reflect
If you receive a Green Bomb, eat up and use your Powerburst of Vitality .
Bomb Tank - Phase 7 Team Split
You may use your Powerburst of Vitality if it is available in order to improve health management when using Reprisal during a Team Split.
⬥ Provoke Vorago as soon as the first Team Split ends
⬥ The Base Tank will provoke during Reflect - do not revoke after this
⬥ A Bomb Tank should use Devotion Intercept right after the second Team Split
⬥ Drop a Combat Dummy during Reflect or during the second TS
Bomb Tank - Phase 8 The End
The goal is to skip the Stand Up and avoid tagging any bombs.
⬥ Pre-ultimate before using Target Cycle, and dump the strongest abilities you have available
⬥ If a Stand Up happens, eat to full life points and utilize your Powerburst of Vitality (if it is not on CD)
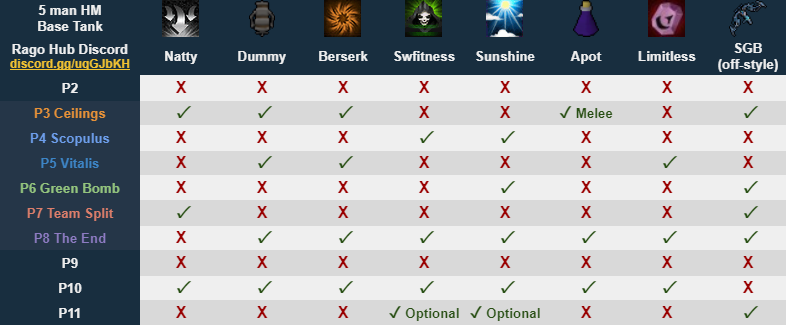
Weekly Special Mechanics - Phases 9, 10 & 11
Overview
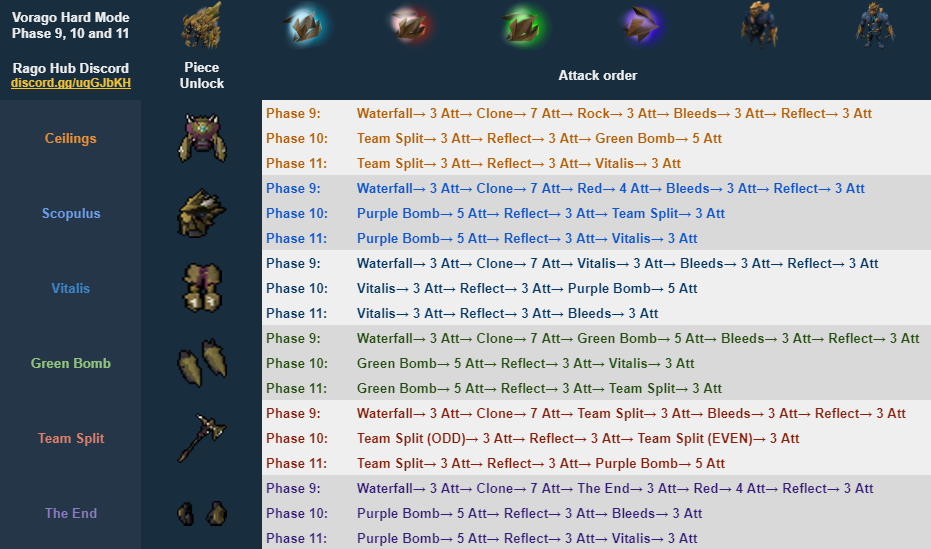
Phase 9
This section will be split into a regular Phase 9 and a Phase 9 with Clone Skip. The strategies only change for Green Bomb.
Bomb Tanks will take turns to Barricade and Intercept the team for each cycle. Make sure to designate who is going to first.
If Clone Skip fails, everyone must get closer to Vorago as soon as possible: DPS goes 2-3 steps away from Vorago and BTs at their usual distance.
Ceilings
BTs must and everyone when Vorago makes the animation to launch the rock. Also, if you are not responsible for bleeds , you should help the team to clear the rocks asap after you are .
Scopulus
It is dealt with in the same way as Phase 2. One BT will step further from rago and the other will and .
Vitalis
⬥ Right before Vorago launches the Vitalis orb, one Bomb Tank will and everyone while going to the orb too. For the clone skip one, the BTs will alternate with the and .
⬥ The DPS should help the team to clear the that spawned. In order to do that, you can deploy dominion mines  before they spawn and use AoE abilities on them.
⬥ For the regular Phase 9, the whole team should be at the NE quadrant and the BTs on the E or N quadrant; but for the Clone Skip, the orb will be thrown in a random direction.
Green Bomb
⬥ Regular Phase 9: BTs must build to 100% before the Green Bomb is launched. After the green targets one person, one BT should and them.
⬥ Clone Skip Phase 9: Both BTs should build to 100% for the first green and deal with it as normal. For the second green, the Base must also build to 100% to and the BT. If the green is on one of the DPS, the BT with off cooldown will and .
Team Split
The BTs will and everyone after the team split.
The End
⬥ BT 1 will be responsible for tagging reds and BT 2 will and them. It is important that everyone either glitches out of arms or stays MD while this is done, to avoid receiving damage from red. The BT that tags must also go to the wall as soon as possible to avoid sharing Red Bombs.
⬥ After that, BT 1 will build to 100% asap and will and everyone right before the stand up of Vorago. Following that, the BT, who is 'd (BT 2), should move away so the red goes to him.
⬥ If there are Ranger + Mage BTs, it is preferable that the Range BT uses and the Mage BT that will tag the reds.
⬥ Before the last Waterfall, whoever is mauling must have Piece (a) and Piece (b) in their inventory. Make sure to grab the Piece (c) and make the maul  before Phase 10 starts.
⬥ One of the BT must drop a dummy at the end of this phase, preferably during the last waterfall and close to the middle.
Phase 10 and 11 Overview
The strategies for the 6 rotations can be summarised into two methods: the safe method and the fast or advanced method.
For the Phase 10 and 11 sections, all the DPS must place their ultimates in melee distance. Whenever an ultimate is mentioned, it is already implied that it should be place in md.
⬥ Bomb Tanks will always split sides: one BT North (usually the one that ultimates) and the other BT South (DPS side)
⬥ Both BTs must use Disruption Shield in Phase 9 when Vorago dies for Scopulus, Vitalis, Green Bomb and The End. This is done to block the first blue in Phase 10 and then Barricade (if needed) the second one. For Phase 11, BTs and DPS should use when it is available
⬥ If BTs do not have active at the same time, the pushback from the blue will not be nullified
⬥ For 4 man teams the Base and TL5 will take a side too. Base usually goes South and TL5 North. This is only helpful on rotations with Green Bomb and Purple Bomb, as it is easier to tank the specials without having to move from the team
Safe Method
It requires everyone to Ultimate on dropdown except for one of the Bomb Tanks. The other BT will use a threshold or two (depending on adrenaline management), and then build to 100% to . The first blue should be blocked by , giving more time to build to Barricade. In the next phase, the BT that used will now build to ultimate and vice versa.
Advanced Method
Requires everyone to Ultimate except for one BT (South) that will use all the strong thresholds and special attacks available. This is done to help with the push, usually referred to as 0-Link (zero link), to avoid having to use . This method is not recommended on a team with multiple learners.
The reason why only one of the BT will Ultimate is because the damage needed to push should be enough from the rest of the team's Ultimates and the BT thresholds. This way the BT that didn't Ultimate can do so in Phase 11
The safe method is not considered a common strategy anymore (as it aims for less damage and a longer phase), but it is still recommended when there are multiple learners in the team.
The fast (advanced) method relies on the team pushing Vorago non-stop, but on a team with low damage it is hard to do so without a set rotation.
Phase 10
In addition to the two methods, there are also some things to point out for some rotations. Make sure to also read about Broken Team Splits below, because it is a bug that happens on every rotation that has as the second special.
Ceilings & Team Split
Avoid using before the phase starts because team split cancels defensives and . Save it for after the team split regardless of what method the team is using. If is used for the team split special, make sure to use it after the team split and not before the special. This also applies to Scopulus and Green Bomb.
Ceilings, Scopulus, Vitalis, & The End
The DPS must step back to block the Vitalis orb in Phase 10 and 11. Make sure to not go further than Bomb Tanks, to avoid sharing Blue Bombs with each other. For the safe method, one of the BT will and the whole team before the Vitalis orb is launched. BTs will rotate for each cycle if needed.
Green Bomb
Deal with the Green Bomb as usual. If it is on a Bomb Tank, they should use their Vitality potion . Optional: If the Bomb Tank's HP is too low, the Base Tank can heal them before the green hits. If it is on the DPS, eat up and let it bounce amongst the pile. Tank it (with ) on your side of the arena if it is a 4 man team.
The right timing must be used to ensure a consistent Phase 11. Read below for the timings.
At the end of the arena in Phase 10, and before it is mauled, the BT should drop a to build at the start of the next phase. This is even more helpful with a Shield Dome maul  , explained below.
Broken Team Split
Specials marked with a red font represent a broken Team Split. You will notice that it is always going to happen when Team Split is the second special in Phase 10 or 11.
A broken Team Split is one where Vorago is able to throw autos (Melee or Blue Bombs) while charging the team split.
The best way to reduce the damage from these is to not attack Vorago at all after the Reflect ends.
If you get autos during a broken team split, simply Pray Deflect Magic , go to your colour box and eat up. Make sure to go closer to Vorago as soon as the Team Split explodes, otherwise you will drag more Blue Bombs into the DPS pile.
Mauling Phase 10
Mauling phase 10 is typically the TL5's job, unless the base is meleeing - this is because a melee base would always be in MD and will be able to at the right time. The timing for the is important because it determines what happens at the start of Phase 11.
You must always wait for the special to be released before mauling, otherwise Vorago will start the next phase with it instead of Auto Attacks.
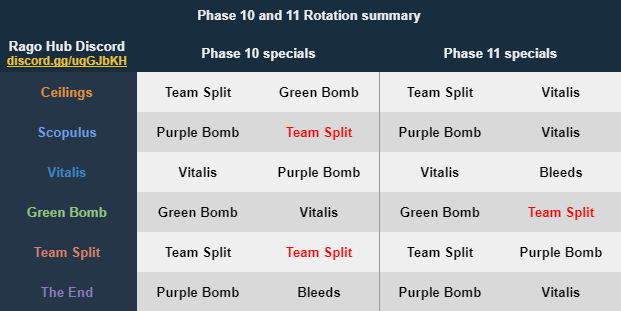
If we take the example of Scopulus week, Vorago's rotation for phases 10 and 11 are as follows:
⬥ Phase 10: Purple Bomb release → 5 Attacks → Reflect (for 3 Attacks) → 3 Attacks → Team Split → 3 Attacks
⬥ Phase 11: Purple Bomb release → 5 Attacks → Reflect (for 3 Attacks) → 3 Attacks → Vitalis orb → 3 Attacks
If you maul in Phase 10 after 2 Attacks have been released, Vorago has 3 remaining Attacks in his rotation (because in Phase 10, there are a total of 5 autos before the Reflect). At the start of Phase 11, he would perform these 3 autos before continuing with his rotation, and going into reflect.
If you mauled 4 Attacks autos after purple release at the start of Phase 10, there would be 1 remaining Attack. This means that Phase 11 would begin with 1 auto before going into Reflect. This leads to a high chance of killing other people as people attempt to DPS at the start of the phase.
If you are unsure of how many Attacks have been fired, it is better to keep Vorago in the spot and when reflect starts.
In summary, there are 3 times to that are optimal for the kill, as they maximise the number of Attacks in Phase 11 before the next special:
⬥ #1: When the first special begins
⬥ #2 When Reflect starts
⬥ #3: When the second special begins
Mauling as soon as Reflect starts is good for all rotations, but it is not the best option.
While this can seem complicated at first, mauling at the right time makes the kill easier because you do not have to calculate how many autos remain from the Phase 10 rotation before the next special will occur in Phase 11.
The following chart shows all the possible timings for each rotation, and they assume the occurred as soon as the special started, with no autos in between the special release and the .
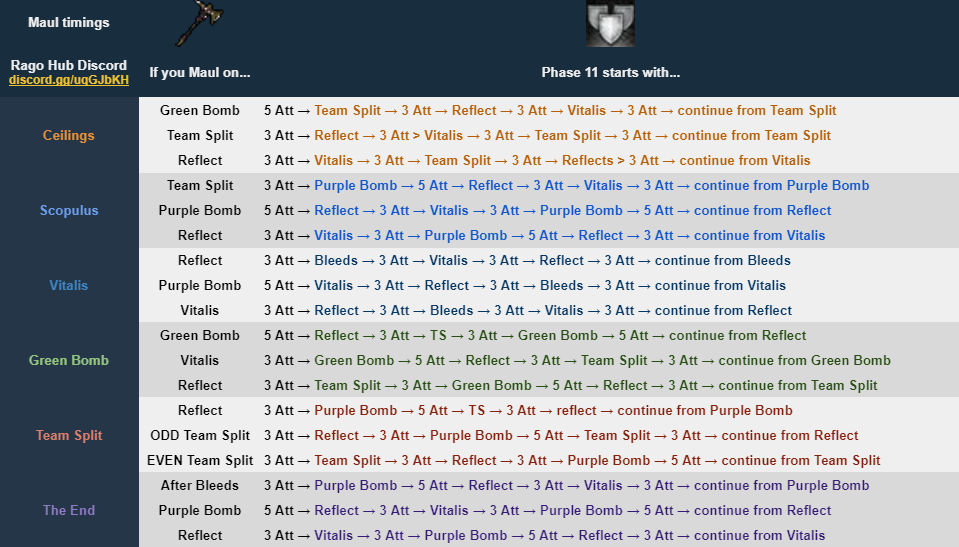
If you get more than 2 autos after a Special, go to the next timing as it is best to skip the first timing to optimize the amount of Attacks on the next phase.
Shield Dome Mauling
This is a strategy that allows you to skip the animation in Phase 10. It does not save time but allows everyone to build on the dummy while Vorago is still talking.
It is done by using Shield Dome before clicking the maul while Vorago is in the spot. do not spam clicking your or the , otherwise it will not work.
Phase 11
This phase is dealt with in the same way as Phase 10, and following the same descriptions in the Overview above,
The Bomb Tank that used Barricade in Phase 10 should now build to Ultimate and the other BT should build to Barricade .
Depending on the push, it might be better for BTs to Ultimate and threshold respectively. Only use Barricade for one of the specials in Phase 11.
Acknowledgements
This guide originally came from the Rago Hub Discord community
Check out Rago Hub for a wide variety of strategy guides for everything-Vorago, featuring a Hammer Climbing guide and more.
Rago Hub: https://discord.gg/uqGJbKH