Ranged Araxxor
Araxxor: Range
Introduction
This is an advanced guide which assumes a strong underlying knowledge of all mechanics and information presented in #araxxor-basic. Each path subsection contains the relevant strategies for p1-3. P4 is the same for all paths except top path skips.
Preset and Relics
Preset Notes
⬥ It is recommended to have the NopeNopeNope perk from Player Owned Farms active.
⬥ Upkeep the  buff from your familiar.
⬥ Araxxor takes a few seconds to clear vulns on phase 1-3, making vuln bombs  usable on all phases.
Top Path (Non-Skip)
⬥ Phase 1
• This phase is timegated so it can be used to set yourself up for p2 while you deal damage
• Use  when the web burn reaches ~70%
• Build adrenaline to 100% and use 
• Build back to 100%
• Wait for araxxor to do a special attack after web finishes burning before going into phase 2
⬥ Phase 2
• Start with  if using crossbows, otherwise use

 →
→  →
→ 
 →
→  →
→  →
→ 
 →
→  → towards Phase 3 while doing defensive abilities to gain adrenaline when Araxxor does the Egg Bomb special attack in Phase 2 (the first spec that happens in phase 2).
⬥ Phase 3
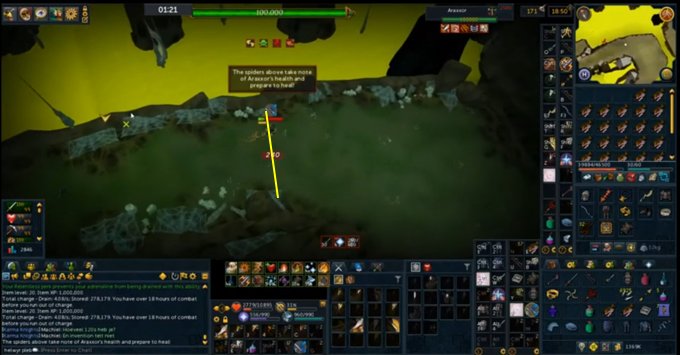
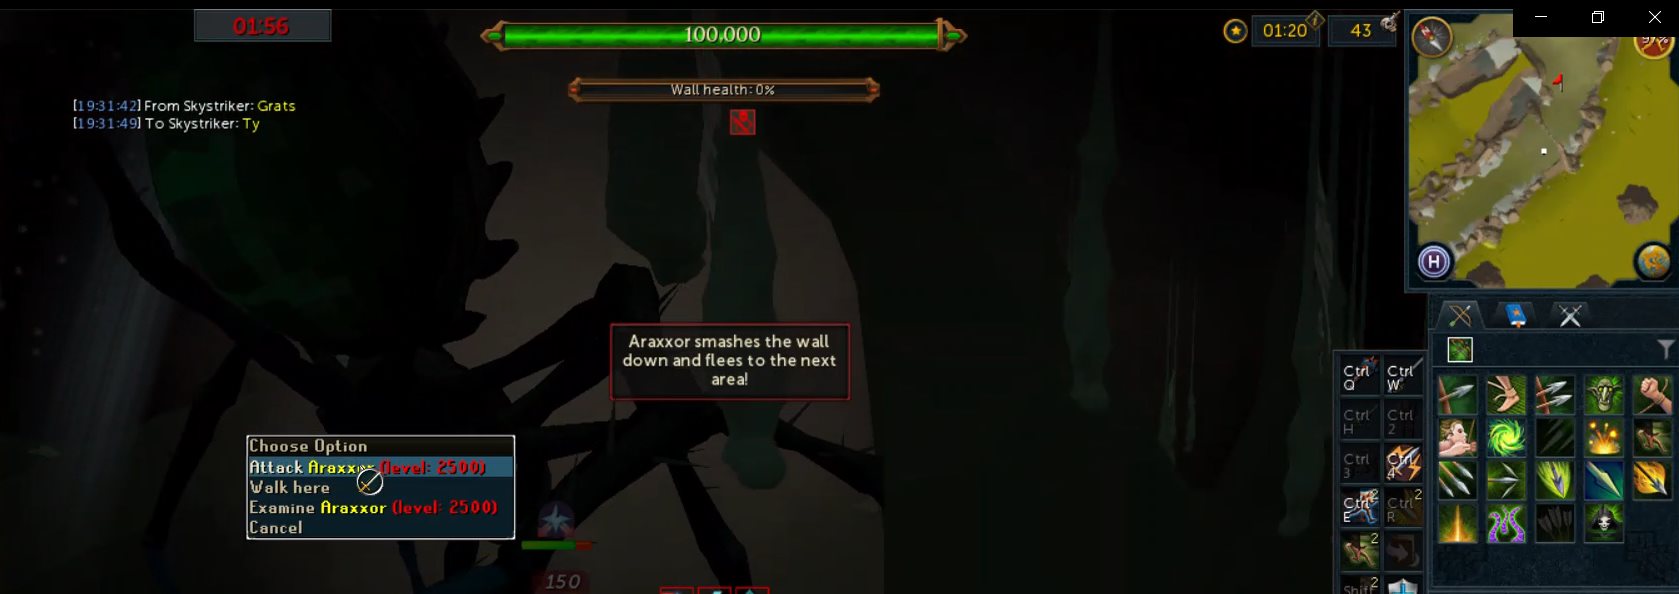
• You want to turn around in phase 3 as soon as you enter so it is good to learn where Phase 2 ends and where Phase 3 begins. Crossing the yellow line in this picture will start Phase 3. Since you run 2 tiles at a time you can click back towards phase 2 just before you cross the line and your character should still cross it.
• Run to the end of the hallway to start phase 3, then run back towards Araxxor.
→ →  → →
→ →  + walk under → →
Top Path Skips
The idea of this method is to solo skip phase 3. If that fails then you still have to help carry the damage to finish phase 3 the normal way. This method requires a Bow of the Last Guardian.
⬥ Phase 1
•  at ~75%% web burn
• Build to 3-4 Deathspore Arrow stacks before web burns completely.
• Turn towards web, and when it burns, drink the powerburst of acceleration and → → → → straight to phase 3, then immediately drop a 
⬥ Phase 3
→  →
→  →
→  → → → (build to 3 stacks and disassemble ) → (switch to ) tc
 + → →
+ → →  →
→  (if needed)
If Araxxor doesn't die from that, he will start healing so do your best to improvise with basics and thresholds. can be used here if thresholds are on cooldown.
Middle Path
⬥ Phase 1
• Walk araxxor so he is right against the web (see below about how to walk p1)
• At 99% web burn you can bladed dive + surge into phase 2
⬩ You'll know if you did it correctly if Araxxor starts absorbing the acid at 1:06 rather than the standard 1:12. This can be delayed if rax does a spec right before the web finishes burning.
• Below is a diagram to help with positioning Araxxor on P1 (Camera facing east)
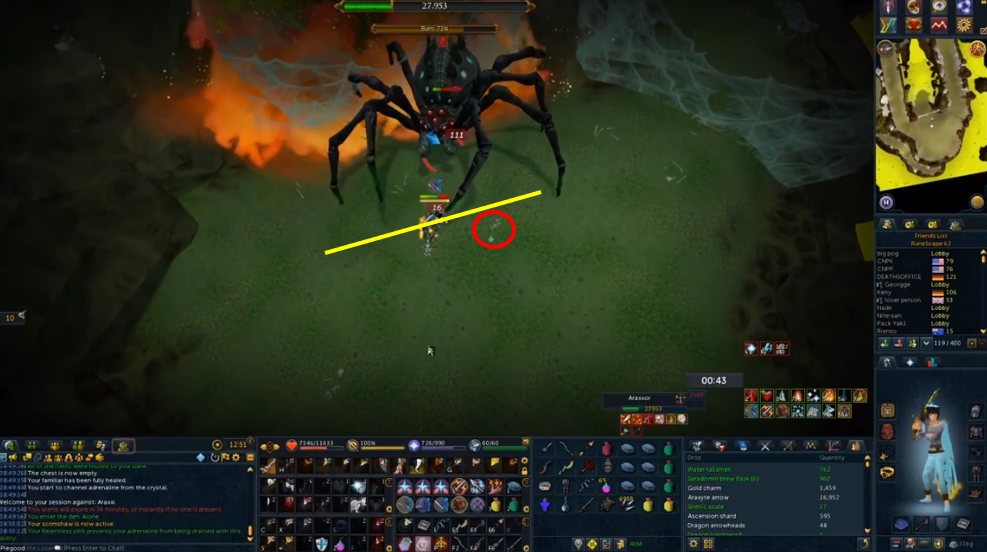
⬩ The yellow line is the line to stand on after walking Araxxor, if you move 1 more square east Araxxor will run into the web and start going west again which could ruin the setup. If you have trouble finding this spot just keep in mind you must stand 1 east of the line where the skulls are (circled in red).
• Here is a video example on walking Araxxor in P1:
⬥ Phase 2
• Run across the acid pool and 3 tiles onto the ramp. This puts rax as far up the path as he can be while still absorbing acid.
• Deal damage
• When rax has absorbed 53% acid, you can + up the ramp, then walk 1 tile west so you have room to dodge cleave specials at the top of the ramp.
⬩ You'll know you did this correctly if rax goes up to 55% then starts dropping, and you'll get the popup message that the bridge is burning when there is 49% acid left. This is the perfect amount needed.
• Set up for phase 3
⬩ Natural instinct timing is calculated based on how much acid rax has poured onto the bridge. The timing is roughly when the bridge has absorbed 25-30% acid. Under normal circumstances, this means the popup would appear at 49%, so you would natural instinct when the bar says 24-19%.
• Build to 100% and prepare for p3.
⬥ Phase 3
• Start with if using crossbows, otherwise use
→ Auto + → → → + walk under → →
Bottom Path
⬥ Phase 1
• No special setup. Just dps araxxor down to <5k hp
⬥ Phase 2
• No special setup. Follow the light and wait for the charge. Stay at 100% adrenaline.
• When you dodge the charge and Araxxor damages the wall, you can click the minimap to start running into phase 3, and then right click Araxxor when he is going up into the ceiling so you can right click 'attack' instantly in phase 3. This is nice in case minions spawn during p2 to avoid Target Cycle targeting them instead of Araxxor.
⬥ Phase 3
• Start with if using crossbows, otherwise use
while running into Phase 3 area → + → → → + walk under → →
Phase 4
⬥ This is the same regardless of which path you took, assuming you did not skip top path p2.
• Spam a defensive or non-mobile surge to gain adren when cutscene ends and drop a dummy, build to 100% adrenaline.
• +  , build with
• Start with if using crossbows, otherwise use
Just before Araxxi becomes attackable, → auto + → → OR if low on adren → Improvise
⬥ If you did skip top path p2, your will be on cooldown, so alternatively use the following guide
• Spam a defensive or non-mobile surge to gain adren when cutscene ends and drop a dummy, build to 100% adrenaline.
• Build to 6-7 stacks and
Just before Araxxi becomes attackable, s → tc r + → (3t) → →
Example Kills