Icon Creation
Introduction
This channel will cover creating and editing:
-
Emojis used in PvME's guides - #unknown-channel
-
Icons used in the preset generator - https://pvme.github.io/preset-maker/
Icon formatting
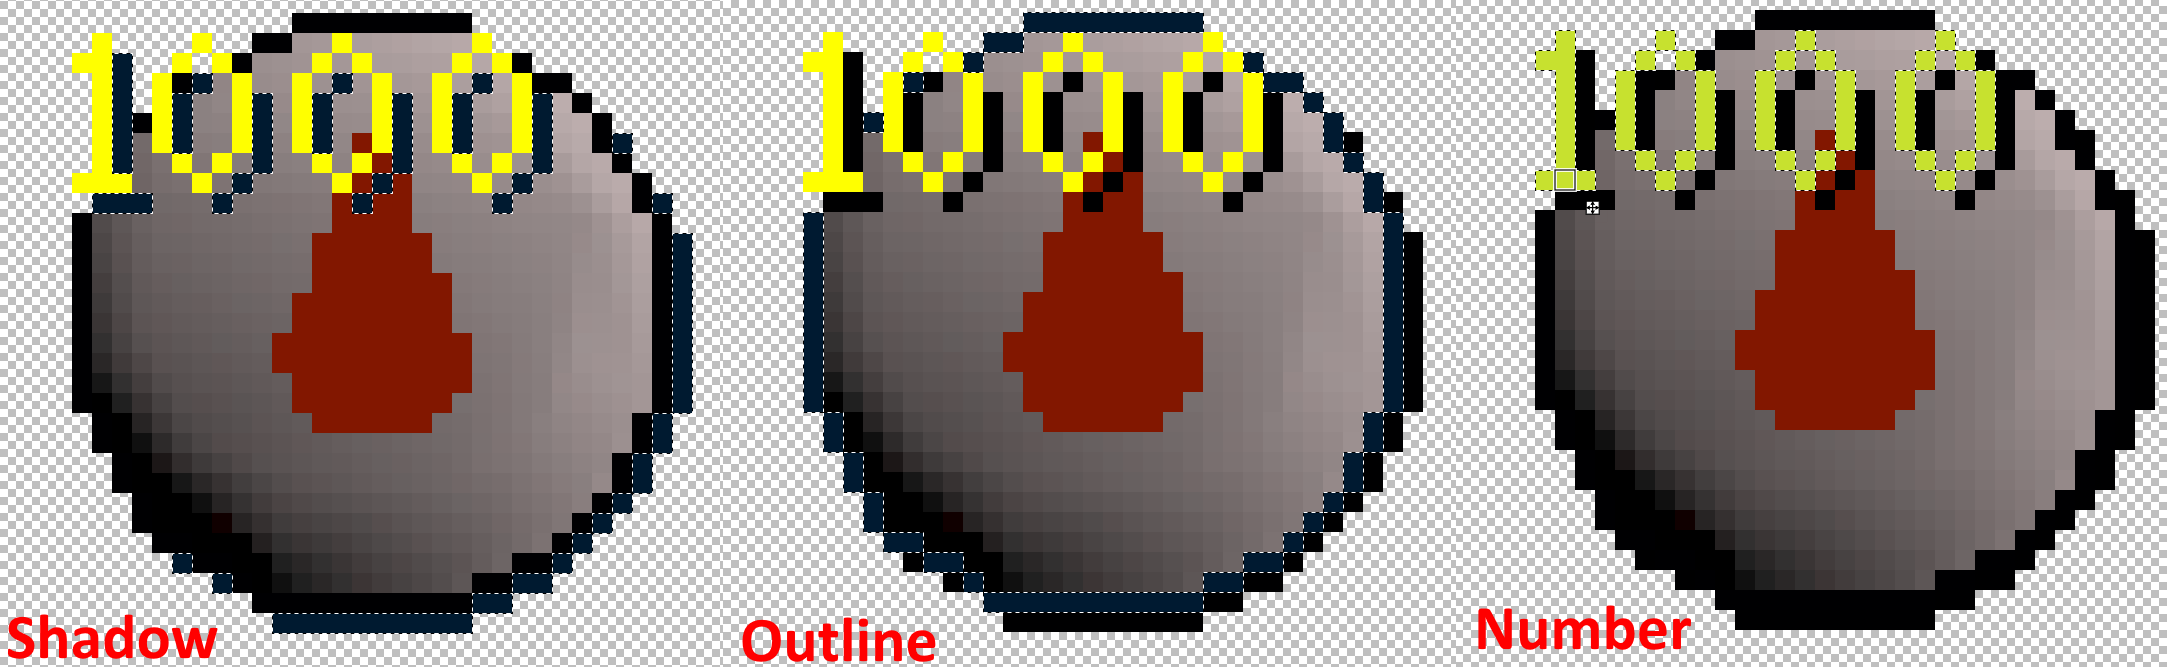
Every icon consists of 4 parts:
-
The main item - Colour varies, never contains the same shade as the outline and shadow.
-
The outline - A black border that immediately surrounds the main item (RGB value 0,0,2).
-
The shadow - A black border that appears bottom-right of the outline where applicable (RGB value 0,0,1).
-
(Only for stackable items) The number (RGB value 255,255,0).
a. Numbers have their own shadows.
Image showing different regions selected:
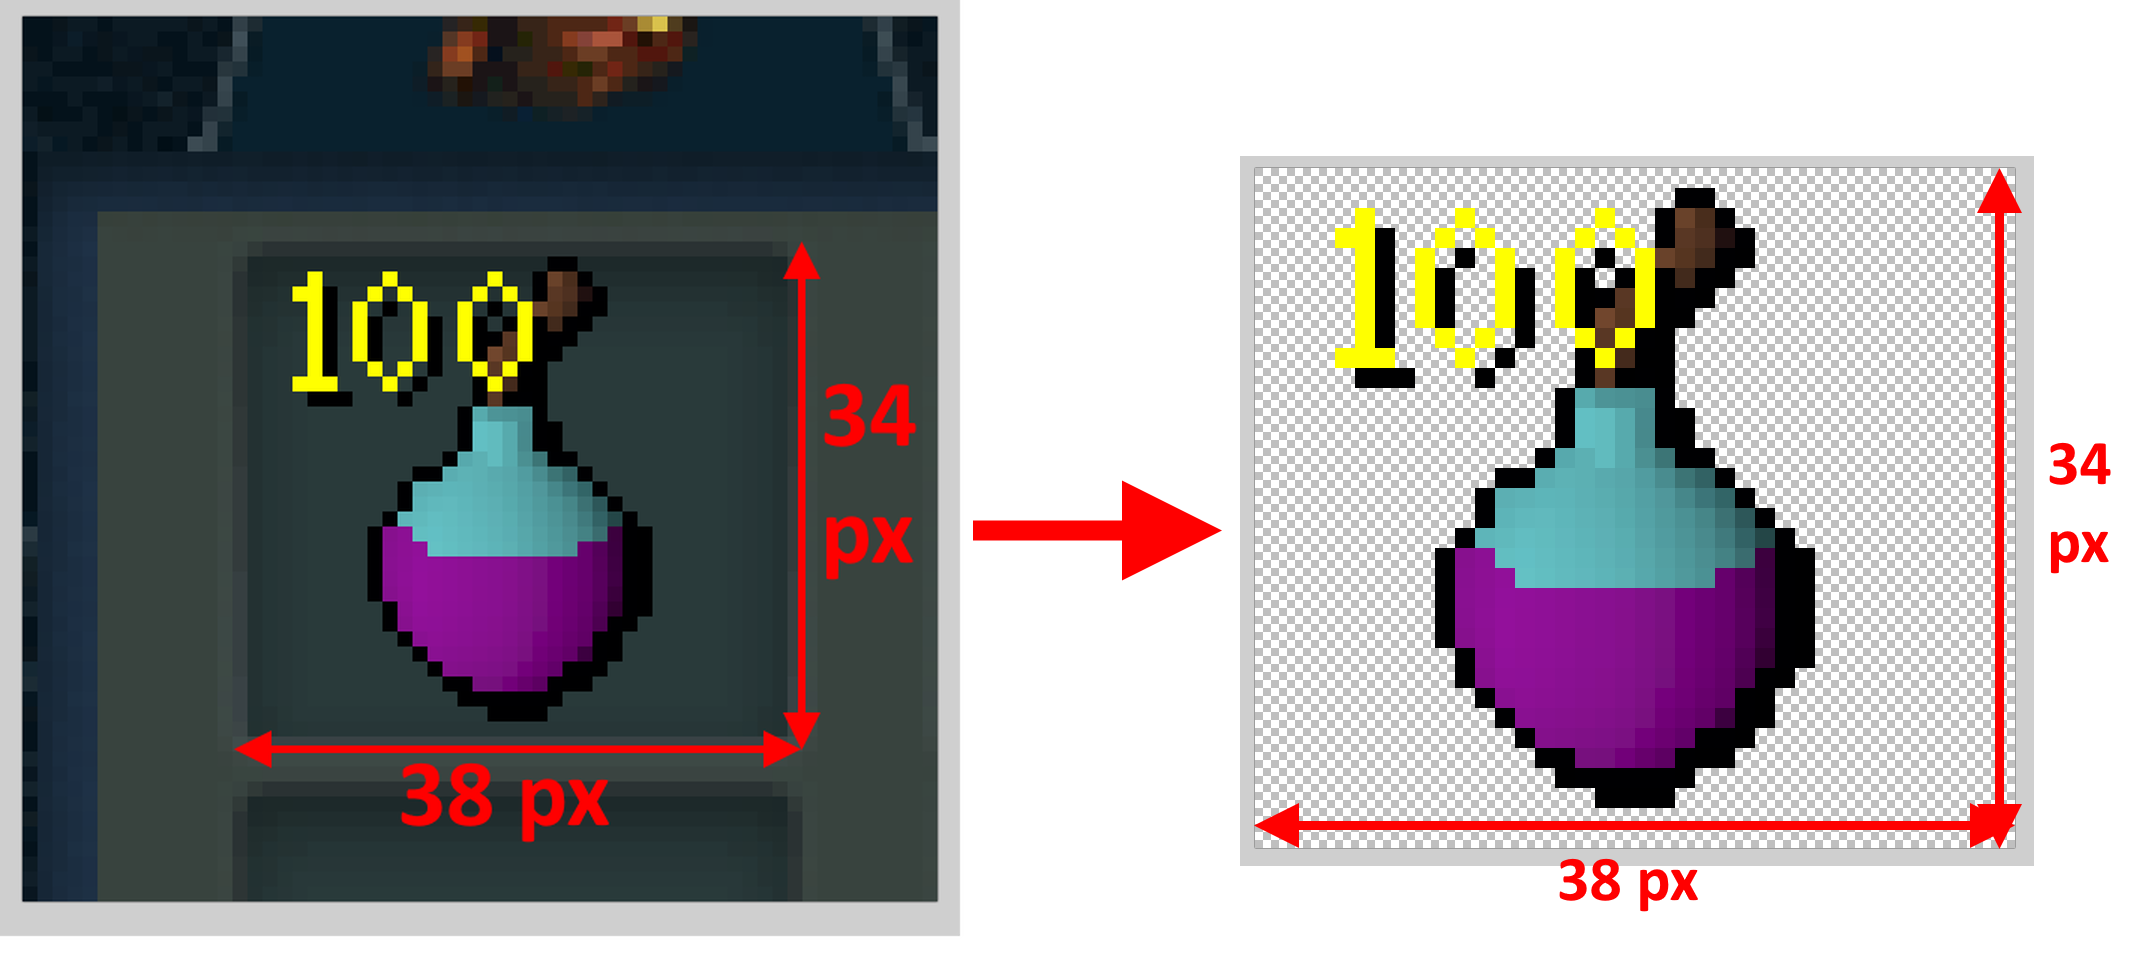
Preset icons are extracted from inventory slots pictures (38x34) and contains all icon parts.
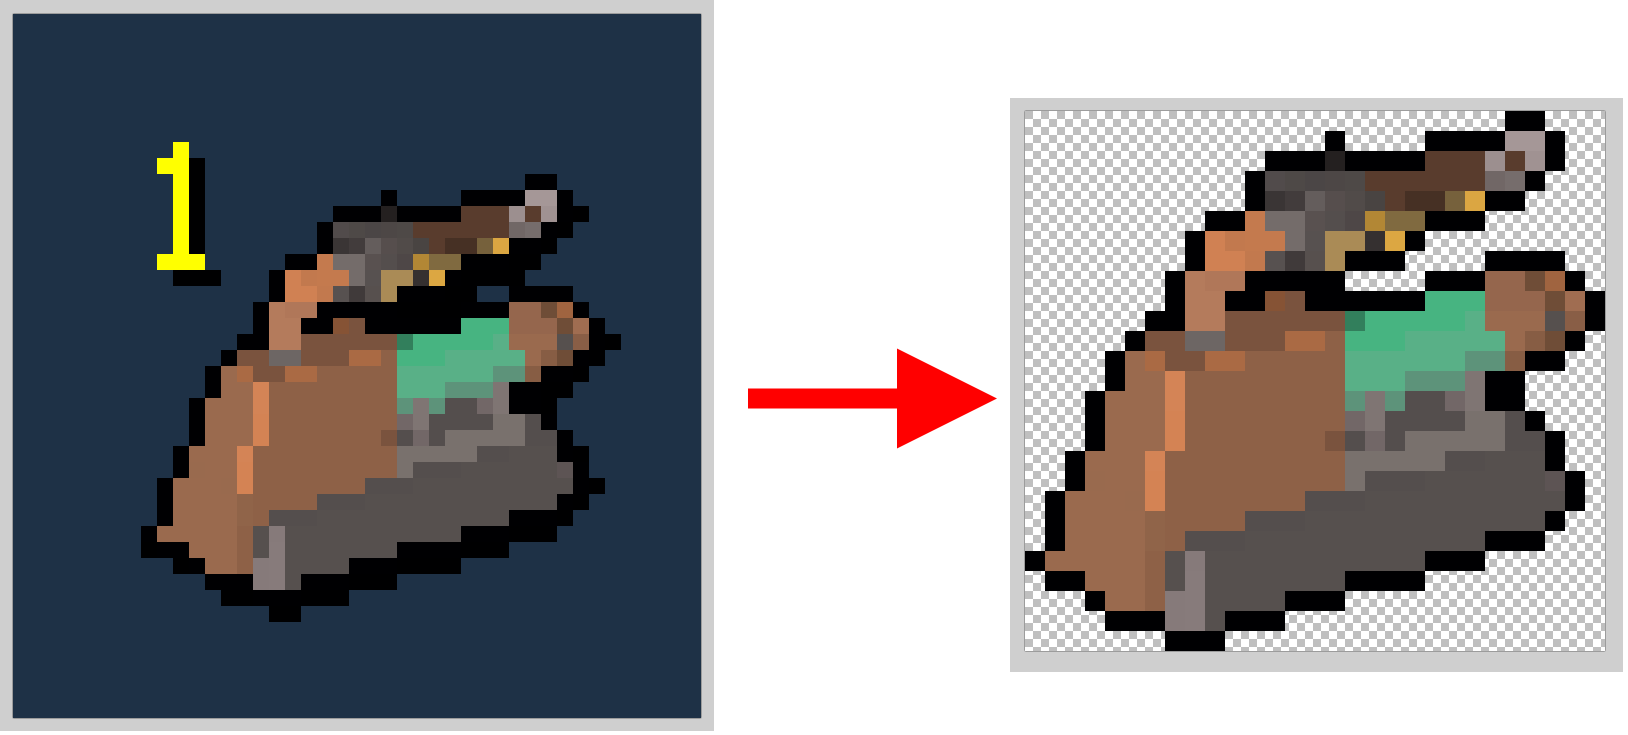
Emojis are extracted from bank pictures and have shadows and numbers removed. They are also cropped to size.
RSWiki icons
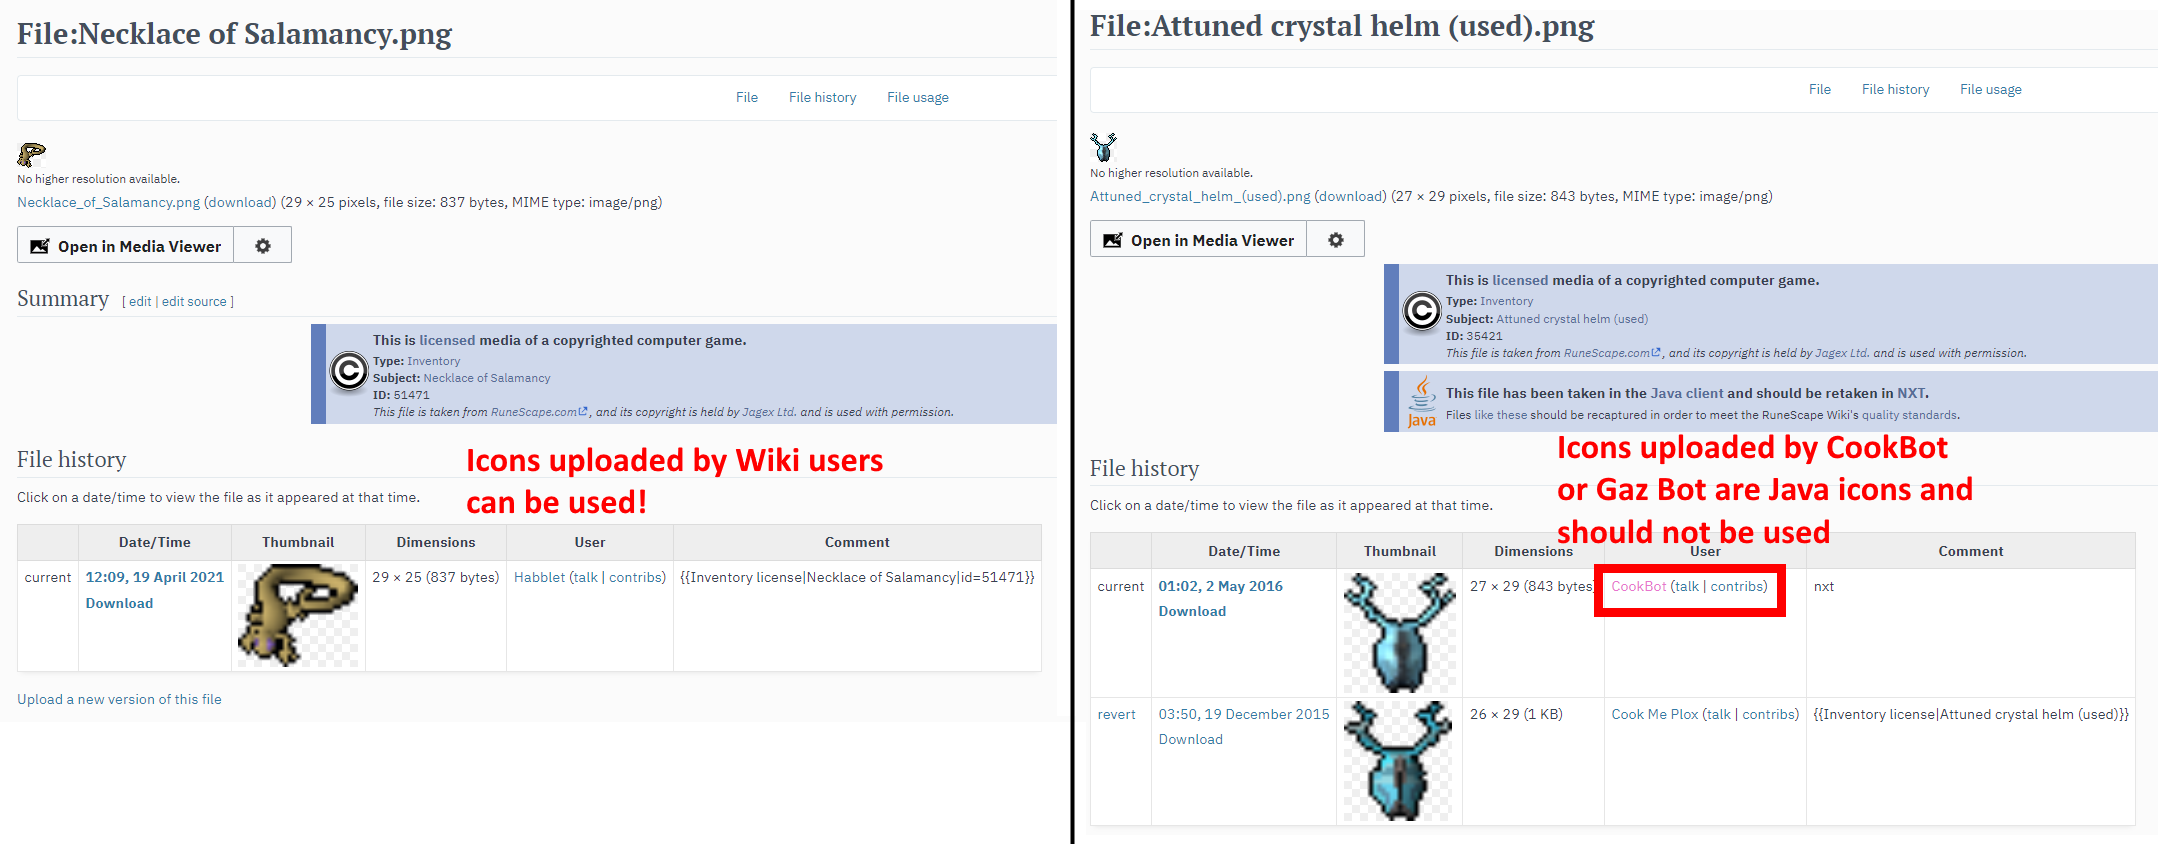
⬥ All preset icons should be manually made, and not based on RSWiki icons.
• Emojis can be made from RSWiki icons based on conditions below.
⬥ The source of the icon determines whether you can use the RSWiki icon as an emoji.
• Icons which are prepared by users and accurately reflects how they appear in the game can be used.
• If the icon is prepared by a bot. It is most likely a Java icon which do not reflect how the icon looks like in the live game.
Icon creation (script)
Currently, the script only works for screen grabs of the inventory section when banking.
Setting up
⬥ Download the script here: https://drive.google.com/file/d/1W6nzHiOYzZhsVZP7k_lmJ_leB9svquoX/view?usp=sharing
⬥ Move the script to a desired directory.
⬥ Run the script to set up the folders required.
• Let the script to install the Pillow Python package if not installed (required for Python to manipulate images).
• DO NOT RENAME THE CREATED FOLDERS.
Making icons/emojis
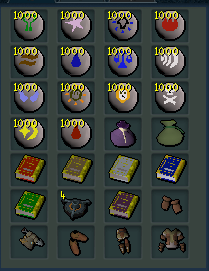
⬥ Take screen grabs of items from the inventory section of the banking interface (example below) and save it in "Inventory screengrabs" as a .png file.
• To make emojis instead of preset icons: add a "_emoji" suffix to the name of the screengrab.
 ⬥ Navigate back and run "Make icon.py"
• Check that the quantities printed in the terminal are correct.
⬥ Check "Generated emojis" for emojis and "Generated preset icons" for preset icons.
⬥ Use "Archive images.py" to archive all images after they have been added.
⬥ Example video of basic/icon creation:
Icon creation (manual)
⬥ Take a screen grab of an item from an opaque bank interface (for emojis) or opaque inventory slot (for preset icons)
• Your bank background should be uniformly coloured to facilitate background removal.
• Items on the Grand Exchange and preset interface have their outlines removed and cannot be used as a source for emojis.
Manual icon creation
-
Open the item you want to make an icon of in Paint.net, crop it as nicely as possible.
-
Zoom in and crop the inventory slot exactly using rectangle select (this should give you a 38x34 area).
-
Use the crop to selection option under Image.
a. Shortcut: Ctrl + Shift + X.
- Select the Magic Wand and Rectangle select/Lasso select tools to select and delete regions until the background is completely removed.
a. Use Shift + Click with the Magic Wand on 0% tolerance on the background to quickly select chunks of regions.
Manual emoji creation
-
Open the item you want to make an icon of in Paint.net, crop it as nicely as possible.
-
Select the Magic Wand tool on 0% tolerance and use Shift + Click followed by Delete on the background.
-
Repeat the previous step for shadow and number pixels.
-
If removing number pixels, ensure that the number or its shadow do not cover the icon.
a. Post in #unknown-channel if there is no way to get the complete unnumbered icon or visit the Image stacking section below.
- Use the Magic Wand again to select the transparent background, press Ctrl + I followed by Ctrl + Shift + X to crop the image to size
Image stacking
If you're trying to emoji-fy a stackable item (check if icon is available on wiki first) and cannot get a whole icon due to the number partially covering it, you can stack multiple incomplete images (made by removing different numbers) to form a complete image.
⬥ The most efficient quantities you can use for stacking are not yet known, but generally:
• Items without varying icons based on quantity (e.g. teleport tabs), use quantities 1, 7 and 9.
• Items with varying icons throughout numbers 1-5 (e.g. bakiriminel bolts), use quantities 11, 44, 77 and 99.
• Items with varying icons throughout 1-1000 (e.g. congealed blood), use numbers 1111, 2222, 7777 and 9999.
Stacking with the script
-
Save an image consisting multiple inventories with different quantities of the same item(s) you want stacked.
-
Run "Make icon.py" to generate the incomplete emojis.
-
Create respective folders starting with "stack" followed by the item name and sort the incomplete emojis into their respective folders.
-
Run "Stack.py" to create the stacked icons.
Manual stacking
-
Have images consisting different quantities of the item(s) you want stacked open in different windows.
-
Carry out removal of background, shadows, and quantities.
-
Paste the incomplete emojis onto different layers and merge them to get the complete emoji(s).
Known issues
⬥ Currently, there is not a standardised method for auras and other icons (e.g. buffs, debuffs).
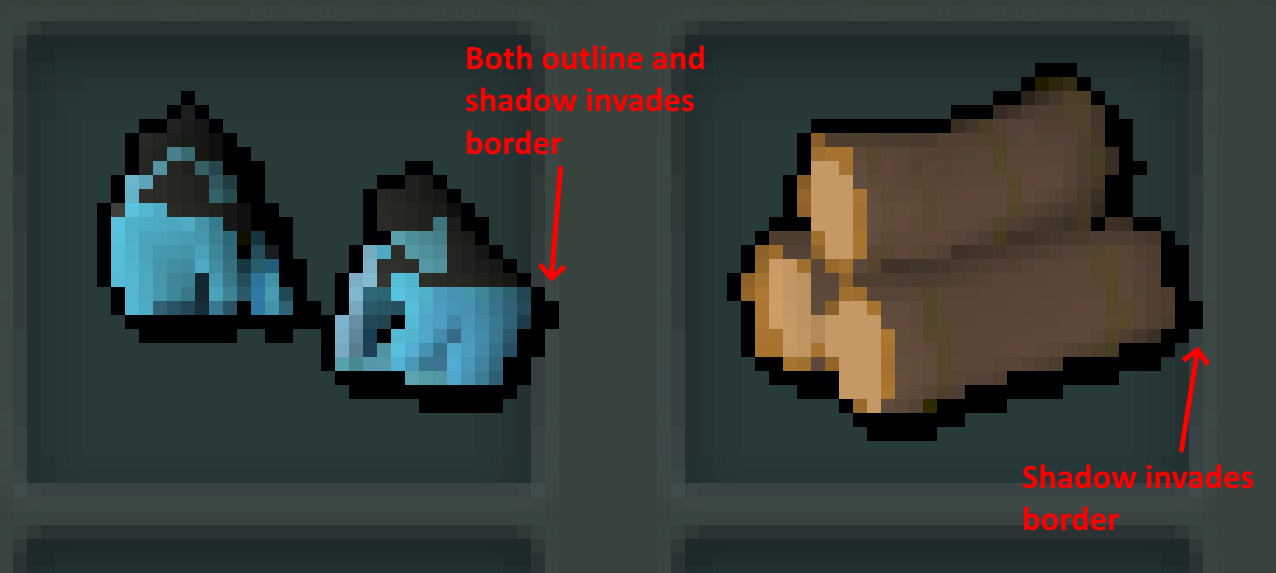
⬥ If your inventory slots (from the banking interface) are not completely uniform, the script will not be able to recognise them as inventory slots.
⬥ The script uses the complete frames of the inventory slot to identify them: https://imgur.com/CCfr7dG, https://imgur.com/ypnZCL3.
• If an item has its shadow and/or outline invading the inventory slot, the frame will not be recognised and the item will not be extracted.
Examples:
Submitting completed icons
Preset icons - Upload the icon to Imgur, click "Copy Link" to get the item link, and fill in this template for each item to submit via pasting it to #unknown-channel:
name:
image:
slot:
label:
breakdownNotes:
wikiLink:
Fields explanations:
⬥ name: The item name as displayed on the RSWiki.
⬥ image: The raw Imgur link.
⬥ slot: Numbers 0 to 13 which decides where the item can be equipped.
INVENTORY = 0
HELM = 1
BODY = 2
LEGS = 3
MH_WEAPON = 4
OH_WEAPON = 5
GLOVES = 6
BOOTS = 7
AURA = 8
AMMO = 9
NECKLACE = 10
RING = 11
CAPE = 12
POCKET = 13
⬥ label: The name: of the item with all lower-case and no spacing OR an acceptable abbreviation.
⬥ breakdownNotes: Default text that appears in item breakdown when an item is picked. This is usually left blank.
⬥ wikiLink: Link to the item on RSWiki.
• Make sure the link is valid.
Examples:
name: Abyssal scourge
image: https://imgur.com/Moh9yya
slot: 4
label: abyssalscourge
breakdownNotes:
wikiLink: https://runescape.wiki/w/Abyssal_scourge
name: Black stone arrows
image: https://imgur.com/uBbMQoy
slot: 9
label: bsa100
breakdownNotes:
wikiLink: https://runescape.wiki/w/Black_stone_arrows
Emojis - Once done creating the emoji(s), use Ctrl + A + Ctrl + C to copy the cropped image (if made manually) or drag and drop saved emojis into #unknown-channel along with the item names.