100% Solo Zamorak (Ranged)
100% Zamorak Solo (Ranged Advanced)

Introduction
100% Zamorak can either be farmed or killed 10 times to build up bad luck mitigation. Ranged with  is currently the meta for fast solo low enrage kills. Rotations presented in the guide should achieve consistent sub 3:40 solos.
This guide assumes knowledge of zamorak and BOLG rotations. Visit #Zamorak Basic Guide, #unknown-channel, #Ranged DPM Advice to learn more.
Preset and Relics
General information
⬥ The pad order for the fight is: 2 → 1 → 4 → 6 → 5 → 3
⬥ When killing witch cancel  early if possible (typically you can activate
  when witch has <10k health remaining)
⬥ Press  to exit infernus the same tick as you activate your last ability (typically ). This will let you exit infernus and tc + ability on
  without losing ticks
⬥ When transitions from green to grey hp he becomes immune that tick (for example if 1st hit of 
 transitions from green to grey the remaining damage and entire 2nd hit will be nulled). Avoid high damaging abilities when is close to phasing to grey hp
⬥ Drink  when you need adrenaline during the 1st minute of the kill
⬥ Aim to keep your HP low throughout the fight to benefit from  and 6th edict. Best way to keep hp low is to tank some autos with
  while under
Pad rotation
General rotation for charging a pad will look like: [basic +  if not on pad yet] → basic → basic → →
  /
/  → ... During the three basics at the begining you should choose basics to end up at 3+
  stacks. Some examples:
1 stacks:  →
→  → → → ...
2 stacks: →  → → → ...
3 stacks:  → → → → ...
Prefight
Equip  +
+  → build with basics on witches to 100% →
  → build with basics on witches to 100% →
  → kill remaining witches with basics (finish with 3+ stacks) → to 2nd edict
2nd Pad [2^^ → 1 → 4 → 6 → 5 → 3]^^
Wait 1 tick → → tc +  + → → →
  → [ if < 58.5% adren] → → [ / if you can cast it before getting adren refund ] → [Adren refund]
  → +
→ +  + to 1st pad → +
Witch:
 + → 2h Auto → → +
1st Pad [2 → ^^1 → 4 → 6 → 5 → 3]^^
(tc) + basic → basic → → → → → → [Adren refund] → → → + towards 4th pad → +
Witch:
+ → 2h Auto → → +
4th Pad [2 → 1 → ^^4 → 6 → 5 → 3]^^
(tc) + basic + → basic → basic → → → → → → [Adren refund] → + towards 6th pad → +
Witch:
+ → 2h Auto → → +
6th Pad [2 → 1 → 4 → ^^6 → 5 → 3]^^
(tc) + basic + → basic → basic → → → → → → [Adren refund] → + inside 5th pad → +
Witch:
+ → 2h Auto → → +
5th Pad [2 → 1 → 4 → 6 → ^^5 → 3]^^
basic → basic → → → + east → → → [Adren refund] → → → +  + inside 3rd pad → +
Witch:
→ → +
3rd Pad [2 → 1 → 4 → 6 → 5 → ^^3]^^
(tc) + basic → basic → → → → → → [Adren refund] → basics to finish
Phase 7
General information
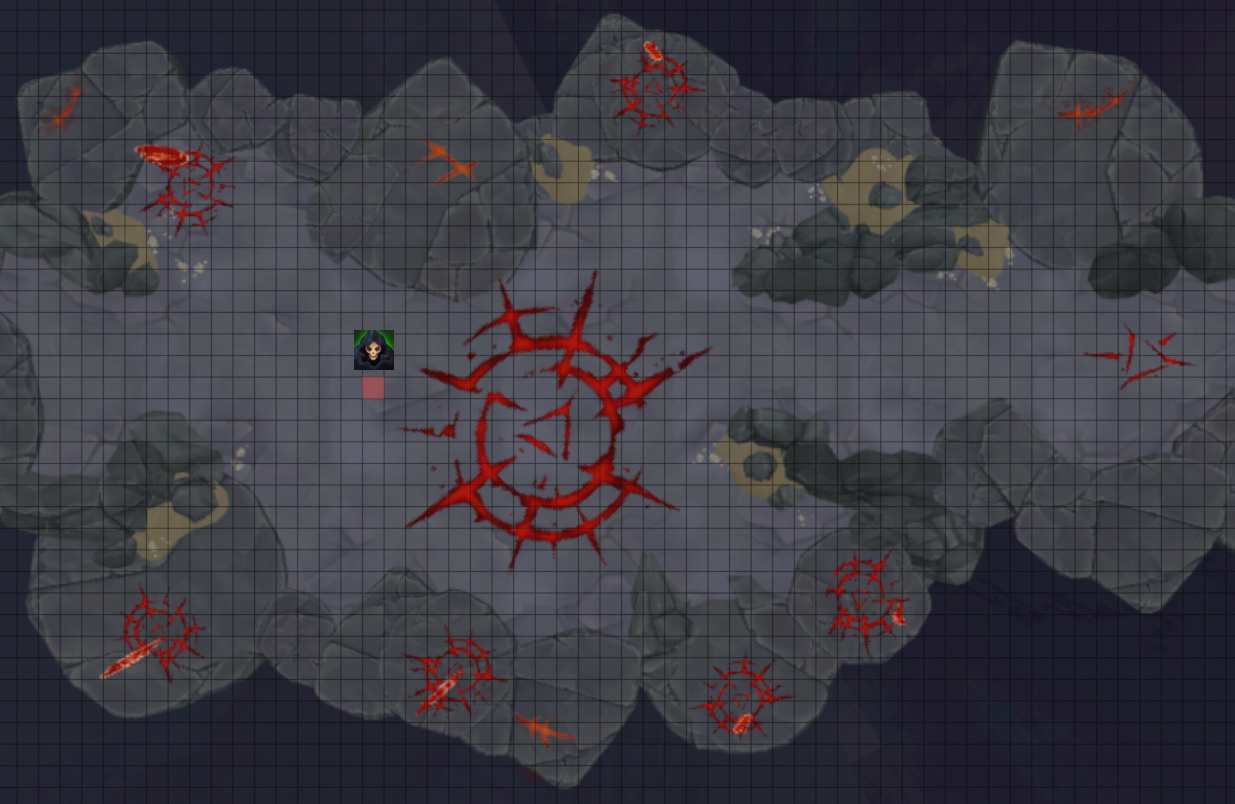
⬥ With correct positioning and placement it's possible to reach all runes from your except the back one (refer to image below). Red arrow indicates the tile where you should place your
⬥ The rotation for runes assumes no back runes. If you get back rune towards it and improvise
⬥ Before 1st rune is shown you should target and kill demon. Once it's dead throw  on zamorak and start lowering hp of north-eastern rune until 1st rune is shown
⬥ After demon is killed use +  which will be used to block the melee hit
⬥ When large red bomb is about to land equip your  to tank it
⬥ It's very important to stay at very low hp during entire P7 (typically ~2k). This means you shouldn't use at all. Having low hp will not only increase the damage from 6th edict and but also make it safer to survive since bleed from will be lower
⬥ placement (red tile):
Rotation
during cutscene → to swiftness tile → →  → →
→ →  → → → → target 1st rune + → → target 2nd rune + → + → target + → → → →
  + → improvise
Example Kills
https://youtu.be/WIoZbw6f4d8 3:18 BIS
https://youtu.be/04tgtcMAQ-k 4:05 no BOLG (Note: this video uses different rotations)