Low Effort Helwyr Hard Mode
Low Effort Helwyr Hard Mode
Disclaimer
⬥ IF YOU CANNOT GET A METHOD TO WORK DO NOT MESSAGE THE CREATOR(S)
• It is more than likely user error or cutting corners, use #pvm-help if you cannot get it to work
Positioning

Notes
⬥ Pink "Other" Tiles - Mushroom buds that you should only stand directly on top of are marked pink above. This is because some adjacent tiles have an increased chance of death due to the possibility of getting hit by multiple Mushroom Barrage attacks at once.
⬥ Position yourself on the tile shown above (the adjacent tile north of the mushroom bud) and avoid gas clouds when they spawn by moving to any safe tile if necessary. Once you are safe from the first set of gas clouds you do not need to move again for the rest of the fight.
⬥ A quick and easy way to remember which tile is safe is to never stand 2 tiles from mushroom buds, but on top of or directly adjacent to mushroom buds as they are normally safe.
Necromancy Low Effort Method (50 kph)
Overview
Notes
⬥ You can save your preset with the excalibur  equipped to automatically dismiss your conjures when banking.
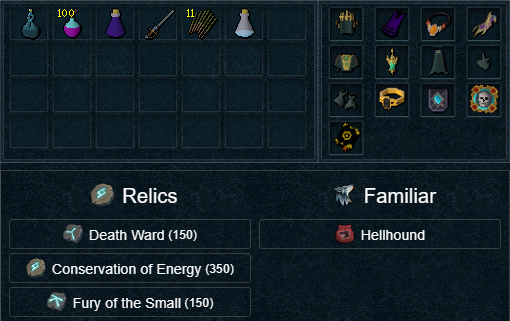
Preset and Relics
Necromancy Alternative Low Effort Method (45 kph)
Overview

 ⬥
⬥  ⬥
⬥  ⬥
⬥  ⬥
⬥  ⬥
⬥ 
 ⬥
⬥  or
or  ⬥
⬥  ⬥
⬥ 
Notes
⬥ Using this setup you are likely to encounter the Mushroom Barrage mechanic. Be aware that Mushroom Barrage explosions will still damage you after Helwyr has died if the spawn animation has begun.
⬥ Avoid going south of the starting tile with this setup. This will allow you to automatically dodge one of the early mushroom barrage attacks and increase survivability.
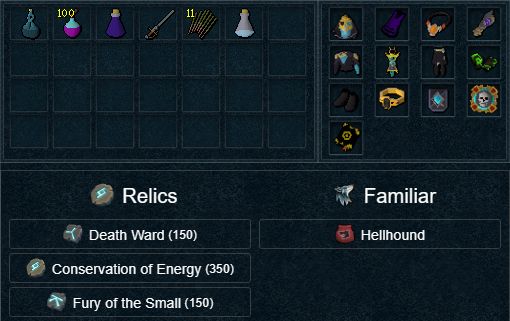
Preset and Relics
Action Bar

The fight
⬥ This method requires teleporting to War's Retreat after every kill to replenish prayer, adrenaline, familiar and player health, and reset cooldowns.
⬥ Cross the barrier to enter the boss room →  →
→  →
→  → (tc)
  →
→  +
+  + Activate
⬥ Turning Auto-Retaliate  on is recommended. If you have Auto-Retaliate off you will need to manually use soul sap at the beginning to start revolution.
⬥ It is not recommended to click on Helwyr to begin attacking due to the delay compared to target cycle. There is a small window to kill the boss before you are overwhelmed by the Mushroom Barrage.