Interface Guide
Interface Guide
Introduction
Having a proper interface setup is important as it allows you to organize your game view and have quick, convenient access to game windows that you frequently interact with such as inventory, gear, familiars, ability bars and so on. A good interface can make the game easier to play and more enjoyable.
What is the User Interface
Creating a good interface is all about displaying the interface elements in a way where everything you need to access is open and important elements are appropriately close to one another, to minimize the distance your eyes and mouse need to travel around your screen. The game comes with a few pre-made layouts, but they all suffer from similar issues.
RS3 New Player Interface
⬥ Consider the New Player interface that players are given when first playing the game.
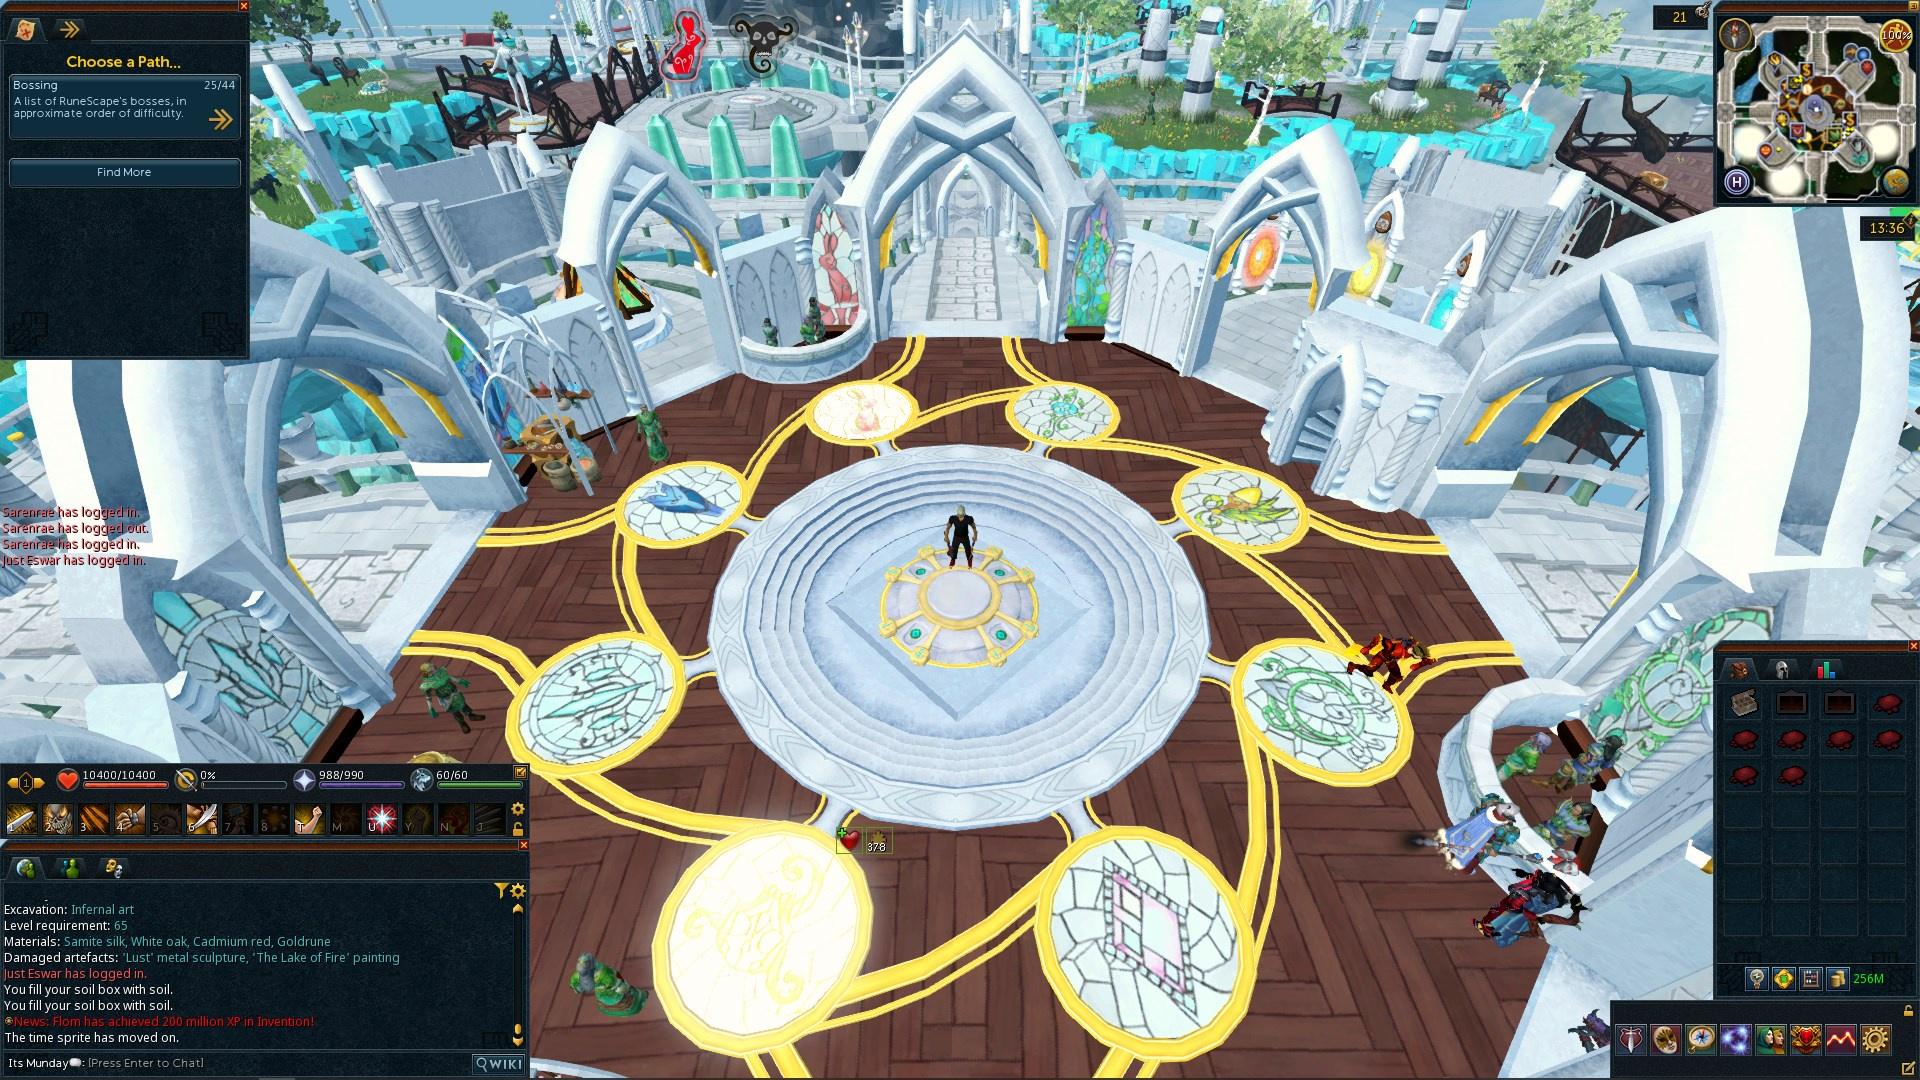
There are several issues with this interface, such as:
⬥ UI elements are spread out and not easily accessible.
• e.g. the primary action bar is too far away from the inventory, and the buff bar (with the buff icons) is not near either of them.
⬥ The existing space is not well utilized.
⬥ The tabs are not appropriately sized and hide the game world underneath them.
⬥ The buff/debuff bars that indicate status effects are not placed in ideal locations.
⬥ Missing elements - including the summoning/familiar tab, the magic spellbook or the defensives tab, and additional action bars.
Useful Interface Elements
⬥ We can observe that some UI elements are more important than others for PvM, including:
• Additional action bars - gives access to a wider range of keybinds by increasing the number of action bar slots visible on-screen at any given time.
• Inventory - goes without saying.
• Worn items/equipment - useful to ensure correct gear is being worn, unequip armour for certain situations, activate your pocket slot items, etc.
• Familiar - makes it easier to track special move points, call your familiar if it's misbehaving, and make it attack faster.
• Spellbook - allows you to quickly switch auto-cast spell
• Minimap - a larger minimap (where permissible) can make it easier to get a high-level overview of areas and navigate quickly.
• Chatbox - most mechanics and interactions will have some form of chat message, and keeping an eye on them can be useful. Also pairs well with the Alt1 plugin.
• Buff/debuff bars - keep track of all buffs/debuffs on the player.
• Specific style windows - it can be helpful sometimes to have additional menus open like the defensives tab, magic spellbook or style-specific ability tabs, to click on certain abilities or spells that you might not want to (or cannot) keybind.
⬥ Other non-essential but nice-to-have menus include:
• Skills menu
• Friends list
• Friends/Clan/Group chat lists
• Prayers tab
• Drops tab to track drops
• Runemetrics tab to track statistics/damage
Creating A Good Interface
Keeping in mind the important elements of a good interface, we can use the earlier one as a reference and modify it into a layout more suitable for PvM and general gameplay. We'll do this in two broad steps - bringing into view and arranging important menus, and then using the advanced layout options to customize the interface further. Any minor tweaks or changes can be made afterwards with ease.
Note: This is only an example to demonstrate how to create an interface, but it is ultimately up to personal preference.
Step 1: Interface Layout
The first step is to set up the main menus and layout of the interface.
⬥ Unlock the interface by clicking the lock icon on the Options ribbon, or using the default keybind L.
⬥ The bottom centre to the lower right is chosen as the focus for the main PvM menus.
⬥ Extra extra action bars are added to give us more keybinds to use.
⬥ The minimap is adjusted, and the Options ribbon is made smaller.
• The ribbon can be edited by clicking the small pencil-in-box edit icon in it.
⬥ Unwanted tabs are removed, like the path menu.
⬥ Useful PvM tabs are added around the area of focus - such as the inventory, the familiar interface, worn items, defensives, and spells.
⬥ Additional menus such as the skills menu or friends list are placed in relatively accessible locations.
⬥ Tabs are made large enough to eliminate extra scrollbars wherever possible.
⬥ Some of the non-essential but useful menus are added and fill in any glaring gaps - the runemetrics tab is optional but can be used to track damage in a fight.
⬥ Now we have an interface that looks something like this:
 ⬥ The basic structure of the interface has taken shape.
Note: A portion of the game window is now covered by interface menus - this will be adjusted in the next step.
Step 2: Edit Layout Mode > Advanced Options
After finalizing the basic layout, the advanced options can be used to customize how some detailed and important aspects of the interface, such as the buff/debuff bars, split private chat, the game view etc.
⬥ To access the menu, press Escape > Edit Layout Mode > Advanced Options and you'll be greeted with a menu that looks similar to the following image. Click the tickboxes to add or remove overlays from the view to customize.
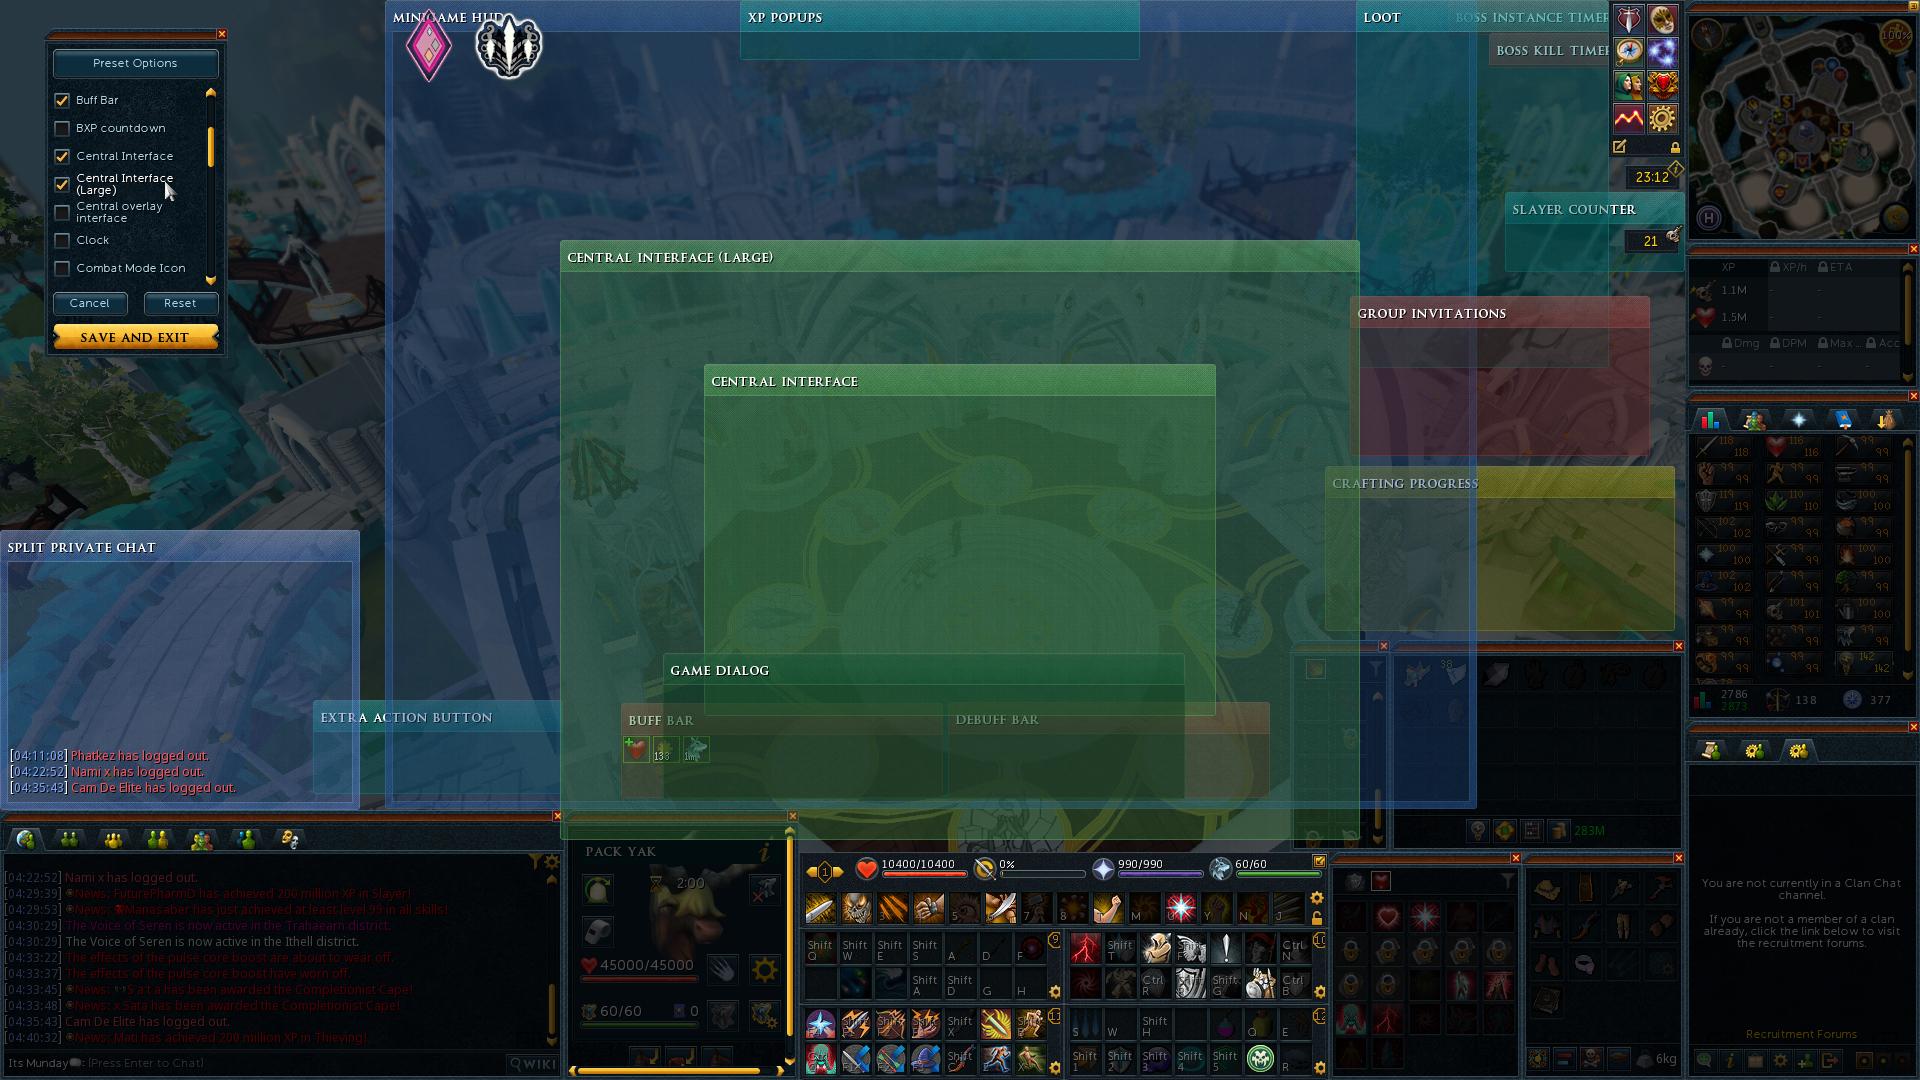
⬥ Click the tickboxes to add or remove overlays from the view to customize.
⬥ The buff/debuff bars are placed close to the focus of the interface, near where the character stands in the centre of the screen, to make them easier to see.
⬥ The private chat is split and placed to one side to prevent it from cluttering up the chatbox.
⬥ The extra action button is kept in an easy-to-click location.
⬥ The boss instance/kill timers, slayer counter, and game clock are visible and don't cover other menus.
⬥ Group invitation popups are placed off to one side to prevent them from being misclicked, say during a boss fight.
⬥ The game view can be customized in the same way. The following screenshots compare two game view sizes, indicated by the red outline.
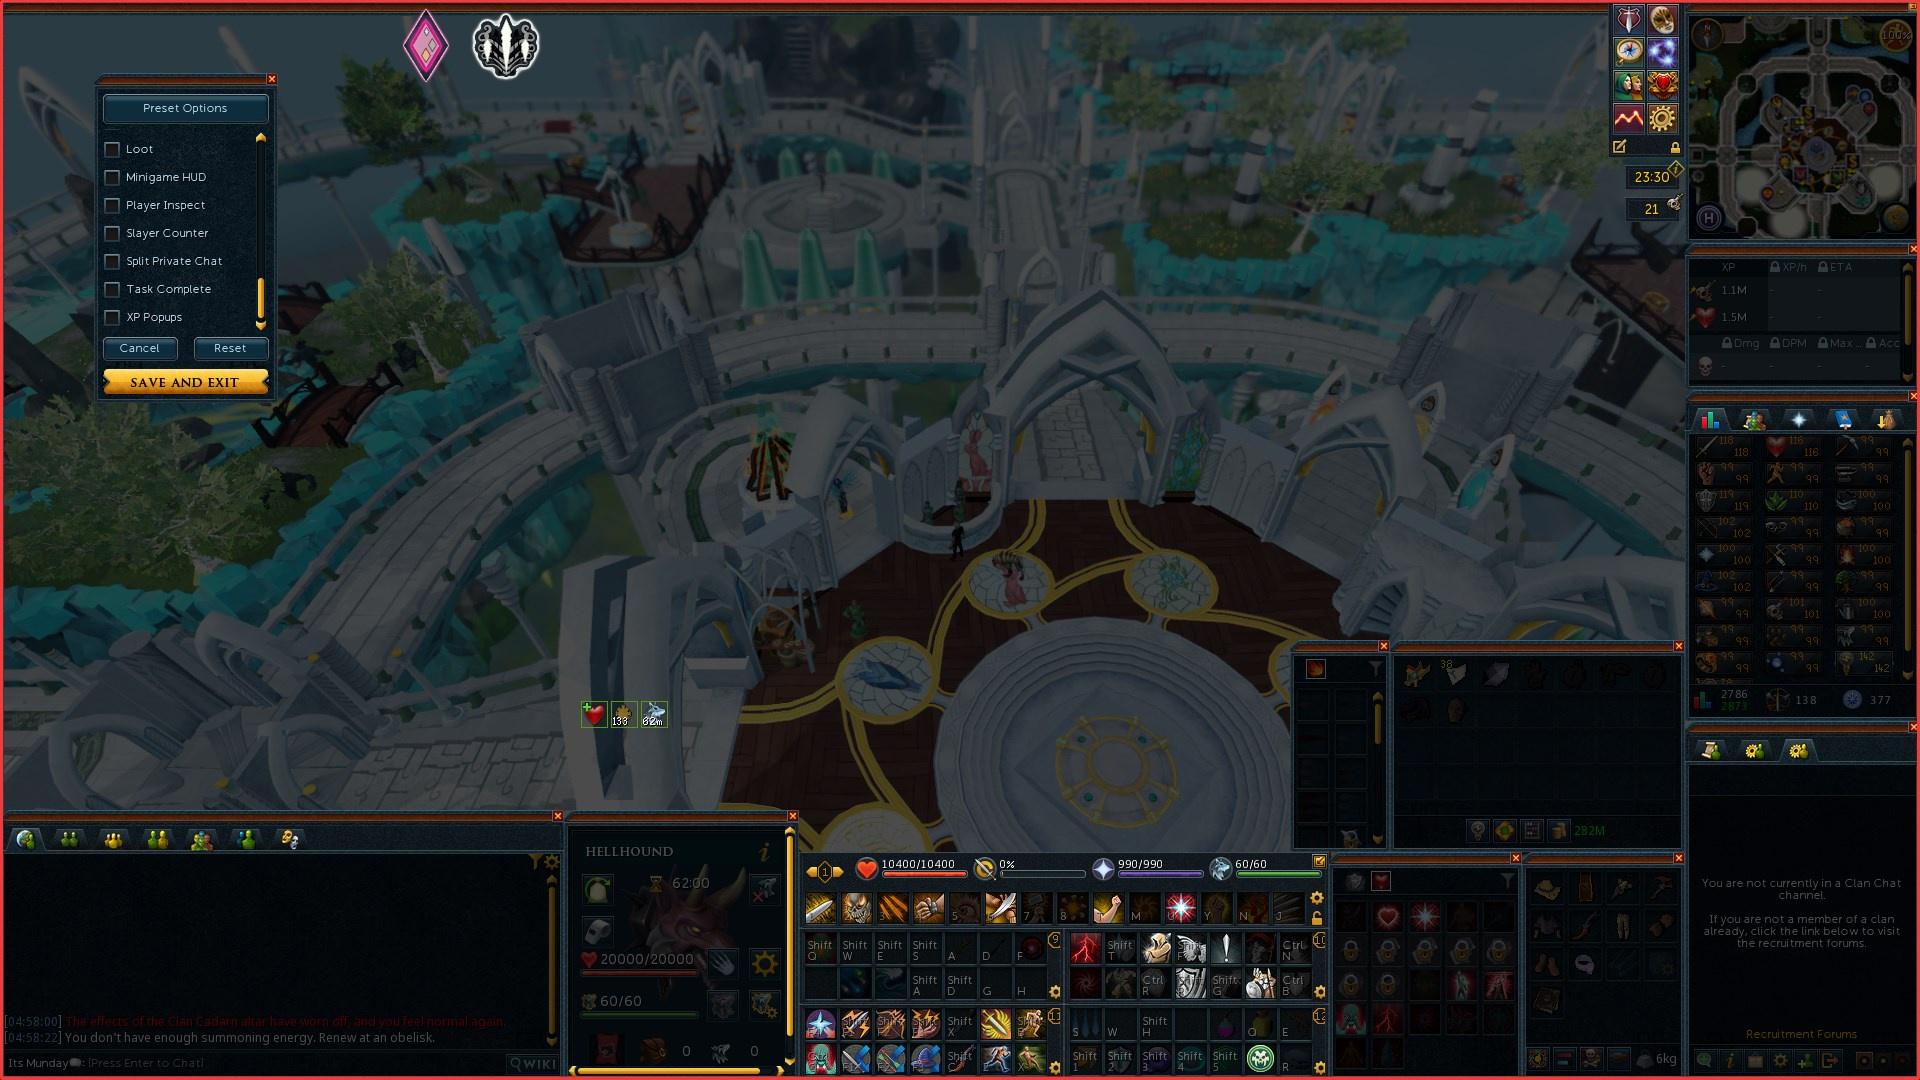
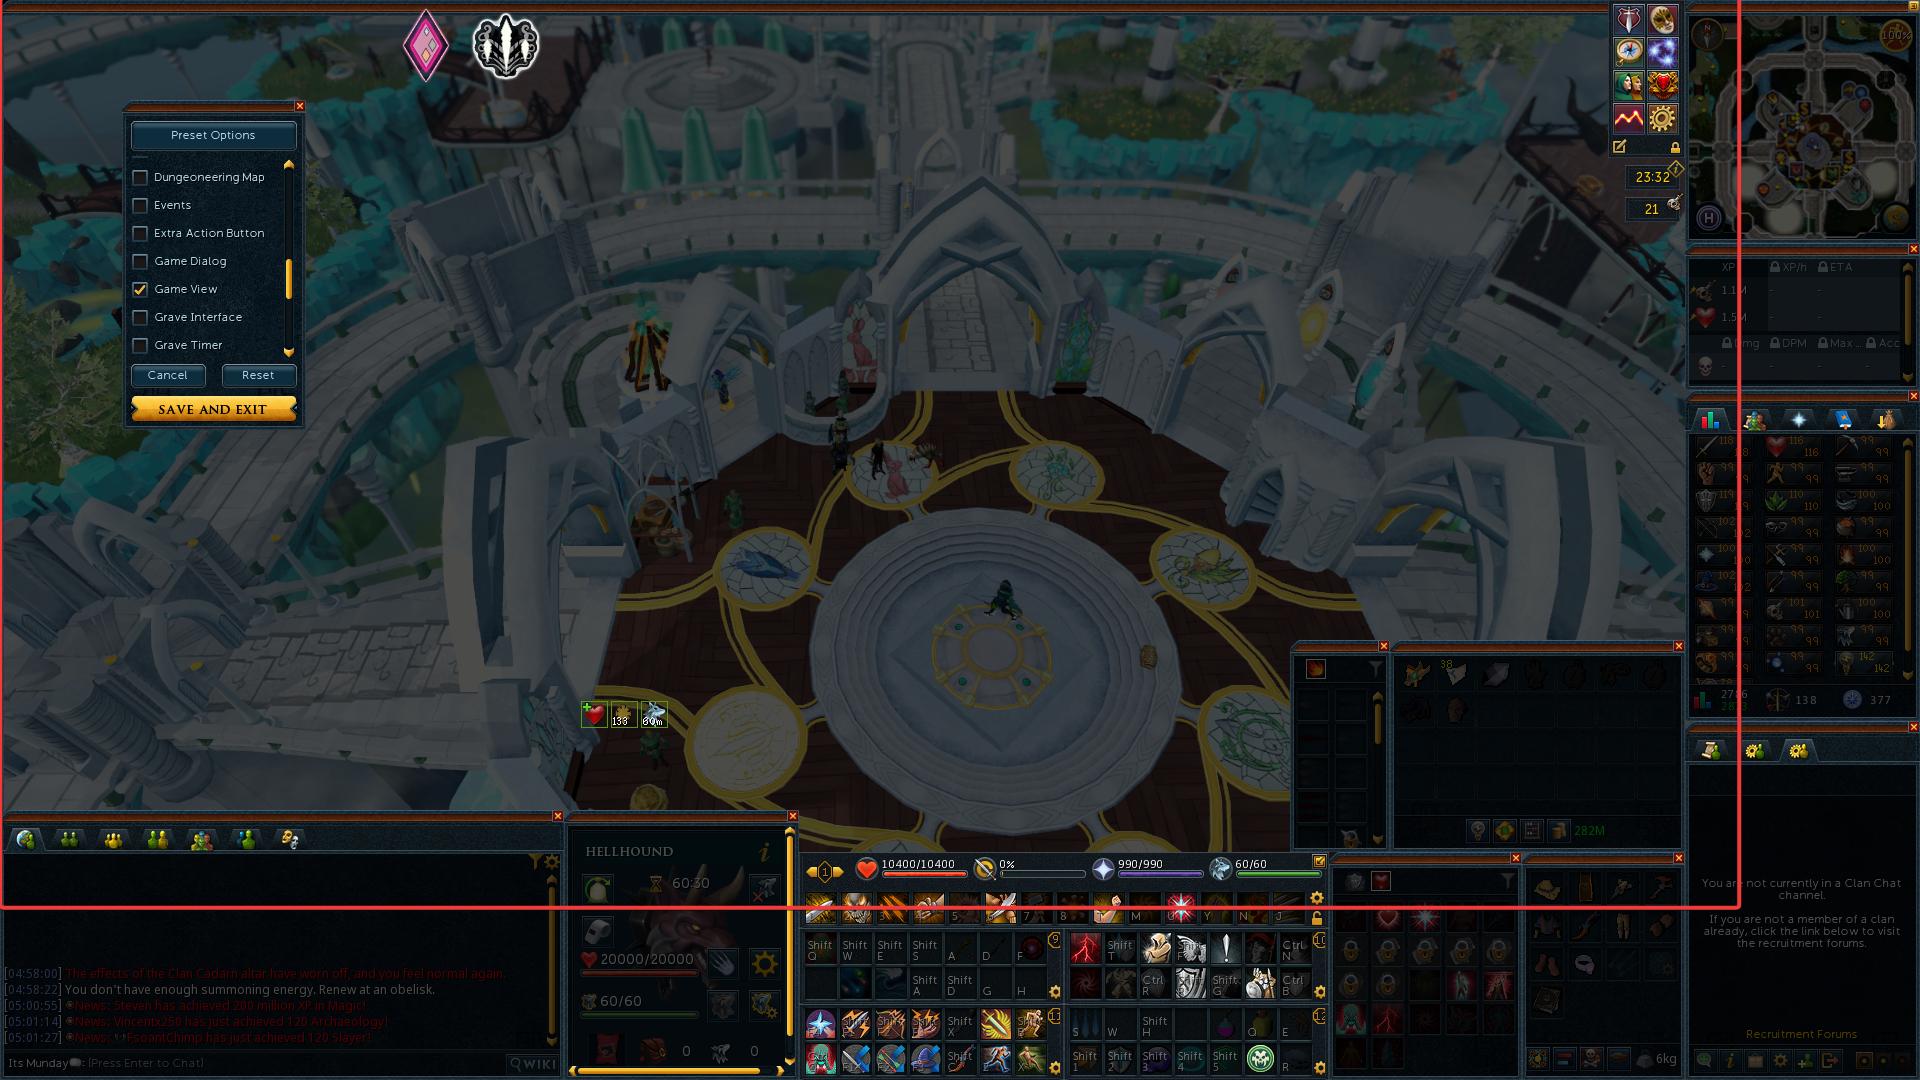
⬥ Adjust the game view to avoid having large portions of it covered by the interface and to your preference.
• This can affect the visibility of some bosses.
• It affects where the player character is centred in your field of view.
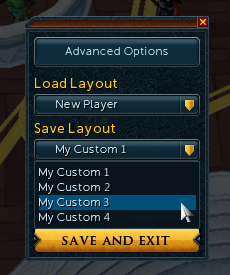
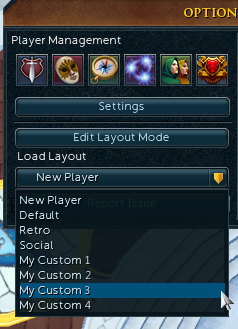
Saving Interface Layout
To save a layout, open the Edit Layout Mode menu and click on a preset name in the Save Layout dropdown menu, and confirm the changes.
To load a layout, click on one of the created/saved load-outs accessed by pressing Escape and selecting a preset from the Load Layout dropdown menu.
Miscellaneous settings
⬥ Some options that can improve the UI are listed under the Gameplay > Interfaces > Appearance settings. Consider enabling the following options:
• Slim headers
• Hide title bars when locked
• Transparency (adjust to your preference)
⬥ For very high-resolution displays, or simply for better visual clarity for tasks such as recording videos, the interface scaling can be adjusted under the Graphics > Interface Scaling setting.
• Note: Changing the interface scaling may prevent Alt1 plugins from working, due to how they read the text in the chatbox.
⬥ The size of the Bank interface can be adjusted - simply unlock the interface, and it can be moved/resized.
Example Interfaces
At the end of the day, a good interface is the one that works for you. Look for common patterns in the interfaces of good PvMers to see how they structure them and why it helps them PvM.
Settings Menu
The Settings menu is accessed through the Options menu in-game, reachable at any time by pressing escape, and contains in-game settings that can be modified. Here, we cover several useful/important options that can be customized.
Gameplay Settings > Interfaces
These settings affect your screen area, visible interfaces and information, and general QoL.
⬥ Game Interaction > Mouseover text
• Keep this on to make it easier to ensure your clicks land on their intended target.
⬥ Game Interaction > Walk markers
• Makes it easier to see where the character is moving when ground tiles are not visually clear, or when animation stalls occur (stalling abilities, delayed animations).
⬥ Game Interaction > Disable shortcuts to close windows
• Prevent UI windows from being accidentally closed if keybound.
⬥ Game Interaction > Slim headers / Hide title bars when locked
• Reduces the space taken up by bulky title bars.
⬥ Game Interaction > Extra potion info
• Show all effects of any potion being consumed.
⬥ Information Windows > Slayer counter
• Keep open to see slayer task counts without needing a slayer helm or slayer gem. Can click the icon to toggle and show reaper tasks.
⬥ Information Windows > Highlight boosted skills
• Show when skills are boosted above or drained below their usual values, useful to know when to re-apply boosts like overloads or notice stat drains from mechanics or items like saradomin brews.
⬥ Information Windows > Boss kill/instance timers
• Shows the time since the start of the fight/instance, which can be used to keep track of mechanics.
⬥ Warning Screens
• Can disable warnings to enter certain areas quicker, such as the Wilderness. Can also add security features like item value warnings and requiring bank PINs on every login.
⬥ Inventory > Drag-to-drop
• Disable this to prevent accidentally dropping valuable items.
⬥ Inventory > Auto-teleport/destroy empty containers
• QoL for skilling.
⬥ Buff Bar
• Turn on everything to ensure you have all necessary buffs, and know if you are ever debuffed.
Gameplay Settings > Combat & Action Bar
These settings affect your combat and gameplay experience concerning PvM.
⬥ Combat Mode > Familiar combat mode
• Set to attack same target to maximize the damage done by the familiar.
⬥ Action Bar > Ability cooldown timer
• Show ability cooldown in seconds - can be useful when learning.
⬥ Action Bar > Ability queueing
• Ability queueing lets abilities be queued in advance, to activate once ready. This has both benefits and downsides.
⬥ Action Bar > Manual spellcasting
• See the !manualspellcasting command.
⬥ Action Bar > Precise adrenaline value
• Ever wonder why your dark bow didn't work at 58% adrenaline? This has you covered. Shows exact adrenaline values for more advanced rotations.
⬥ Action Bar > Additional action bars
• Have up to 4 extra on-screen action bars for more keybinds.
• More details in Keybinds and Action Bars section.
⬥ Action Bar Binding
• Bind action bars to weapons to automatically switch between them when swapping weapons. Helps with setting up keybinds for switches and hybridising.
• More details in Keybinds and Action Bars section.
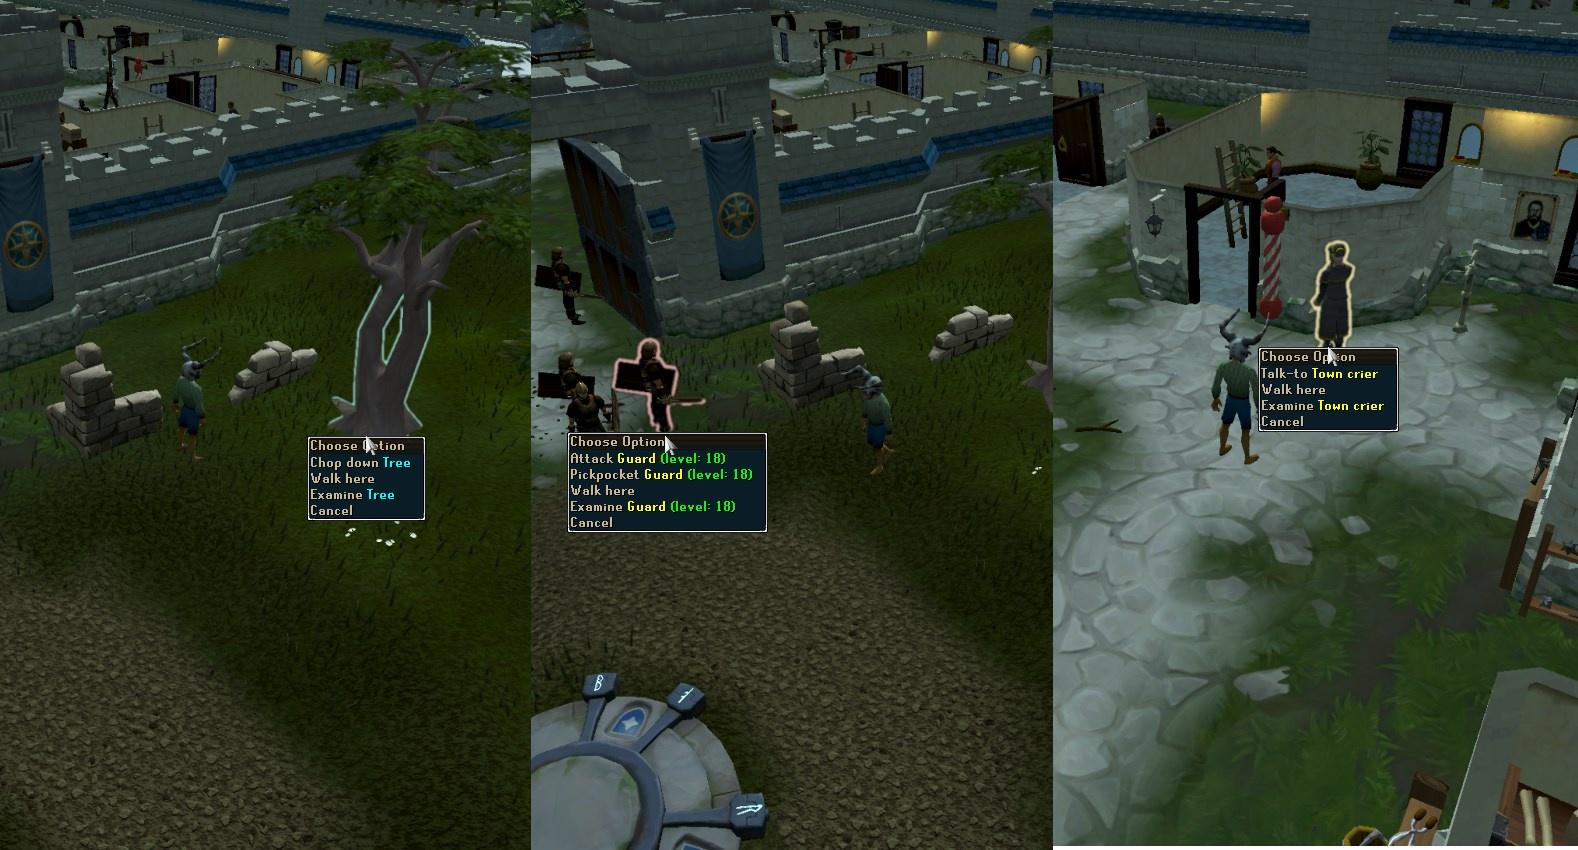
⬥ Choose Option Menu > Player/NPC attack options
• Choose what click options are available for players and NPCs to avoid misclicks.
⬥ Choose Option Menu > Hide familiar options
• Prevent accidentally misclicking familiars during combat with things like bladed dive or intercept.
⬥ Hitsplats
• Customize hitsplat colors to distinguish between different hits in combat more effectively.
Gameplay Settings > Targeting
These settings affect the way your character chooses and changes combat targets.
⬥ Targeting > Target reticules
• Indicate what targets are selected (yellow circle) or aggroed to the player (red circle).
⬥ Targeting > Target scenery with targeted movement abilities
• Toggles the ability to Bladed Dive/Dive directly onto scenery. Turning this off will prevent you from diving onto scenery accidentally.
⬥ Targeting > Target cycle settings
• Set up Target Cycle to target monsters with keybinds.
• Target cycling can target monsters at precise times, switch between multiple targets rapidly in multi-target scenarios, and in some cases target monsters earlier than they normally would be attackable (e.g. any of the GWD2 bosses like Vindicta or Helwyr).
⬥ Hitsplats
• Customize hitsplat colours to distinguish between different hits in combat more effectively.
Gameplay Settings > Camera
Settings to do with camera and camera movement.
⬥ System > Camera mode
• Different camera modes offer different levels of maximum zoom and rotation speed. Recommended to use freedom mode for better visibility.
⬥ System > Camera shake
• Toggle whether the camera shakes during cutscenes and certain PvM encounters.
• Situationally useful - e.g. enable for ED2 (to see dragon special attacks easier), but disable for RotS (easier to escape tunnels without the shaking effect).
Gameplay Settings > Item Drops
These settings impact the loot system and the visual appearance of drops.
⬥ Loot System > Use area loot
• Area loot opens up a menu to loot items. Both opening the interface and looting items can be keybound.
• Can be customized based on item quantities, types and values to determine what gets looted.
• Useful to avoid accidentally missing loot on the floor.
⬥ Loot Beams > Show loot beams
• Highlights items above a player-defined threshold with a customizable beam to avoid accidentally not picking them up.
Gameplay Settings > Chat & Social
These settings affect the chatbox and MMO aspects of the game.
⬥ Chat Customisation
• Customize how your chatbox appears, decide what messages are shown and in what colours, and re-size text, amongst other options.
• Enabling Split private chat will make it easier to keep track of private messages.
⬥ Accept Aid
• These settings affect what 'aid' spells other players can cast on you. It is recommended to use the following specific settings to ensure you can receive buffs from other players during group PvM:
⬩ Invitations - everybody
⬩ Tele-other - nobody (keep this OFF to avoid potential lures)
⬩ Lunar spells - everybody
⬩ Seren spells - everybody
⬩ Other assists - everybody
Controls
These settings are used to set all keybinds used within the game, affecting everything from action bar bindings to UI elements to hidden hotkeys. It is recommended to go through the controls set to ensure they are to your preference, but some of the less well-known keybinds that can be set are mentioned for convenience.
⬥ Quick prayer - this keybind toggles on/off all prayers set to quick prayer simultaneously.
⬥ Target cycle - keybinds for target cycling.
⬥ Special attack - can keybind weapon special attacks without having to sacrifice an ability bar slot*.
⬥ Familiar action - can keybind familiar actions without having to sacrifice an ability bar slot*.
⬥ Extra action button - can trigger extra action button effects (in fights like Solak or Zamorak) without clicking it.
⬥ Area loot - open the area loot menu without moving.
Note: Special attack and familiar action keybinds cannot be queued with ability queueing if set through the Controls tab. Use the action bar if queueing is required.
Graphics
These settings affect the visual appearance of the game. Depending on your computer's specs, you can adjust these to improve the game's performance or increase the graphical fidelity of the game. Some useful ones are covered here, but more detailed explanations of all the options can be found on the RuneScape Wiki page about Graphics Settings.
⬥ Draw distance - the higher this setting, the more of the world is visible, but it can impact FPS on slower machines.
⬥ Remove roofs - this can make it easier to navigate the world (e.g. for activities like solving clues).
⬥ Textures and Terrain Blending - these make the game significantly nicer to look at, but when both are disabled, certain areas of the game may become easier to navigate.
• e.g. placing dummies at Solak might become easier due to ground tiles at Solak becoming visible.
⬥ Interface Scaling - changes interface scaling anywhere from 70-300%.
⬥ Mouse-over entity highlights - when the cursor hovers over and clicks an object, a coloured outline appears, with the colour depending on what was interacted with (non-monster NPC, monster NPC or interactable terrain).
Action Bars
Action bars are part of every player's interface containing slots that you can drag different actions to keybind. This section covers basic information about action bars, extra action bars, and action bar binding.
Action Bar Basics
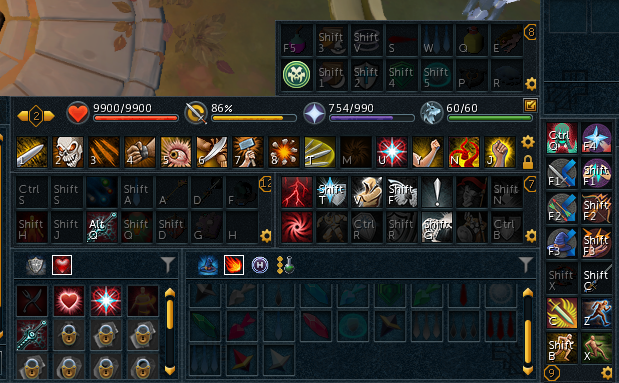
⬥ Action bars have 14 slots that can be filled with a variety of actions, including but not limited to abilities, prayers, spells, and gear switches. To populate the bar, simply drag an action onto a slot on the bar.
Note: If this does not work, then your bar is locked. To unlock your action bar, click the golden lock icon on the primary bar (shown in the following picture).

⬥ In addition to the ability slots, the primary action bar also displays:
• Health - the red meter
• Adrenaline - the yellow meter
• Prayer points - the purple meter
• Summoning points OR special move points - the green meter, click this to toggle it
⬥ Additionally, the four icons on the bar can be interacted with to enable some settings:
• Clicking the heart icon will turn on regenerate which will enable once outside combat.
• Clicking the sword icon will toggle auto-retaliate mode on and off - when this is on, the icon will be replaced with a pair of cross swords
• Right-clicking the prayer and summoning icons will let you set up quick prayers and configure a familiar action respectively.
⬩ These can then be activated by clicking on their respective icons, or keybinding them.
⬥ The golden lock icon can be toggled lock the action bars - to prevent changes being made to abilities on any bar on-screen.
⬥ Right-clicking the cog will bring up access to combat settings and quickly change combat mode.
Action Bar Presets
⬥ The number on any action bar indicates what preset for that bar is currently loaded. There are a total of 15 presets (10 in free-to-play).
⬥ Adding an action to the action bar is sufficient to update the preset. The preset can then be loaded to any action bar by changing the number on that bar.
• Right-clicking the number icon of the action bar will bring up a list of presets that can be loaded.
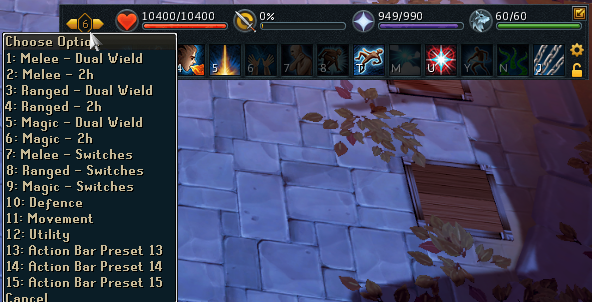
⬥ Action bar presets can be named in the settings found at Settings > Gameplay > Action Bar > Change Action Bar Preset Names
Additional Action Bars
⬥ Additional action bars can be displayed by enabling them in the settings.
• Settings > Gameplay > Action Bar > Display Additional Action Bars
⬥ You can have up to four additional bars for a total of five on-screen at any given time.

⬥ Additional bars provide more slots to place actions for keybinding, reducing the number of things you need to manually click. They also facilitate easier switching of gear during combat and can overall improve your gameplay experience as you take time and familiarize yourself with your keybinds while playing.
Action Bar Binding
⬥ Action bars can be configured to switch automatically depending on the weapons equipped by the player.
• The settings can be found in Settings > Gameplay > Action Bar Binding
⬥ Bindings can be made for when the following types of weapons are equipped:
• only 2h weapons
• only dual wield weapons
• either 2h or dual wield weapons
Note: Both the primary and additional action bars can be bound, independent of one another if needed.
⬥ Consider the following example:
• Action bar preset number 5 → ability bar for 2h magic
• Action bar preset number 6 → ability bar for dual wield magic.
• Action bar preset number 9 → additional ability bar for magic-related abilities and switches.
• We want our primary action bar to change based on our equipped weapons.
• We also want our secondary bar to change based on our equipped style.
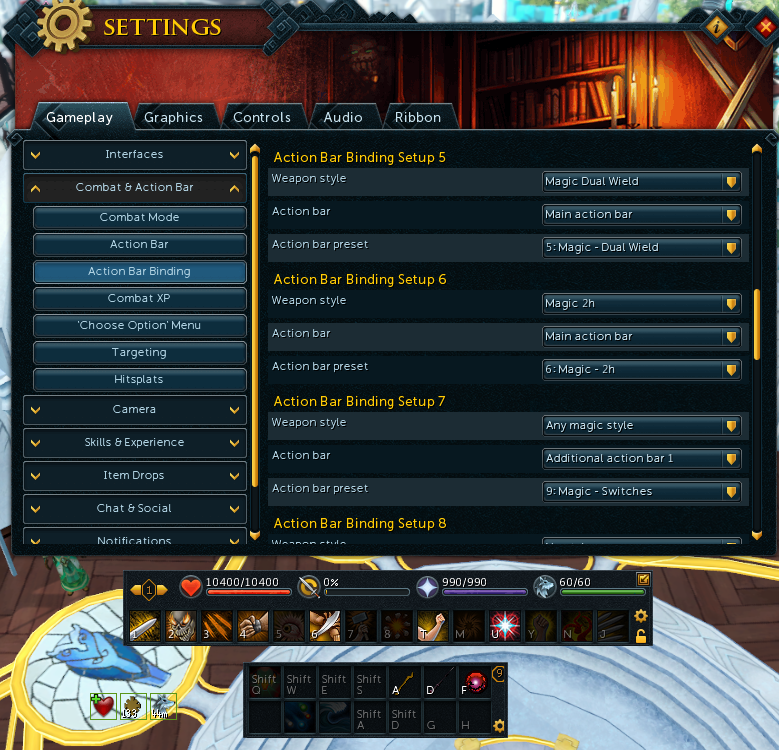
⬥ In the above example, the first binding setup makes the main/primary action bar, when equipping 2h magic weapons, to swap to preset number 6 (named Magic - 2h).
⬥ The second binding setup changes the primary action bar to preset number 5 (Magic - Dw), whenever equipping dual-wield magic weapons.
⬥ The third binding setup changes the additional action bar, when equipping any magic weapons, to the correct preset (Magic - Switches)
⬥ When set up correctly for multiple styles, it will look something like this:
Keybinds
When it comes to setting up keybinds, some important points can help structure your keybinds and make them easier to incorporate into PvM. The goal is to make learning your keybinds less frustrating, and feel more natural to use. This is done by making a few decisions.
Keybind Tips
⬥ Keybinds should be easy to reach - moving your hands too far can make it difficult to find and press keys.
• Consider placing your more frequently used binds closer at hand, and rarely-used ones further away.
⬥ Bind similar items near each other.
• e.g. Overhead prayers could be put together to prayer switch more easily. Or your shield keybind and shield abilities. Or weapon switches.
⬥ Modifier keys can increase the number of binds available, at a cost - it is easier to press one key than two.
• This affects things such as prayer switches which occur very often. For more information, look at Modifier Keys.
⬥ Certain common rapid input sequences that are often used as your PvM progresses are worth considering when choosing binds. It is helpful to have easy-to-press keybinds sequences for such scenarios. An input such as q → w → r is easier to press than something like q → ctrl+w → alt+r.
⬥ Examples of such input sequences found in PvM:
• Auto  + Detonate
  + Ability
• Auto + DW switch 
 + Ability
• Target Cycle + Smoke Cloud  + Ability
⬥ Using an MMO mouse gives many easily accessible buttons to bind actions to.
⬥ Using the middle mouse button for camera instead of keys frees up 4 keybinds.
• It can also be easier to move the camera during PvM using the mouse.
Modifier Keys.
Note: If you release the modifier before the key first, it will trigger the underlying key press. Keep this in mind when setting up modifier keys.
⬥ The Shift, Alt, and Ctrl keys can be used to modify keybinds.
• A, Shift+A, Ctrl+A and Alt+A would be four separate keybinds.
⬥ This increases the range of available keybinds.
⬥ If using a mouse, you can bind Modifier+Key to a single mouse button, making it easier to press.
⬥ Some gaming mice software may not work on all operating systems, especially Linux.
• Logitech mouse users have an open-source option for Linux called logiops. Find it in your favorite distro's repository (e.g. Chaotic-Aur for Arch Linux users) or look at their repository at https://github.com/PixlOne/logiops. Note that other options such as xbindkeys or input-remapper will not work to hold down a mouse key and have it act like holding down Shift or Control, they can only do a one-time click, not extended holds, despite what their documentation says. Lastly, there are also other alternatives such as Piper for consideration.
• On Mac, the Logitech Gaming Software may be a useful alternative to the default G-Hub software.
Disclaimer: Any unofficial third-party tools are as always recommended to be installed and used at your own risk.
Utilizing Additional Action Bars
⬥ Additional on-screen action bars can be used to split your abilities/keybinds in a logical manner to make them easier to learn and remember.
⬥ You can have up to 4 additional bars on-screen.
⬥ One example layout could be the following (see the picture below as well):
• 1st Bar: extra abilities and weapon switches for the currently equipped style, that automatically changes with action bar binding.
• 2nd Bar: defensives 


 / constitution abilities

 (since these are common to all styles and can always be on screen).
• 3rd Bar: prayers 


 / movement abilities like


 / Bladed Dive switch etc.
• 4th Bar: food 

 / common utility spells


 / utility items
 / teleport / etc.
Keybinds Guide
⬥ As a reference, check out this very well-thought-out guide to setting up the keybinds that can help you plan your keybinds.
https://www.youtube.com/watch?v=zn_y-_2giZg
Banking & Presets
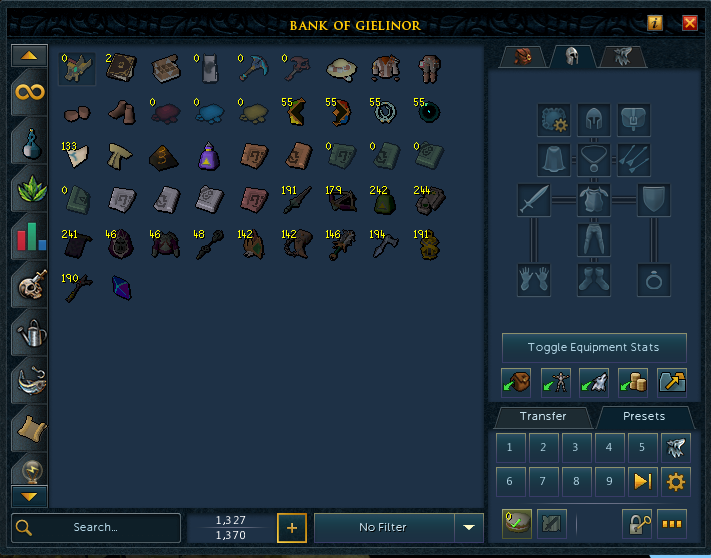
Bank organization is very much a subjective choice, and entirely up to your preference. There are some items that you may want to consider when sorting and placing in your tabs.
Bank Tabs
⬥ Having well-sorted bank tabs can make it easier to keep track of gear upgrades, and ensure you have enough supplies to last your bossing trips, which is especially relevant for group PvM, so you do not have to interrupt gameplay and slow your teammates by having to buy supplies during an aura.
• PvM gear - armour, weapons, switches, jewellery, pouches, quivers, and other related items.
• Supplies for PvM - all kinds of food, potions, runes, ammunition, summoning pouches + scrolls, and more.
• Herblore tab - optional but might make it easier to keep track of your supplies to make potions with (more relevant for ironmen).
Bank Presets
⬥ Bank presets make it easy to equip entire loadouts with a single click.
⬥ There are 15 presets available, accessible by clicking the cog icon at the bottom right of your bank interface. We can cover a few important points about presets here.
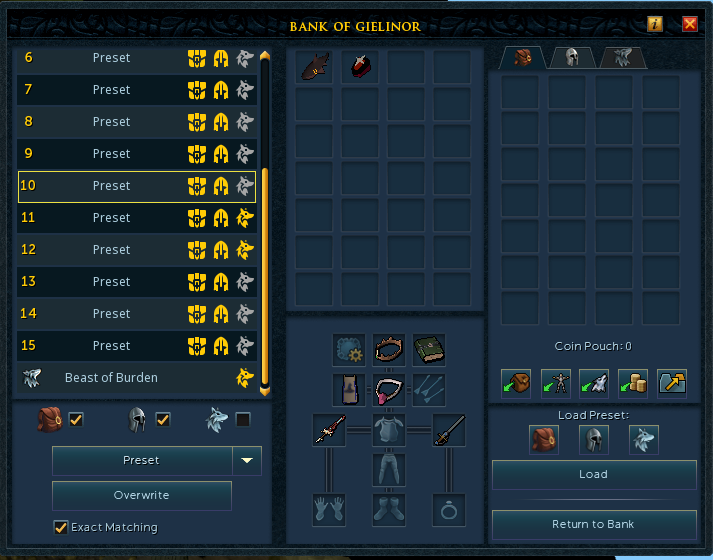
⬥ Every preset can be configured to load any combination of the inventory, worn items and beast of burden storage (if summoned).
• This can be done by clicking the yellow icons next to the preset (or the tick boxes below the preset list).
• In the above image presets 11 & 12 will also load familiar storage in addition to inventory and worn items, but the others will not.
⬥ To save a preset with the currently equipped items, select a preset slot and click the Overwrite button at the bottom left.
⬥ To save the beast of burden storage, use the dedicated Beast of Burden located below preset number 15.
⬥ The middle section of the interface shows the inventory/worn items that will be equipped when that preset is loaded.
⬥ The Exact Matching option will check for perks when equipment is withdrawn if there is an augmented item in the preset.
• After enabling this option, you must re-save the preset with the correct augmented items for it to apply.
• This is useful when you have multiple of the same item but with different perks.
⬥ Presets can be dragged and dropped to re-order them.
⬥ Saved presets can be loaded within the bank interface by clicking the numbered icons at the bottom right corresponding to each preset.
• They can also be loaded using the number keys 1 and 2 for the first two presets, and Alt+(number) for higher presets.
⬥ Here is an example demonstrating setting up and loading a preset.
Quick Banking Preset
⬥ It is generally a useful idea to dedicate one of your preset slots to a 'quick banking' preset that you can use to apply buffs before a bossing trip or between kills, such as bonfire boosts, incense sticks, potion effects, familiar timers, etc.
⬥ Some items that people may include in their banking preset include:
• HP-boosting gear/items  >
> 


• Familiars/scrolls 


• Pre-fight potions - Overloads  /Weapon Poison
  /Thermal flask
• Pouches (to check rune amounts) 


• Runes 


• Incense sticks - Spirit Weed  / Lantadyme
  / Kwuarm
• Divine charges 
• Pantheon aura 
• Premier artefact 
• Powders - Penance  / Item Protection
• Infernal puzzlebox 
• Pocketslot items + recharges 


• Magic cape 
• Life refresh
• Grim gem
• Wicked hood
• Runecrafting cape 
• Blessed flask 
• Luck of the Dwarves 
• Archaeology cape 
• Summoning renewal 

Note: Typically, ancient ceremonial armour is not included as the Nex bank door can be permanently unlocked using a full set 


 + 10M GP
  at Ashuelot Reis.