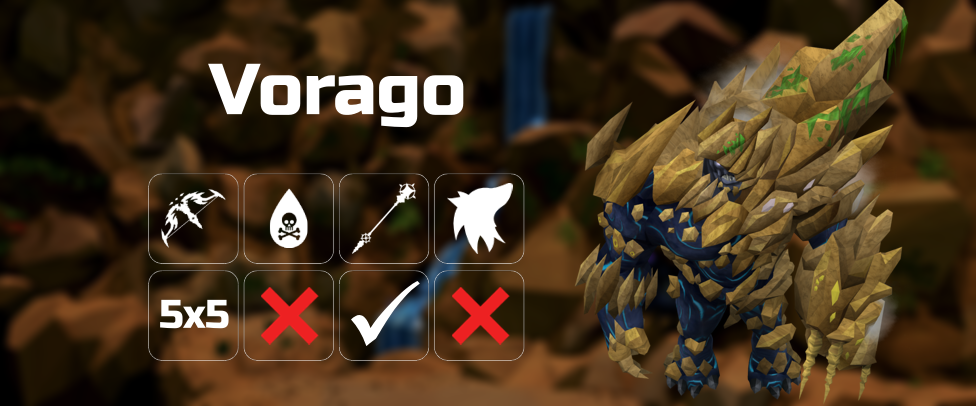
Normal Mode Vorago Overview
Vorago
Introduction
Vorago is a high level group boss. He boasts high defense and complex mechanics that challenge even the best players. His unique drops include Tectonic Energies and Seismic equipment.
This guide is only an introduction + mechanics guide. For DPS rotations, see #deleted-channel
Drops
⬥ There are five drops per kill, one for each phase.
⬥ Drops are allocated to the team in the following manner:
• The person with aggro at the end of each phase has a 1/3 chance at any given drop. This is usually the Base Tank.
• The Bomb Tank has a 1/3 chance at any given drop.
• The player with the highest DPS in each phase has a 1/3 chance at any given drop.
⬥ The majority of revenue comes from the Tectonic Energies  .
.
⬥ Each drop has a 4/5 chance of 2 Tectonic Energies .
⬥ Each drop has a 1/200 chance at a Seismic weapon 
 , and both weapons have an equal chance. Only one Seismic can drop per kill.
⬥ Each drop has a 1/5000 chance of an Ancient Summoning Stone  , with a threshold of 1000.
⬥ Most teams split Tectonic Energies and Seismics at the end of the hour. Players should explicitly mention any other splitting methods at the start of the trip.
Each total kill is worth  9,428,976, with Tectonic energies accounting for 4,499,432 of that. In trio, advanced players can get up to 7 kph, earning on average 22,000,945 gp/hr each. In 4 man, you can expect 7 kph, earning on average 16,500,709 gp/hr each.
Presets - General
General Notes
⬥ New players must talk to Vorago and go through his dialogue options first before they can enter the fight.
• Select "What are you doing here?", followed by "Can I face you?"
• Once players reach the "So, do we fight?" dialogue, they are eligible to fight Vorago.
⬥ The default familiar is 

 for all combat styles.
• A Beast of Burden can be used, but is highly discouraged due to Vorago's massive defensive stats.
• Vorago is immune to familiar damage.
⬥  are primarily used only once, during phase 5. They can also be spammed during damage-based phases.
Picking A Combat Style
All three combat styles are viable at Vorago.
⬥ Ranged and Melee are the strongest styles.
⬥ Magic is not far behind, and performs similarly to Ranged if Ranged does not have its expensive best-in-slot gear.
⬥ Melee can be difficult to use. Its range limitation applies several restrictions.
• Not recommended for beginners
• Melee distance can cause less experienced players to take more damage
• Unable to Bomb Tank in conventional teams
Preset Notes
⬥ A 1-dose  can be used on most weeks for entry damage alone.
• Multiple doses are required for Green Bomb, and highly recommended for Ceiling Collapse, Teamsplit, and The End.
⬥  can be used to build adrenaline between phases for more damage.
• Optional
• Often used with 
⬥ A  is eaten after taking entry damage to free up an inventory space for equipping 2H weapons.
⬥  /
/  /
/  are highly recommended due to Vorago's high defensive parameters.
• Other auras are discouraged, though supreme accuracy auras can be used.
⬥ Putting Turtling 3 over Turtling 4  on your t90 shield is recommended.
• The extra tick of Barricade  from is irrelevant, and it can cause issues primarily with cooldown on The End P4 if mistimed.
Rune Pouch Setup
⬥  Rune Pouch


⬥  Rune Pouch


⬥  Rune Pouch


⬥  Rune Pouch


⬥  Rune Pouch
• is used for non-magic setups, and does not include 
• To include for Scopulus, combine + →  , and add
⬥ Magic-specific spells: 


⬥ Spells for all styles:  /
/ 


 (
( or
or  )
)
⬩ Only the Base Tank and Bomb Tank are required to bring these spells.
⬩ For everyone else these spells are optional, but recommended in case of emergency
Note: Presets may change slightly between weekly rotations.
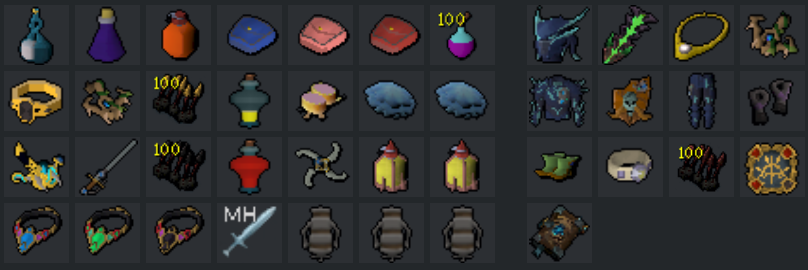
Presets
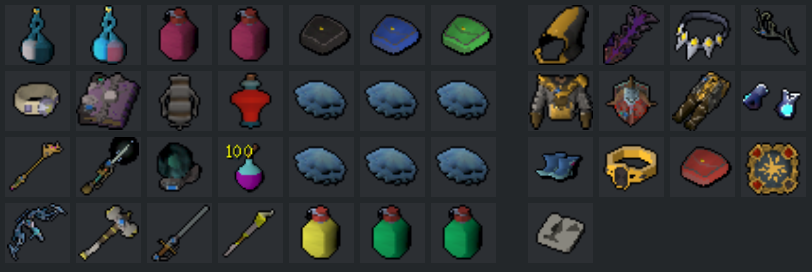
Basic Magic Preset
⬥  Wand of the Cywir Elders -
 Planted feet 
⬥  Virtus Book -
 Flanking 4 
⬥  Seren Godbow is used with
• This is optional and can be omitted.
⬥  Superior Statius Warhammer is used with Ingenuity of the Humans on certain phases.
• This is optional, and can be replaced with any mainhand melee weapon for  .
.
• An augmented mainhand melee weapon with  should be used to avoid losing stacks, if applicable.
⬥  Amulet of Souls is a suitable alternative to
  Reaper Necklace
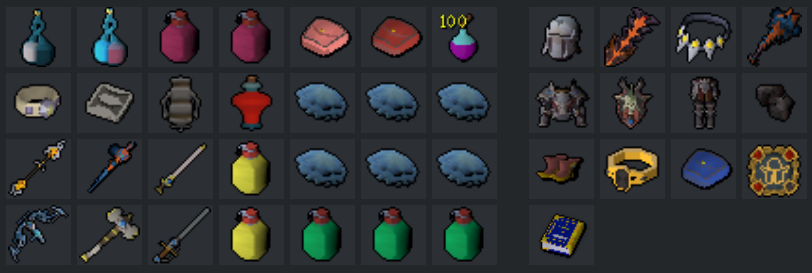
Advanced Magic Preset
⬥ Wand of the Cywir Elders - Planted feet
⬥  with Guthix Staff
⬥  with Statius Warhammer
⬥  Powerburst of Acceleration and
  Phoenix Necklace are used for accel climbs only.
• They are optional.
⬥ An augmented mainhand melee weapon with should be used to avoid losing stacks, if applicable.
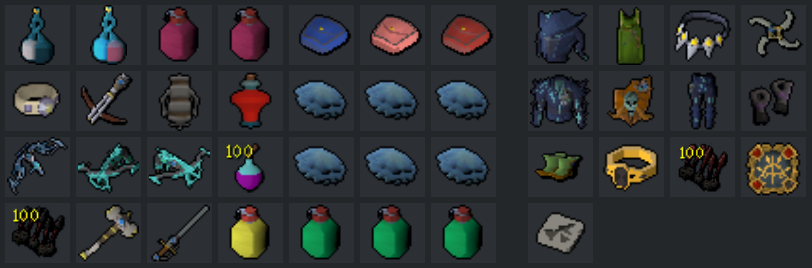
Basic Ranged Preset
⬥  Shadow Glaive -
 Planted feet
⬥  Offhand Chaotic Crossbow -
 Flanking 4
⬥ Superior Statius Warhammer is used with Ingenuity of the Humans on certain phases.
• This is optional, and can be replaced with any mainhand melee weapon for .
• An augmented weapon with should be used to avoid losing stacks, if applicable.
⬥ Seren Godbow
• This is optional and can be omitted.
⬥ Amulet of Souls is a suitable alternative to Reaper Necklace
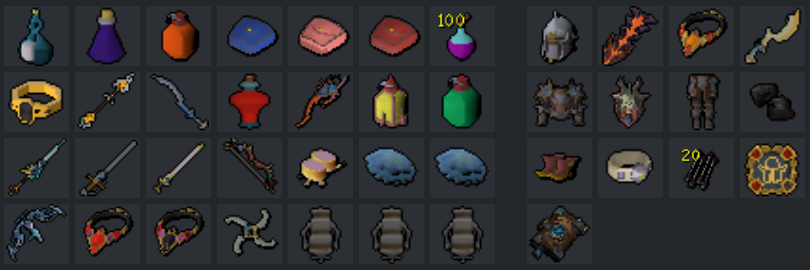
Advanced Ranged Preset
⬥ Shadow Glaive - Planted feet
⬥  with Seren Godbow
⬥  with Dark Bow
⬥ with Statius Warhammer
⬥ Powerburst of Acceleration and Phoenix Necklace are used for accel climbs only.
• They are optional.
⬥ An augmented mainhand melee weapon with should be used to avoid losing stacks, if applicable.
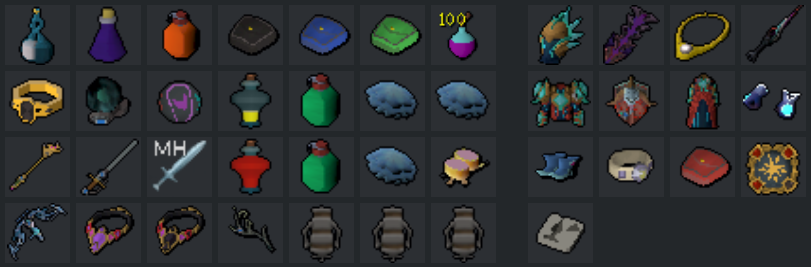
Basic Melee Preset
⬥ Seren Godbow is used with Ingenuity of the Humans
• This is optional and can be omitted.
⬥ Superior Statius Warhammer is an integral part of melee.
• While it is optional, it is heavily recommended.
⬥ Amulet of Souls is a suitable alternative to Reaper Necklace
⬥  Vampyrism Scrimshaw can be used on time gated phases to preserve food.
  Saradomin Book should be used for damage-based phases.
• has a cooldown upon activation, and should be activated at face, the end of phase 2, and the end of p4.
Advanced Melee Preset
⬥  Offhand Drygore -
 Flanking 4
⬥ with Statius Warhammer
⬥  with Dragon Claws
⬥ with Dragon Halberd 
⬥ Darkbow - Invigorating 4  +
+ Aftershock 1
• Used for building adrenaline on .
⬥ Shadow Glaive - Energising 4 
• Used for building adrenaline on .
⬥  Black Stone Arrows are used to add a stack with
  .
.
⬥  Zaros Godsword - is situationally used and can be omitted.
General Fight Mechanics
Before The Fight
⬥ There are 6 weekly rotations that cycle every Wednesday at 00:00 Game Time.
• The six rotations are, in order: Ceiling Collapse (Ceiling) → Scopulus (Scop/Scops) → Vitalis (Vit) → Green Bomb (GB) → Teamsplit (TS) → The End (Purple Bomb/PB)
⬥ There are three roles at Vorago.
• Base Tank: Takes melee damage, positions Vorago, and handles various mechanics throughout the fight
• Bomb Tank: Often abbreviated "bt". Tanks magic damage blue bombs and handles various mechanics throughout the fight.
⬩ Not to be confused with other "bt" abbreviations, like Yakamaru's base tank
• Top Lure Voke 5: Often abbreviated as TL5/TLV5, or referred to as the "jump/jumper". Climbs Vorago on phase 1 and handles the 5th bleed during phases 2 and 4.
⬥ Entry damage is 70% of your max life points regardless of team size.
• This damage also cancels defensive abilities, and the  healing effect.
⬩ Use and after taking the entry damage
⬥ There are 12s between challenge and entry damage. Advanced players can use this time to use .
• There are 36 ticks from challenging Vorago to Target Cycle, and 35 ticks from the Accept Challenge message to Target Cycle.
• Drop down damage is 20 ticks after challenging Vorago.
• Sample rotation:
⬥ To time , use it 20 ticks after challenging Vorago/accepting challenge.
• This can be done by counting each tick from when you challenge by looking at prayer point drain
• It can also be done by looking at the bar above Vorago and clicking on it when it is about to fill, as in the following clip:
https://www.youtube.com/watch?v=MG00fhlSnKA
During The Fight
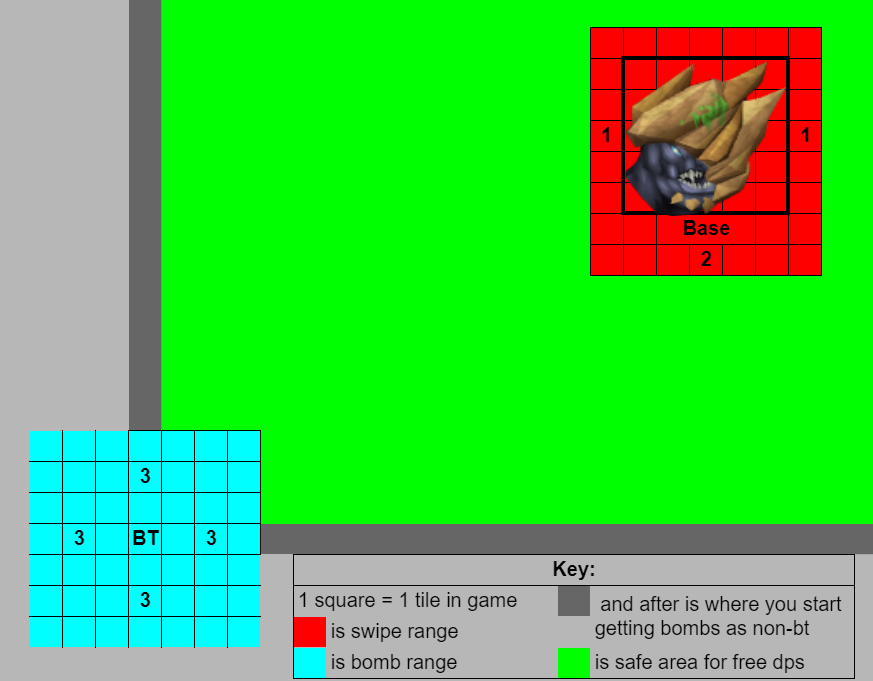
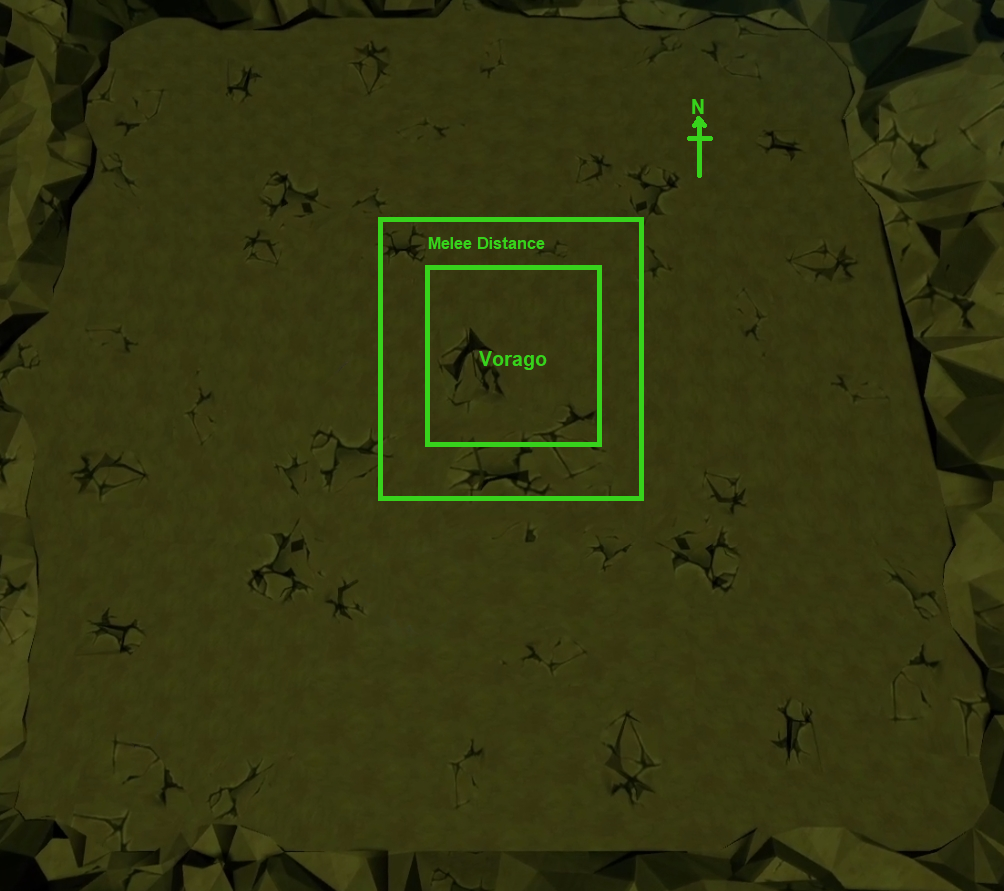
⬥ Vorago has two basic auto attacks: Melee Swipes and Blue Bombs
• Melee swipes target the base tank. They are AoE 1 square around Vorago, and have additional range around the base tank.
• Blue bombs are thrown at the furthest player from Vorago, typically the bomb tank. These are homing, deal high magic damage, don't splash, and have a three tile range (7x7) AoE.
• Vorago can also do both attacks simultaneously. He will use the animation for a blue bomb.
⬥ Because all of Vorago's attacks are AoE, all members of the team must be conscious of their positioning at all times to prevent unnecessary and unintended damage.
⬥ Diagram of Vorago's attack radii:
⬥ During phases 1-4, Vorago clears , and regenerates stats almost instantly.
• This includes defense drains, such as
• Affinity debuffs will last their full one minute duration.
• Advanced players can spam to maintain uptime.
⬥ Phases 1 and 2 are the same regardless of the weekly rotation.
⬥ Vorago's click box spawns in with the boss's animation. As such, Target Cycle can be used to attack Vorago one tick sooner than clicking at the start of every phase.
• This can be used to damage Vorago before he uses his first attack, including Teamsplits, Waterfalls, and Purple Bombs.
⬩ In cases where Vorago becomes invulnerable after his first attack, a fast-hitting ability must be used. Slow-hitting abilities will be nulled.
⬥ There is a one tick window between phases during which can be used without taking damage. This can be used to mitigate food usage for the team.
• This tick is often referred to as the "crack tick", as it occurs as the floor is cracking/breaking into the next phase
⬥ There are 17 ticks from the crack tick to the Target Cycle tick.
• Target Cycle can be timed by using an ability with a 10s cooldown ability, such as 

⬩ Ensure they are not on cooldown when avoiding Vorago's jumps at the end of each phase.
⬥ Three maul pieces are obtained throughout the fight. The three pieces are combined to create the Maul of Omens. This is used at the end of phase 5 to finish Vorago off.
• Maul pieces are dropped during phases 1, 2, and 4.
• Maul pieces can be left on the floor until the end of phase 4 if inventory space is an issue.
• Do not drop the maul piece on a crack tick. This causes the maul piece to disappear entirely, failing the kill.
Phase 1
New Special Mechanics
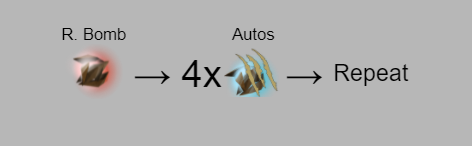
⬥ New special attack: Red Bomb
• Thrown at the furthest player away from Vorago.
• Deals 2k damage in a 2 tile range (5x5)
• Cancels defensive abilities and puts them on a short cooldown.
• Damage cannot be blocked or reduced with anything other than .
• Damage is increased by 1k for any player standing within a 5 tile radius (11x11) of the target
• Comes with a non homing blue bomb that can be dodged by moving.
⬩ Non homing blue has a 3 tile radius (7x7)
⬩ Can hit any nearbly player, not just the player with the Red Bomb
Vorago's Attack Rotation
Base Tank
⬥ There are two ways to lure Vorago on this phase. The beginner method in trio+ teams is to lure Vorago towards the northeast corner so that the TL5 does not receive bombs.
• In this lure method, because the Base Tank is expected to move after the TL5 repositions Vorago,  and
and  are less effective. Consider using
  or
or  instead.
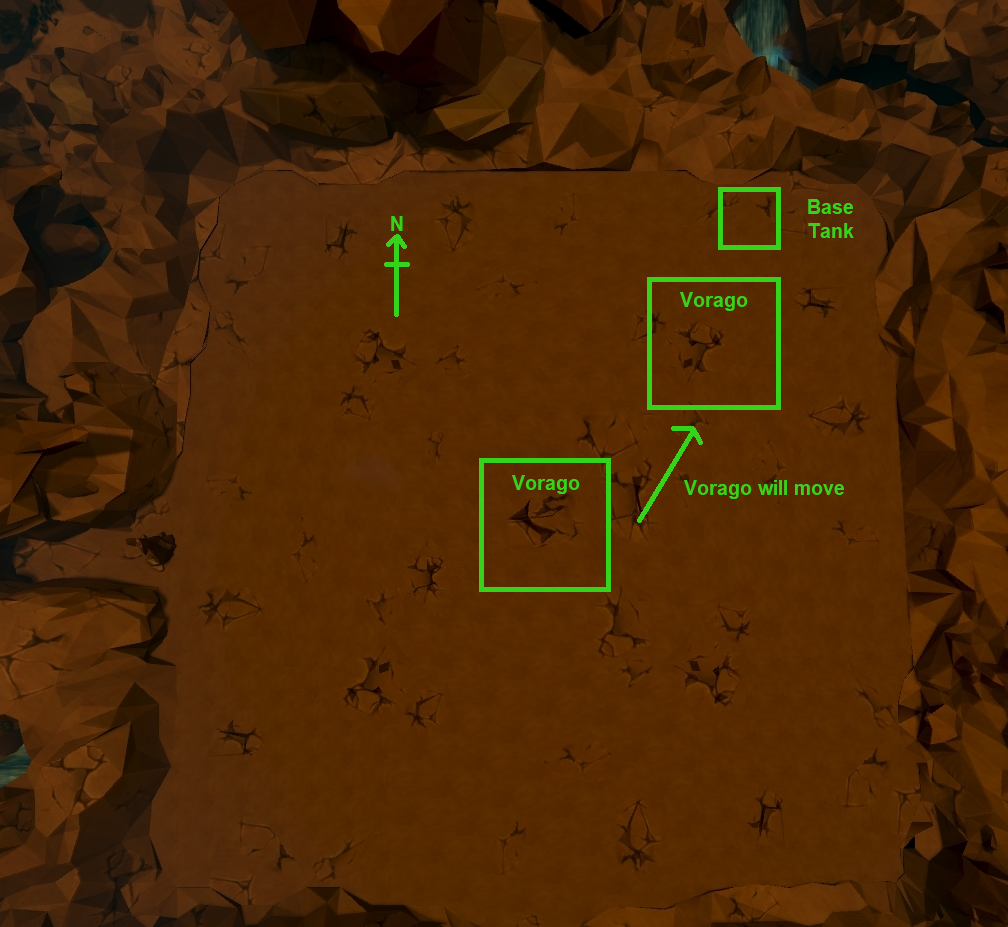
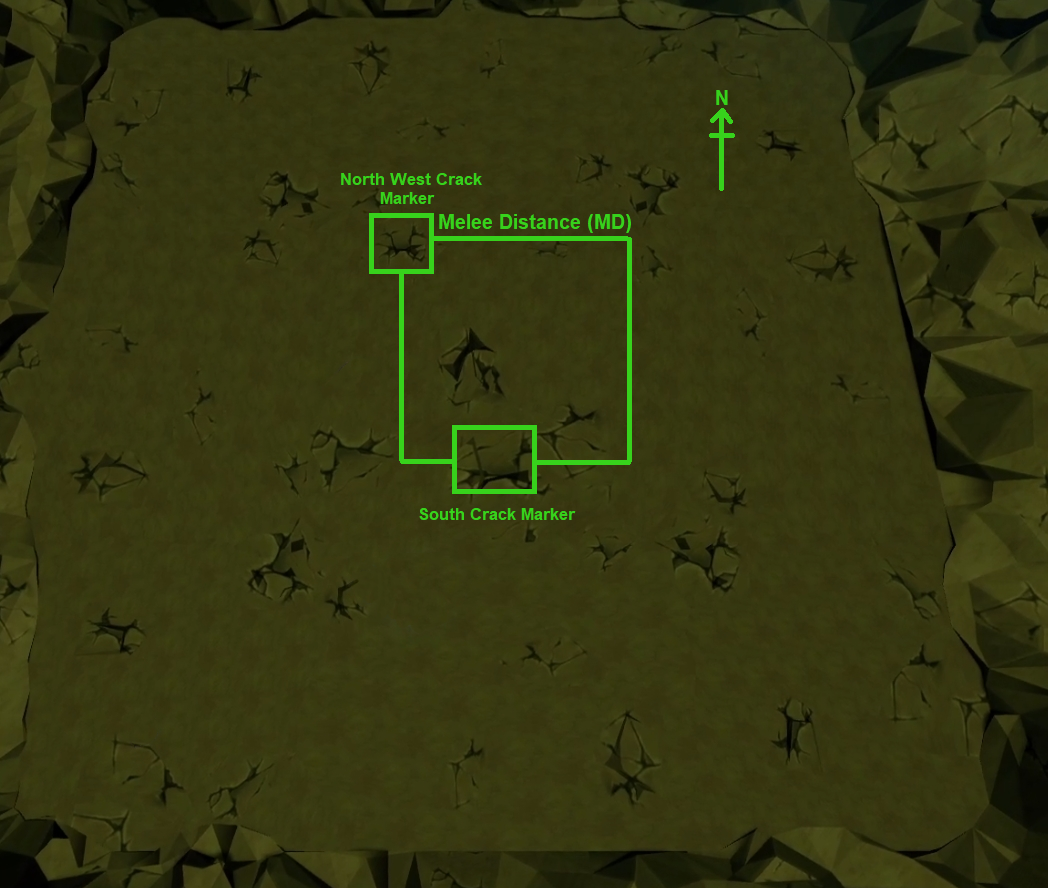
⬥ The advanced method is to lure Vorago near the northwest corner to give the TL5 bombs. This is typical in trios, and expected in duos. Care must be taken not to lure Vorago too far west so that the TL5 can provoke Vorago into the right position.
• There is a precise / spot which can be used to line Vorago up with the cliff in case of a bad lure.
⬩ Stand at the west edge of the ultimate if Vorago walks east, and vice versa.
• Note that in duos, Vorago can throw Blue Bombs at the Base Tank. This chance is increased if Vorago is east of the jump spot.
• Sample Advanced Mage/Range Lure P1: https://clips.twitch.tv/CourageousPiercingStarPhilosoraptor

⬥ In trio+ teams, the Base Tank should use provoke after the TL5 enters the cliff.
• If the Bomb Tank is damaging Vorago on the Target Cycle tick, the Base Tank should account for the one tick later entry into the cliff.
⬥ In duos, the Base Tank can use on the Bomb Tank during the jump animation to help the Bomb Tank survive.
• The Bomb Tank's click box will remain at the top of the cliff until the end of the animation.
⬥ Advanced melee Base Tanks may opt to position Vorago into the proper position for the TL5.
• Referred to as "solo lure"
• See #deleted-channel for a detailed explanation
• Not used by mage and ranged Base Tanks due to / area limitation
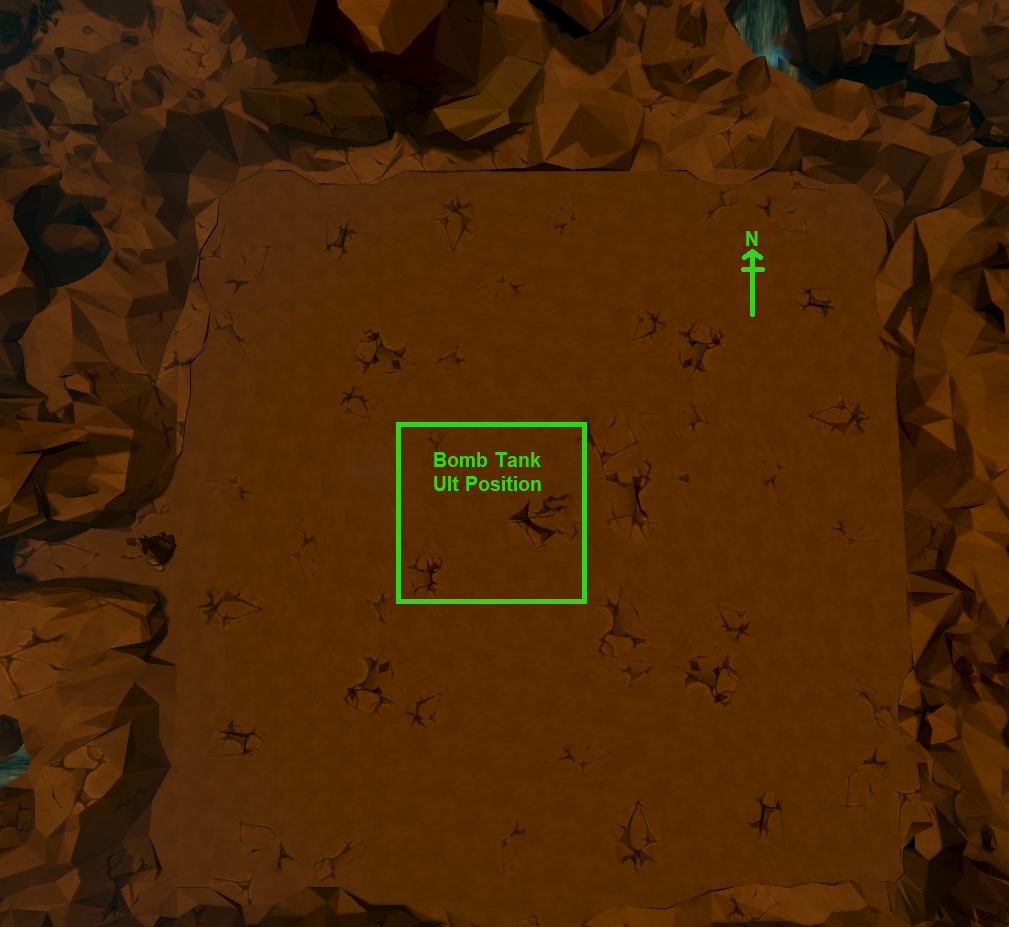
Bomb Tank
⬥ In trio+ teams, confirm with the Base Tank on which lure will be used.
• If tanking bombs, make sure to keep HP high after entry damage
⬥ Position / accordingly.
• The positions are not precise, and have a large margin for error.
⬥ In duos, the Bomb Tank is expected to climb while tanking bombs.
• The damage taken during climb can be extremely high. This is further exacerbated by the inability to eat during climbing animations.
⬩ Try to eat to full HP before starting the climb, and eat accordingly.
⬩ A fast climb is imperative to mitigating damage. See the TL5 section for the expected climbs.
• Because the Bomb Tank also tanks bombs during the jump animation, the Bomb Tank should eat to high HP before jumping.
⬩ Pray  to block Blue Bombs.
⬩ Deflect Prayer can be changed once during the jump animation by clicking on the appropriate Deflect Prayer from the prayer book. The Deflect Prayer will change as soon as the player hits the ground, and will block damage accordingly.
⬥ In duos, the Bomb Tank can also apply a using the Target Cycle mechanic. This alleviates the Base Tank's rotation.
• An additional  , or stalled
  can be used to deal more damage.
• Damage dealt during climbing animations is nulled. Make sure to delay entry into the cliff by 1 tick to make sure that the damage lands.
⬩ Should the damage be nulled, the affinity debuff from will still apply.
TL5
⬥ Position next to the cliff on the west side of the arena, and spam click to enter.
• Vorago does not move until someone enters the cliff. Entering the cliff on time is important to ensuring the Base Tank's lure.
⬥ Because the TL5 receives a Red Bomb at the start of the fight, should be used during the climb instead of on entry.
⬥ Climbing quickly is an important, but often overlooked skill.
• In trio+ teams, the limiting factor in the phase is often how quickly the TL5 can position Vorago.
• In duo teams, fast climbs are required to mitigate damage
⬥ There are three climbs.
• → →
⬩ Slowest, but easiest of the three climbs
⬩ → → Climb Demonstration: https://youtu.be/of6PdOdQBpw
• → → using the corner cut method
⬩ More difficult than the previous climb due to the precision of the corner cut Bladed Dive, but faster
⬩ → → Corner Cut Climb Demonstration: https://youtu.be/tXqfyJwBIyk
• is used. → → → using the corner cut method
⬩ Most difficult, but fastest climb. Forgoes Powerburst of Vitality, so ample healing is required.
⬩ Accel Climb Demonstration: https://youtu.be/fI0yN5-8HtM
• Optional: If Vorago is solo lured, or can be used to move directly from the last gap to the jump spot
• Duo Bomb Tank Climb Demonstration with stalled + : https://youtu.be/2peWQMtrukQ
• Duo Bomb Tank Climb Demonstration with stalled + + : https://www.youtube.com/watch?v=BSwkMG0o5QU
General Phase Notes
⬥ Vorago's HP can be lowered to about 13k, but the phase does not end until the jumper jumps.
• HP will "reset" to 80k if it goes under about 13k.
⬩ Try to stop attacking at about 25k HP.
• This mechanic also exists on phase 2 before the end of Bring Him Down, and on phase 4 before the final waterfall.
⬥ The jumper will receive a maul piece in their inventory once they reach the ground. Therefore, a free inventory space is required to jump.
⬥ Once the jumper jumps, reduce Vorago's HP to 0 to finish the phase.
⬥ Vorago will jump three times, dealing significant damage any players caught on the landing. Use and to avoid the jumps.
⬥ Vorago can regenerate 1 HP during the jumps. This happens when the instance timer reaches 1:09. While Vorago can be attacked if he regenerates 1 HP, doing so is heavily discouraged.
• Some of the unintended consequences include receiving blue bombs during the jumps, and an invisible red bomb that lands at the start of phase 2.
• The first player to tag Vorago at 1 HP will also hold aggro for the first bleed on phase 2
Phase 2
New Special Mechanics
⬥ New special attack: Smash
• Commonly referred to as "Bleeds".
• Vorago smashes the ground five times, applying a strong Destroy Tank bleed onto his current target.
⬩ Bleed hits deal melee damage
• Bleeds can be seen as a  icon on the player's debuff bar.
• Each tick of bleed damage cancels defensive abilities, and thus cannot be used to block damage.
• Tanking a second bleed without clearing a previous bleed results in a 6k typeless hit.
• Bleeds can be cleared with  , and distance from Vorago. Distance can be created using ,
  , and .
⬩ Bleeds are cleared at 7+ tiles away from Vorago.
⬩ Distance Bleed clears should be done as close to tick perfect as possible, just before taking damage from the first Bleed tick. This maximizes the amount of time the next player has to use  .
.
• Bleeds can be distance cleared with a simultaneous + to prevent Vorago from moving.
⬩ The + is tick perfect, just before taking damage from the first Bleed tick.
⬩ should be aimed with Vorago as the target, not the ground.
⬩ Clearing Bleeds with a diagonal may cause Vorago to move.
• Vorago always throws a blue bomb with his third Bleed, but otherwise does not attack during this time.
⬥ New special attack: Reflect
• Also known as "Link", and is used interchangeably with Reflect
• Vorago targets one player for 15 ticks. Any damage dealt to Vorago during this time is instead redirected to the targeted player.
• Abilities do not deal their normal damage, and instead tend to deal more damage than usual.
⬩ e.g.  can hit over 20k damage
• Most bleeds and abilities activated before Reflect that would hit into Reflect are nulled instead.
⬩ Abilities that would land on the tick the Reflect message appears still deal damage to Vorago.
⬩ An ability bled with the  special effect will not be nulled, and instead will damage players during reflect.
⬩ If you currently have the FSOA  spec active, equip your switch to ensure no autos are fired during reflect.
Vorago's Attack Rotation

General Phase Notes
⬥ Phase 2 is time gated. In order to progress the phase, Vorago must absorb at least two Gravity Orbs, which spawn on Reflect. Thus, at least two Reflect special attacks are required.
• Since this phase is time gated, use as many defensives as necessary to avoid using food at all during this phase.
⬥ Because this phase is time gated, damage dealt is largely irrelevant. The only notable damage benchmark is to reduce Vorago's HP to under 25k before the final Reflect.
• DPS ultimates can be skipped. However, they can be used for anyone competing for drops.
⬥ Stack  , and use affinity-increasing abilities to increase hit chance.
• Up to 4 can be thrown per player. An additional one can be thrown during Bring Him Down.
Smash Bleed Notes
⬥ At the start of the phase, the Base Tank should still hold aggro from phase 1. He should receive the first Bleed.
• If someone else tagged Vorago at 1 HP from the previous phase, that person will instead receive the first bleed.
• 1 HP aggro can be overridden with Target Cycle. Because a properly-timed Target Cycle ability will attack Vorago before he uses his first Bleed, aggro will shift to the Target Cycling player.
⬩ The Base Tank should always Target Cycle this phase to ensure the first bleed if possible.
⬩ A Vulnerability Bomb can be used in place of Target Cycle to allow for more lenient timing.
⬩ All other players should avoid Target Cycle.
• The first Bleed of this phase does not have an animation. It occurs as soon as Vorago's feet touch the floor.
• Vorago will then randomly aggro any member of the team, including the Base Tank. The Base Tank should use Provoke after Freedom to ensure aggro for the second Bleed.
⬥ The Base Tank should clear the first two Bleeds using and .
⬥ The Bomb Tank should use after the second bleed, and clear the third and fourth Bleeds with and .
• Vorago always throws a Blue Bomb with the third Bleed. Because the Base Tank just used , this Blue Bomb should always go to the Base Tank. Save  for this Blue Bomb, as it is a guaranteed heal.
⬥ The TL5 should use after the fourth Bleed and clear the fifth Bleed with .
⬥ In duos, the Bomb Tank takes the fifth bleed.
• Either the third or fourth bleed should be cleared with an + .
• Otherwise, the Bomb Tank should the third Bleed, the fourth Bleed, and:
⬩ Step one tile forward if was used with a magic weapon (8-tile range).
⬩ Step two tiles foward if was used with most 2H ranged weapons (9-tile range).
⬩ Stand still if was used with dual wield ranged weapons (7-tile range).
• Optionally, the Base Tank can + clear the fifth Bleed.
⬩ Useful if the Bomb Tank uses early and tanks Bleeds 2-4 instead
⬥ Players should stand melee distance when using to avoid moving Vorago from Base Spot.
• Players can easily move to melee distance by:
⬩ Stepping under Vorago, then using a non-channeled ability
⬩ Equipping a melee weapon and clicking on Vorago
⬩ Barging in
Gravity Orb Notes
At the start of every Reflect, Vorago will spawn a Gravity Orb.
⬥ Clicking on a Gravity Orb will cause Vorago to absorb it.
⬥ A total of 2 Gravity Orbs are required to finish the phase.
⬥ If a Gravity Orb is not clicked before the next Reflect, a second Gravity Orb will not spawn. Vorago must use an additional Reflect to spawn the required 2 Gravity orbs. This should be avoided.
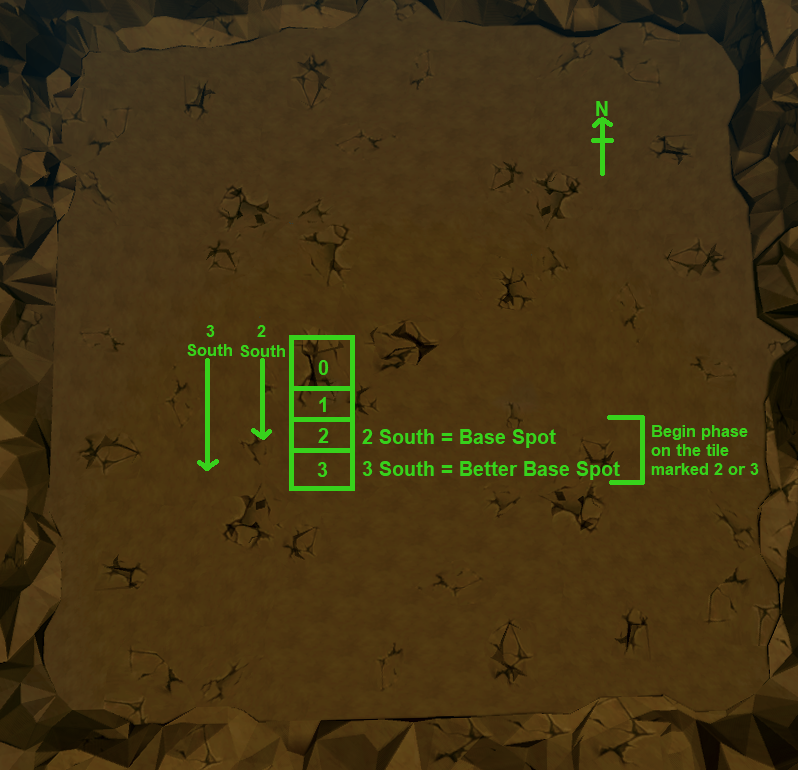
⬥ Gravity Orbs have limited range. Vorago must be close enough to each Gravity Orb, or the orb will not be absorbed.
⬥ There are two positions in the middle of the arena referred to as "Base Spot". In these spots, Vorago is close enough to every Gravity Orb spawn such that he does not have to move at all during the phase.
• The Base Tank should lure Vorago into Base Spot on the first or second bleed by standing two or three squares south of the L crack.
• The Base Spot three south of the L crack is slightly better, as it allows a north side Base Tank to tag the middle Gravity Orb without moving Vorago.
⬥ See #deleted-channel for instructions on how to recenter Vorago if he moves from Base Spot.
Red Bomb Notes
⬥ Because Red Bombs cancel defensive abilities and put them on cooldown, the Bomb Tank can take significant damage during this phase.
⬥ + + is commonly used during Red Bombs to mitigate damage and food usage.
• Either the Base Tank or the Bomb Tank will use on the Red Bomb
• The Bomb Tank can force the Red Bomb onto someone else if they are going to use .
⬩ To force a Red Bomb, the Bomb Tank should move closer to Vorago so that someone else is the furthest player from Vorago. Start moving immediately after the third attack during Reflect.
⬩ In duos, the Bomb Tank will need to move either melee distance or underneath Vorago to force the Red Bomb onto the Base Tank.
Bring Him Down And Transition Into P3
⬥ + to the last Gravity Orb.
• must be used during the final Bleed clears to ensure that and are off cooldown for the final Gravity Orb.
⬥ The phase will progress into Bring Him Down (BHD), during which all players spam click Vorago.
⬥ Once the bar at the top fills, Vorago will stumble. The team must deal a collective 50k damage to free the next maul piece.
• This portion is 20 ticks long.
• Vorago is blocking during this time. is guaranteed to land 5 arrows.
• Rangers should switch to bolts other than  , as procs will deal damage based on Vorago's low HP.
⬩ Reequip before the start of phase 3.
• Vorago's defense is signficantly reduced during this time, allowing players to reach 100% hit chance quite easily.
• Damage dealt during this time does not affect Vorago's HP.
• damage does not count towards the 50k damage threshold, and instead will damage Vorago's HP bar instead.
⬩ This is useful if Vorago's HP is still high.
• Failing the 50k damage threshold causes Vorago to regenerate a large amount of HP. An additional 2 Gravity Orbs are required to progress the phase.
• A can be dropped in either the southwest corner or north side of the arena during this time to prep for phase 3.
⬩ is commonly used to aid building adrenaline during phase 3.
⬥ The second maul piece will appear on the floor after succeeding BHD.
⬥  to finish the phase.
• A properly-timed can take advantage of BHD's 100% hit chance while still damaging Vorago's HP bar.
Sample BHD Rotations
⬥ Mage
 →
→  →
→  (2-hit) →
  → →
→ →  / → (slow/far)
⬥ Ranged
(unequip )  →
→  / →
/ →  →
→  → →
→ →  → (slow/far)
⬥ Melee
→  → (
→ ( ) →
) →  →
→  →
→  / → (4t)
Note: assuming you are not using , end BHD with  before he stands so you get a boosted 188 / on stand
Advanced Concept: Natural Instinct
Because there is a large amount of time between phases, can be used to build additional adrenaline for phase 3, and later, phase 5.
Timing your Natural Instinct
⬥ There are 40 ticks from Vorago's death to the Target Cycle tick of the next phase.
⬥ Common notations are:
• t0: Target Cycle tick
• t-x: Number of ticks before Target Cycle tick. t-33 would mean 33 ticks before Target Cycle.
⬥ A common strategy is to use Natural Instinct on a tick that is a multiple of 3, and continuously use abilities. This allows players to build the maximum amount of adrenaline, and time Target Cycle at the same time.
• The most common ticks are t-33, t-30, and t-27.
• t-33 is when Vorago lands from his first jump.
• t-33 can also be found by timing a slow-hitting , then using 2 abilities. Make sure is strong enough to finish the phase.
• t-30 can be timed by using an ability using the t-33 visual cue.
• t-27 is when Vorago lands from his second jump.
• If a different tick is required, a combination of abilities and lost ticks from t-33 can be used to find a certain tick.
• Sample Natural Instict Rotation: https://youtu.be/z1Q1e2dY-F8
Phase 3
General Phase Notes
⬥ Phase 3 introduces the weekly rotation.
⬥ This phase is purely DPS based. Players should make sure they start this phase with full adrenaline, and all relevant cooldowns.
• can be used on a combat dummy from phase 2 to aid building adrenaline.
• An additional can be dropped immediately at the start of the phase to aid adrenaline building and stalling abilities.
⬩ Avoid dropping this in the middle of the arena, as it can make Target Cycle unreliable
P3: Ceiling Collapse
New Special Mechanics
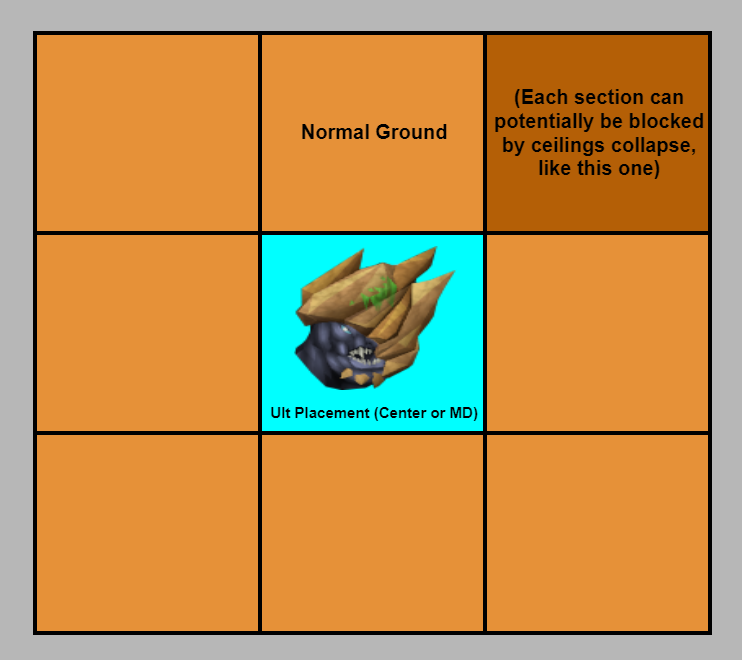
⬥ New special attack: Ceiling Collapse
• Vorago smashes the ceiling, causing a large rock to fall on 1/9th of the arena.
⬩ Any players crushed by the rock will be pushed away and dealt 8000, divided between everyone who was crushed (e.g. two players crushed will be dealt 4000 damage each)
⬩ The rock renders the area underneath untraversable
⬩ Rocks can be right-clicked and destroyed at the cost of 4000 HP
• After the rock falls, Vorago will jump to a random 1/9th of the arena, including his current location.
⬩ Vorago cannot jump to an area that is already covered by rocks, or will be covered by the imminent rocks
Vorago's Attack Rotation

Phase Notes
⬥ Falling rocks can be difficult to spot. Shadows enabled and high lighting detail are recommended to better distinguish falling rocks.
• Using Medium Shadows + no skybox is the recommended minimum to distinguish falling rocks.
⬥ This phase poses several unique challenges due to the random jump locations.
• Because the distance to Vorago cannot be guaranteed for any player, this phase is often free-for-all Bomb Tank for all non-melee players.
⬩ Be prepared to Deflect Magic at a moment's notice.
• Vorago can also jump on top of the player with aggro, giving the player little to no time to  .
.
• / should be placed melee distance or under Vorago's spawn position so that players can receive the damage buff regardless of Vorago's position.
⬩ Floor markings can be used to find the correct spot. The L crack is melee distance of Vorago on the south side during this phase.
⬩ Make sure to move out of melee distance after placing the ultimate.
• A rock in the middle of the arena often breaks line-of-sight with Vorago, and interferes heavily with DPS.
⬩ Use and destroy the rock ASAP.
P3: Scopulus
New Special Mechanics
⬥ New special enemy: Scopulus
• Two scopuli are spawned at the start of the phase, in the southwest and southeast sections of the arena.
• Each Scopulus has 150k HP.
• They are melee enemies, and have typical properties of melee enemies
⬩ Attacks with melee
⬩ Weak to 
⬩ Affinities heavily skewed in favor of magic, and heavily against ranged/melee
• blocks more than the typical 50%/60% damage. Failure to use will result in heavy damage.
• No special attacks
• Immune to familiar damage
• Does not clear , , or stat drains
• When one Scopulus dies, the other becomes enraged
⬩ Enraged Scopulus heals 15k instantly, and doubles its attack speed
Phase Notes
⬥ Widely regarded as the easiest weekly rotation.
⬥ Vorago is invulnerable during this phase. The players will be damaging two Scopuli instead.
⬥ During this phase, Vorago will still throw Blue Bombs. He will not use any other attacks.
⬥ Because Scopuli deal heavy melee damage, the Base Tank must hold Scopuli aggro to prevent the Bomb Tank from receiving heavy, unprotected damage.
⬥ Scopuli have unique aggro mechanics.
• Unlike most enemies, Scopuli are prone to changing targets.
• Scopuli are more likely to target the first player to tag each scopulus.
⬩ The Base Tank must tag both Scopuli ASAP, while the Bomb Tank should avoid attacking until both Scopuli are tagged.
• Scopuli will frequently change targets the further apart they are.
⬩ Scopuli should be stacked on top of each other to prevent this.
• Scopuli will frequently change targets if they are not tagged often by the person with aggro.
⬩ The Base Tank should use AoE abilities often to prevent this.
⬩ count as attacks for holding Scopuli aggro.
• Ice Nihils  in particular are notorious for aggroing Scopuli. Mages should use Smoke Nihils instead.
⬥ Scopuli can be consistently stacked with the use of Target Cycle.
• Stand melee distance on the west side of the southwestern Scopulus, and use backward Target Cycle with an AoE ability to tag both Scopuli at once.
⬩ The southeastern Scopulus will walk towards the Base Tank and stack directly on top of the southwestern Scopulus.
⬥ Scopuli can be flanked.
• Use the Scopuli lure listed above, then walk to the north side of the Scopuli once they are stacked.
• Clip example of how to lure Scopuli and move into a flanking position - https://www.youtube.com/watch?v=UtBBbOpRx84
P3: Vitalis
New Special Mechanics
⬥ New special attack: Vitalis Orb
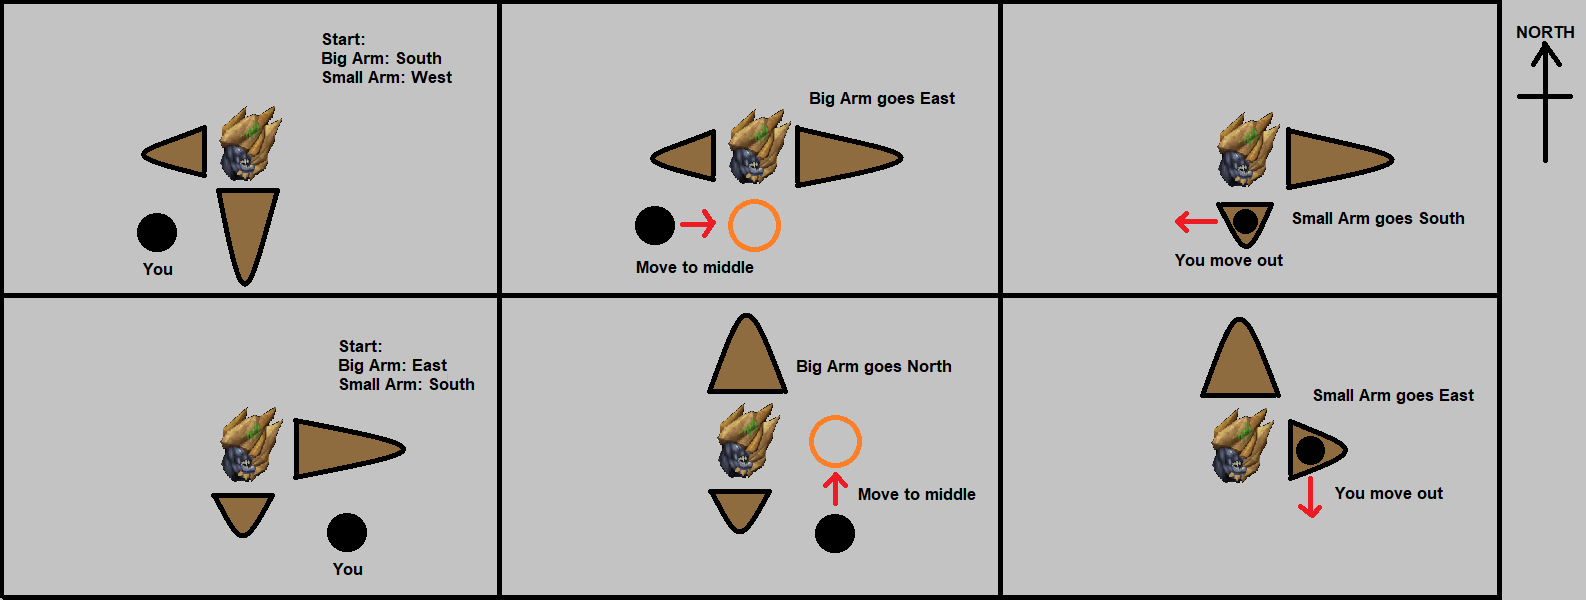
• Vorago will throw a Vitalis Orb in one of eight directions (north, northeast, east, southeast, south, southwest, west, northwest)
⬩ If Vorago hasn't moved from his spawn position, the Vitalis Orb can only be thrown in one of three directions (north, northeast, east).
• After traveling a short distance, the Vitalis Orb explodes.
⬩ The explosion deals 2000 typeless damage, and is affected by damage modifiers. This includes the Berserker auras and defensive abilities.
⬩ The Vitalis Orb explosion spawns 5 Vitalis. Each player that tanks the typeless damage from the explosion reduces the number of Vitalis spawn by one.
⬥ New special enemy: Vitalis
• 20k HP each
• Deals moderate melee damage
• Blocking
⬩ Also blocks line-of-sight
• Inexplicably forces players to target away from Vitalis, if Vitalis is targeted
Vorago's Attack Rotation

Phase Notes
⬥ Vitalis is considered the hardest weekly rotation
⬥ The difficulty of this rotation comes from the Vitali that spawn during this phase.
• Because they block line-of-sight, attacking Vorago can be difficult, or even impossible at times.
⬥ In 4 man+ teams, three members should stand melee distance, while the Bomb Tank stands further out to tank Blue Bombs.
• Melee distance players will always have line-of-sight to Vorago. They are responsible for the majority of the damage during this phase.
• The Bomb Tank may end up being completely surrounded by Vitali, stopping all attacks completely.
⬩ This is okay, as long as the Bomb Tank is still alive and tanking Blue Bombs
⬩ The rest of the team must deal the remaining damage required to finish the phase
• The other three players should pray to block damage from Vorago's melee swipes.
⬥ In trio and duo teams, everyone should stand melee distance.
• Players besides the Base Tank can stand halberd distance for the first two auto attacks at the start of the phase to help mitigate damage and maximize damage from .
• Blue Bombs will be sent to one player at random.
⬩ Prayer flicking is required to stay alive during this phase. Blue Bombs land one tick prior to the next potential melee swipe. These attacks do not overlap.
⬩ Prayer flicks are only required if Vorago uses his bomb launching animation.
• Players should stand away from each other to prevent Blue Bomb AoE damage.
• can be used to heal from Blue Bomb damage.
⬩ Risky. Players will receive damage from Vitali, so a tick perfect is required.
⬩ Blue Bombs are still random, so the heal is not guaranteed.
⬥ Finishing the phase ASAP is imperative, as the damage from the Vitali, melee swipes, and blue bombs adds up.
⬥ Try to finish before Bleeds, as clearing Bleeds with blocking Vitali can be difficult.
⬥ Duo teams may opt for the safer, albeit slower strategy of standing adjacent with each other.
• This allows players to support each other with the use of defensive abilities + .
• Bleeds can be handled with + .
⬩ The Bleed tanking player should use on the fourth Bleed, not the first.
⬩ The Barricading player should after the fourth Bleed, and the fifth.
• Blue Bombs are no longer random, as they will always deal AoE damage.
⬩ can be used reliably.
• Do not stand on top of each other. Players that do so will not have line-of-sight with each other, and thus be unable to .
• Adrenaline permitting, players can use  + during Reflect, and after Bleeds.
⬩ delays damage by one tick, but damage calculation occurs at the same time as if was not used. Thus, the prayer flick timing does not change.
P3: Green Bomb
New Special Mechanics
⬥ New special attack: Green Bomb
• Most complex special attack, with many different and often detrimental outcomes depending on how it's handled
• The Green Bomb will first pick 1/9th of the arena to cover in a green mist.
⬩ Mist deals negligible damage every few ticks
⬩ Each tick of mist damage drains 10% adrenaline.
⬩ Mists do not disappear until the end of the phase.
• After the mist, the Green Bomb will then home in on a player at random.
• Targeted player receives a notification
• All Green Bomb hits cannot be blocked, cancel defensive abilities, and puts them on cooldown.
• If no player is within a 5x5 area of the targeted player, the Green Bomb will deal 10k damage, drain 10% adrenaline, and dissipate
⬩ Additionally, Vorago will immediately skip to his next special attack, regardless of where he is in his current attack rotation.
• If a player is within a 5x5 area of the targeted player, the Green Bomb will deal 1k damage, drain 10% adrenaline, and will home in on the nearby player.
⬩ If multiple players are nearby, one is chosen at random.
⬩ If the nearby players are also in a 3x3 area of the targeted player, the nearby player will take 1k damage and lose 10% adrenaline.
⬩ The Green Bomb will dissipate once it deals damage 4 times. There will be a bounce animation after the 4th damage tick, but will not deal damage to the nearby player.
⬩ If a Green Bomb bounces to a player twice, it will deal ~8k damage if there is another player nearby to recieve the bomb, or ~11k if not. The Green Bomb will then dissipate if there is no other player to receive.
• If the phase ends after a Green Bomb launch but before landing, the Green Bomb will not deal damage.
Vorago's Attack Rotation

Phase Notes
⬥ Green Bomb is often considered to be the second hardest weekly rotation.
⬥ The preferred method of dealing with the Green Bomb in any team size is to free-for-all tank the 10k damage without passing.
• is required for the Bomb Tank, while heavily recommended for the rest of the team.
• While there are normally 5 auto attacks after a Green Bomb, tanking the Green Bomb forces Vorago to skip to his next special attack. This reduces the number of auto attacks to 3.
• Passing the Green Bomb, then tanking the 10k or 8-11k is not recommended. It can cause some unforseen circumstances, such as the second Green Bomb launch at the start of Reflect.
• If players receive a second Green Bomb, note that the Bomb Tank cannot tank two Green Bombs in a single phase.
⬩ Onus falls upon the Base Tank to protect their Bomb Tank from death.
⬩ Players can either use + , or to the Bomb Tank and pass the Green Bomb.
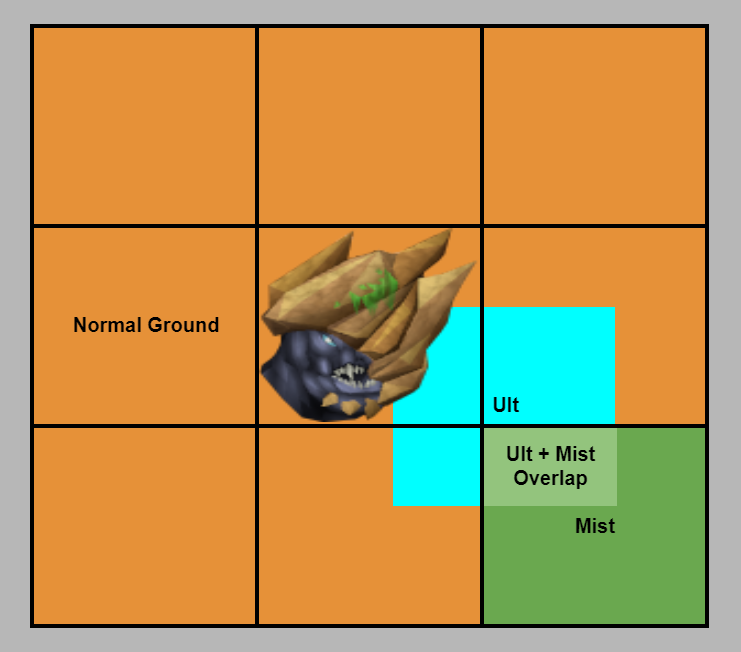
⬥ The team should spread out, and drop their / such that a single green mist does not cover the entire area.
P3: Teamsplit
New Special Mechanics
⬥ New special attack: Teamsplit
• Vorago paints the entire team either red or blue.
• Teamsplit cancels defensives and puts them on a short cooldown.
• Two 2x2 squares will spawn in the arena, red and blue.
• Players can run to the colour square that corresponds with their colour.
• All players not standing in the correct square when Vorago explodes will take 8000 typeless damage that cannot be blocked by defensive abilities.
• Vorago is invulnerable before he explodes.
Vorago's Attack Rotation

Phase Notes
⬥ Teamsplit is a simple and slow-paced mechanic, which makes it easy for beginners to grasp.
⬥ The difficulty of this weekly rotation lies in trying to deal damage.
• Because Teamsplit and Reflect both prevent damage to Vorago, players will need to maximize their damage in what little time Vorago is vulnerable.
• Because Teamsplit spawn locations are random, players will need to tank the damage from at least one Teamsplit to maximize time in / .
⬩ +  can be used to increase survivability and deal more damage.
⬩ Bomb Tanks that choose to tank the second Teamsplit should be aware that a long phase can be difficult to survive. Be prepared to eat upon the Red Bomb release.
• Beginners may find it easier to forgo / entirely and only use thresholds + special attacks instead
⬥ Abilites bled with the effect can hit into Vorago's invulnerability during Teamsplits. While they don't deal damage, they force Vorago to continue attacking during Teamsplit.
• This is often called a "Broken Teamsplit".
• Very detrimental on this phase, as it severely reduces the amount of time the team has to DPS. It can also kill unsuspecting players.
⬥ The duration between the first Teamsplit explosion and Reflect is one tick shorter if players used an ability on the Target Cycle tick.
⬥ The Base Tank should move to melee distance and to reduce the damage the Bomb Tank receives during this phase. This should be done during Reflect, or rotation permitting, the entire phase.
P3: The End
New Special Mechanics
⬥ New special attack: The End
• Vorago slams his arms down, sectioning off a quarter of the arena
⬩ Anyone caught outside the arms will take a typeless bleed that can only be blocked by . This bleed deals damage every other tick.
⬩ It ramps up quickly if players don't move back into the arms.
• Vorago spawns 1 Purple Bomb per player, and 5 Blue Bombs + 3 Red Bombs regardless of team size. One type of bomb spawns in each of the other three quadrants.
⬩ Red and Blue Bombs are always second and third, though the order in which they appear is random.
⬩ Purple Bombs are always last.
• Vorago will rotate his arms anticlockwise until he reaches the Purple Bomb quadrant.
⬩ Anyone caught outside the arms who wish to reenter must be in a quadrant before the arms reach that area.
⬩ Bombs can be individually launched while Vorago's arms are in the appropriate quadrant. This is often called "tagging".
• During the first 21 ticks, Vorago takes full damage.
• In the Blue Bomb quadrant, Vorago takes 1/2 damage.
• In the Red Bomb quadrant, Vorago takes 1/3 damage.
• In the Purple Bomb quadrant, Vorago takes 1/4 damage.
• Once Vorago reaches the Purple Bomb quadrant, Vorago will stand up and launch any bombs that weren't tagged.
⬩ Bombs are evenly distributed among the team.
⬩ Each player will receive ceiling(number of bombs/team size)
⬩ In duos, leaving the 5 Blue Bombs and 3 Red Bombs means each player takes 3 Blue Bombs and 2 Red Bombs.
• Before standing, Vorago is a blocking entity. will always land five arrows.
⬥ New special attack: Purple Bomb
• Occurs only during The End special attack
• Deals 2k damage, and is unaffected by defensive abilities except
• Deals AoE damage to any players in a 5x5 radius, and drains 5% adrenaline from any secondary targets
• Transforms the player, cancelling and preventing the use of
• Does not affect defensive abilities, and does not increase in damage
Vorago's attack rotation

Phase Notes
⬥ Often called "Purple Bomb"
⬥ This rotation, like Teamsplit, is easy to learn, but difficult to master. There is a limited amount of time to DPS.
⬥ There are several ways to handle the bombs.
• Safest Method: + Blue Bombs. One player tags 2 Red Bombs, while the other player tags 1 Red Bomb.
⬩ This ensures players do not receive a heavy amount of burst damage when Vorago stands.
⬩ One player must tag the Blue Bombs, while the other player must + on the entire team. The tagging player will have his defensive abilities cancelled and put on a short cooldown.
⬩ Slowest method, as it requires players to use adrenaline on , and sustain the adrenaline loss from the Red Bombs.
⬩ The Base should move melee distance and on stand to reduce the damage taken by the Bomb Tank.
• Middle Ground Method: + .
⬩ Like the previous method, one player tags Blue Bombs while the other player uses + on the entire team.
⬩ Red Bombs are left alone to be tanked upon stand.
⬩ The Base should move melee distance and on stand to reduce the damage taken by the Bomb Tank.
• Fastest, Riskiest Method: Tag nothing.
⬩ Maximizes adrenaline and DPS
⬩ Players will receive heavy burst damage on stand.
⬩ should be used to help tank some damage on stand, if the phase reaches that point.
⬩ The Bomb Tank should use on stand to prevent the Base Tank from tanking melee swipes and Blue Bombs at the same time.
⬥ Bomb tagging roles fall upon the Base Tank and Bomb Tank, unless otherwise specified.
⬩ Either player can do either tagging or + .
⬩ Confirm with the team which method is to be used.
⬥ While Vorago is normally invulnerable during the the arm slam animation, he will continue to take damage from any abilities bled using .
⬥ Players can escape from the arms without taking the bleed damage.
• Often called "glitching out".
• If Vorago is focused on the southwest or southeast quadrant, players can stand on where the arms would close into the next quadrant. The arm will be on top of the player. From there, players can freely move around the arena.
⬩ Only works on the south and east arms.
• Only recommended if using the no tag method, or the player is not resposible for handling the bombs.
⬩ Glitching out prevents players from tagging bombs.
• Can be used to spread out DPS ultimates, preventing bombs from dealing AoE damage.
• Diagram on glitching out
Phase 4
New Special Mechanics
⬥ New special attack: Waterfall
• Vorago spawns a waterfall in a random corner of the arena. Players must run behind the waterfall before Vorago explodes.
• Players not behind the waterfall when Vorago explodes will be dealt ~10k damage.
• Vorago is invulnerable and does not attack during the waterfall.
⬥ New special attack: Stone Clone Spawn
• Vorago does a melee swipe animation, but this is not a damaging attack.
• One player at random receives a Stone Clone.
• The player who has Vorago's aggro cannot receive a Stone Clone. This is usually the Base Tank.
⬥ New special enemy: Stone Clone
• 10k HP
• Uses the same combat style as the targeted player
• Has an adrenaline bar and uses abilities like players
• Follows a set ability rotation (e.g. Magic clone always starts with  )
)
• Not very threatening since it can be killed quickly
⬩ Can pose a large threat if left unchecked. It can use thresholds like and .
⬥ New technique: Clone Skip
• The Stone Clone and the 7 auto attacks following it can be skipped. This is a massive 33.6s time save per kill if done both times.
• The Stone Clone can only spawn if Vorago has a valid target in range that is not the Base Tank (the person with aggro).
• The Base Tank should walk Vorago to the edge of the arena. All other team members should move to the opposite side of the arena.
⬩ The other team members can use and to move away from the Base Tank quickly.
• Vorago will use the Stone Clone melee swipe animation, but no Stone Clone will spawn because there is no one in range. The 7 following auto attacks will be skipped.
• The rest of the phase continues as normal, with Vorago proceeding to his weekly special attack.
• Clone Skip Demonstration: https://www.youtube.com/watch?v=maGhYnPa92w
• The shorter phases have a ripple effect on the difficulty of the phase.
⬩ Most notably, the Bomb Tank's will not be off cooldown for the second weekly special attack.
⬩ The onus falls upon the Base Tank to cover any relevant mechanics, if necessary.
⬩ See each week's sections for additional issues related to Clone Skip.
General Phase Notes
⬥ Phase 4, like phase 2, is time gated. The phase does not end until three Waterfall special attacks.
• As such, the same principles from phase 2 apply.
⬩ DPS ultimates are not necessary, but can be used to compete for DPS drops.
⬩ Stack Storm Shards and use affinity-increasing abilities.
⬥ Phase 4 always starts with Waterfall → 3 auto attacks → Stone Clone → 7 auto attacks* → weekly special attack.
• The Bomb Tank can use on the first or second Blue Bomb for a quick heal.
⬩ Do not use on the third Blue Bomb, as it can be sniped by a Stone Clone.
• *The Stone Clone and the following 7 auto attacks can be skipped. For more information, see the Clone Skip section below.
• If the team is not using Clone Skip, the Bomb Tank should save for the 7 auto attacks after the Stone Clone spawn.
⬩ Bomb Tanks with a Stone Clone can also get a extension by killing the clone.
• If the team is using Clone Skip, defensive abilities are largely unnecessary. Use them at the Bomb Tank's discretion.
• The Bomb Tank usually the weekly special attack. See each week's section for additional information.
P4: Ceiling Collapse
Vorago's Attack Rotation

Phase Notes
⬥ Rocks remaining from phase 3 will fall into phase 4.
• The positions of these rocks carry over. Thus, remembering a safe spot from phase 3 is important to avoiding unnecessary damage.
• Falling rocks from the phase transition deal 4k damage.
• Corner rocks can block waterfalls. Additionally, two adjacent cardinal direction rocks can block a waterfall (e.g. a south and east rock block the southeast waterfall)
⬩ Destroying rocks deals 4k damage. Be prepared to eat and destroy rocks at the start of phase 4.
⬩ A waterfall can be blocked by two cardinal direction rocks and a corner rock, so players may have to destroy two rocks to access a waterfall.
⬥ When Vorago starts his Ceiling Collapse special attack, the Bomb Tank should use + .
• Every member of the team should aim to destroy any remaining rocks that haven't been cleared while + is active. This includes the imminent rock.
⬥ Bleeds occur shortly after Vorago lands from the Ceiling Collapse special attack. The team may still be spread out clearing rocks. Move melee distance ASAP to handle Bleeds and prevent Vorago from stalling his attack rotation.
Clone Skip Notes
⬥ The Bomb Tank cannot both Ceiling Collapse rocks. The Base Tank should one of them.
• However, if no form of Turtling is used (e.g., with  ) then the Bomb Tank can do both .
⬩ Take caution if you do not have Malletops  extension as it may mean your would be shorter than Intercept .
⬥ Rocks from phase 3 that are east, south, or west must be cleared before the first Waterfall.
• Vorago will never walk north.
P4: Scopulus
Vorago's Attack Rotation

Phase Notes
⬥ Scopulus does not have a weekly special attack for phases 4 and 5. For phase 4, a Red Bomb takes the place where the weekly special attack would occur.
⬥ Handle the Red Bomb in the same manner as phase 2. Either the Base Tank or the Bomb Tank can .
• The Bomb Tank can surge from max attack range to move underneath Vorago to force the Red Bomb.
Clone Skip Notes
⬥ The Bomb Tank cannot both Red Bombs. The Base Tank should one of them.
• However, if no form of Turtling is used (e.g., with ) then the Bomb Tank can do both .
⬩ Take caution if you do not have Malletops extension as it may mean your would be shorter than Intercept .
P4: Vitalis
Vorago's Attack Rotation

Phase Notes
⬥ Vitalis Orbs will always be north, east, or northeast if not doing Clone Skip, assuming Vorago does not move from the centre of the arena.
• The team should move to the northeast during the 7 auto attacks after the Stone Clone to prepare for the Vitalis Orb.
⬥ Killing the Vitali that spawn is top priority, as they cause a number of pathing problems.
⬥  can be used to help with Vitali, though they only deal 4k damage each.
Clone Skip Notes
⬥ The Bomb Tank cannot both Vitalis Orbs. The Base Tank should one of them.
• However, if no form of Turtling is used (e.g., with ) then the Bomb Tank can do both .
⬩ Take caution if you do not have Malletops extension as it may mean your would be shorter than Intercept .
• Due to the alternating , ample DPS on both Vorago and Vitali are required from both the Base and Bomb Tanks.
⬥ Because Vorago moves from the centre of the room, the direction of the Vitalis orbs are random.
P4: Green Bomb
Vorago's Attack Rotation

Phase Notes
⬥ The Green Bomb principles from phase 3 apply to phase 4.
• Tanking the Green Bomb instead of passing it is preferable.
• While there are normally five auto attacks after a Green Bomb, tanking the Green Bomb shortens this to three auto attacks.
• Passing before tanking the Green Bomb leads to a longer phase, and can have undesirable effects.
⬥ Since this is a time gated phase, use + to block the 10k damage from the Green Bomb.
• If the Green Bomb is NOT on the Bomb Tank: the Bomb Tank should + the team.
• If the Green Bomb IS on the Bomb Tank: the Base Tank should + the team.
Clone Skip Notes
⬥ Neither the Base Tank nor the Bomb Tank can both Green Bombs assuming the use of Turtling 4.
• The Base Tank should be prepared to tank a 10k with and/or if either role receives both Green Bombs.
• However, if no form of Turtling is used (e.g., with ) then the a player can both if needed.
⬩ Take caution if you do not have Malletops extension as it may mean your would be shorter than Intercept .
P4: Teamsplit
Vorago's Attack Rotation

Phase Notes
⬥ after Teamsplit if the additional damage reduction + Heal Other are required. Otherwise, this can be skipped.
⬥ Like phase 3, Teamsplits can be broken during this phase.
• Unlike phase 3, Broken Teamsplits are beneficial during this phase because they alleviate some of the time gate.
• Bleed a melee ability using the effect just before the Teamsplit.
⬩ Any melee ability affected by works.
• Splashing does not matter, so anyone can break Teamsplits regardless of primary combat style.
• The optimal timing is to one tick after the 6th Blue Bomb, then bleeding an ability immediately after.
• Make sure the team is aware of this strategy's use, as it can kill unsuspecting players.
⬩ Vorago will throw Blue Bombs during Teamsplit with no animation. In addition, if Vorago is standing next to a player, he can also melee swipe.
Clone Skip Notes
⬥ Since is optional this week, cooldown does not play a large factor during this week.
⬥ If Clone Skip is paired with Broken Teamsplits, the amount of time the team has to DPS is much shorter than normal. Make sure the team has enough DPS to clear the phase on time.
⬥ The optimal timing for Broken Teamsplit with Clone Skip is → immediately off cooldown → wait 1 tick → 
P4: The End
Vorago's Attack Rotation

Phase Notes
⬥ Because this phase is time gated, defensive abilities can be used to mitigate most or all of the damage during this phase.
⬥ The Base Tank should tag all of the Red Bombs during this phase, while the Bomb Tank should use + + Heal Other on the team.
⬥ On Vorago's stand, the Base Tank should use + on the team.
⬥ When Vorago throws his Red Bomb, the Base Tank should do one of the following:
• the Bomb Tank again using the remaining duration (Malleotops + T90 Shield + Turtling 3 only)
• + the Bomb Tank.
• Move melee distance and use to reduce the number of Blue Bombs the Bomb Tank receives.
⬥ If the Base Tank and Bomb Tank reverse their order, the Bomb Tank's may be on cooldown at the start of phase 5.
Clone Skip Notes
⬥ Due to phase length, Clone Skip largely unaffects timing. The strategy without Clone Skip still applies.
• Turtling 4 prevents players from using on time. Turtling 3 is recommended.
Transition into Phase 5
End of P4
⬥ Vorago's HP should be lowered before the third Waterfall. Ideally, should finish Vorago off.
• A can be thrown to aid this.
• can be used some time before the last Waterfall to aid with hit chance.
• Rangers should use bolts other than for . Reequip before the start of phase 5.
⬥ The mauler should pick up the first two maul pieces before the third waterfall.
• The default maul player, unless otherwise specified, is: any melee player → TL5 (trio+) → Bomb Tank (duo)
⬥ Like the transition from phase 2 to phase 3, can be used to build additional adrenaline from a dummy.
• The ideal dummy position is close to the center of the arena.
• timing is largely the same as the phase 2 → phase 3 transition
• Facing direction is preserved between phases. The Bomb Tank can start a rotation facing east, and during global cooldown on phase 5 to place a melee distance .
⬩ Avoid using on t-15, as it causes some strange loading issues.
⬥ The third maul piece spawns on the floor near Vorago after the third Waterfall. A red dot on the minimap can be used to help find the maul piece.
Phase 5
New Special Mechanics
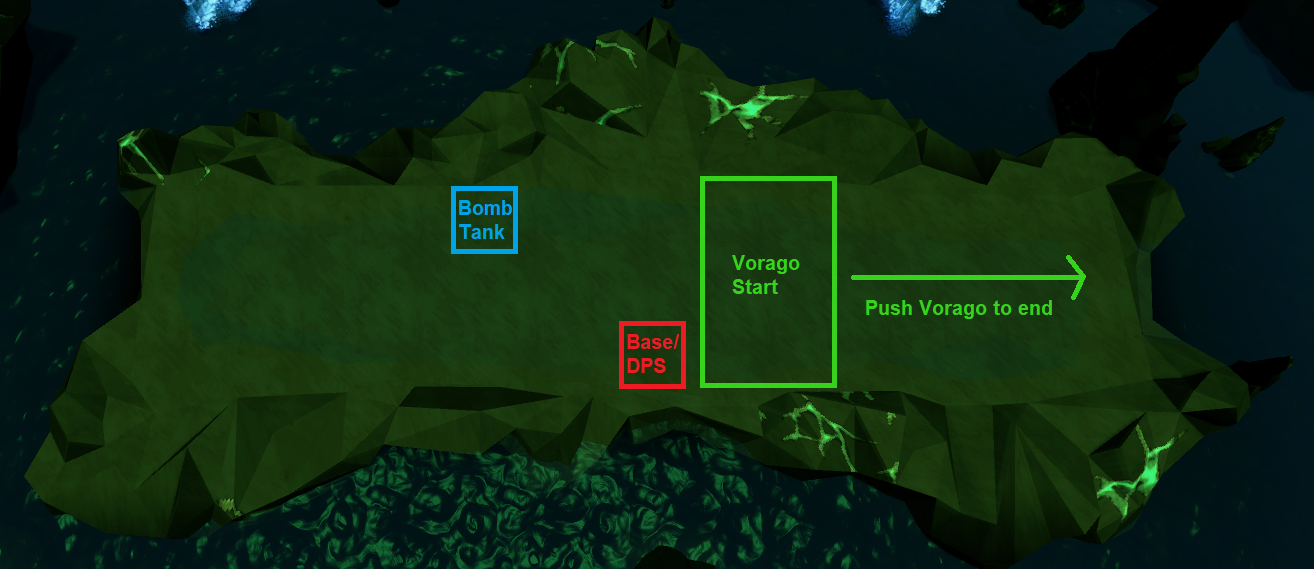
New special arena: Pushing Vorago
⬥ Vorago spawns in the middle of a long and narrow phase 5 arena.
⬥ Vorago covers the width of the arena and is blocking, preventing access to the eastern side of Vorago.
• hits Vorago as if he were a blocking entity.
⬥ Players must push Vorago eight tiles east from his starting position, then use the Maul of Omens.
• Players can push Vorago one tile east by dealing about 20k damage.
• Commonly referred to as "push".
• The damage threshold is more complex than this. For a detailed explanation, see #deleted-channel.
⬥ Vorago will push players backward by dealing damage to the team.
• Commonly referred to as "push back".
• Push back is not relative to the amount of damage players receive.
• Each attack has its own value push back value.
⬥ Melee Swipes and Blue Bombs push back the team.
• In duos and trios, this number is always one tile of push back for every successful hit.
• In teams of 4+, this may not always hold true.
• Melee swipes only occur if at least one player is standing within melee distance.
• Because Vorago can use both his melee swipe and Blue Bomb in a single auto attack, players may receive two squares of push back in a single auto attack.
• AoE damage can affect push back.*
⬥ Only a limited number of defensive options can prevent push back from auto attacks.
• (Blocks all push back from auto attacks during its duration)
• (Blocks all push back from a single auto attack)
• (Blocks half a tile of push back per auto attack while is active. Only occurs at 50% damage reduction. Recommended only during Reflect.)
•  (Blocks half a tile of push back per auto attack while is active. Not recommended.)
• All other defensive options (  etc) do not affect push back.
⬥ Some of Vorago's special attacks push back the team.
• Damage from PKing on Reflect will cause push back. The amount of push back varies on the ability and damage dealt.
• Tanking melee bleed ticks from Vorago's Smash will cause push back. The amount of push back per tick of damage is 1/team size (e.g. duos is 1/2 tile per tick of damage)
• See the weekly rotation sections below for other sources of push back.
⬥ Only one tile of push and push back per tick can occur.
• Push and push back can occur on the same tick.
• Because only one tile of push back can occur, an auto attack hitting multiple players will still only push back one tile.
• An auto attack that hits multiple players can only be blocked if all players are under the effects of . If even one person receives damage, the auto attack will cause push back.
⬥ Vorago will slightly raise his defense level for each tile Vorago is pushed east past the starting point.
General Phase Notes
⬥ The Maul of Omens can be created by clicking any of the maul pieces while all three are in the mauler's inventory.
⬥ Once Vorago is at the eastern edge of the arena, use the Maul of Omens within halberd range by clicking on the maul.
⬥ After the first auto attack, Vorago's attack speed changes to once every three ticks.
• Vorago no longer clears / after this point.
⬥ Vorago cannot attack on the same tick he is pushed.
• The next Blue Bomb will be at least 3 ticks after he is pushed.
• Players can stall Vorago's attack rotation indefinitely by pushing Vorago at least once every three ticks.
⬩ This is commonly known as "stall" and "stalling".
⬩ With a strong, well-timed rotation, teams can completely prevent Vorago from attacking.
⬩ Finishing this phase before Reflect, or even the first special attack is possible. These are known as 0 link and 0 spec phases respectively.
⬩ These strategies employ more aggressive rotations, which usually include the Bomb Tank skipping for a damage boosting ultimate. However, these strategies can be slower if the phase does not finish before Reflect.
⬥ List of stall durations:
• Vorago is pushed: 3 ticks
• Vorago pushes back (any source): 6 ticks
• Vorago uses a special attack:
⬩ Purple Bomb: 5 ticks
⬩ Green Bomb: 10 ticks
⬩ Teamsplit: 4 ticks
⬩ Vitalis: 4 ticks
⬥ Stall duration is overwritten by the most recent cause of stall.
• e.g. If Vorago throws a Green Bomb on tick 1, and Vorago is pushed on tick 2, Vorago will throw a blue bomb on tick 5. The push stall duration overwrites the Green Bomb stall duration.
⬥ Because the arena is narrow, players must be careful about preventing AoE damage from Blue Bombs.
• The Bomb Tank should be on the northern edge of the arena, while the rest of the team should be on the southern edge. This prevents Blue Bombs from dealing AoE damage.
⬥ While can mitigate some push back, players are highly recommended avoiding it. See #deleted-channel for a detailed explanation.
⬥ Vorago's aggro is random and cannot be controlled.
• cannot be activated on Vorago during this phase.
⬥ Vorago's Smash attack is only three smashes long, rather than five.
• Because aggro is random, all players must be ready to clear Bleeds.
• Distance Bleed clears on this phase are determined by distance from where the player received the bleed, not distance from Vorago.
⬩ Using  or towards Vorago from the far west is an option for Bleed clears.
⬩ If a Bleed is received in an undesirable spot (roughly half way between Vorago and the west side of the arena), there may not be enough distance in either direction to clear the bleed. If this happens, use , tank the entire Bleed duration, and DPS as much as possible.
• Dual crossbow range is occassionally not enough to clear Bleeds.
⬩ Players should with a 2-handed ranged weapon, or / instead.
⬥ There are three ways to clear a triple Bleed.
• Standard Method: → →
⬩ Easier to execute
⬩ Spends two abilities that deal little damage (, )
• Advanced Method: → →
⬩ Difficult to execute losslessly
⬩ Spends only one ability that deals little damage (), and only if a player receives all three Bleeds.
⬩ Mages will need to turn their run off after to ensure enough distance to .
⬩ Rangers will need to camp a 2H weapon to ensure enough distance to .
• Alternative Advanced Method: + → →
⬩ Difficult to execute losslessly
⬩ Helps meleers stay melee distance during Bleed clears
⬥ The primary timing is when the first Blue Bomb lands, after Vorago's weekly special attacks.
• This can be delayed to the second Blue Bomb if using .
⬥ If the team expects more than one weekly special attack, the Bomb Tank and Base Tank swap positions immediately after Vorago's third Bleed.
• The time between weekly special attacks is too short for one player to two consecutive weekly special attacks.
⬥ There is an earlier Base Tank timing, after Smash but before Vorago's weekly special attack.
• Commonly referred to as "early cade"
• Used if the team can finish the phase before or on the weekly special attack release.
P5: Ceiling Collapse/Teamsplit
Vorago's Attack Rotation

Phase Notes
⬥ Ceiling Collapse does not have its own unique phase 5 mechanic, and instead uses the Teamsplit phase 5 mechanic.
⬥ Tanking the 8k damage from Teamsplit does not cause push back, and can be used as a reliable source of damage.
⬥ Because Teamsplits cancel defensive abilities and put them on cooldown, the last Blue Bomb before Teamsplit usually cannot be blocked.
• Unaware players may try to this Blue Bomb at low HP without Deflect Magic, potentially receiving fatal damage.
• Early is not used on this rotation.
P5: Scopulus/The End
Vorago's Attack Rotation

Phase Notes
⬥ Scopulus does not have its own unique phase 5 mechanic, and instead uses the The End phase 5 mechanic.
⬥ Purple Bombs do not cause push back if they only hit their designated targets.
⬥ Each Purple Bomb causes one tile of push back if they deal AoE damage.
⬥ Purple Bomb timers are counted in ticks, not seconds.
⬥ Purple Bomb timers are always at least 5 ticks apart. Two Purple Bombs will never explode at the same time.
⬥ In duos, the Purple Bomb can largely be ignored since players are already separated from each other.
⬥ In trios, the Base Tank does not stand near south edge like usual. The Base Tank instead stands near the north edge, and close to Vorago.
• Since the Bomb Tank is also north, the Base Tank and Bomb Tank should watch their distance from each other.
• Trio positioning:

⬥ In teams of 4+, all members except the Bomb Tank stand on the south wall. Each player should run north when the timer reaches 5 ticks, wait for the Purple Bomb to explode, then run back south.
• The number of Purple Bombs is capped, so not every person may receive one in large teams.
P5: Vitalis
Vorago's Attack Rotation

Phase Notes
⬥ Vitalis Orbs always cause push back if at least one player is standing in the Vitalis Orb explosion.
⬥ Vitalis Orbs do not cause push back if no one is standing in the Vitalis Orb explosion.
⬥ During this phase, Vitalis Orbs spawn 2-4 Vitali instead of 5.
⬥ Vitali melee attacks cause push back. The amount of push back per Vitali melee attack is 1/team size.
⬥ Players will inexplicably change targets to Vorago when targeting Vitali. This can be especially detrimental during Reflect.
⬥ can be preplaced to help deal with Vitali.
• are mutually exclusive with most rotations because count as valid targets.
⬥ This phase can be extremely difficult in duos. Teams without sufficient DPS will struggle to generate enough push to counteract the guaranteed Vitalis Orb push back, and the push back from Vitali.
P5: Green Bomb
Vorago's Attack Rotation

Phase Notes
⬥ The 10k hit from tanking Green Bombs without passing causes push back.
⬥ The 1k AoE damage from passing Green Bombs causes push back.
⬥ Passing a Green Bomb without dealing AoE damage does not cause push back.
⬥ Because tanking Green Bombs forces Vorago into Reflect, and Vorago's attacks can be stalled for an indeterminate amount of time, the number of Blue Bombs between the Green Bomb launch and reflect can be anywhere from 0 to 5.
⬥ Because this is the only week during which Blue Bombs can be skipped with more DPS, is highly recommended.
⬥ As with previous phases, the preferred method of handling the Green Bomb is to tank the 10k damage with a .
• In duos, players should already be on opposite sides of the arena.
• In trios, the TL5 should be on the south edge, while the Bomb Tank and Base Tank should be on the north edge.
⬩ The Base and Bomb Tanks should take extra care not to pass the Green Bomb between each other, as they are both on the north edge of the arena.
• Trio positioning:
• In teams of 4+, everyone but the Bomb Tank should stand on the south edge. The player with the Green Bomb should run to the north edge, tank the 10k hit, and run back south.
⬥ While the Green Bomb is normally followed by a long delay in Vorago's attacks, this only happens for the first Green Bomb. Subsequent Green Bombs will be followed by Blue Bombs in quick succession.
• The Bomb Tank must be at a higher HP than usual to tank subsequent Green Bombs with a .
• A Bomb Tank cannot survive subsequent Green Bombs on his own without a .
⬩ Should the phase last this long, the onus lies on the Base Tank to save the Bomb Tank.
⬩ The preferred method to deal with this situation is + .
For those interested in reading up on more Vorago-related information and theorycrafting, take a look at Rago Hub and their wealth of knowledge: https://discord.gg/uqGJbKH