Melee DPM Advice
Introduction
In RuneScape PvM, the meta at the time of writing is about pushing out as much damage in as little time as possible. It is important to understand that good and efficient PvM, especially at the higher tiers, is about squeezing out as much damage as possible in between mechanics.
This channel will go over general damage output lessons, ability prioritisations, crafting a rotation, a learning path, common mistakes, and tips and tricks.
Related Channels
For further information and reading, you can refer to the following resources.
Note: If you have any difficulties in using the tools or understanding what the information means, you can always ask in #pvm-help.
Revolution Bars and General Background Knowledge
For general PvM terminology, DPS tips, and revolution bars, check out their respective sections in #General DPM FAQ.
Ability Information
Note: If you have any difficulties in using the tools or understanding what the information means, you can always ask in #pvm-help.
Ability Prioritisation
Ability Ranking
⬥ Generally, high damaging abilities should be prioritised and used more often than low damaging abilities.
• This can be affected by what equipment the player owns, such as Gloves of Passage  or an Abyssal Scourge
  or a Masterwork Spear of Annihilation
  and so when upgrading gear, it is worth spending a little time to learn how it affects your abilities.
⬥ The following image shows the relative strengths of abilities in different scenarios, ranked by damage per tick.
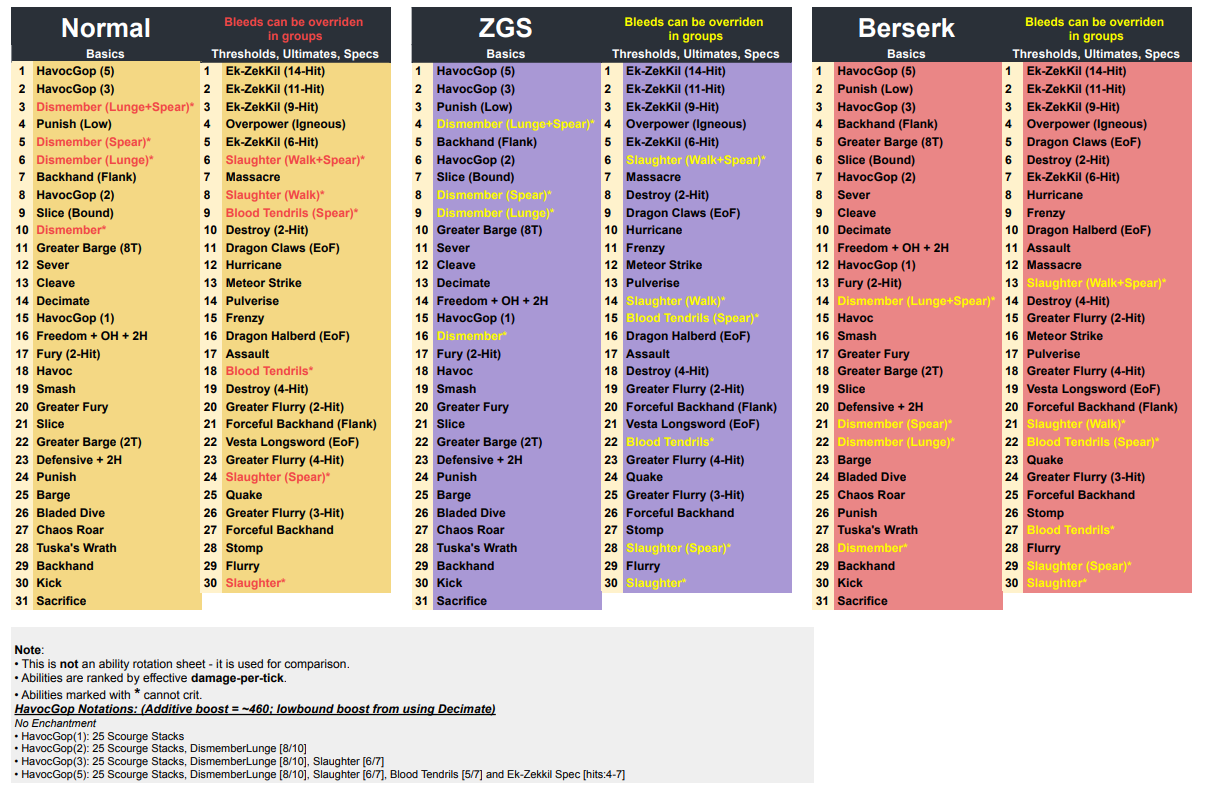
Note: This is not an ability rotation, only a damage comparison chart. It does not consider ability cooldowns or any specific PvM encounter, simply damage-per-tick in a vacuum. For information on how to incorporate these into a proper rotation, see the Building A Melee Rotation section below or in the pinned Table of Contents.
Dual Wield vs 2H Camp
Note: This compares strictly camping dual-wield vs. camping 2H, but it is recommended to juggle, as it gives access to all the following benefits and more.
Dual-wield Camp Benefits + 

⬥ Access to both Hurricane  and Destroy
  using T85/95 weapons dropped by Arch-Glacor.
• The off-hand allows use of Hurricane with dual-wields.
• When both Leng weapons are equipped, the shared cooldown between and is removed.
• The T95 main-hand also has a situational special attack  that raises your damage cap for 30 seconds.
⬥ Easier to use switches.
• Can use  or off-hand switches like Flanking
  easier, as no extra main-hand switch is required.
⬥ Access to Destroy as an ability.
2H Camp Benefits 

⬥ Access to 2H autos, which are much stronger than dual-wield autos.
⬥ Access to halberd-range weapons like Laniakea's Spear  and Noxious Scythe for bigger 5x5 AoEs.
• With Laceration boots  even Bladed Dive
  can become a 5x5 AoE.
• Benefits abilities like Hurricane and Meteor Strike  .
.
⬥ Some AFK Methods may benefit from the bleed-extending effect of the Masterwork Spear of Annihilation , etc.
⬥ Can be more revolution-friendly, such as for Slayer  tasks or AFK grinding methods.
Building a Melee Rotation
Here we'll cover some of the points to keep in mind to build a successful Melee DPS rotation. For more information on how these rotations are affected by certain items or switches, such as see the Important Items section.
Note 1: In the current meta, camping dual-wield > camping 2H, but you can juggle weapons at times. Additionally, some switches used in melee are 2H.
Note 2: If Greater Fury  is unlocked, you can replace Fury
  , with it.
Managing Cooldowns
⬥ High damaging abilities often come with long cooldowns - when building a rotation, ability prioritisations and cooldowns should be on your mind.
⬥ If you use all of the high damaging abilities at once, their cooldowns will force you to use multiple weak abilities in succession while waiting to use them again.
⬥ To avoid this problem, you want to use filler abilities to space out your high damage abilities, to pace yourself and manage cooldowns.
⬥ The filler abilities that you can build your rotations around for melee can vary, based on camping a single weapon or juggling dual-wield and 2H:
• If camping weapons: (Greater) Fury / will be used as fillers.
⬩ Both have decent damage (157% maximum damage) and short cooldowns (9t/5.4s, or 3 GCDs).
⬩ They can be used with both dual-wield and 2H.
• If juggling 2H/DW: (Greater) Fury is still an option, but now Cleave  and Decimate
  can form the backbone of rotations.
⬩ and are both strong (188% maximum damage) and have cooldowns of relatively short cooldowns (12t)
• Both have decent damage (157% maximum damage) and short cooldowns (12t/7.2s or 4 GCDs).
• They do not share cooldowns - if using 2H/DW switches, you can use both.
Basic Pattern
⬥ When camping either 2H or DW, Fury should form the foundation of your rotation. Aside from being a suitable filler ability, it also provides a crit chance buff that helps boost the following ability.
• Remember to cancel after 2 hits (3t/1.8s), by using the next ability as soon as possible. This is not required when using
⬥ The basic pattern when camping 2H or DW uses often, in 'blocks' of 3 abilities:
• [ → Ability → Ability ] → Repeat
⬥ When building adrenaline, fill the empty slots with strong basics like the following, prioritising those that can crit. Various updates have evolved some basics into Elite versions. These are stronger than core basics and further elaborated later.
⬥ Elite Basics:
• Havoc (with Gloves of Passage) 
⬩ Ensure bleeds are active during the effect
• Punish (if target has less than half health) 
• Dismember (Lunge) 
• Backhand (Flanking) 
⬥ Core Basics:
• Decimate (DW)
• Cleave (2H)
• Sever 
• Dismember 
• Havoc (DW) 
• Smash (2H) 
⬩ Anything weaker than this (157% maximum damage) should be avoided.
Note 1: cannot crit but is still a strong ability.
Note 2: With Gloves of Passage worn, can potentially be stronger than abilities like and - see the section on Gloves of Passage for more info.
⬥ When it comes to weapon juggling, some recent powercreep has made 2H/DW juggling for the sake of having more abilities to use less common.
• With Lengs you can use both and just camping DW.
• Enhanced Gloves of Passage makes strong.
• With Abyssal Scourge camping DW becomes extremely strong due to its passive effect.
• becomes more of a filler ability than something you aim to constantly use.
⬥ Prior to getting the above upgrades, if you juggle 2H/DW, a basic rotation using and in 'blocks' of 4:
• [ → → Ability → Ability ] → Repeat
Note: This pattern becomes less important as you add the upgrades mentioned earlier, and you may prioritize more dual-wield abilities over switching to 2H for specifically.
⬥ Once your rotation gets going, you can start using abilities like thresholds or better to fill in the blanks.
Building The Rotation
Note: The default Berserk  duration is 34t/20.4s seconds, but can be extended to 44t/26.4s from the 3-piece set effect of Vestments of Havoc


 . Examples of full Berserk rotations can be found at the bottom of this guide in the General Berserk Rotations section.
⬥ Berserk lasts 20 seconds, but only has a 60 second cooldown. We want to prioritise building to 100% adrenaline and using Berserk often, as it boosts damage by 100%.
• The exception to this is when the fight would end too quickly, or mechanics occur, and you can't benefit from the full duration.
• Ideally, enter boss fights with 100% adrenaline so you can activate it immediately at the start.
⬥ You can think of your overall rotation as two repeating sections:
• [20.4s inside ] → [39.6s outside] → Repeat
⬥ Both in and out of Berserk , you will want to prioritise your strong thresholds, special attacks, and modified ultimates.
• Assault 
• Destroy
• Hurricane
• Greater Flurry 
• Forceful Backhand (Flanking) 
• Igneous Overpower 
• EZK 

• etc.
⬥ Additionally, when not in the following thresholds are also strong, especially with the Masterwork Spear of Annihilation :
• Slaughter (walked) 
• Blood Tendrils 
⬥ The goal is to fit as many of these strong abilities within the duration of as you can to maximise the damage potential.
• While inside you deal double damage - take full advantage of this.
• As is relatively shorter in duration compared to  or
or  , so you will have to plan your cooldowns a little carefully.
• Continue to use the basic building block patterns to space out your abilities as required.
⬥ Typically, you do not want to use bleeds inside as it does not boost them, but you may have to at times, such as:
• If you need the extra adrenaline is an option.
• If you run out of good abilities (possible at times).
⬥ While waiting for cooldown, you have time to make use of your thresholds (and stronger) adequately.
• You do not want to needlessly camp 100% adrenaline.
• There are a few options for this depending on your gear:
⬩ Ek-Zekkil special attack (typically used in an EoF  )
)
⬩ Zaros Godsword special attack
⬩ Igneous Overpower
⬩ All the other thresholds available to Melee.
• You can start building to 100% adrenaline when is nearly ready to use again.
Note 1: For more information about these options, see the sections on the EZK vs. ZGS vs. Overpower.
Note 2: To see examples of how to maximise your damage inside see the section at the bottom called General Berserk Rotations.
Tips
⬥ Any basic ability with damage lower than Fury is considered a weak ability and should be avoided when possible. Sometimes you may be forced to use them. Don't sweat it too much.
• Slice 
• Sacrifice 
• Tuska's Wrath 
• Backhand (no Flank) 
• Regular Barge 
⬥ You may hear people refer to abilities as '188s' - this means abilities that have a maximum damage of 188%, including Sever , Cleave , and Decimate amongst others.
⬥ The critical chance buff gained through is wasted if the follow-up ability cannot crit, but it may be unavoidable sometimes.
⬥ If Greater Fury is owned , there are scenarios where it may be better than some strong abilities like / / etc.
Cancelling Channels
Why Channelled Abilities are Important
⬥ It is important to properly cancel abilities in order to not lose any ticks, or damage potential.
• Animations can be unreliable, and longer than the actual hit duration of the ability.
• It can be higher damage-per-tick, or net you more adrenaline, to cancel long channels early.
• Abilities like and channels that are not cancelled, suffer significant delays with revolution.
⬩ See the following example.
When to Cancel Channels
Reminder: 1.8s = 3t = 1 GCD
⬥ Fury
• Cancel after its 2nd hit as global cooldown ends (3t/1.8s).
⬥ Assault
• Typically cancelled on the 4th hit (7t/4.2s), but other cancel timings include 3 hit (5t/3s) and 2 hit (3t/1.8s).
⬥ Destroy
• Timings to cancel on 2/3/4 hits are the same as Assault cancel timings.
⬩ When Vestments of Havoc are worn, and Greater Barge  is used, typically you'll end up doing a second 2 hit in your rotation.
⬥ Greater Flurry
• Timings to cancel on 2/3/4 hits are the same as Assault cancel timings.
• You can 4 hit if you need to bring off cooldown faster.
• Otherwise do the number of hits you require to align your rotation, so that you can fit one ability on the last tick of for boosted damage.
⬥ Note that Assault suffers from different hit timings based on if cast with DW or 2H, but the cancel timings will remain un-affected.
• hit timings will change from ticks 2/4/6/8 to ticks 3/5/7/9 (delayed by 1 tick) if cast with DW, but the cancel timings remain the same.
Important Melee Abilities
Certain Melee abilities are worth noting, due to their behaviour and how they can be used. Here, we cover some of these abilities.
Greater Fury
How It Works
⬥ Greater Fury is an upgraded version of regular Fury , unlocked by reading a Greater Fury ability codex  costing
  250,288,252.
⬥ Greater Fury hits once dealing 157% ability damage, giving the next ability an added 10% critical strike chance.
• Switching your main-hand weapon loses the buff.
• If crits, the first hit of the next ability will be a guaranteed crit.
• As it becomes a non-channelled ability, it is Revolution-friendly.
Is it Worth it?
⬥ Generally, Greater Fury is not a recommended upgrade.
• Regular Fury has better synergy with the Abyssal Scourge in a fight
⬥ It is possible for to be stronger (on average) than some 188% damage abilities ( / / ) under the right circumstances.
• This is due to its potential guaranteed crit buffs.
• This requires sufficient critical chance stacking, using a Grimoire  and Biting 4
  perk active, and the next ability must be both high-damage and be able to crit.
• Some examples of follow-up abilities include Igneous Overpower , charged Greater Barge and Assault .
Greater Barge
How It Works
⬥ Greater Barge is an upgraded version of regular Barge , unlocked by reading a Greater Fury ability codex costing 138,719,857.
⬥ It has two components - its own damage, and its passive effect.
⬥ Normal ability effect:
• For each tick (0.6s) since a player stopped attacking their target, damage range increases (+2% minimum hit, +10% maximum hit), capping at 10 ticks for a damage range of 45%-225%.
• It also clears binds on the player, and where possible, will also bind a target for 11t/6.6s.
⬥ Additionally, if it has been at least 8t/4.8s since the player has attacked a target, it gains another effect:
• This is indicated by the Greater Barge icon appearing on your Buff Bar.
• Using the ability will cause a second buff icon  to appear on your bar.
• The next following melee channelled ability within 10t/6s will become a damage-over-time (DoT) instead.
• This is the reason is so strong.
Note: Channelled abilities that become DoTs through the effect of are typically called barge "bleeds" - however, they are not actually bleeds.
Why It's Good
⬥ Being able to turn channelled abilities into DoTs offers the following advantages:
• It reduces the time required to cast them to 3t/1.8s, allowing you to continue using other abilities while they deal damage.
• This is very strong when combined with something like Berserk to fit more high-damaging abilities into its short duration.
• It also increases the burst potential of Melee  in a fight.
⬥ This effect is typically used at the following places:
• At the start of a fight.
• After any mechanic that forces you to stop attacking for a period of time (e.g. reflect at Vorago).
• After a Berserk mid-combat.
Using Greater Barge in Combat
⬥ To use in combat, there are two ways to do it.
⬥ Method 1:
• Ability + click away → any Defensive → →
⬩ You must click away at least 1 tick before the defensive, or you will not get the bleed effect.
• Defensives include abilities such as Anticipation  , Freedom
  , etc.
⬥ Method 2:
• Ability → wait 2 ticks → →
⬩ Doing it this way saves 1 tick (8t vs 9t) compared to the first method.
Notes
Note: points marked with * are likely unintended bugs.
⬥ Multiple DoTs can stack on the same target, so it is group-PvM-friendly.
⬥ Bleeding will reduce the cooldown of for all 4 hits.
⬥ Unlike normal non-damaging abilities, ZGS special attack will try to drag you in when using it, so remember to click away as you use it otherwise you will auto-attack and lose the buff.
⬥ * Greater Barge does not give adrenaline if you still have a target that is dead.
⬥ Damage dealt from the bleed will be affected by the equipment currently worn.
• e.g. if you bleed Assault with T80 weapons and change to T90, any remaining hits will be calculated with T90 damage instead of T80.
⬥ Each bleed hit rolls its own chance to hit.
⬥ * If you stall a barge bleed the following will occur:
• Hit 1 will be stalled, and when released will hit at the time it usually would as the first hit of that ability.
• Hits 2-4 will not be stalled, and will hit the target at their usual timing, no matter how far you currently are from the target - this allows the hits to be far-cast.
Greater Flurry
How It Works
⬥ Greater Flurry is an upgraded version of regular Flurry  , unlocked by reading a Greater Flurry ability codex
  costing 53,139,601.
⬥ Each hit of reduces the cooldown of Berserk by 2t/1.2s, up to a maximum of 4 hits, or 8t/4.8s.
⬥ The damage dealt depends on the situation:
• Against a single target, damage is increased, dealing 31-157% damage per hit.
• Against multiple targets, the damage is the same as normal Flurry .
• If bled with it does NOT act as an AoE.
Why It's Good
⬥ It can help reduce the cooldown time of Berserk significantly, used almost 3 times per minute. This is important to minimize the amount of time spent outside a damage-boosting ultimate.
⬥ It acts as an extra strong damaging threshold for Melee users.
⬥ You can cancel it on a desired hit to help line up timings for an ability on the last tick of .
• For more information, see !lasttick command.
Chaos Roar
Note: for a quick summary, you can use the !chaosroar command.
How It Works
⬥ Chaos Roar  is a basic ability unlocked by reading a Chaos roar Ability codex
  costing 42,675,009.
⬥ It has an initial hit of 20-130%, but also doubles the base damage of the next melee ability used with 12t/7.2s.
• This includes all hits of bleeds and multi-hit abilities like Hurricane and Igneous Overpower .
• For channelled abilities like Assault only get their first hit boosted.
Why It's Good
⬥ It can be extremely damaging when followed-up with certain abilities:
• Ek-Zekkil special attack can deal massive damage used after .
• Slaughter and Tendrils with are strong choices as well (note that will give double recoil damage).
• Can follow up with Hurricane or Meteor Strike for high AoE clear damage.
Important Items
This section will examine equipment that is useful for Melee , and should be incorporated where relevant as you get comfortable with handling them. Not all items are applicable in all scenarios, so use your best judgement.
Flanking Switch
How It Works
Note: To learn more about how flanking angles work, check out #mechanics.
⬥ This is a simple, easy-to-get, relatively inexpensive and strongly recommended switch, especially for group-based content.
⬥ Recommended to put on an off-hand weapon to use with dual-wield.
⬥ When standing 'behind' bosses, Flanking  turns Backhand and Forceful Backhand
  into far stronger abilities at the cost of their stun. At it's maximum rank of Flanking 4:
• The damage range of is increased from 20-100% up to 52-260%, making it one of the strongest basics.
• The damage range of is increased from 40-200% up to 64-320%, making it much stronger.
⬥ In order to get 2 in one rotation, the first must be at the latest the second ability after .
• This is before the 3-piece set effect of Vestments of Havoc is acquired.
Note: (Flanking) Forceful Backhand may not heavily prioritised due to the availability of stronger thresholds, however it can help salvage a rotation in a pinch.
Sliver Enchantments
How It Works
⬥ With the release of Zamorak  and ED4, slivers were added to the game.
⬥ Slivers can be consumed with some other items to create enchantments.
• Enchantments are one-off consumables that permanently unlock certain effects.
⬥ There are 3 enchantments relevant to Melee :
• Enchantment of Agony  costing 62,194,695.
⬩ Increases the non-bleed damage-boosting effect of enhanced Gloves of Passage by +6%.
⬩ Increases their bleed damage buff effect by +5%.
• Enchantment of Heroism  costing 63,523,607.
⬩ Champion's Ring  has +1% increased critical hit chance.
⬩ also adds +1.5% critical hit damage per bleed on the target.
⬩ If bleeds are used on the target, the upgraded is better than the Reaver's Ring  .
.
• Enchantment of Savagery  costing 29,549,457.
⬩ Increases the damage-boosting effect of the Terrasaur Maul  by a further 5%.
Jaws of the Abyss 
How It Works
⬥ It is a T85 power armour helmet that has one a strong passive: melee basics give +2% adrenaline per active bleed on a target.
⬥ It is camped for this effect, and is a high priority upgrade.
⬥ Bleeds that affect include the following:
• Dismember
• Slaughter
• Blood Tendrils
• Massacre 
• Ek-Zekkil special attack
• Abyssal Parasites from Abyssal Scourge / Abyssal Armour Spikes 
• Fragmentation Shot 
• Corruption Shot 
• Deadshot 
⬥ The effect is doubled under Natural Instinct  buff.
buff.
Key Considerations
⬥ Despite being T85, it is the best-in-slot where Trimmed Masterwork Armour 

 set effect is not absolutely vital to survival.
⬥ The extra adrenaline from the effect can help make stronger rotations, and is required for some meta rotations to work.
⬥ As the effect activates without any additional input required from the user, this is a revo-friendly buff.
Abyssal Scourge
Note: See !lengs and !scourge for a summary.
How It Works
⬥ It is a T92 mainhand melee weapon, currently the best-in-slot main-hand option for long-term dual-wield damage, and is a high-priority upgrade.
⬥ It has a passive effect called Abyssal Parasites:
• Every melee hit with refreshes and adds a stack of Abyssal Parasites.
• Parasite stacks deal 18-31 bleed damage every 1.8s, per stack , increasing up to 50 stacks.
• Stacks reset after 9 seconds if not refreshed.
• Parasite stacks count as a bleed.
⬥ Parasite stacks can also be added by at a lower rate.
Key Considerations
⬥ Camping is extremely strong, and building stacks at the start of a fight is important to quickly benefit from the full bleed damage.
⬥ Stacks can be gained faster using bleeds and multi-hit abilities, including:
• Dismember is typically cast with a Masterwork Spear of Annihilation but can be cast with at the start of a fight to build stacks quicker.
• In rare cases with out damages in , see the link below to get an idea of when this is worth doing.
• Similarly, the Ek-ZekKil special attack can be cast with for parasite stacks.
⬩ Only do this if you cannot benefit from the full 14 hits from using instead.
⬥ It is better to use Leng mainhand over when:
• The additional accuracy is required.
• Parasite stacks cannot be consistently built.
• Need to use Hurricane and Destroy within 20 seconds of each other, using as a switch.
⬥ Between and Lengs , it is generally the case that Drygores 
 and Khopeshes
 are irrelevant in the current meta.
Leng Weapons
Note: See !lengs and !scourge for a summary.
How It Works
⬥ Lengs are T95 (or T85 for the weaker variant) dual-wield weapons that will be your primary dual-wield weapons, used alongside the Abyssal Scourge as a switch.
⬥ The off-hand allows you to use Hurricane with dual wield.
⬥ When any combination of the T85/T95 main-hand and off-hand Lengs are worn, and no longer share a cooldown.
• This effectively gives an extra threshold to that can be used.
⬥ The T95 main-hand Leng special attack is called Icy Tempest:
• Increases hitcap for all melee damage by 30%.
• Costs 20% adrenaline, and has a 100t/60s cooldown.
Key Considerations
⬥ Using to de-sync and cooldowns lets you use both with dual-wield - this is more DPS due to the extra threshold.
⬥ can be cast with and stalled, then released with to benefit from both Parasite stacks as well as the cooldown benefits.
⬥ It is better to use Leng mainhand over when:
• The additional accuracy is required.
• Parasite stacks cannot be consistently built.
• Need to use Hurricane and Destroy within 20 seconds of each other, using as a switch.
⬥ The special attack is recommended to be used pre-kill or in timegated phases, where you can benefit from the increased hitcap, such as:
• Tarakat (Salve Amulet  damage boost).
• Raksha (anima damage boost in phase 4).
• Seiryu (at the last crystal).
• Telos (under  and in phase 5).
• At War's Retreat (using the adrenaline crystals) for fights where you at the beginning.
⬥ Between and Lengs , Drygores and Khopeshes are mostly irrelevant in the current meta.
Masterwork Spear of Annihilation (MSoA)
How It Works
⬥ The MSoA is the upgraded form of the regular Spear of Annihilation.
⬥ It increases the base duration of bleed abilities by 50% rounded down.
⬥ It is recommended to use it as a bleed switch, perked with Lunging 4  for .
for .
⬥ The following bleeds are affected by :
• Dismember (5 → 7 hits)
⬩ With Strength Cape  (8 → 10 hits)
• Blood Tendrils (5 → 7 hits)
• Slaughter (5 → 7 hits)
• Ek-ZekKil special attack (with EoF) (6 → 9 hits)
• Massacre (5 → 7 hits)
⬥ The effect does not work with Greater Barge bleeds, as they are not considered actual bleeds.
Key Considerations
⬥ This weapon is typically used to switch for bleeds but may also serve as a 2H switch in general if you do not want to bring more items.
⬥ It drastically improves the damage of the abilities it affects.
• becomes your strongest basic ability.
⬥ The extended bleeds pair well with the Champion's Ring and Gloves of Passage (as well as their respective Enchantments).
Laniakea Spear
How It Works
⬥ It is a halberd-range T82 weapon with T90 damage and T75 accuracy, with the range of a halberd.
⬥ Its passive effect causes poison  to proc 5% more often, dealing 5% more damage.
Key Considerations
⬥ Normally not worth using over higher tier weapons, but the following can make it worthwhile:
• If Bik arrows  are used to scale damage.
• If using a Blood Reaver  along with a Scrimshaw of Vampyrism
  and/or Vampyrism aura
  .
.
• It can be better than a Noxious Scythe on poisonable targets with 100% hitchance.
⬥ It can be used to clear pools with Bladed Dive at Raksha instead of if you perk it with  +
+  for the minimum hit increase.
⬥ One rarely-done, extremely niche application is called Lani-flicking:
• It is when you cast abilities with better weapons but switch to during GCD, to try and increase procs.
• This is extremely click intensive and prone to mistakes.
Ek-ZekKil (EZK)
Note: Use !ezkeof (or see the section on EZK EoF) for a summary on why you should EoF your EZK .
How It Works
⬥ The EZK's special attack, Igneous Cleave costs 50% adrenaline, has a 60 second cooldown, and has two components:
• An initial hit of 62-190% ability damage.
• A follow-up 6-hit bleed that hits every 4 ticks, with each hit dealing 5% more damage multiplicatively than the previous hit.
⬥ The follow-up bleed can be increased up to 9 hits using the Masterwork Spear of Annihilation if using an EZK EoF special attack .
⬥ While the special attack is active, each time a bleed used on the target, gains 1 extra hit (capped at 5 extra hits).
⬥ The following abilities extend duration:
• Dismember
• Slaughter
• Blood Tendrils
• Massacre
• Combust 
• Frag Shot
• Deadshot
• Abyssal Parasites from Abyssal Scourge
• Morrigan's Javelin spec  - PvP only.
• Combust effect from Dragon Rider amulet 
 - 10% proc chance.
⬥ The following abilities do not extend duration:
• Corruption Shot
• Corruption Blast 
• Puncture from Greater Dazing Shot 
• Incendiary Shot 
Key Considerations
⬥ It is strongly recommended to place the EZK in an EoF to be able to use the special attack with for the longer bleed. See !ezkeof for more.
⬥ It is one of the best attacks to follow up after Chaos Roar for the massively increased damage.
⬥ You can use with instead to get more stacks of Abyssal Parasites, if you will not benefit from the increased duration by using it with instead.
Gloves of Passage
How It Works
⬥ The passive effect, Enduring Ruin, grants Smash and Havoc two effects:
• Next non-bleed attack within 10t/6s deals ~10% more additive damage.
⬩ This does not stack with or other boosting effects.
⬩ If a bleed ability is used, the effect is consumed but does not benefit the player.
• Target takes 20% more multiplicative damage from bleeds for 17t/10.2s (including bleeds already in effect).
⬥ The effect is retained if switching gloves after using /  .
.
⬥ If an Enchantment of Agony is consumed, these gloves can be upgraded from T85 → T90 enhanced version to benefit from the following:
• Damage-boosting effect increased by +6%.
• The bleed damage buff is increased by a further +5%.
Key Considerations
⬥ Melee is a bleed heavy style - it has many abilities that benefit from the bleed damage-increasing effect like / / / .
• It also increases the parasite bleed from using or .
• The MSoA only amplifies this effect.
⬥ This makes / far stronger than their 157% maximum damage may suggest.
• with 11 stacks is stronger than:
⬩ / /
• with an active / / / / bleed is stronger than:
⬩ / / 
Stalling
⬥ The increased next-ability damage from using / can be applied to multiple abilities using stalling.
⬥ The following examples work both with and interchangeably.
⬥ When wearing :
• → (stall) Ability 1 → (release) Ability 1 + Ability 2 will buff both abilities
• (stall) → (release) + Ability 2 will result in Ability 2 being buffed as normal.
Note: The following section requires further testing!
⬥ When not wearing :
• The boost will extend for 2 ticks (i.e. all abilities on 1 tick + the following tick).
• → 5TAA → Ability will both the auto and ability.
• → (stall) Ability 1 → (1t early release) Ability 1 → Ability 2 will also work.
• Equipping on tick 3 when click-releasing an ability on tick 2 in the second method, will not break the effect, except if the abilities are: 2H / channelled / special attacks.
Vestments of Havoc
Note: Use !armour to see raw damage comparisons between different tiers of armour.
How It Works
⬥ These are a T95 set of melee power armour that are intended to be used as 'glass cannon' armour - more damage at the expense of defence.
• They are T95 but have T100 damage bonus, and an armour bonus equivalent to T75 power armour.
⬥ The set effect, Herald of Chaos, depends on how many pieces are worn.
• 2-piece effect: Gain 15% adrenaline over 18 seconds after casting a melee ultimate ability.
⬩ does not affect the adrenaline gain.
⬩ Using a second ultimate while it is active will end the effect and instantly add +20% adrenaline.
• 3-piece effect: Berserk duration is extended by 10t/6s, from 34t/20.6s to 44t/26.2s.
• 4-piece effect: Adrenaline cap while wearing all 4 pieces is raised to 120%.
⬩ This stacks with Heightened Senses  to 130%.
⬩ The effect instantly ends if any piece is unequipped.
Key Considerations
⬥ By sacrificing some defence, the player gains a substantial amount of damage potential.
⬥ The low armour rating usually does not matter, but some exceptions exist (such as melee Telos).
⬥ The 2-piece set effect can act as a replacement for Limitless  .
.
⬥ The 3-piece effect can adjust the way rotations are executed:
• Doing → → allows you to use a second (2 hit) → before runs out.
• The extended duration requires more strong abilities to fill - it is common to see being used within for this reason.
⬥ The 4-piece effect can be used as a switch at the start of a fight, but requires a helmet switch (with ) to use properly.
• This allows you to → → at the start of a fight.
Dragon Battleaxe 
How It Works
⬥ The special attack Rampage costs 100% adrenaline and has the following effects:
• Drains 10% (rounded down) of  /
/  /
/  /
/  levels.
• Boosts  level by 10 + 1 level for every 4 levels drained from other stats.
• Multiplicative 10% reduction on hitchance.
• Multiplicative 20% damage boost (hidden).
⬩ Stacks with going from 1.25x → 1.5x damage boost.
⬩ Stacks with Berserk (2.0x → 2.2x boost) - making only a 10% damage boost, not 20%.
Key Considerations
⬥ is mostly used when the hitchance debuff will not matter, and you have time to use it.
⬥ Examples of places it can be used:
• Where you cannot deal damage for a time (e.g. Taraket while phasing).
• Where your damage output is not a priority for a time (e.g. Ambassador spinners' phase).
• Where you can use it in advance (e.g. War's Retreat adren crystals before a fight, or preparing for a speedkill).
Important EoFs
This section covers weapons that are worth placing into an Essence of Finality amulet for access to their special attacks.
Dragon Claws EoF 


How It Works
⬥ Dragon Claws have a special attack called Slice and Dice that consumes 50% adrenaline to deal 4 damaging hits on the target, dealing a total of 184-600% ability damage.
⬥ They are a useful way to dump excess adrenaline in scenarios such as:
• Getting a Relentless  proc after a Berserk
• Near the end of a kill where you no longer need the adrenaline.
• Places where you get excess adrenaline (e.g. Telos green beam).
⬥ Some examples of bosses where is used:
• Melee Telos
• Seiryu 1-cycle attempts
• Advanced rotations are Solak and Ambassador
• Zamorak, Lord of Chaos.
Statius' Warhammer (SWH) EoF 

How It Works
⬥ The SWH special attack, Smash costs 35% adrenaline and has two effects:
• Deals an initial hit of 83-208% ability damage.
• Lowers the target's Defence level by 30%, and increases affinity by +5 for 1 minute.
⬩ This can stack with a Guthix staff  and Quake to reach 5+2+2 = +9 affinity bonus.
⬥ It is primarily used for its special attack.
⬥ Placing in an EoF prevents it from degrading when used.
• You can place it in an even when it is low on charge without issues.
⬥ It's great where you require additional accuracy to avoid splashing, such as:
• Vorago
• Telos
• Nex: Angel of Death
• Raids
Ek-Zekkil (EZK) EoF
How It Works
⬥ The EZK special attack, Igneous Cleave costs 50% adrenaline and has two effects:
• Deals an initial hit of 62-190% ability damage.
• Applies a 6-hit bleed on the target with an initial hit of 30-105% ability damage, increasing by 5% multiplicatively each hit.
⬩ While the special attack is active, each time a bleed used on the target, gains 1 extra hit (capped at 5 extra hits).
⬥ It is primarily used for its extremely strong special attack.
⬥ It is strongly recommended to EoF this weapon, as this allows it to be cast with a Masterwork Spear of Annihilation which extends the bleed by 3 hits.
⬥ Strongly recommended to cast with as it boosts both the initial cleave and bleed hitsplats.
Note: See the section on Ek-Zekkil (EZK) for a list of abilities that do and don't extend duration.
EZK vs. ZGS vs. Overpower
Here we compare which of these options is recommended to use between Berserks while waiting for the cooldown.
Briefly, > > when wearing Vestments of Havoc.
When to EZK
⬥ This is strongest option if all its hit can hit, and should be prioritised if possible.
• If you cannot get off all the hits after which may often happen, then it gets use within instead.
⬥ Multiple casts will override one another - only one person in a group encounter should use it at a time.
• This is even more important because the later hits deal more damage than the earlier hits.
When to ZGS
⬥ Considering that Greater Flurry and other strong abilities exist, the duration of is long enough that without Relentless it's very difficult to get off a full rotation.
⬥ Mostly used if you won't really be able to use a second time and is not an option.
⬥ Can be nice for AoE scenarios.
When to Overpower
⬥ You will almost always use Igneous Overpower because you can it get off fully, and the adrenaline costs manageable enough to use it mostly off-cooldown.
⬥ You can use it twice per minute (50t/30s cooldown) if you do it early enough within but that depends more on your specific rotations.
⬥ Will deal nearly identical damage outside of with multiple stacking bleeds.
⬥ Due to hit-capping issues it's recommended to before it.
Other
⬥ Bleeds like Slaughter / Blood Tendrils / Dismember are important and will also be used in this period.
⬥ is also often used to get the next on time, but may not be needed if phases are long enough.
• It may also impact adrenaline remaining for other thresholds.
Defensive Autos
While colloquially referred to as 'defensive' autos, it is more accurate to call them 'non-damaging' autos, since some non-defensive abilities have similar interactions with autos. Examples include ZGS special attack and Berserk .
For a thorough explanation of how defensive autos (and auto attacks in general) work, refer to #auto-attacks. Here, we will simply cover some of their uses.
Why Defensive Autos Exist
⬥ Generally, casting any ability will put your auto-attack  on cooldown based on your weapon speed.
⬥ However, non-damaging abilities do not cause this cooldown.
• This means that defensive autos can be used within your main ability rotation.
⬥ Note that Melee does not have an auto attack keybind like Magic and so some input sequences may be different/delayed.
Common Applications
Note: You can check out !defauto and !freedom for a brief summary of mechanics.
⬥ Forcing 2H autos using using Fast/Fastest Ability → Defensive → Ability.
• Replacing the with a magic spell keybind with the appropriate runes will attempt to cast the spell in place of the auto.
⬥ Forcing off-hand + 2H autos with Freedom
• The rotation is: Fast/Fastest Ability → Freedom → (1t delay) + 2H switch → Ability
• This will give an off-hand and a 2H auto, but do not switch to 2H too early.
⬥ Applying Smoke Cloud 
• Method 1: Press + Ability 1 tick after GCD ends to 4TAA .
⬩ This must be done following a Fastest speed, non-channelled ability.
• Method 2: Use to get OH + 2H autos, and replace the OH auto by pressing before - this is 1t faster than method 1.
⬩ This requires a magic offhand with an autocast set, that you have the required runes for.
• Method 3: Press Target Cycle → + Ability to start an encounter if you do not intend to utilise the Greater Barge buff at the start of a fight.
Note: this is not an exhaustive list of auto attacks, just some of their uses cases.
5-Tick Auto Attack (5TAA)
Note: Any time a speed is before an auto/ability (e.g., "Average Ability") this simply refers to the weapon speed used to cast it.
What is 5TAA
Note 1: With the Abyssal Scourge with the Jaws of the Abyss , 5TAA is rarely used, as a 3 hit Greater Flurry gives the same result. It's also less prevalent when hybridding or using non-zerk auras like Invigorate  .
.
Note 2: See !lasttick command or the Berserker Auras section of #mechanics for more information.
⬥ 5TAA is an extension of weapon juggling, similar to 4TAA with Magic but as Melee does not have an auto-attack keybind, it delays the execution by 1 tick.
• With : Fast/Fastest Ability → T4 Auto + Ability
• With : Fast/Fastest Ability → T4 Auto → T5 Ability
⬥ This is because without the auto keybind, we cannot force the auto before the ability, so the ability gets delayed to prevent putting the auto attack on cooldown.
⬥ If using Revolution, some extra effort must be done to 5TAA:
• You have to use Cease  after casting your first ability.
• Then click your target after global cooldown ends.
• Finally, use an ability 1t after that.
Where It's Used
⬥ 5TAA is primarily done to align ticks so you can cast an ability on the last tick of Berserk .
• This is because that ability will be boosted by both the and an active Berserker  aura.
aura.
⬥ This is typical in rotations that use one 7t channel (4 hit Destroy ) without the ability to use a 5t channel (like 3 hit Greater Flurry ) to align ticks. See the following table for an example.
T0    : Berserk cast
T3-6  : 2x Ability
T9    : 7t channelled Ability
T16-19: 2x Ability
T22   : Fastest non-channelled Ability
T26   : Auto attack*
T27-30: 2x Ability
T33   : Ability + Berserk ends (this ability gets boosted by both Berserk and Berserker aura)
Note: this is not a rotation to copy - it is simply an example to show how the ticks align.
 →
→
Pocket Slots
⬥ The following image describes when to use which option.
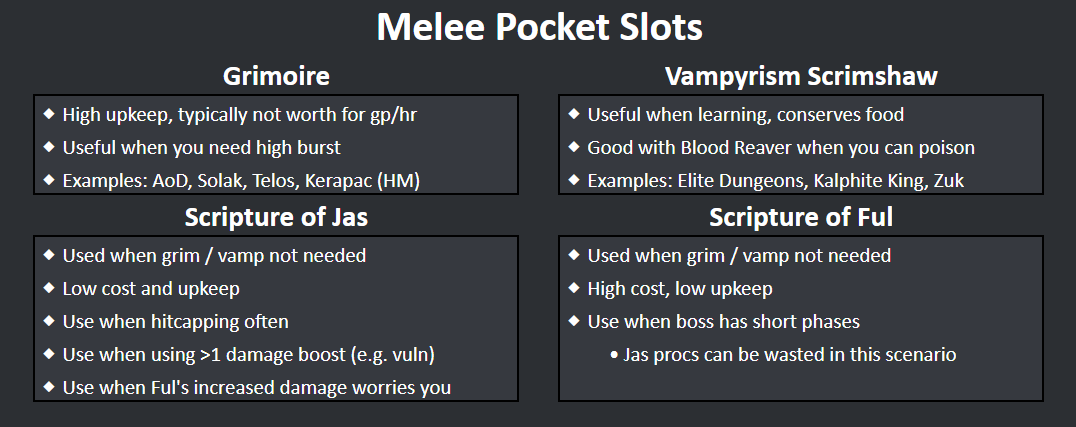
Note: For more information, you can check out the !pocket command.
General Berserk Rotations
This section will cover usage of strong abilities (thresholds or better) within your Berserk under different scenarios.
The following unlocks are assumed:
⬥ Ring of Vigour  or its passive effect after Extinction quest.
⬥ Igneous Kal-Ket 
Keep in mind the following:
⬥ These are only suggestions work from, and will not necessarily be applicable at all bosses or all scenarios.
• For boss-specific rotations, see their respective guides.
⬥ If Igneous Kal-Ket is not unlocked, use Forceful Backhand (Flank) , Cleave or other strong abilities to substitute.
⬥ Conservation of Energy relic  is recommended for adrenaline refunds from and in order to execute a stronger rotation.
⬥ Replace Fury with Greater Fury if you have it instead.
Berserk w/ Adren Renewal 
⬥ 1x Destroy
⬥ 1x Greater Flurry (3 hit)
⬥ 1x Assault
⬥ 1x Hurricane
⬥ Example rotation:
• → → → → + (equip ) → (3 hit) → → → →
Berserk w/ Limitless
⬥ 1x Destroy
⬥ 1x Greater Flurry (3 hit)
⬥ 1x Assault
⬥ 1x Hurricane
⬥ Example rotation:
• → → → → + (equip ) → → + (3 hit) → → →
Berserk w/ Adren Renewal + Smoke Cloud Berserk +
⬥ 1x Destroy
⬥ 1x Greater Flurry (4 hit)
⬥ 1x Assault
⬥ 1x Hurricane
⬥ Example rotation:
• + → (DW) → (4t) + → → + (equip ) → (4 hit) → → →
Berserk w/ 4-piece Vestments + Adren Renewal +
⬥ 2x Destroy (second Destroy is 2 hit)
⬥ 1x Igneous Overpower
⬥ 1x Assault
⬥ 2x Hurricane
⬥ 1x Chaos Roar + Slaughter
⬥ Example rotation:
• + → → → → (equip ) + → → → → → (2 hit) → → → (2 hit) →
Berserk w/ 4-piece Vestments + Adren Renewal + EZK EoF + +
⬥ 1x Destroy
⬥ 1x Assault
⬥ 1x Greater Flurry (3 hit)
⬥ 2x Hurricane
⬥ 1x Backhand (Flank)
⬥ 1x Chaos Roar + EZK special attack
⬥ Example rotation:
• + → (DW) → (4t) + → → (equip ) + → → (equip ) + → → (equip ) + → → (3 hit) → →
Berserk w/ 4-piece Vestments + Adren Renewal + Limitless + +
⬥ 2x Destroy (second Destroy is 2 hit)
⬥ 1x Assault
⬥ 1x Greater Flurry (3 hit)
⬥ 2x Hurricane
⬥ 1x Forceful Backhand (Flank)
⬥ 1x Igneous Overpower
⬥ Example rotation:
• + → (equip ) + → → → (4t) + → → (3 hit) → → → → → + (2 hit) →